Download PDF
Download page Call Transferring.
Call Transferring
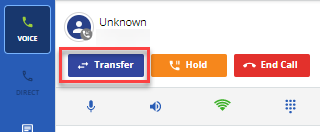
You can transfer calls within the agent desktop to a number of different recipients. When enabled, the transfer option appears on your screen while you are In the In Call status. When you initiate a call transfer, a transfer dialog (sliding panel) simplifies the transfer process. When selecting a contact, agent, or number for the transfer, a confirmation panel (sliding panel) provides instructions about confirming or canceling the transfer.
![]()
Filtering Records: You can filter records using the search functionality in the Phonebook, Agents, and History tabs.
To transfer a call:
- Click Transfer to access the call transfer menu.
The Transfer Options screen is displayed with the following tabs:
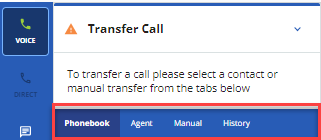
- Select one of the following transfer options by clicking the specific tab:
- Phonebook: Select frequently used numbers from a drop-down menu to transfer the call. There might also be queues (group of agents) available, allowing you to transfer to them and see how many recipients may be available.
- Agent: Select a specific agent from a drop-down menu to transfer the call.
- Manual: Enter a number with or without an extension to transfer the call.
- The History tab stores and displays the last seven transfer destinations you used in each service. The tab also contains the information about Type, Name, and Date where:
Type: Provides information about how the call was transferred, for example: Agent's extension, Phone number, Agent name, and so on.
Name: Displays the agent name if the call had been transferred by agent's name or displays the phone number if the call was transferred using the phone number.
Date: The date on which the call transfer occured.
Each transfer type is described in greater detail in the below links.
- Depending on your settings, not all transfer options are available. Check with your manager to verify the transfer options available to you.
- During the transfer process, you will hear an audio tone. A single tone indicates you have connected to the transfer recipient, moved the customer or transfer recipient on or off hold, or reconnected back to the customer.
Upon selecting the transfer type and initiating the transfer, the caller (see Conference screen below) is put on hold while you are connected to the Joining Party, transfer recipient (see Conference screen below).
![]()
Select the ![]() (Merge option) to bridge each new party into the call. Once all parties are connected, your Conference screen is updated as follows:
(Merge option) to bridge each new party into the call. Once all parties are connected, your Conference screen is updated as follows:
![]()
The number of parties (up to 10) that you are allowed to conference is set up by your manager.
Whenever you initiate the transfer, the following controls over the conference become available to you:
| Icon | Meaning |
|---|---|
| Allows you to call a number. |
 Drop Drop | Allows you to drop any added party. |
| Allows you to mute the conference or any party within the conference. |
 Reconnect Reconnect | Reconnects you back to the caller and drops all the parties in the conference. |
| Calls any additional party using the transfer option. This puts the caller or the conference on hold. |
| Swaps between a conference and an additional line and puts them on hold. |
| Adds any additional party to the conference. |
| Allows you to exit a conference – keeping the conference active. |
These conference controls along with the call controls are transferred to the first agent added to the conference once you leave the conference, as long as the agent is using the agent desktop.
You can leave the conference by clicking the Leave Conference button and complete your transfer or select ![]() (Reconnect option) to drop all parties and continue your call with the original caller. While it is not required that you stay connected during a conference call, we recommend doing so for a few seconds before leaving to ensure that the transfer was successful. After leaving the conference, you are placed into the Wrap Up status and can select the appropriate termination code. Only the termination code selected by the final agent to speak with a caller is saved.
(Reconnect option) to drop all parties and continue your call with the original caller. While it is not required that you stay connected during a conference call, we recommend doing so for a few seconds before leaving to ensure that the transfer was successful. After leaving the conference, you are placed into the Wrap Up status and can select the appropriate termination code. Only the termination code selected by the final agent to speak with a caller is saved.