Download PDF
Download page Managing a Contact.
Managing a Contact
A contact is a record that contains information about your customer, such as their name, telephone number, and address) and their channel preferences (that is, if, when, and how they would like to be contacted). You can create, modify, and delete a contact.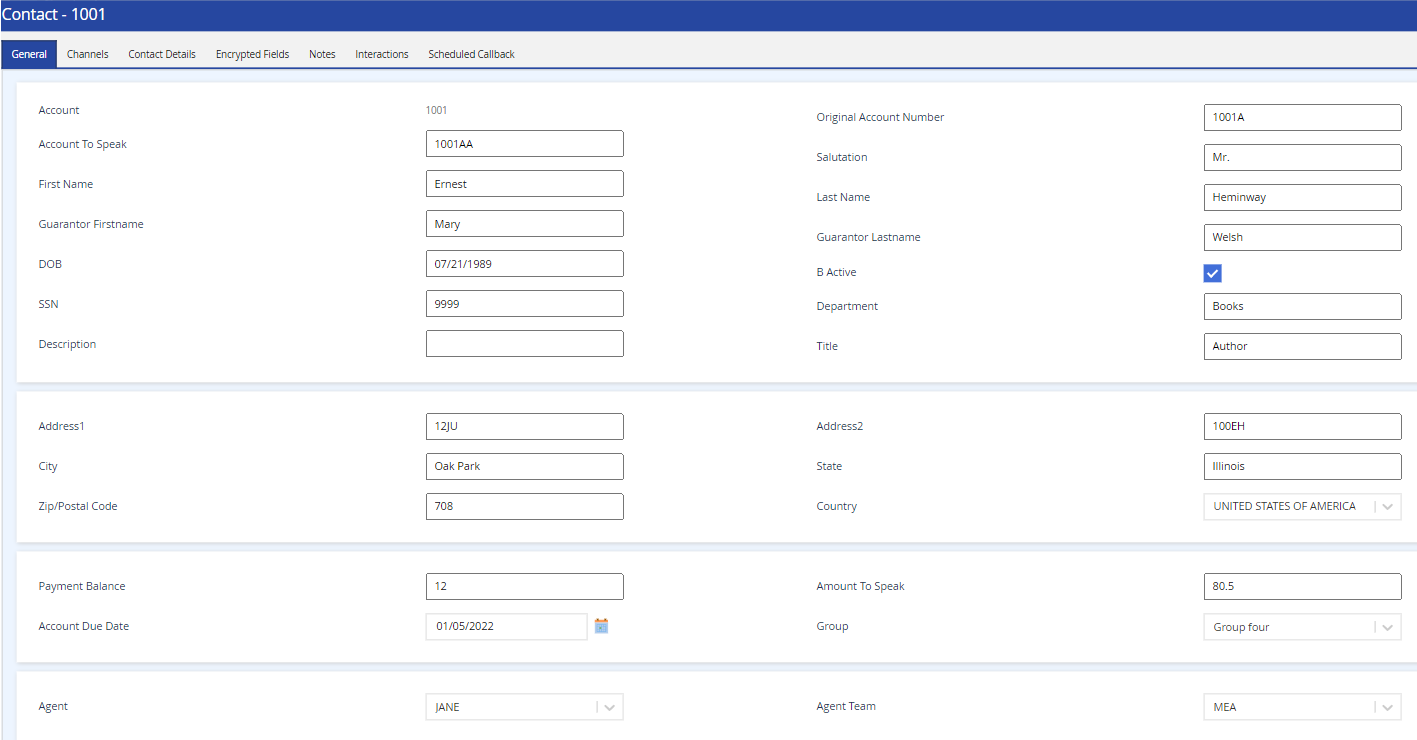
Creating a Contact
To create a contact:
- On the Configure tab of the LiveVox Portal (LVP), click Contacts > Contacts.
The Contacts window appears. - On the Contacts tab, click Add.
The Contact window appears displaying the following tabs:- General
- Channels
- Contact Details
Encrypted Fields (if applicable)

This tab appears only if it has been enabled by the LiveVox Customer Care Team. The tab is used to store confidential information, such as your customer's credit card number or SSN.
- Notes
- Interactions
Scheduled Callback
Specify values in the fields.
For information about the fields, see Contact Field Descriptions.
Click Save.
A message stating that the contact is added appears. The contact appears in the table on the Contacts tab.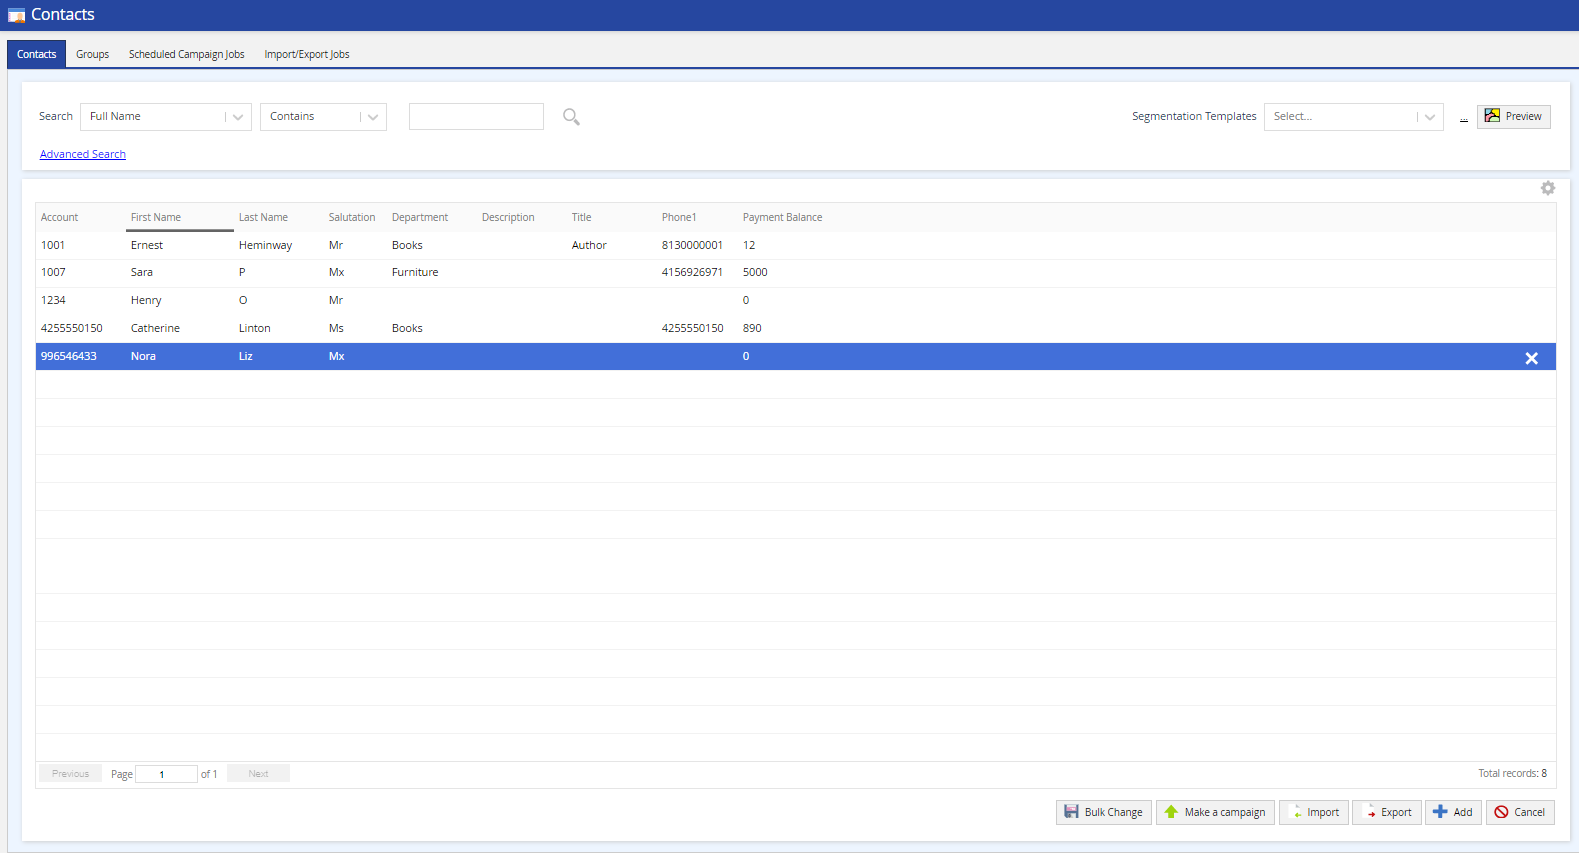
Ensure that the Days of Contact Retention period value is set in Configure > Services > Client > Settings > Contact Manager Settings > Days of Contact Retention so that accounts in Contact Manager are not purged.
If you are using Attempt Supervisor to block calls, and the account records are not in Contact Manager, Attempt Supervisor creates a placeholder for Phone 1 in the account.
In PDAS 11.0 and 12.0, if PDAS needs to add a block to a contact and that contact does not exist in Contact Manager, PDAS creates a record in Contact Manager and adds a phone number with 999* (for example, 9999999999) to the contact. Also, with no records in Contact Manager, the counting of contact attempts within Contact Manager will be inaccurate, and attempts intended to be blocked by PDAS may go through.
Accessing or Modifying a Contact
To view or modify a contact:
- On the Configure tab of LVP, click Contacts > Contacts.
The Contacts window appears. On the Contacts tab, double-click the row displaying the contact that you want to modify.
The Contact window displaying the following tabs appears.
For more information about the fields on the tabs, see Contact Field Descriptions.
Tab Description General General information about the contact. Channels Information about the available channels and permissions for the contact. Contact Details Additional information about the contact. Encrypted Fields (if applicable) Encrypted information about the contact. Notes
Notes could provide more information about the status of an account and/or the actions taken by the agents on an account. For a contact, you can view the latest 5000 notes (based on the modification date) added by agents and LVP users. The table displays the following columns:
- Create Date: Date and time when the note was added.
- Modify Date: Date and time when the note was last modified.
- Note
Interactions
Details about the previous attempts made to reach the contact and the outcome.

You can customize the table on this tab (for example, display more columns) by using the gear icon
 . For more information, see Customizing a Table.
Scheduled Callback
Callbacks scheduled for the contact.
- You can filter the scheduled callbacks by using the Search By field.
- You can customize the table on this tab (for example, display more columns) by using the gear icon . For more information, see Customizing a Table.
Modify the values in the fields.
- You can add a note for the contact by using the Add button on the Notes tab. After you add a note, you cannot modify or delete it.
- On the Scheduled Callback tab, you can modify and deactivate the scheduled callbacks. For more information, see Managing Scheduled Callbacks.
- Agents can view your note on their Agent Desktop if the Notes Enabled checkbox is selected on the General tab in their Agent Desktop window. This window appears when you click Agents > Agent Desktop on the Configure tab of LVP.
Click Save.
Your changes are saved.
Modifying Multiple Contacts
You can modify multiple contacts together such that they contain the same value.
To modify multiple contacts:
- On the Configure tab of LVP, click Contacts > Contacts.
The Contacts window appears. If you want to modify the contacts that are associated with a filter, on the Contacts tab, by using the Search field or the Advanced Search option, run the filter.
For information about how to filter contacts, see Filtering Contacts.
Click Bulk Change.
The Bulk Change window appears.- The Filter field displays the run filter. If you did not run a filter, the All value appears in the field.
- The Total Records field displays the total count of contacts in the filter.
- In the Category field, specify one of the following values:
- Change Status: Enables you to modify the status of the contacts in the filter to active or inactive.
- Adjust Payment Balance: Enables you to modify the payment balance of the contacts in the filter.
- Adjust Account Due Date: Enables you to modify the payment due date of the contacts in the filter.
- Change Group: Enables you to modify the group assigned to the contacts in the filter.
- Change Contact Ownership: Enables you to modify the agent ID and agent team assigned to the contacts in the filter.
Adjust Consent Fields: Enables you to modify the consent fields of the contacts in the filter.
- Adjust Custom Fields: Enables you to modify the custom fields of the contacts in the filter.
- Modify All Contact Fields: Enables you to modify most fields of the contacts in the filter.
- Delete Contact Records: Enables you to delete all the contacts in the filter.
- If you specified a value other than Delete Contact Records in the Category field, select the slider
 next to the fields that you want to modify, and then modify the values.
- Click Save.
All the contacts in the filter are modified. If you had specified the Delete Contact Records value in the Category field, all the contacts in the filter are deleted.
Deleting a Contact
To delete a contact:
- On the Configure tab of LVP, click Contacts > Contacts.
The Contacts window appears. On the Contacts tab, hover over the row displaying the contact that you want to delete, and then click the close icon
 .
.
The Confirm window appears.- Click OK.
The contact is deleted.