Download PDF
Download page Settings.
Settings
The Settings tab enables you to define an acceptable value for different fields within ticketing. You can configure the general settings, labels, label components, label followers, link types, priorities, status, and types for a ticket.
General Settings
The General settings consist of two options:
- Bulk Ticket Upload
- Mentions to Followers
Enabling Bulk Ticket Upload
You can enable the bulk ticket uploading option for tickets.
To enable the option.
- On the Configure tab, go to Ticketing > Tickets Config.
The Ticketing Config window appears.
In the General section, select the Bulk Ticket Upload checkbox.

You should select this option when you want to upload tickets for the first time. Enabling this option can overwrite the existing LiveVox tickets.
Communicating to Ticket Followers
To communicate to ticket followers about updates made to a ticket, in the General section, select the Mentions to Followers checkbox. For example, if an agent is assigned to a ticket, they automatically are added as a follower of a ticket and will get all updates on the ticket.
Creating a Label
You can categorize the tickets using labels. When you create a label and attach the label to tickets, it is easier to update the tickets based on the selected labels. Each of the labels that you create is displayed as an option in the Label field of a ticket.
To create a label:
On the Settings tab, in the Labels section, click
 .
.
The New Label window appears.

A label is case-sensitive, you have to specify the ticket using the uppercase case, number, and underscore when creating a label.
Specify the label name and click OK.
The label is created, and it appears in the Labels section. This label appears as an option in the Label field of a ticket.
- If you do not want a label to appear as an option in the Label field of a ticket form used by you in the Labels section, in the row displaying the label, clear the Public checkbox.
- To set a label as the default value in the Label field of a ticket, in the Labels section, in the row displaying the label, select the Default option.
- The order in which the types appear in the Labels section represents the order in which they appear in the dropdown as options in the Label field of a ticket. You can modify the position of a label by dragging the name of the label in the Labels section to the desired position.
- In the Labels section, you can:
- Modify the prefix, name, or description of a label by clicking the Prefix, Name, or Description cell in the row displaying the label and then entering the value you want.
- Search for a label by entering the partial or complete prefix of the label in the Filter box.
- Delete a label by hovering over the row displaying the label and then clicking the delete icon
 .
.
Specifying a Label Component for the Label
You can categorize a label at the component level. For example, when you have a label Case, to bring clarity to the label you can further categorize it into a bug, issue, new feature, and others. You can select the appropriate component for the label.
To create a label component:
- On the Settings tab, in the Label Components section, click
 .
.
The New Component window appears.
Specify the label component for the label, and then click OK.
The label component is created, and it appears in the Label Component section. You can create different components for each label that appears in the dropdown list.
- If you do not want a component to appear as an option in the Components field of a ticket form that is available for your use then in the Components section, clear the Public checkbox in the row displaying the component.
- The order in which the types appear in the Components section represents the order in which they appear as options in the Components field of a ticket. You can modify the position of a component by dragging the name of the component in the Components section to the position you want.
- In the Types section, you can:
- Modify the name of a component by clicking the Name cell in the row displaying the component and then entering the name you want.
- Search for a component by entering the partial or complete name of the component in the Filter box.
- Delete a component by hovering over the row displaying the component and then clicking the delete icon.
Defining Label Followers
You can add followers to the ticket. When you add followers, they are notified by email of any updates or changes done to the ticket.
The agents handling the tickets are automatically added as followers of the ticket and will receive an email notification when a ticket is updated/changed.
- On the Settings tab, in the Label Followers section, click .
The New Follower window appears.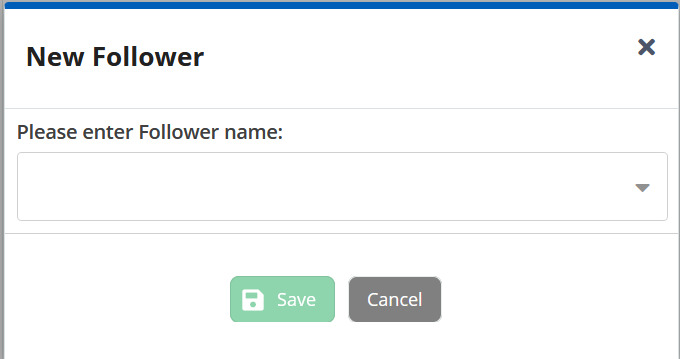
Select the follower's name from the drop-down list, and then click Save.
The Followers list is created, and it appears in the Label Follower's section.
Defining the Link Types
In a ticket, you can link the articles and URL or another ticket to that ticket so that it appears in the Links tab of a ticket. You can create the predefined status in the Link Types section by specifying the name (status) inward description (enhancing the status description), and the outward description (this description appears in the Links tab of a ticket). For example, you can specify the name as Blocks, inward description as Blocked by, and outward description Blocks.
On the Settings tab, in the Types section, click
.
The New Link Type window appears.

You can categorize ticket types by defining the Type option when you create a ticket. Earlier, the default was an optional value that appeared on a ticket.
Specify the Link Type name, Inward Description, and Outward Description.- Click Save.
The types list is created, and it appears in the Link Types section.
Defining Priorities
The priority of a ticket indicates the level of urgency and helps you specify the work order of the tickets. This enables the important issues and key customers to get the attention they deserve.
You can define the options that appear in the Priority field of a ticket by creating ticket priorities. Each of the priorities that you create is displayed as an option in the Priority field of a ticket. By default, the following priorities are available for each ticket type: High, Medium, and Low. You can, however, modify these priorities.
You can also define the service-level agreement (SLA) limit for a ticket priority.
You can monitor the SLA metrics on the ticket dashboard.
To create a priority and define its SLA:
- On the Configure tab, go to Ticketing > Tickets Config.
The Ticketing Config window appears. - On the Settings tab, in the Priorities section, click .
The New Priority window appears.
Specify the priority and click OK.
The priority is created, and it appears in the Priorities section.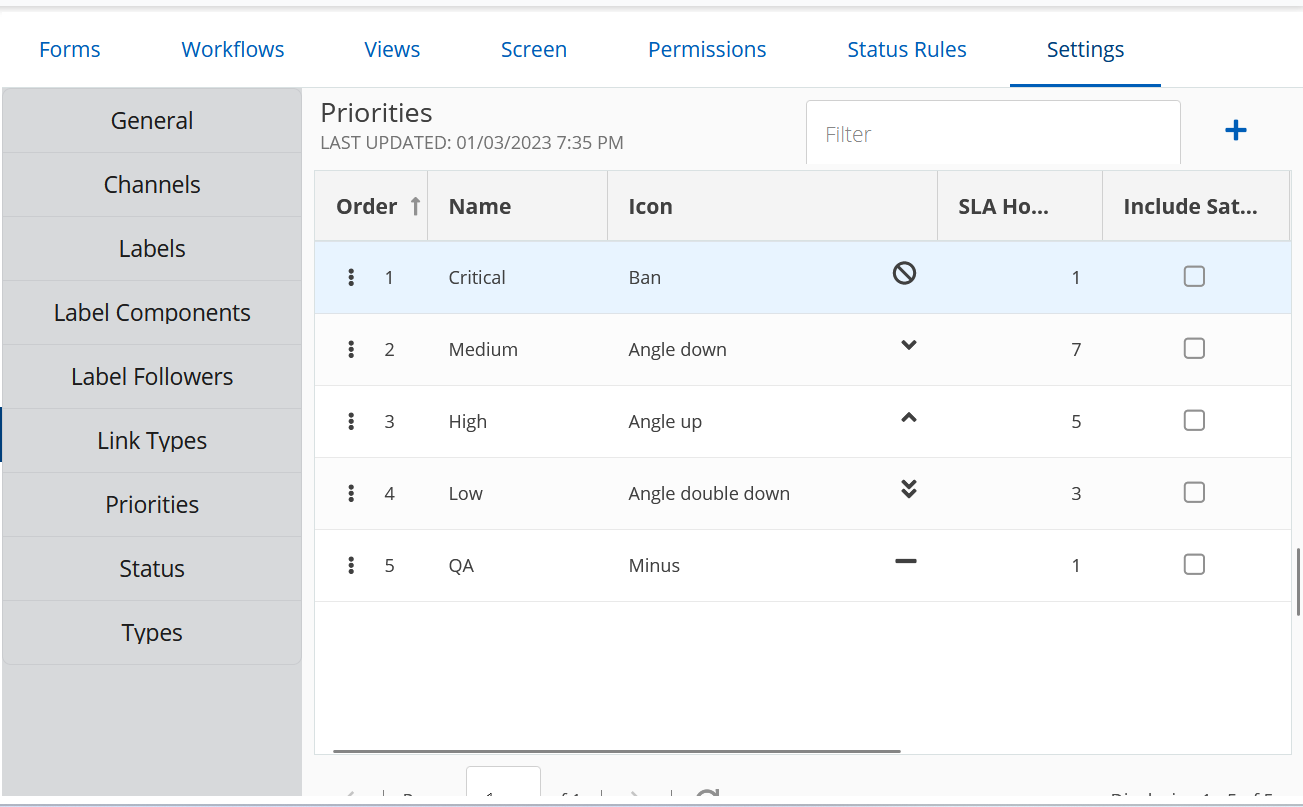
This priority appears as an option in the Priority field of a ticket.
- In the row displaying the priority, click the Icon cell, and then select the icon by which you want to represent the priority.
If you want to define the service-level agreement (SLA) hours for the priority, in the row displaying the priority, click the SLA Hours cell, and then enter the desired value.

If you want the SLA hours to include Saturdays or Sundays, select the Include Saturday or Include Sunday checkbox, respectively.
- If you do not want a priority to appear as an option in the Priority field of a ticket, in the Priorities section, in the row displaying the priority, clear the Public checkbox.
- To set a priority as the default priority in the Priority field of a ticket, in the Priorities section, in the row displaying the priority, select the Default option.
- The order in which the priorities appear in the Priorities section represents the order in which they appear as options in the Priority field of a ticket. You can modify the position of a priority by dragging the name of the priority in the Priorities section to the desired position.
- In the Priorities section, you can:
- Modify the name of a priority by clicking the Name cell in the row displaying the priority and then entering the name you want.
- Search for a priority by entering in the Filter box the partial or complete name of the priority.
- Delete a priority by hovering over the row displaying the priority and then using .
Defining Statuses
The status of a ticket indicates the progress of a ticket towards completion or resolution.
You can define the options that appear in the Status field of a ticket by creating ticket statuses. Each of the statuses that you create is displayed as an option in the Status field of a ticket. By default, the following priorities are available for each ticket type: Open, In Progress, and Closed. You can, however, modify these statuses.
To create a status:
- On the Configure tab, go to Ticketing > Tickets Config.
The Ticketing Config window appears. - On the Settings tab, in the Status section, click .
The New Status window appears.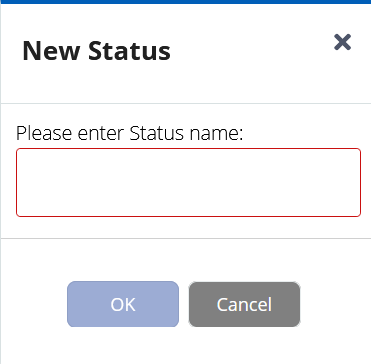
Specify the status and click OK.
The status is created, and it appears in the Status section.
This status appears as an option in the Status field of a ticket.
- If you do not want a status to appear as an option in the Status field of a ticket, in the Status section, in the row displaying the status, clear the Public checkbox.
- If you want a comment to be added to a ticket when the ticket moves to a given status, in the Status section, in the row displaying that status, select the Requires Comment checkbox.
- If you want a ticket to be closed when it moves to a given status, in the Status section, in the row displaying that status, select the Closes Ticket checkbox.
- The order in which the statuses appear in the Status section represents the order in which they appear as options in the Status field of a ticket. You can modify the position of a status by dragging the name of the status in the Status section to the desired position.
- In the Status section, you can:
- Modify the name of a status by clicking the Name cell in the row displaying the status and then entering the desired name.
- Search for a status by entering, in the Filter box, the partial or complete name of the status.
- Delete a status by hovering over the row displaying the status and then using .
Defining Types
You can define the options that appear in the Type field of a ticket by creating ticket types. Each of the ticket types that you create is displayed as an option in the Type field of a ticket. For example, you can define whether the ticket belongs to a specific department or is a general ticket.
To create a ticket type:
- On the Configure tab, go to Ticketing > Tickets Config.
The Ticketing Config window appears. - On the Settings tab, in the Types section, click .
The New Type window appears.
Specify the type and click OK.
The type is created, and it appears in the Types section.
- This ticket type appears as an option in the Type field of a ticket.
- You can now assign a Default Type to a ticket.
- Ticket types control the layout and what fields are exposed on a ticket.
- Ticket configuration is easier if you assign a default type to a ticket.
- This ticket type appears as an option in the Type field of a ticket.
- If you do not want a ticket type to appear as an option in the Type field of a ticket, in the Types section, in the row displaying the type, clear the Public checkbox.
- The order in which the ticket types appear in the Types section represents the order in which they appear as options in the Type field of a ticket. You can modify the position of a ticket type by dragging the name of the type in the Types section to the desired position.
- In the Types section, you can:
- Modify the name of a ticket type by clicking the Name cell in the row displaying the type and then entering the desired name.
- Search for a type by entering the partial or complete name of the ticket type in the Filter box.
- Delete a ticket type by hovering over the row displaying the type and then using .
Managing Channel Options
A channel is a source of communication, for example, SMS, email, Fax, message, and so on. You can update or add a new communication channel to the channel list. Prior to this release, you had limited options in pre-selecting channel options. You can now define the source of a Ticket, and it is available wherever the Channel drop-down is visible.
Creating a Channel
To create a new channel:
- On the Configure tab, go to Ticketing > Tickets Config.
The Ticketing Config window appears. - On the Settings tab
Click
.
The New Channel pop-up window appears.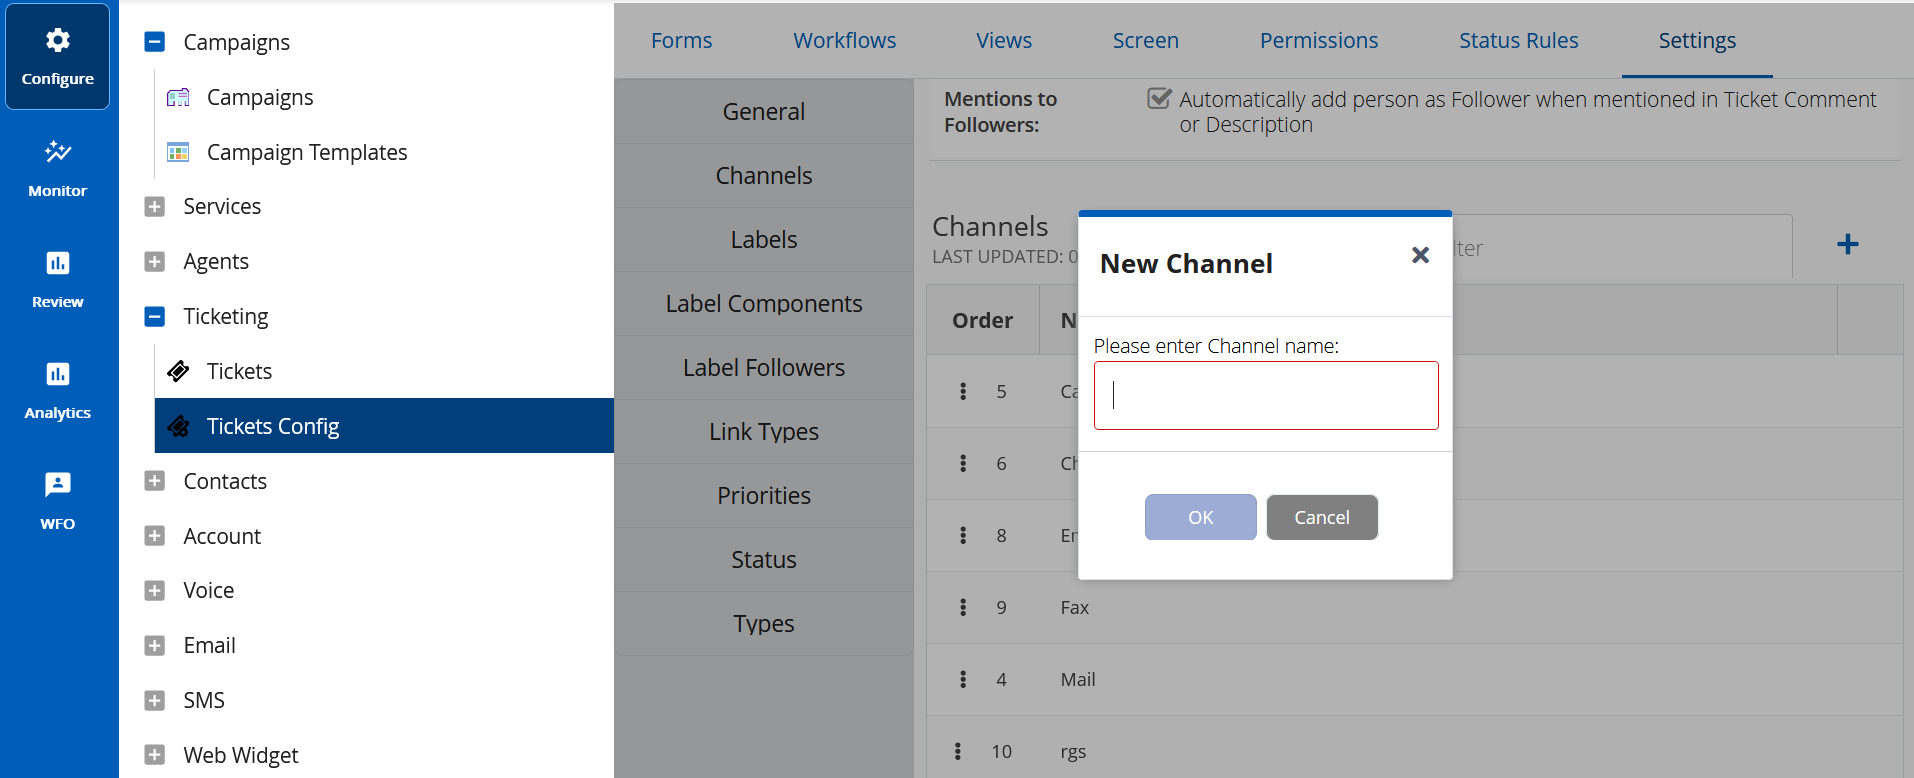
By enabling Channel, you can easily track the source where the ticket was created; the source is displayed wherever the field is visible.
- Specify the channel name and click OK.
The new channel is created and added to the list.
Updating the Channel
You can update an existing channel name.
To update an existing channel:
- On the Configure tab, go to Ticketing > Tickets Config.
The Ticketing Config window appears. - On the Settings tab
Double-click on the existing channel.
The text option is enabled for you to edit the existing name.
You can delete an existing channel or a newly created channel. To delete an existing channel, hover over an existing channel,
icon appears. Click the delete icon. The channel is removed from the channel list.