Download PDF
Download page Creating a Transaction Campaign.
Creating a Transaction Campaign
A transaction campaign is a marketing campaign that aims to increase sales by promoting a specific product or service using discounts, promotions, or special offers that encourage customers to make a purchase. The Campaigns editor helps you create a transaction campaign using campaign files that contain phone numbers and customer information for use on the LiveVox dialing systems.
This topic details the process of uploading a campaign and assigning dial characteristics from the Campaigns window.
Before you begin, ensure that you have an appropriate Transaction input filter available to process the campaign file correctly. For more information, see Managing an Input Filter.
To upload a campaign file manually:
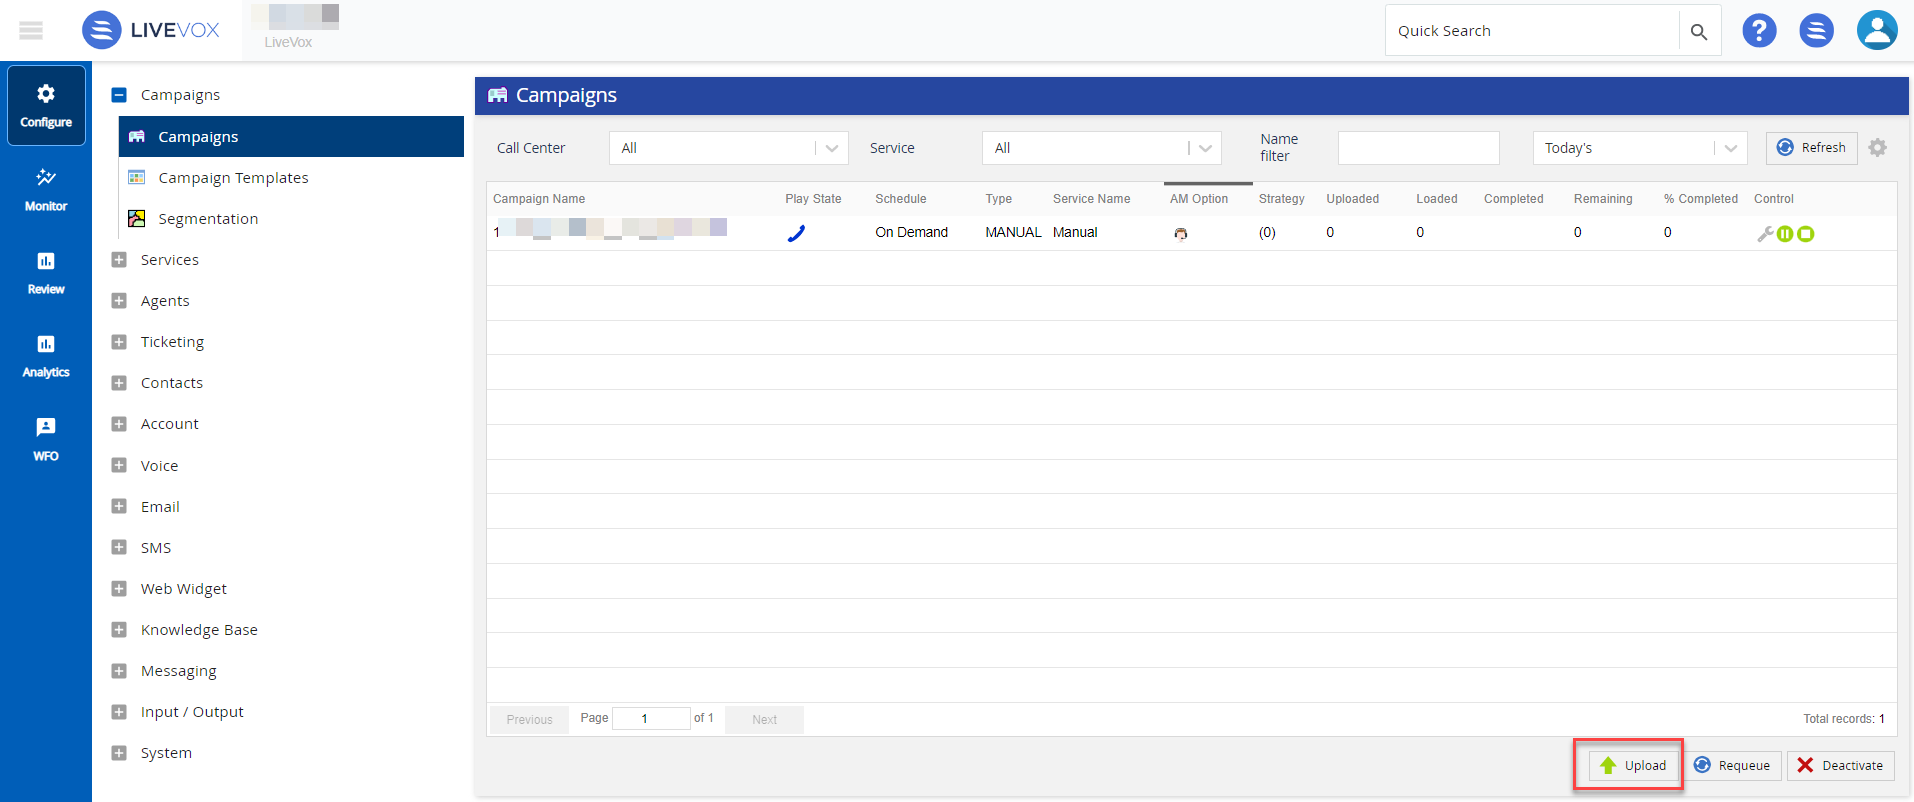
- From the LiveVox Portal, navigate to Configure > Campaigns and click Campaigns.
- Click the Upload button in the lower-right corner of the Campaigns window. The Upload Campaign window appears.
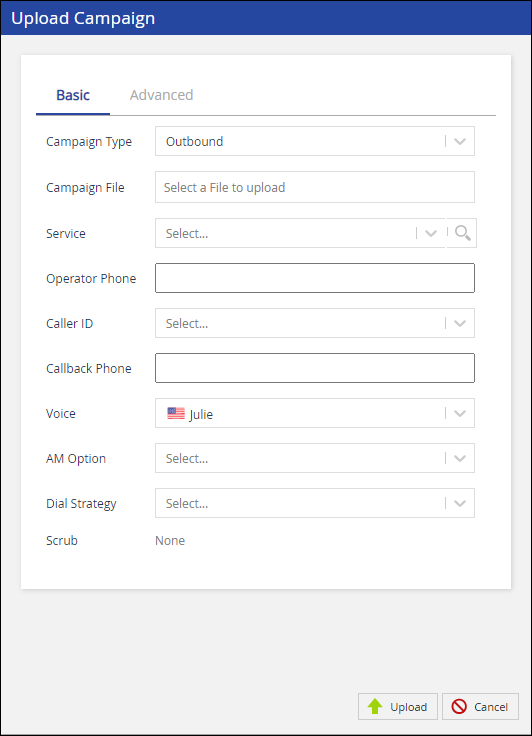
In the Upload Campaign window:
- Select the Basic tab to set service and campaign-level attributes.
Select the Advanced tab to enable the Segmentation, scheduling, and append settings.
The following table describes the fields (checkboxes) that appear on:- The Basic tab in:
- The Create Campaign window when creating a campaign through Contact Manager (contact campaign).
- The Upload Campaign window when uploading a campaign through Campaign Manager (transactional campaign).
The Advanced tab in:
- The Create Campaign window when creating a campaign through Contact Manager (contact campaign).
- The Upload Campaign window when uploading a campaign through Campaign Manager (transactional campaign).
A campaign for emails can be created only through Contact Manager.

On the Basic tab, if the value in the Campaign Name field is the name of a campaign template, the fields on the Advanced tab display the values from the campaign template. You can modify these values. For information about campaign templates, see Using Campaign Templates.
Basic Tab
Field Description Campaign Type Select the type of the campaign (for example, Email, Messaging, Outbound, or SMS). Campaign SubType This field appears if the value in the Campaign Type field is Messaging.
Select the type of messaging (for example, WhatsApp).
Campaign Name This field appears when creating a campaign through Contact Manager (that is, in the Create Campaign window).
Enter the name for identifying the campaign throughout the LiveVox Portal.
If you enter a name that matches the name of a campaign template, the remaining fields on the Basic tab display the values from the campaign template. You can modify these values. For information about campaign templates, see Using Campaign Templates.
Campaign File Click Select a File to upload, and then select the campaign file that you want to upload.
Service Select the service on which you want the campaign to run. You can search for a service by its name, call center, type, and preview mode by clicking the magnifying glass icon
 .
.Operator Phone This field appears if the value in the Campaign Type field is 10DMT, HCI, HTI, or Outbound.
Enter the number that you want the LiveVox platform to first dial for tethering extension-based agents into the system.
The type of the Operator Phone field (that is, disabled or text box) is determined by the value in the Operator Phone Source ID field on the Settings tab of the selected service (that is, the value you selected in the Service field).
Caller ID This field appears if the value in the Campaign Type field is 10DMT, HCI, HTI, or Outbound.
Select the number from which you want the customers to be called.
If you want the caller ID associated with the contact group that is assigned to the contact to be used, select the Contact Group value. This value also enables you to group agents in a single service or call center without the need to split the campaign.
- If the contacts in the campaign are not assigned to a contact group, or if the contact group does not have a caller ID or callback number, the caller ID and callback number of the selected service are considered.
- The options in the Caller ID field are determined by the value in the Caller ID Source ID field on the Settings tab of the selected service.
- If the local caller ID feature is enabled, the default value in the Caller ID field is [Local, rotated].
Callback Phone This field appears if the value in the Campaign Type field is 10DMT, HCI, HTI, or Outbound.
Enter the number that you want your customers to dial if they want to contact you—this is the number that you want to leave on their answering machines.
If the value in the Caller ID field is Contact Group, the Callback Phone field displays the Contact Group value by default.
The type of the Callback Phone field (that is, disabled or drop-down list box) is determined by the value in the Callback Phone Source ID field on the Settings tab of the selected service.
Voice This field appears if the value in the Campaign Type field is 10DMT, HCI, HTI, or Outbound.
Select the voice that you want to be used in the calls.
- The default value in the Voice field is the same as that in the Voice ID field on the Settings tab of the selected service.
- The Voice field contains the voices that are selected on the Voice Pool tab of the client associated with the selected service.
Depending on the voice pool configuration, this field contains the following options:
- Bob: American Male
- Claudine: French Canadian Female
- Juanita: Spanish Female
- Julie: American Female
- Kate: British Female
- Lee: American Male
- Gisele: Portuguese Female
- Gruff F: American Female
- Gruff M: American Male
- Scarlet: South American Female
AM Option This field appears if the value in the Campaign Type field is 10DMT, HCI, HTI, or Outbound.
Select the answering machine (AM) option that you want to be used for the calls.
The default value in the AM Option field is the same as that in the AM Option field on the Settings tab of the selected service.
Depending on the configuration, this field contains the following options:
- Don't Leave Messages: If an answering machine is detected, does not leave a message and disconnects the call.
- Leave Messages: Detects answering machines and leaves a message.
- Transfer all Connections: Does not detect answering machines and transfers all connections to agents.
Dial Strategy This field appears if the value in the Campaign Type field is not Email.
Select the strategy that you want to be used for contacting the phone numbers.
From This field appears if the value in the Campaign Type field is Email.
Select the name of the email address from which you want the emails to be sent to your customers.
The From field contains the display names that appear on the Addresses tab in the Email Channel window. For more information, see Navigating the Email Channel Window.
Email Message This field appears if the value in the Campaign Type field is Email.
Select the template that you want to be used in the email message.
The Email Message field contains the deployed email message templates that appear in the Message(s) field in the Messages window. For more information, see Configuring Messages.
Message This field appears if the value in the Campaign Type field is Messaging or SMS.
Select the template that you want to be used in the SMS or WhatsApp message.
The Message field contains the deployed SMS or WhatsApp message templates that appear in the Message(s) field in the Messages window. For more information, see Configuring Messages.
Scrub This field appears if the value in the Campaign Type field is not Email.
Type of phone numbers that are scrubbed (removed).
The value in the Scrub field is the same as that in the Scrub field on the Settings tab of the selected service.
You cannot modify the value in this field. The field contains one of the following values:
- None: Does not scrub any phone number.
- Wireless: Scrubs all wireless numbers so that all landline numbers are contacted.
- Landline: Scrubs all landline numbers so that all wireless numbers are contacted.
- Segmented Wireless: Enables you to use different contact strategies based on the position of a phone number to contact both landline numbers and wireless numbers from the same campaign. This is achieved by shifting the wireless numbers to positions 16 through 30 of the phone number list of a contact. That is, all wireless numbers from positions 1 through 15 are scrubbed.
Advanced Tab
Checkbox Description Segmentation Template If you want the campaign to be divided into smaller campaigns (sub-campaigns), select this checkbox. If you select the checkbox, a field appears for you to select a contact segmentation template.
Segmentation is the process of dividing a campaign (parent) into campaign segments (sub-campaigns) based on certain criteria. If a contact in a campaign does not meet the criteria, the contact is included in the parent campaign. For more information about segmentation or how to create a segmentation template, see Creating Sub-Campaigns Using Segmentation.
Exclude Parent Segmentation If you want the parent campaign to be excluded, select this checkbox. Allow Append If you want to allow the campaign to be appended to an active campaign, select this checkbox.
The Allow Append checkbox appears if the Campaign Appends Allowed checkbox on the Settings tab of the client is selected.
An active campaign is a campaign that is playing.
- To append a campaign to an active campaign, contact the LiveVox Customer Care Team.
- A campaign API is required to append a campaign to an active campaign.
- A campaign can be appended to an active campaign only if the former is built, played, or paused.
On Demand If you want the campaign to be manually run, select this checkbox. Schedule If you want the campaign to be automatically run based on a schedule, select this checkbox.
When you select the checkbox, by default, the campaign is scheduled to start running immediately after it is uploaded (as indicated by the selected ASAP checkbox) and stop running when one of the following criteria are met (as indicated by the selected End of Day checkbox):
- The contact window (based on compliance policies) ends.
- When all the phone numbers in the campaign have been contacted.
- When the campaign is manually stopped.
If, however, you want the campaign to start and stop running at a specific time, clear the ASAP and End of Day checkboxes, and then, in the respective Select Time fields, specify the start time and end time (in hours and minutes).
The start time and end time are represented in Eastern Time, in the 24-hour time format.
If you want the campaign to be run the next day, select the Next Day checkbox, and then specify values in the Start Time and End Time fields.
- The Basic tab in:
The service-level Scrub option auto-populates for the selected service. If the service-level scrub option is Select One (Null) for the particular service, then the client-level Scrub option is auto-populated for that particular service when you manually load the campaign.
At this time, permitted users can override this setting by choosing another Scrub option from the drop-down. See the Product Documentation site for information about user roles and permissions.
To assist clients with wireless number dialing strategies, LiveVox uses a database of wireless numbers from Interactive Marketing Solutions (http://www.ims-dm.com/). LiveVox is subscribed to the automated file delivery service from IMS for the following:
- Wireless block identifier file. This is the list of area codes and exchanges or blocks of numbers assigned to wireless carriers active within the North American Numbering Plan in the US and Canada. This file is received from IMS on a monthly basis.
- Ported number file. This is the list of numbers that appear to belong to wired landlines but are now assigned to wireless telephones and the list of numbers that appear to belong to wireless telephones but are now assigned to wired landlines. This file is received from IMS on a daily basis.
For more information, refer to the FAQs from Interactive Marketing Solutions:
While the IMS services are accurate, LiveVox cannot guarantee 100 percent accuracy at all times, given the update intervals and other factors.
- Click the Upload button in the Upload Campaign window to complete the process.
A message appears in the portal stating that the campaign was successfully created.
The shelf life for campaign files is 14 days. Shelf life defines the number of days the campaigns are displayed on the LiveVox Portal Manager screen. This is a default setting.