Download PDF
Download page Assignments.
Assignments
You can assign schedules to agents by drag and drop, in bulk, by copying across dates, or by activities. You can assign schedules from WFO > Workforce Management > Assignments.

Before you Begin
You must configure the schedules before assigning them to agents.
Assigning Schedules
You can assign schedules using the Assignments tab.
View the schedule details for a specific month, for two weeks, for a week, or for one day. If you are viewing the schedule for a specific day, you can also view the duration for that schedule in increments of 5, 10, or 15 minutes. Click
 to select the schedule duration. Specify the dates using
  .
.Search for a particular agent using the Filter by agent name field.
- Use
 to specify more detailed filter criteria.
Assigning Schedules from the Agents Tab
You can assign schedules by using one of the following methods:
- Assigning Schedules by Drag and Drop
- Assigning Schedules in Bulk
- Assigning Schedules by Copying Across Dates
- Assigning Schedules by Activities
Assigning Schedules by Drag and Drop
- On the WFO tab, go to Workforce Management > Assignments.
- From the Assign drop-down menu, click By Drag & Drop.
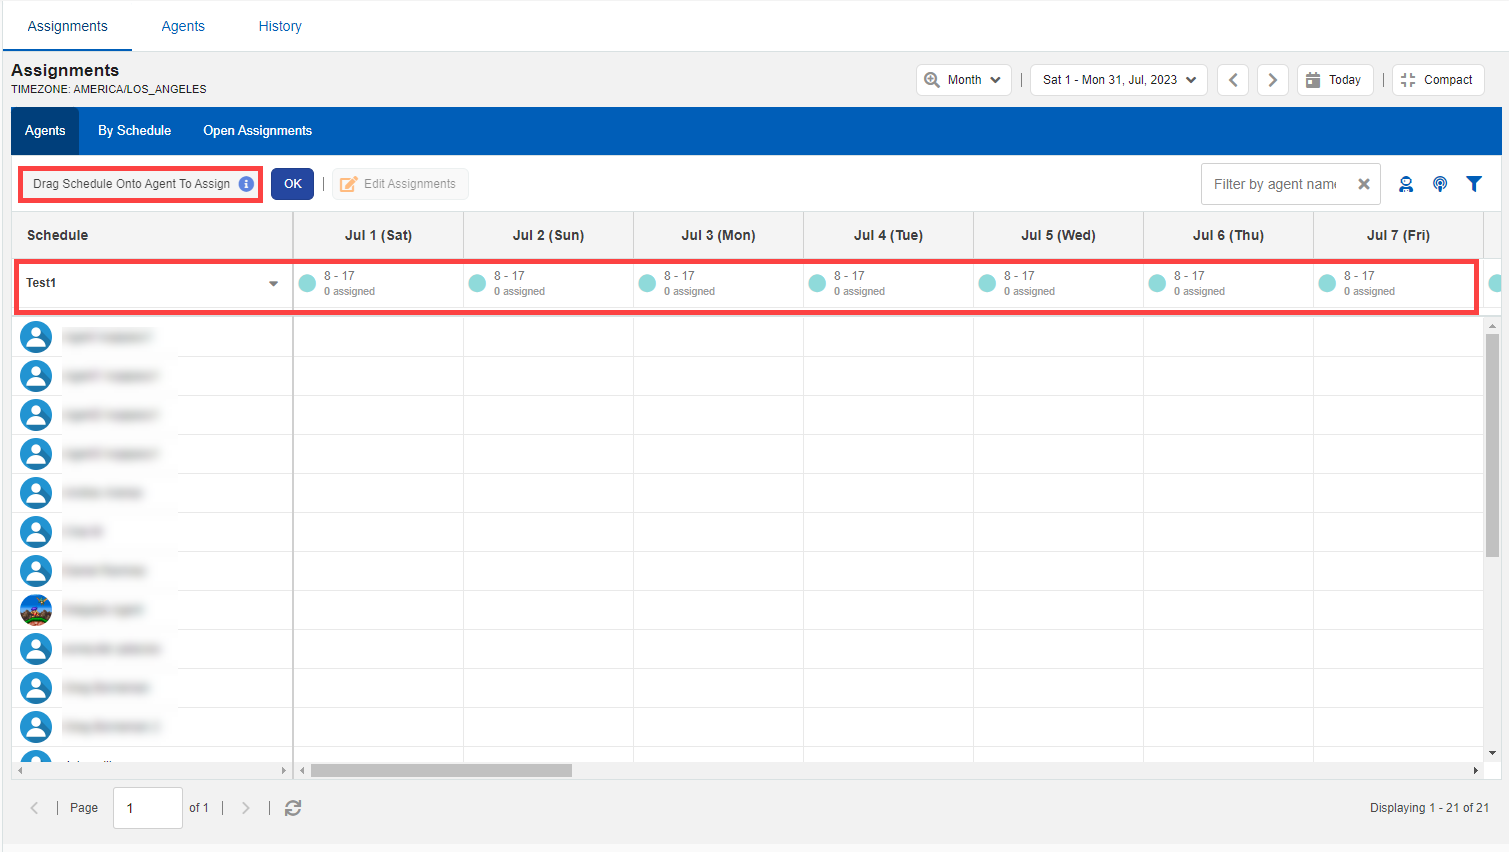
- Select a schedule from the drop-down menu.
In the first row, the schedule and the schedule timings appear. - From the first row, drag the shift and drop it in the corresponding agent cell to assign the schedule.
- You can do this for the number of slots available for the respective schedule. After all the slots are filled, you cannot apply that schedule to other agents.
- Click
 to save all the changes and make the schedule available for the agents and other managers.
Assigning Schedules in Bulk
By using bulk assignment, you can select multiple agents for shift assignment.
- On the WFO tab, go to Workforce Management > Assignments.
- From the Assign drop-down menu, click In Bulk. The Bulk Assign window appears.
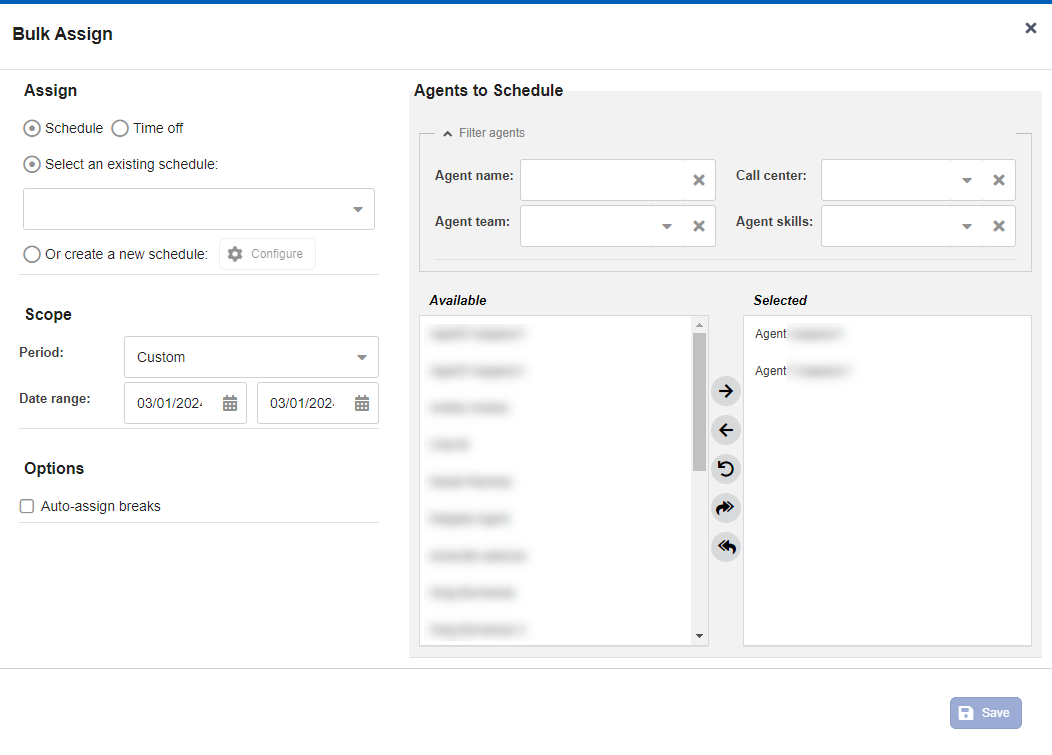
- Select between Schedule and Time off.
- Select the required schedule for scheduling using the Select an existing schedule drop-down. If you want to create a new schedule, select Or create a new schedule and click
 . See Schedules for more information.
 - Select the Scope to assign the schedule for a specific time. Select the Period and Date range from the drop-down.
- Under the Options section, select the Auto-assign breaks check box to schedule breaks automatically.
- In the Agents to Schedule section, filter the list of agents by selecting the options from the drop-down for the following values:
- Agent Name
- Call Center
- Agent Team
- Agent Skills
- Select one or multiple agents (hold CTRL to select multiple) from the Available column and move them to the Selected column.
- Click
 to save the assignment.
 - Click to save all the changes and make the schedule available for the agents and other managers.
- You can assign agents to multiple shifts per day.
- You can change the hours for the schedule.
Assigning Schedules by Copying Across Dates
You can copy the shift assignment for a specific day or a range of days to another range of days using the Copy Assignments option. To copy shift assignment:
- On the WFO tab, go to Workforce Management > Assignments.
- From the Assign drop-down menu, click By Copying Across Dates. The Copy Assignment window appears.
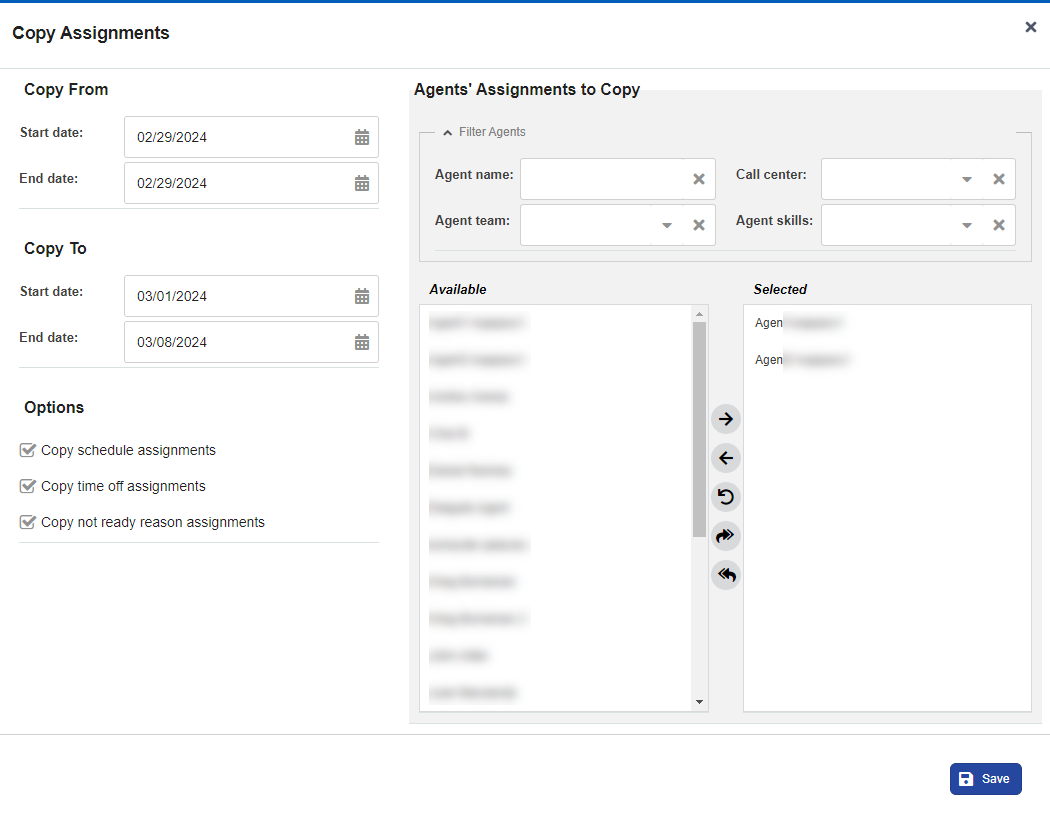
- Select Copy From and Copy To date range.
- In the Options section, select the required options from Copy schedule assignments, Copy time off assignments, and Copy not ready reason assignments.
- You can Filter the list of Agents' Assignments to Copy by:
- Agent Name
- Call Center
- Agent Team
- Agent Skills
- From the Available list, select the agents to whom you want to assign the schedules.
- Click to save the assignment.
- Click to save all the changes and make the schedule available for the agents and other managers.
Assigning Schedules by Activities
You can assign schedules based on different activities like Break, Lunch, Meeting, Other, and Training. The Activities option is available only when assignments are scheduled for a day. Click to select the day and duration in increments of 5, 10, or 15 minutes.
- On the WFO tab, go to Workforce Management > Assignments.
- From the Assign drop-down menu, click Activities.
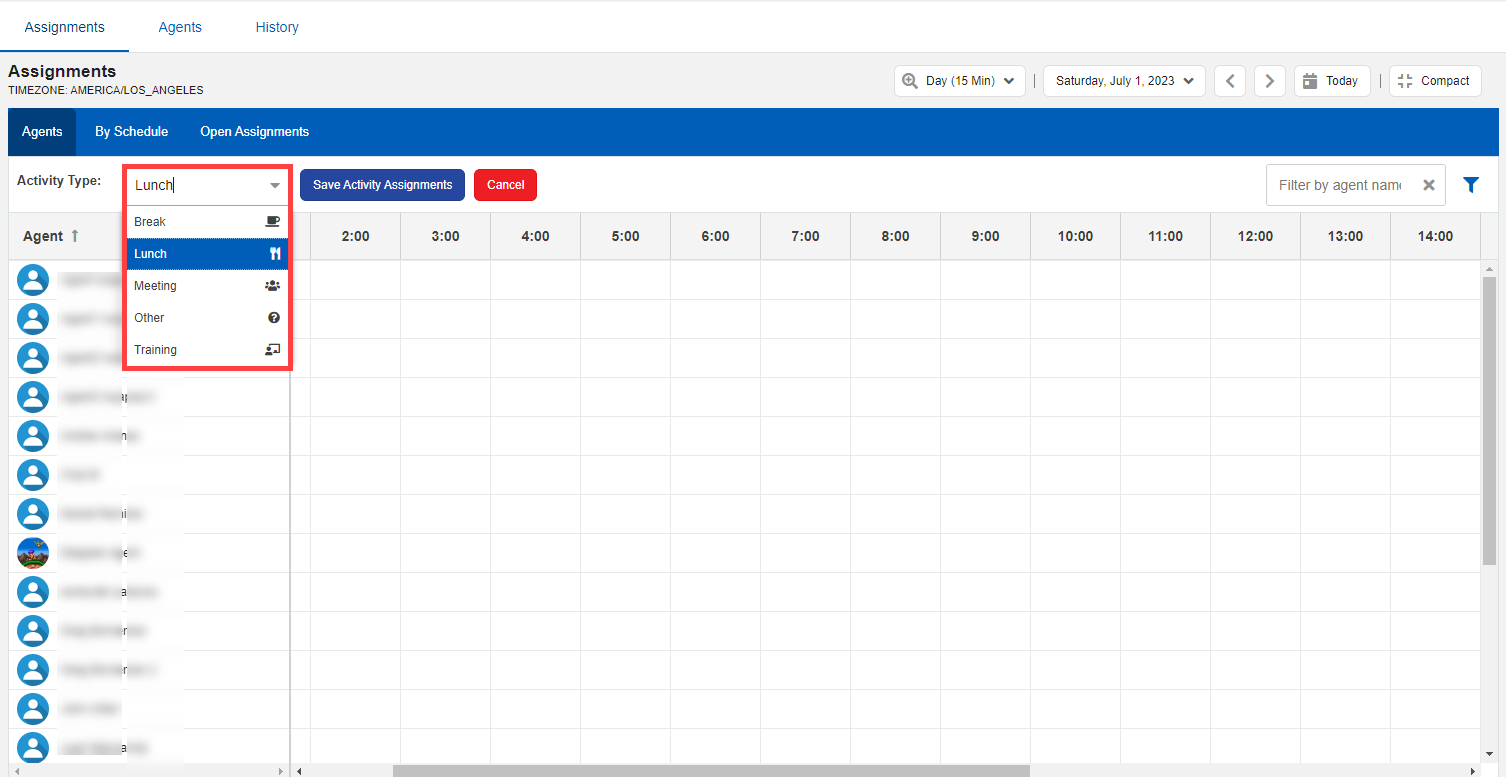
- Select the Activity Type from the drop-down menu. Choose from Break, Lunch, Meeting, Other, and Training.
- Select the time slots.
- Click
 .
. - Click to save all the changes and make the schedule available for the agents and other managers.
Assigning Schedules from the Schedule Tab
You can assign the available schedules to agents using the Schedules > By Schedule tab. To assign schedules from this tab:
- On the WFO tab, go to Workforce Management > Assignments.
- Click the By Schedule tab.
- From the Schedule drop-down menu, select the schedule.
- In the Assign field, select Appoint Open Assignments or Activities using the drop-down.
The Activities option is available only when assignments are scheduled for a day. Click to select the day and duration in increments of 5, 10, or 15 minutes. - If you select Assign > Appoint Open Assignments, the Appoint Open Assignments window opens.
- Select the Schedule from the drop-down.
- From the Agent drop-down list, select the agent to whom you want to assign the open slot.
- Make the necessary changes and click .
- If you select Assign > Activities, see Assigning Schedules by Activities.
- Click to save all the changes and make the schedule available for the agents and other managers.
Assigning Schedule from the Open Assignments Tab
- On the WFO tab, go to Workforce Management > Assignments.
- Click the Assignments tab and then click the Open Assignments tab.
- Select the Date based on the open assignments available and assign it to the agent.
- Click .
- Click to save all the changes and make the schedule available for the agents and other managers.
Auto-Schedule Assignments
To auto-schedule assignment:
- On the WFO tab, go to Workforce Management > Assignments.
- Click
 . The Auto Schedule window appears.
 - From the Select a published forecast drop-down, select a published forecast.
- Select a schedule from the Select a schedule using the drop-down. If you want to create a new schedule, select Or create a new schedule and click .
- From the Assign Agents section, select one of the options.
- In the Choose a model for each day in the table, select the required schedule and forecast date.
- Click OK.
Editing Assignments
To edit an assignment:
- On the WFO tab, go to Workforce Management > Assignments.
- Double-click the assignment you want to edit.
- The Edit Assignments window opens.
- To create a new assignment:
- Click
 . The New Assignment window opens.
 - Select the Assignment Category, Start Time, and End Time from the drop-down.
- Select the Add default break check box to add a break.
- Click OK.
- Click
- To edit an existing schedule, select the schedule and click
 .
.- Make the necessary changes as required.
- To delete a schedule, select the schedule and click
 .
. - Click .
Viewing Agent Schedules
The Agents tab allows you to filter and view the agent's schedule details for today, a specific day, week, two weeks, or a month with a compact or expanded view.
To view agent schedules:
- On the WFO tab, go to Workforce Management > Assignments.
- Click the Agents tab.
- View the schedule details for a specific month, for two weeks, for a week, or for one day. If you are viewing the schedule for a specific day, you can also view the duration for that schedule in increments of 5, 10, or 15 minutes. Click to select the schedule duration. Specify the dates using .
- Filter the Agent name using .
- Use
 to refresh the information displayed.
Viewing Schedule History
The History tab provides all the details of the changes made to schedules, schedule assignments, time off assignments, and auto-schedule jobs. Details such as who made the change, when were the changes made, what changes were made, and other details are captured. Click the Schedules, Schedule Assignments, Time Off Assignments, and Auto Schedule Jobs tabs for relevant details.