Customizing the Dashboard
The Monitor Dashboard can be tailored to meet your organization’s goals through the addition, modification, or removal of widgets. Use the preview feature to confirm each widget meets your specific needs before adding it. If necessary, you can easily reset configurations, giving you complete control over your dashboard setup.
Configuring Widgets
You have the option to configure a range of widgets on your dashboard for monitoring specific data. Choose from the available widgets and customize them according to your needs.
To configure widgets:
- Navigate to the Monitor tab.
- Go to the dashboard you have created from the tabs on the right pane.
- Click Dashboard Settings or click
 .
- The Available Widgets tab displays a list of all the widgets available for the Monitor dashboard. From the Select Monitor Level drop-down list, select the monitor level.
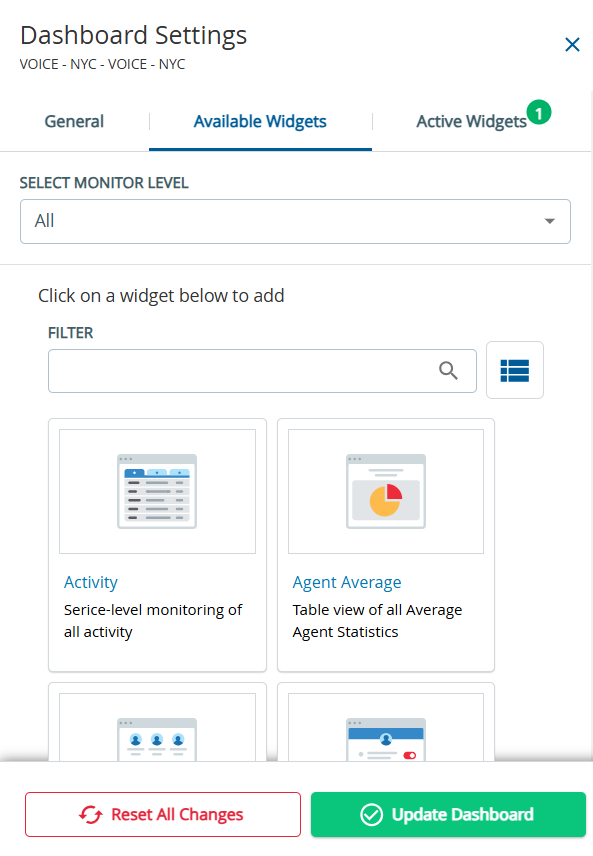
- If you know the widget name, type the name of the widget in the Filter field. Click
 to view the available widgets in the form of a list. Click
 to view the available widgets in the form of a grid.
- From the list of available widgets, choose the widget based on what you want to monitor and click the widget. The Dashboard Settings pane is displayed with the sample preview of the widget selected.
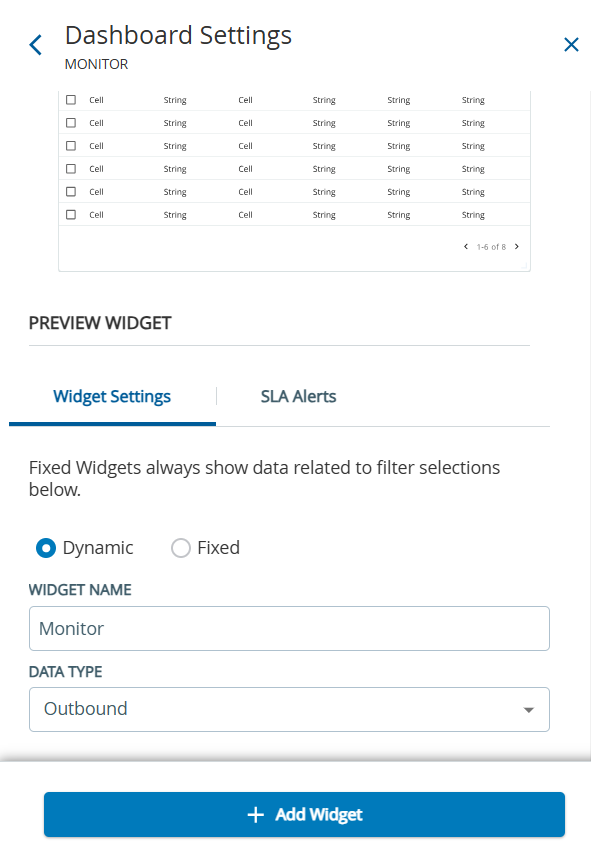
- In the Preview Widget section, under Widget Settings, customize the widget as follows:
- Select between Dynamic or Fixed data using the radio button. Fixed data persists across different hierarchical levels and dynamic data changes based on the hierarchy chosen.

For Fixed data, specify the Call Center or the Service.
- In the Widget Name field, change the widget name, as required.
- From the Data Type drop-down list, select the call direction. Choose between Outbound, Blended, and Inbound.
All widgets do not support all the call directions, namely Outbound, Blended, and Inbound. Depending on the call directions supported by the widget, the Data Type drop-down list options are displayed.
- Select between Dynamic or Fixed data using the radio button. Fixed data persists across different hierarchical levels and dynamic data changes based on the hierarchy chosen.
- Click
 .
- To update the dashboard with the newly added widget, click
 .
Modifying the Widgets
To modify the widgets on the dashboard:
- Navigate to the Monitor tab.
- Go to the dashboard you have created from the tabs on the right pane.
- Click Dashboard Settings or click .
- The Active Widgets tab displays all the widgets that have been added to the dashboard.
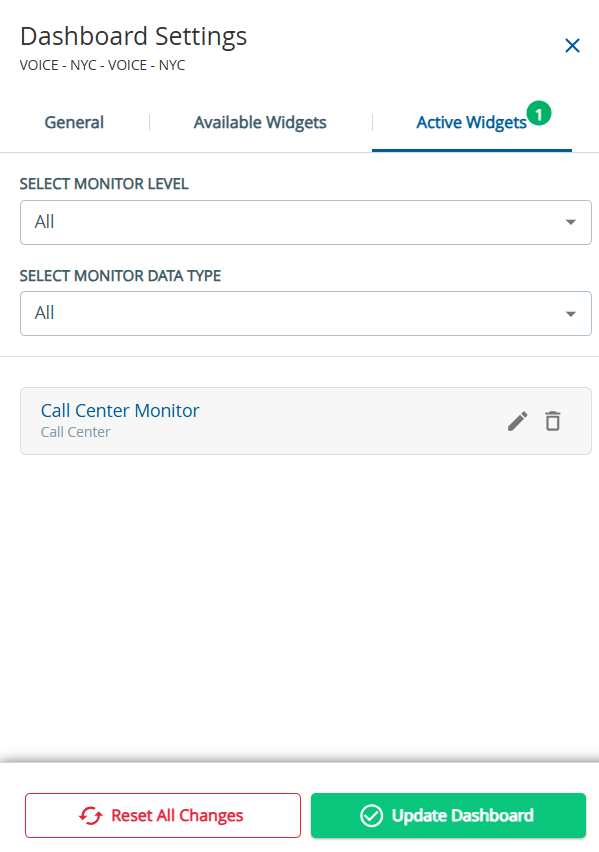
- To filter, select Monitor Level from the Select Monitor Level drop-down list and select the Data Type from the Select Monitor Data Type drop-down list. The widgets are displayed based on the selected filter criteria.
- From the list, hover over the widget you want to modify. Click
 to edit the widget. The Customize Widget pane is displayed with the sample preview of the widget selected.
- In the Preview Widget section, under Widget Settings, customize the widget as follows:
- Select between Dynamic or Fixed data using the radio button. Fixed data persists across different hierarchical levels and dynamic data changes based on the hierarchy chosen.
For Fixed data, specify the Call Center or the Service.
- In the Widget Name field, change the widget name, as required.
- From the Data Type drop-down list, select the call direction. Choose between Outbound, Blended, and Inbound.
All widgets do not support all the call directions, namely Outbound, Blended, and Inbound. Depending on the call directions supported by the widget, the Data Type drop-down list options are displayed.
- Select between Dynamic or Fixed data using the radio button. Fixed data persists across different hierarchical levels and dynamic data changes based on the hierarchy chosen.
- Click
 .
- To update the dashboard with the newly added widget, click .
Deleting the Widgets
To delete a widget on the dashboard:
- Navigate to the Monitor tab.
- Go to the dashboard you have created from the tabs on the right pane.
- Click Dashboard Settings or click .
- The Active Widgets tab displays all the widgets that have been added to the dashboard.
- To filter, select Monitor Level from the Select Monitor Level drop-down list and select Data Type from the Select Monitor Data Type drop-down list. The widgets are displayed based on the selected filter criteria.
- From the list, hover over the widget you want to modify. Click
 to delete the widget from the dashboard.
- To update the dashboard with the newly added widget, click .
Arranging the Widgets
To change the position of a widget within the Voice Monitor Dashboard, drag the widget to the required position using drag icon  .
