Download PDF
Download page Recording Events Report.
Recording Events Report
This report provides the details of all access logs and changes of recording events. You can view the details of action taken by the user or agent interacting with the recording.
Search Criteria
To access the Recording Events Report, navigate to Review > Agent Reports > Recording Events Report. This takes you to the Recording Events Reporting search tool to choose the parameters for generating the report.
This report may only be generated with a start and end time frame no greater than 90 days. Data can be generated from up to 730 days back.
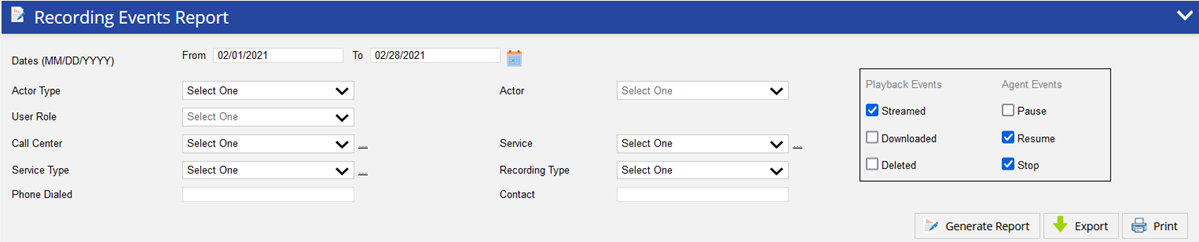
Specify the following options to generate the report. Only date range is required to generate the report and rest of the fields are optional. These optional fields can be used to get the specific records.
- Date Range – Enables you to type in dates in the format of MM/DD/YYYY or choose dates using the calendar button. Clicking on the calendar button opens the Date Picker interface.
- Under the Range tab, you can select the date range.
Under the MultiSelect tab, you can select multiple sequential or non-sequential dates.
- Actor Type - Agent or User who interacted with an audio or screen recording. Select your option from the drop down.
- Actor - Based on the selected Actor Type, choose a specific Agent or User from the drop down.
- Playback Events - User playback events include Streamed, Downloaded and Deleted recordings. You are able to select which user events you want included on the report.
- Agent Events - Agent call control events include Pause, Resume and Stop recording from Agent Desktop. You are able to select which agent events you want included on the report.
- User Role - This field is available only if the value of Actor Type field is selected as a User. Select a user role from the drop down.
Call Center – Select a call center with a drop-down menu.
- Multiple Call Center Selection – Clicking on the link next to the Call Center drop-down menu opens the Select Call Center window.
- Search the required call center by typing the text in the Search textbox.
- Click a call center from the Available column to move it to the Assigned column.
- Click the Assign All button to add all the available call centers to the Assigned column.
- Click a call center from the Assigned column to remove the assigned call center. It will be moved to the Available column.
- Click the Remove All button to remove all the assigned call centers. They will be moved to the Available column.
- Multiple Call Center Selection – Clicking on the link next to the Call Center drop-down menu opens the Select Call Center window.
- Service – A particular service can be selected using the service drop-down menu. If a particular call center is selected prior to selecting a service, services only available for that particular call center will appear.
- Multiple Service Selection – Clicking on the link next to the Service drop-down menu will open the Service Selection window:
- Search the required Service by typing the text in the Search textbox.
- Click a service from the Available column to move it to the Assigned column.
- Click the Assign All button to add all available services to the Assigned column.
- Click a service from the Assigned column to remove it from the assigned services. It will be moved to the Available column.
Click the Remove All button to remove all the assigned services. They will be moved to the Available column.
- Multiple Service Selection – Clicking on the link next to the Service drop-down menu will open the Service Selection window:
- Service Type -Allows you to select a particular service type using the Service Type drop-down menu. If a particular service type is selected, only the services available for that service type appear in the Services drop-down list.
- Multiple Service Selection – Clicking on the link next to the Service Type drop-down menu opens the Select Service Type window:
- Search the required service type by typing the text in the Search textbox.
- Click a service type from the Available column to move it to the Assigned column.
- Click the Assign All button to add all available service types to the Assigned column.
- Click a service type from the Assigned column to remove it from the assigned service types. It will be moved to the Available column.
- Click the Remove All button to remove all the assigned service types. They will be moved to the Available column.
- Multiple Service Selection – Clicking on the link next to the Service Type drop-down menu opens the Select Service Type window:
- Recording Type - Select the type of recording event captured from the available drop down (Call Recording/Screen Recording).
- Phone Dialed - Enter the phone number of the caller that was dialed when the recording was performed (if available).
- Account - Enter the account number of the caller (if available).
Generate Report and Results
After choosing the search parameters, generate the report by clicking the Generate Report button to the right of the search options. The generated report contains the following result columns.

- Actor - Specifies the name of the Agent or User who interacted with the recording.
- Actor Type - Specifies if Actor is an Agent or User.
- Name - Displays the name of the contact.
- Service - The service on which the call was recorded.
- Account - The account number associated to the recording.
- Phone - The phone number for the recorded call.
- Agent - The agent who recorded the session.
- Session - Displays the session ID for screen recording and Object ID for call recordings.
- Date - Date when the call or screen recording was performed.
- Transfer Connect - The time at which the call was initially transferred in Hours: Minutes: Seconds.
- Transfer End - The time at which the call transfer was terminated in Hours: Minutes: Seconds.
- Transfer Connect Duration - The total time of the call transfer duration (Transfer End Time - Transfer Start Time)
- Campaign - The name of the campaign the recording is associated to.
- Outcome - The LiveVox result code assigned to the call.
- Action - Action taken by the user or agent interacting with the screen or audio recording.
- Recording Type - The type of recording that was accessed.
- Action Time - The date and time of the interaction.
Additional Buttons
- To export the generated report, click the Export button (next to the Generate Report button) and select the required option of file type. The available options are PDF, Excel, CSV.
- To print the generated report, click the Print button (next to the Export button). The generated report opens in another tab. Select the details for printing the report and click the Print button.