Download PDF
Download page Contact Lookup Report.
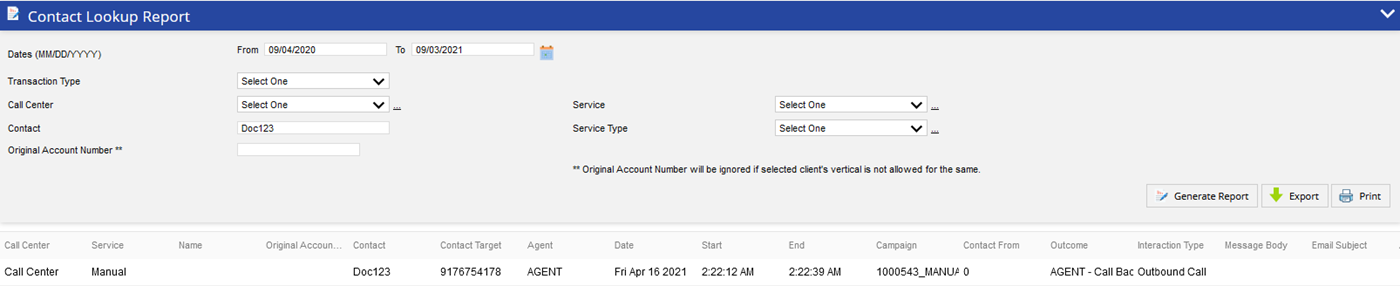
Contact Lookup Report
The Contact Lookup Report provides you quick and easy access to all attempts for a specific account. Outbound attempts and inbound calls received by LiveVox are displayed.
To access the Contact Lookup Report, go to Review > Contact Lookup Report.

Search Criteria
An account number is required to begin a search.
- Date Range: Enables you to type in dates in the format of MM/DD/YYYY or choose dates using the calendar button. Clicking on the calendar button opens the Date Picker interface.
- Under the Range tab, you can select the date range.
- Under the MultiSelect tab, you can select multiple sequential or non-sequential dates.
- Transaction Type: Enables you to select the transaction type (Inbound, Outbound, Inbound SMS, Outbound SMS, Outbound Email, Inbound Email) from the drop down menu.
- Call Center: Select a call center with a drop down menu.
- Multiple Call Center Selection: Clicking on the link next to the Call Center drop-down menu opens the multiple call center selection window
- Click a call center row from the Available column to move it to the Assigned column.
- Click the Assign All button to add all the available call centers to the Assigned column.
- Click a call center row from the Assigned column to remove the assigned call center. It will be moved to the Available column.
- Click the Remove All button to remove all the assigned call centers. They will be moved to the Available column.
- Multiple Call Center Selection: Clicking on the link next to the Call Center drop-down menu opens the multiple call center selection window
- Service: A particular service can be selected using the Service drop-down box. If a particular call center is selected prior to selecting a service, services only available for that particular call center will appear.
- Multiple Service Selection: Clicking on the link next to the Service drop down menu will open the multiple service selection window:
- Click a service row from the Available column to move it to the Assigned column.
- Click the Assign All button to add all available services to the Assigned column.
- Click a service row from the Assigned column to remove it from the assigned services. It will be moved to the Available column.
- Click the Remove All button to remove all the assigned services. They will be moved to the Available column.
- Multiple Service Selection: Clicking on the link next to the Service drop down menu will open the multiple service selection window:
- Contact: Specify multiple account numbers to be searched. A maximum of 10 account numbers can be searched at a time using comma as a delimiter.
- Service Type: A particular service type can be selected using the Service Type drop-down box. If a particular service type is selected, services available for that particular service type will only appear in the Services drop down list.
- Multiple Service Selection: Clicking on the link next to the Service Type drop down menu will open the multiple service type selection window:
- Click a service type row from the Available column to move it to the Assigned column.
- Click the Assign All button to add all available services types to the Assigned column.
- Click a service type row from the Assigned column to remove it from the assigned service types. It will be moved to the Available column.
- Click the Remove All button to remove all the assigned service types. They will be moved to the Available column.
- Multiple Service Selection: Clicking on the link next to the Service Type drop down menu will open the multiple service type selection window:
Original Account Number: Specify the alternate account number (different from the unique account identifier within the LiveVox client's CRM platform).

The Original Account Number will be ignored if selected client's vertical is not allowed for the same.
Generate Report
After choosing parameters, generate the report by clicking Generate Report at the bottom of the page. The report generates the following data:
- Call Center: Call Center Name
- Service: Service Name
- Name: First and Last Name of customer
- Original Account Number: An alternate account number that is different from the unique account identifier within the LiveVox client's CRM platform
- Account: Account Number for the record
- Contact Target: Displays the Phone number or Email ID used to contact the account
- Agent: Agent name (if available)
- Date: Date and time of the call
- Start: Start time of the call in Hours: Minutes: Seconds
- End: End time of the call in Hours: Minutes: Seconds
- Campaign: Name of the campaign the phone number was found within
- Contact From: Displays the source of contact
- Outcome: LiveVox result code assigned to the call
- Interaction Type: Displays the transaction type
- Message Body: Displays the interaction text
- Email Subject: Displays the interaction subject.
- Attachments: Contains
 if the interaction type is email and if the email contains an attachment. To download the attachment, double-click , and then click the attachment in the Download Email Attachment window.
You can see information for previously deleted services on the contact lookup report. Records of deleted services are highlighted in light green.
To Export the report, click the Export button (next to the Generate Report button) and select the required option of file type. The available options are: PDF, Excel, CSV.
To print the report, click the Print button (next to the Export button). The generated report opens in another tab. Select the details for printing the report and click the Print button.