The Home Bar helps you navigate to different pages and use a few features like Agent Assist, Notes, Omni-Search, and LV Connect. You can add elements to help the agent use the desktop effectively.


The following are the field descriptions that are listed in the Home Bar:

  1. Agent Assist: With Agent Assist, agents can interact with customers more efficiently, provide information about existing offers, resolve customer issues quickly, and avoid errors during interactions.
  2. Enable Notes: When Enable Notes option is selected, the agent can add notes in the LV Connect window.
  3. Omni Search Field: The search functionality in the Contact Center CRM agent desktop has been enhanced to provide personalized search options. Based on the agent roles and permissions, a personalized search experience is provided to the agents so they can quickly access the data they need.  You can enable the omni-search function for the agent, which means that the agent can search using a single parameter using the operators for Contacts, Accounts, and Ticketing records. 
  4. Notes: The agent can click the Notes button and add any information that needs to be recorded or noted during the call with the customer.
  5. Recently Viewed: The Recently Viewed button shows an agent's recently viewed contacts, tickets, or accounts.
  6. Knowledge Portal Buttons: If the agents can click the Knowledge Portal button on the Home Bar to refer to any particular article or can select the list of articles.
  7. Screen Pop: This will enable the agent to pop up the active window during the call interaction.

You can create and design multiple pages. Ensure you add the  Home Bar  element on each page for better navigation.

Adding the Home Bar and Icons

To add a home bar and icons to the page:

  1. On the page, select the Elements section.
  2. Drag and drop the Home Bar icon to the page.
  3. Hold the Home Bar and drag it to the top of the page.
  4. To add icons and change the properties of the Home Bar, click the Properties tab.
  5. Enable the highlighted elements as shown in the image.
    The details will appear on your Home Bar.

  6. To add icons, click Configure button.
    The Home Bar Buttons Setup window appears.
  7. In the Home Bar Buttons Setup window, perform the following steps.:

Adding Custom Buttons

Apart from the buttons in the Properties menu, you can add custom buttons to your home bar. In the Properties tab, click Custom Buttons.
The Home Bar Buttons Setup appears.

  1. Click New.
  2. By default, the Component is Home Bar.
  3. Specify the Label as Home.

    Since you want to add a Home button to the Home Bar, specify it as Home. To add any other icon, you must select the relevant name accordingly.

  4. Select the Home icon from the drop-down list.
  5. Select the Action Type as Page.

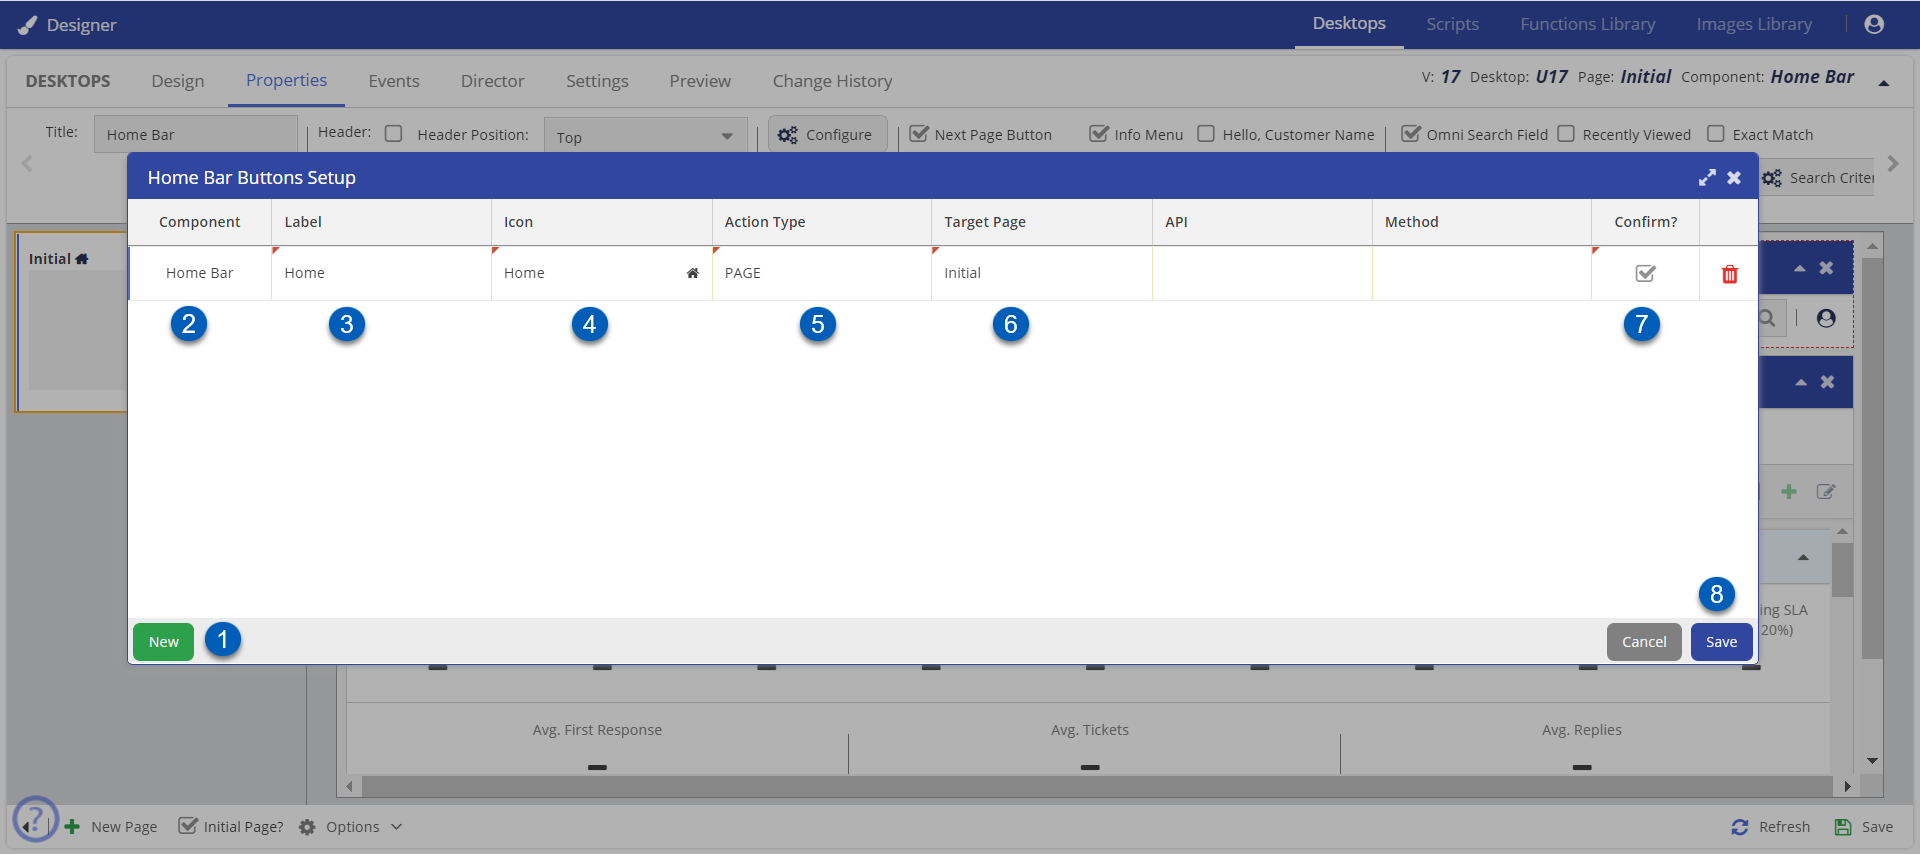
    The available Action Types are:

    API: This field appears when the value in the Action Type field is FUNCTION CALL or POP URL.

    Page: Displays all the created pages.

    Pop URL: Displays an external webpage on a new browser tab.

    Push URL: Displays an external webpage on an existing browser tab.


  6. Select Initial from the drop-down list for the Target Page.

    The initial page is the first or the landing page. 

  7. Enable the Confirm? Option.
  8. Click Save.

Show Me How

This video shows the steps involved in transitioning between pages.