Download PDF
Download page Nodes.
Nodes
Nodes are the building blocks of a bot. This topic describes the basic and advanced nodes that are available for building a bot and how to use them.
- When designing a node, in the text box (for example, the Ask a question field), you can enter a maximum of 4000 characters. The number of characters that you can enter appears below the text box.
- You can enhance the question or message that you enter in the text box by clicking the icons that appear below the text box. For more information, see Enhancing a Node Message.
Basic Nodes
You can build a simple by adding basic nodes to it.
Email Address
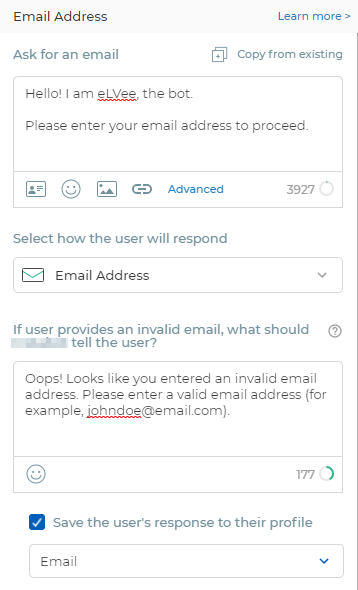
The Email Address node enables a bot to prompt a customer to provide their email address so that their response is validated and then automatically saved to their profile. This node eliminates the need to manually record the email address of the customer. In addition, it enables the bot to display an error message when the customer provides an invalid email address. In addition, by default, the Email Collected bot goal is applied to the node to enable you to track the number of customers who have responded to the node within the bot.
- The Email Address node is similar to the Free Text Reply node in that both enable you to display a message that is intended to prompt the customer to provide a response to continue the conversation. The Email Address node, however, is intended to prompt the customer to provide their email address so that it can be saved to their profile.
- For information about bot goals, see Goals.
Designing the Email Address Node
To design the Email Address node:
On the Bot Nodes tab, in the Ask for an email field, enter the message that asks the customer to respond with their email address.
By default, the Save the user's response to their profile checkbox is selected and the Email value appears in the drop-down list box below the checkbox to indicate that the customer's response is saved to the Email user property. For information about user properties, see Properties.
- In the If user provides an invalid email field, enter the message that states that the customer has entered an invalid email address.
Free Text Reply
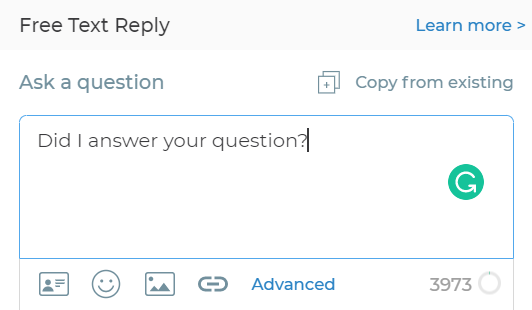
The Free Text Reply node enables a bot to prompt a customer to provide a response to continue the conversation.
Designing the Node
To design the Free Text Reply node, on the Bot Nodes tab, in the Ask a question field, enter the question that you want to ask the customer.
Multiple Choice
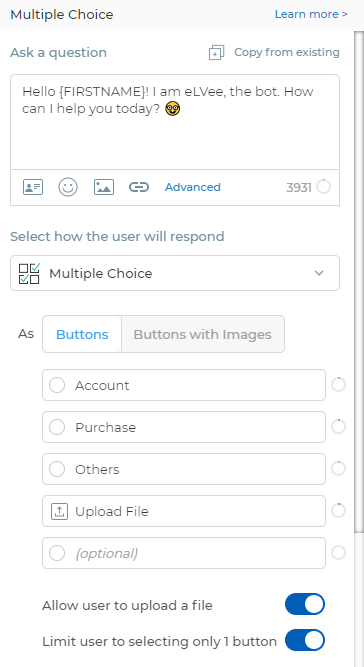
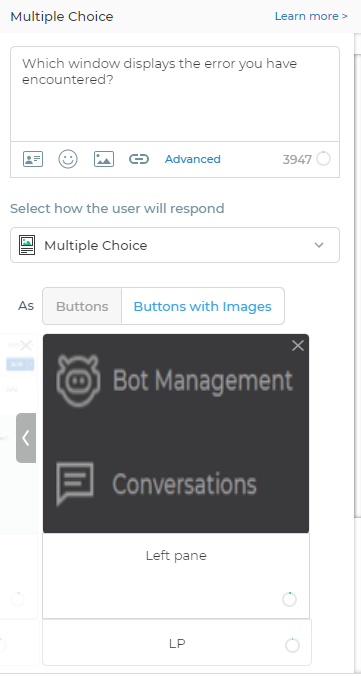
The Multiple Choice node enables a bot to display a list of options (as buttons) with a supporting question to prompt a customer to select one or more buttons to continue the conversation. The following options are available for configuring the buttons:
Buttons: This option enables you to add multiple buttons with labels and define if the customer can select multiple buttons. You can also define if the customer can upload a file; this option, however, is applicable only if you have limited the customer to select only one button.
Buttons With Images: This option enables you to add multiple buttons with images, labels, and descriptions to create a view resembling a list of cards for options. You can use this option if you want to illustrate or distinguish the buttons, or if you want to highlight the differences between the buttons.
Designing the Multiple Choice Node
To design the Multiple Choice node:
On the Bot Nodes tab, in the Ask a question field, enter the question that you want to ask the customer.
- If you want to enable the customer to click multiple buttons, disable the Limit user to selecting only 1 button option.
If you want to enable the customer to upload an image, enable the Allow user to upload a file option.
You can enable this option only if you have enabled the Limit user to selecting only 1 button option.
- If you want to display buttons that are related to the question, without images:
- Click Buttons.
In the text box, enter a label for the button.
- As you enter a label, another text box appears so that you can add a label for the next button.
- You can add as many buttons/labels as you want.
- You can delete a button by clicking the close icon
 .
.
- If you want to display buttons that are related to the question, along with images:
- Click Buttons with Images.
- Click the space that displays the Image or GIF icon
 , and then add an image that represents the option.
 If required, in the first text box below the image, enter a description of the image.
If required, in the second text box below the image, enter a label for the button.
- You can change the image by hovering over it and then clicking Upload image.
- You can add as many images as you want by clicking the plus icon
 .
. - You can delete a button by clicking the close icon .
No Reply
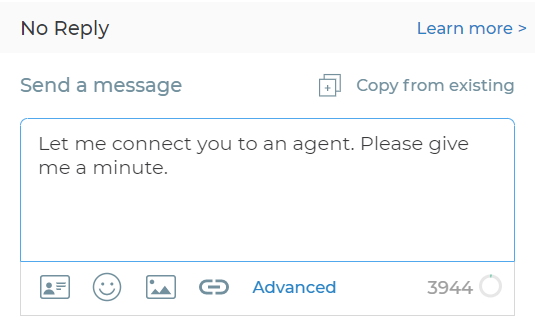
The No Reply node enables a bot to display a message that does not require a response from a customer. After displaying the message, this node automatically continues the conversation by displaying the next node in the bot flow. You can also use this node to transfer a chat to a live agent.
Designing the No Reply Node
To design the No Reply node, on the Bot Nodes tab, in the Send a message field, enter the message that you want to convey to the customer.
If you want a chat to be transferred to a live agent, enter the following message: go_to_agent
Phone Number
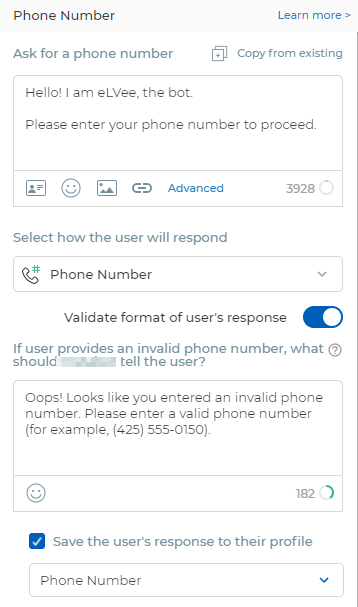
The Phone Number node enables a bot to prompt a customer to provide their phone number so that their response is validated (optional) and then automatically saved to their profile. This node eliminates the need to manually record the phone number of the customer.
The Phone Number is similar to the Free Text Reply node in that both enable you to display a message that is intended to prompt the customer to provide a response to continue the conversation. The Phone Number node, however, is intended to prompt the customer to provide their phone number so that it can be saved to their profile.
This node also enables you to display an error message when the customer provides an invalid phone number.
Designing the Phone Number Node
To design the Phone Number node:
On the Bot Nodes tab, in the Ask for a phone number field, enter the message that asks the customer to respond with their phone number.
By default, the Save the user's response to their profile checkbox is selected and the Phone Number value appears in the drop-down list box below the checkbox to indicate that the customer's response is saved to the Phone Number user property. For information about user properties, see Properties.
If you want to allow the customer to enter a phone number in any format (for example, an extension), disable the Validate format of user's response option.
- If you have enabled the Validate format of user's response option, in the If user provides an invalid phone number field, enter the message that states that the customer has entered an invalid phone number.
User's Name
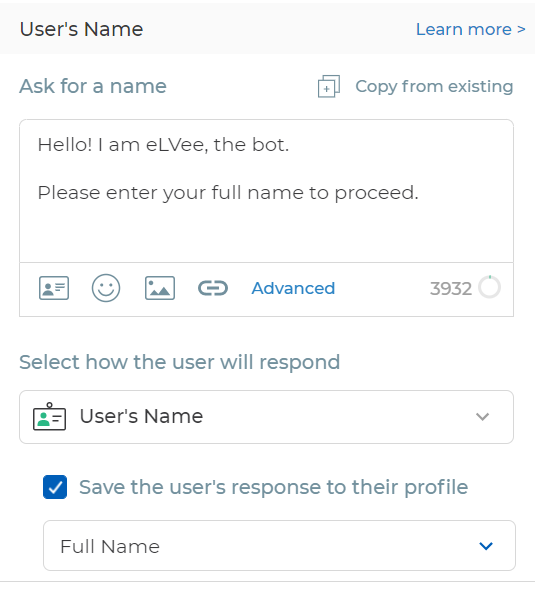
The User's Name node enables a bot to prompt a customer to provide their full name so that their response is automatically saved to their profile. This node eliminates the need to manually record the full name of the customer.
The User's Name is similar to the Free Text Reply node in that both enable you to display a message that is intended to prompt the customer to provide a response to continue the conversation. The User's Name node, however, is intended to prompt the customer to provide their full name so that it can be saved to their profile.
Designing the User's Name Node
To design the User's Name node, on the Bot Nodes tab, in the Ask for a name field, enter the message that asks the customer to respond with their full name.
By default, the Save the user's response to their profile checkbox is selected and the Full Name value appears in the drop-down list box below the checkbox to indicate that the customer's response is saved to the Full Name user property. For information about user properties, see Properties.
Example
If the customer enters the text Jane Doe in response to the question displayed through the User's Name node, the customer's contact record is updated as follows:
- First Name: Jane
- Last Name: Doe
Advanced Nodes
You can build a complex bot to expand its capabilities by adding advanced nodes to it.
Conditional Logic
The Conditional Logic node enables a bot to route a customer to different paths within the bot based on their response to a different node in the bot, their user property, the completion of a bot goal, or the result of a Script node.
Some of the scenarios in which you can use this node are as follows:
- To know when a customer has previously provided some information so that you can skip asking the customer for that information again.
To recognize a customer who has completed a bot goal.
For information about bot goals, see Goals.
- To check if the response of the customer to a previous node contains or matches a certain phrase.
- To identify the result of a Script node.
Designing the Conditional Logic Node
To design the Conditional Logic node:
If you want to be able to easily identify or find the node, in the Conditional Logic section, in the CONDITION NAME field, enter a name for the node.
In the Conditional Logic section, in the IF field, select one of the following options:
- the User's Response to: Checks the response provided by the customer to a node in the bot.
- the User property of: Checks the value of a user property of the customer.
- the Goal: Checks the status of a bot goal.
- In the next drop-down list box, select the node or the bot goal that you want to associate with the condition.
- If you selected the User's Response to or User property of option:
- In the next drop-down list box, select the operator.
In the Value of the condition box, enter a value for the condition.
- After you enter a value, another box appears so that you can add another value.
- You can add as many values as you want.
- You can delete a value by clearing it in the box.
- If you selected the Goal option, in the next drop-down list box, select is Completed or is Not Completed.
Examples
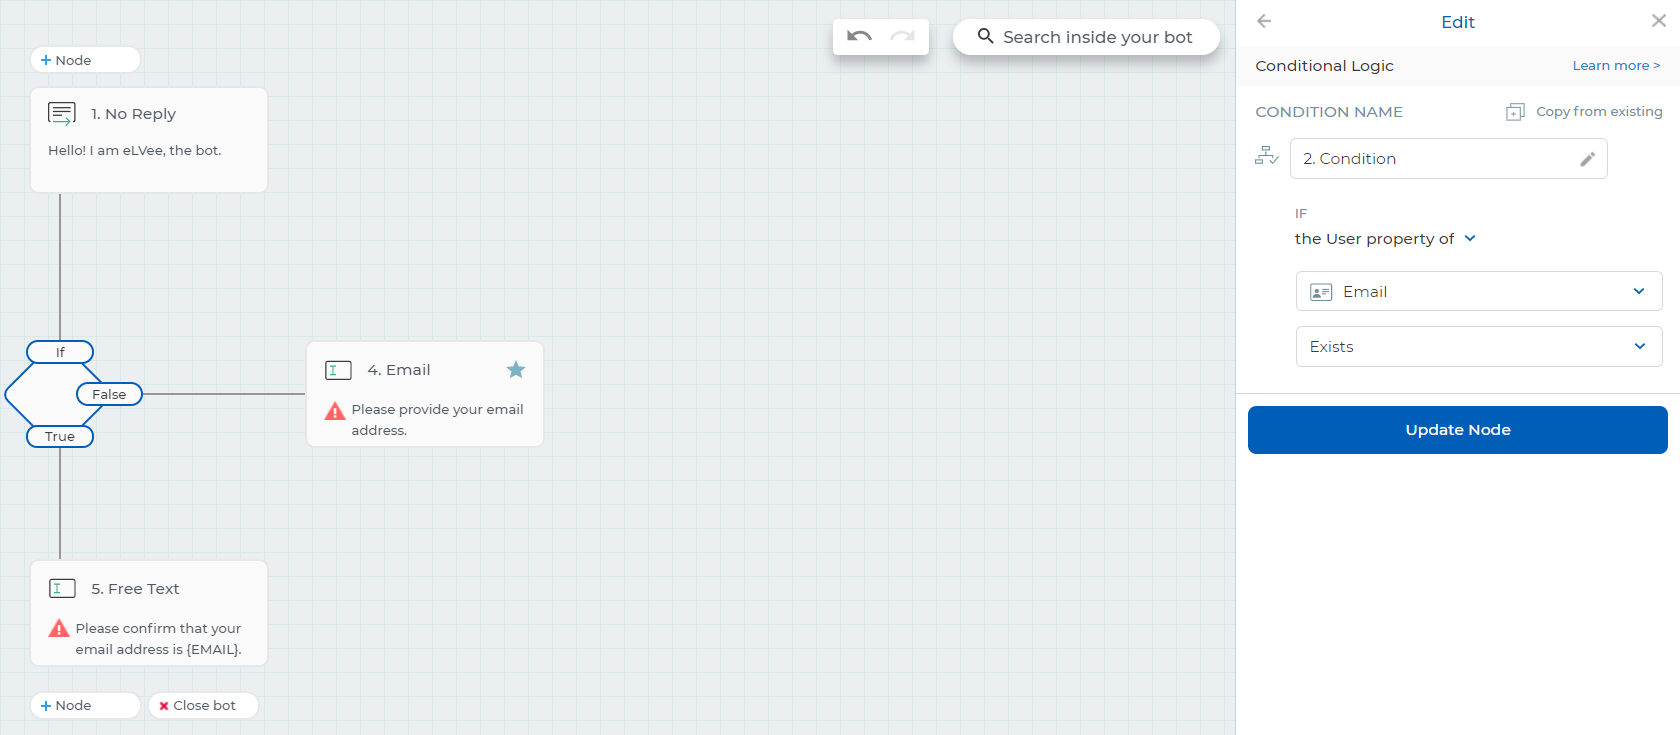
- In the following bot, the Email User Property logic of the Conditional Logic node is used to check if the email address of the customer exists in their profile. If the email address exists, the bot asks the customer to verify the email address (by using the Free Text node). Otherwise, the bot asks the customer to provide an email address (by using the Email Address node).
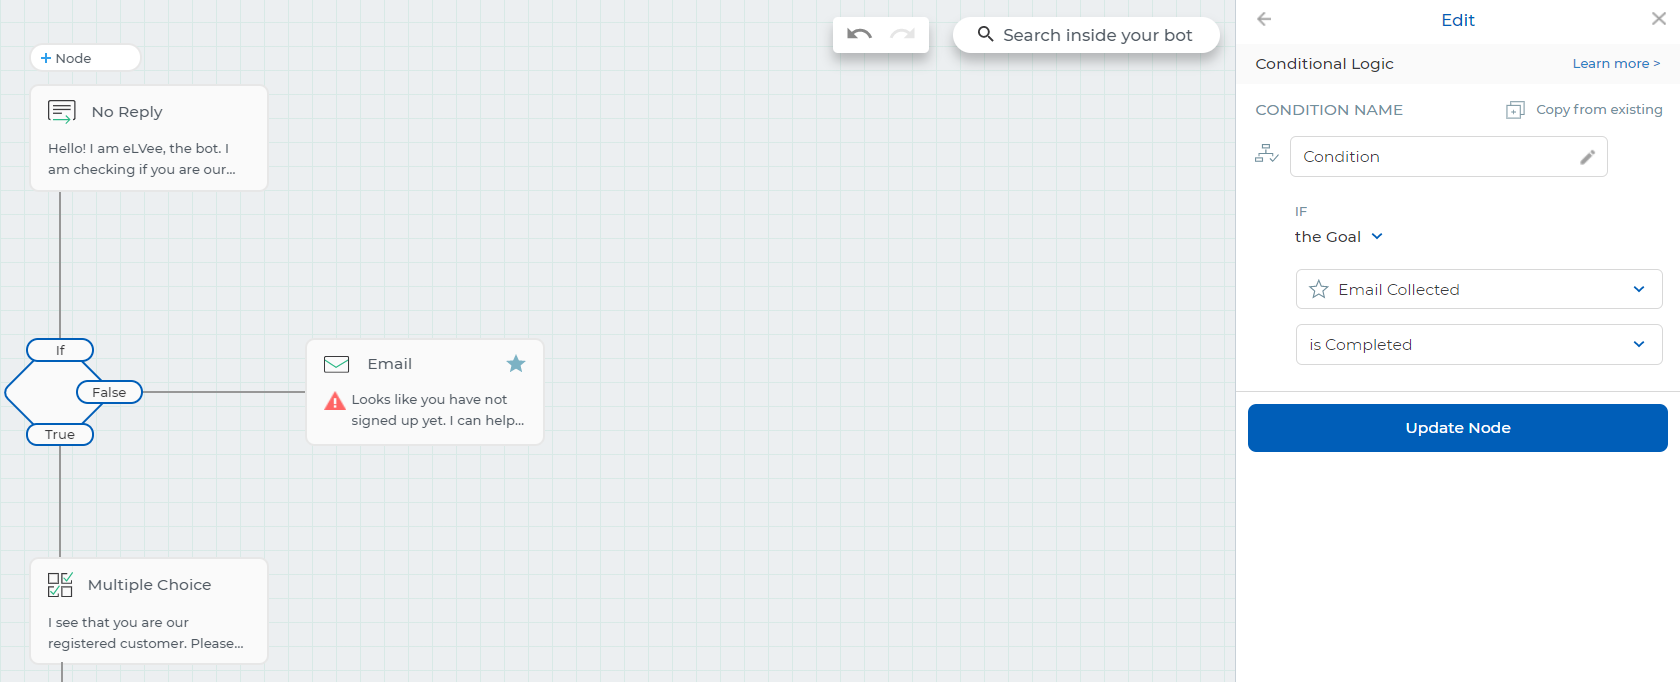
- In the following bot, the Goal logic of the Conditional Logic node is used to check if the customer had completed a bot goal named Email Collected.
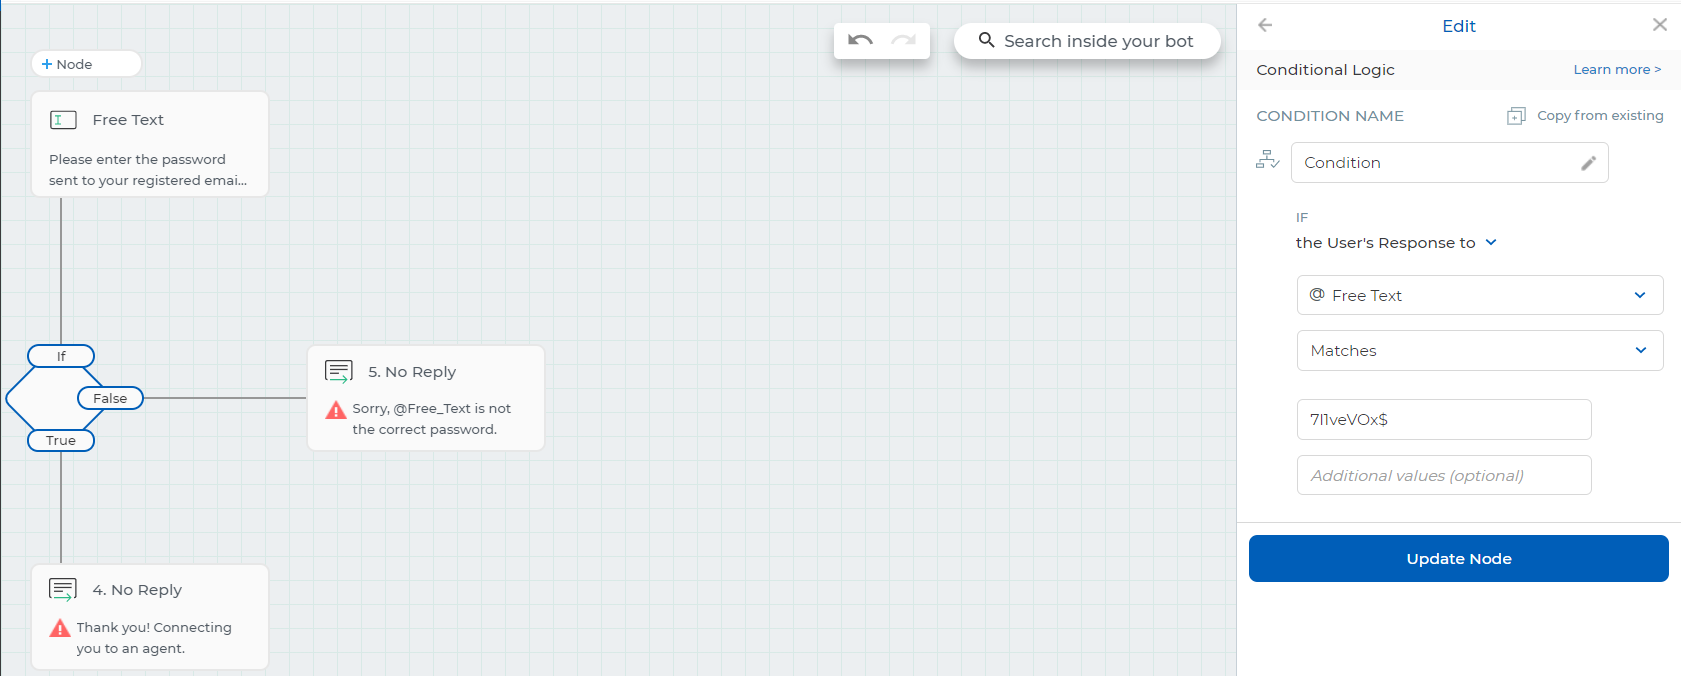
- In the following bot, the User Response logic of the Conditional Logic node is used to check if the response provided by the customer to the Free Text node matches 7l1veVOx$.
Dialogflow
The Dialogflow node enables a bot to intelligently converse with a customer by detecting the intention of the customer based on their response. You can use this node to create a user interface that emulates a conversation with a live agent as the customer communicates with the bot in their natural language. The node can recognize the nuances of human language by translating the customer's text (natural language) into machine-readable data by using a machine-learning model that you can train by providing examples.
The node handles a conversation through intents, which are categories that represent the possible intentions for a question asked by the customer during a conversation. You can define as many intents as you want for a bot to handle the entire conversation. The node works by comparing the text entered by the customer with the intents, mapping the text to the best intent in the bot (intent matching), and then providing a response to the customer.
You can define intents and their responses by using Google's Dialogflow Console. For more information, see the Dialogflow documentation.
The Dialogflow node must originate from the Free Text Reply node.
Designing the Dialogflow Node
Before you design the Dialogflow node:
- Connect Dialogflow to LiveVox Bot.
- Ensure that the bot contains a Free Text Reply node that asks the customer what their question is.
To design the Dialogflow node:
In the Name of the node to get the user's question field, select the name of the Free Text Reply node from where the customer's question is intended to originate.
If you want to create text responses for each intent within the LiveVox Bot instead of the Dialogflow console, disable the Display text response from Dialogflow option.
For more information, see the Dialogflow Intent Response section.
- In the How should we handle each intent field, select one of the following options:
- Each intent into a separate branch: Automatically creates multiple options (branches) following the Dialogflow node for each selected intent. You can select this option if you want to send the customer to a different path depending on the detected intent.
- All intents into a single branch: Automatically creates a single option (branch) following the Dialogflow node for all selected intents. You can select this option if you want to send the customer to the same path regardless of the detected intent.
If you have selected the Each intent into a separate branch option, in the Which intents do you want this node to handle field, select the checkboxes next to the names of the intents that you want the node to detect.
- This field contains the names of the intents that are created in the Dialogflow console.
- Default Fallback Intent is invoked when the bot does not recognize the text provided by the customer (that is, the text that cannot be mapped to any intent).
You can refresh the list of intents by clicking Refresh my intents.
Dialogflow Intent Response
In addition to creating intents, you can use the Dialogflow console to create and manage responses for each intent. When designing the Dialogflow node in LiveVox Bot, if you enable the Display text response from Dialogflow option, the bot displays the intent responses from the console. If, however, you want to create and manage responses for the intents of a Dialogflow node within LiveVox Bot, disable the Display text response from Dialogflow option and add the Conditional Logic node to the selected intents of the node.
Example
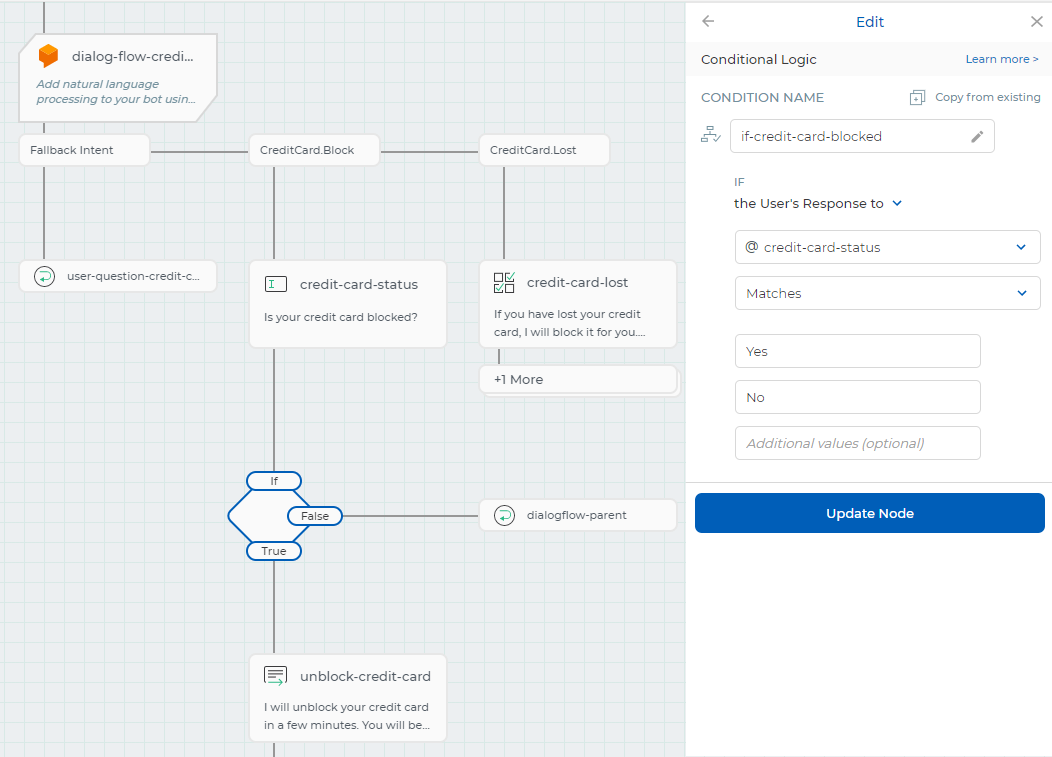
In the following bot, two Dialogflow nodes are used. The first Dialogflow node (dialogflow-parent) includes the CreditCard and Mortgage intents. The second Dialogflow node (dialogflow-credit-card), which is linked to the CreditCard intent, includes the CreditCard.Block and CreditCard.Lost intents.
If a customer responds to the first node (user-question) with a message that matches the CreditCard intent, the customer is sent to the CreditCard intent path of the dialogflow-parent node. If the customer then responds to the Free Text Reply node (user-question-creditcard) with a message that matches the CreditCard.Block or CreditCard.Lost intent, the customer is sent to the respective path of the dialogflow-credit-card node.
Similarly, if the customer responds to the user-question node with a message that matches the Mortgage intent, the customer is sent to the Mortgage intent path of the dialogflow-parent node.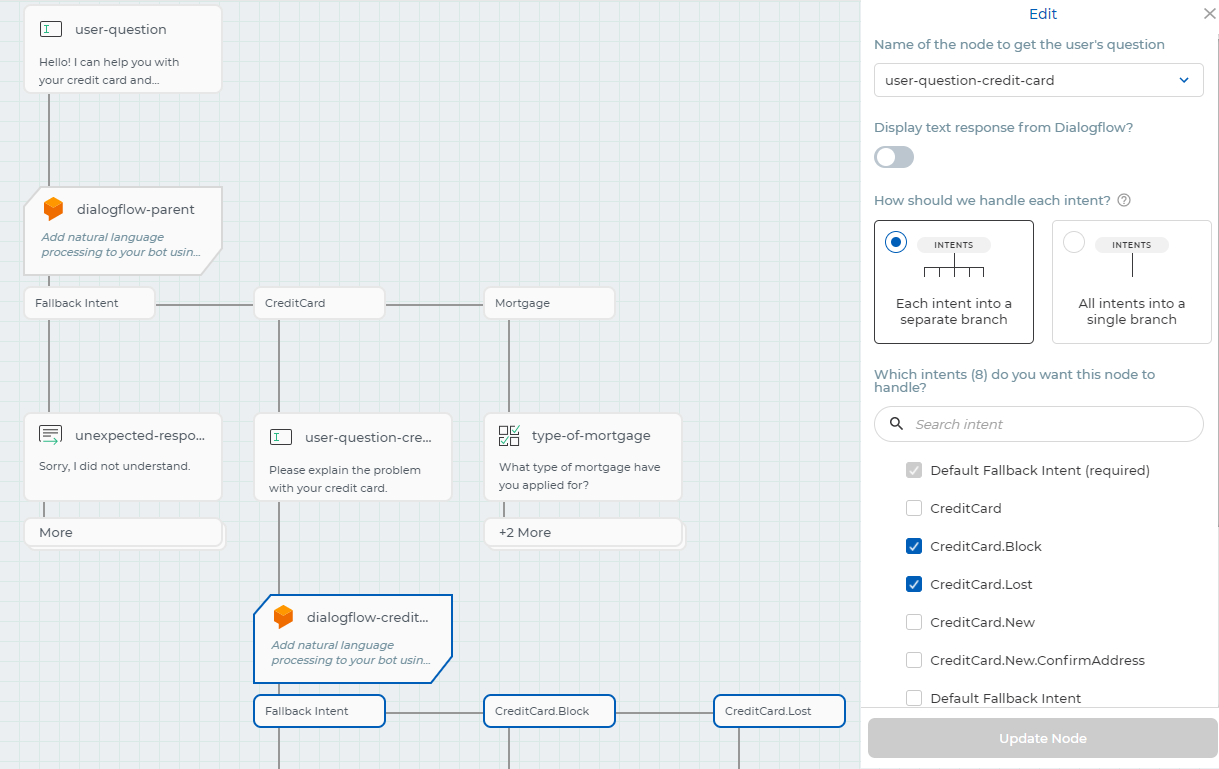
Script
The Script node enables a bot to insert and run any JavaScript in the background as a customer interacts with the bot.
Some of the scenarios in which you can use this node are as follows:
- To determine if the value provided by a customer to a user property (for example, account ID) matches that in their profile.
To perform a calculation based on a value provided by a customer and use the calculated result elsewhere in the bot. This can be achieved by using setResult() in the script.
Example
Suppose that a node prompts a customer to enter the amount that they want to borrow for a loan. You can use the Script node to calculate the interest for that amount based on your rate of interest. In addition, you can display the result of the Script node to the customer by using a different node in the same bot.
If you want to display the result of the Script node elsewhere in the bot:
- Enter setResult() at the end of your script.
- In the node where you want to display the result, enter @ to reference the name of the Script node.
- If the name of the Script node contains dots or spaces, you must replace them with underscores when referencing the name in the target node. For example, if the name of the Script node is Verify ZIP.Code, enter the following syntax when referencing it in the target node: @verify_zip_code
Designing the Script Node
To design the Script node:
- In the Script Node section, click Open the script editor.
The Editor window appears. Enter the script.
Enter
next();where you want your script node execution to end.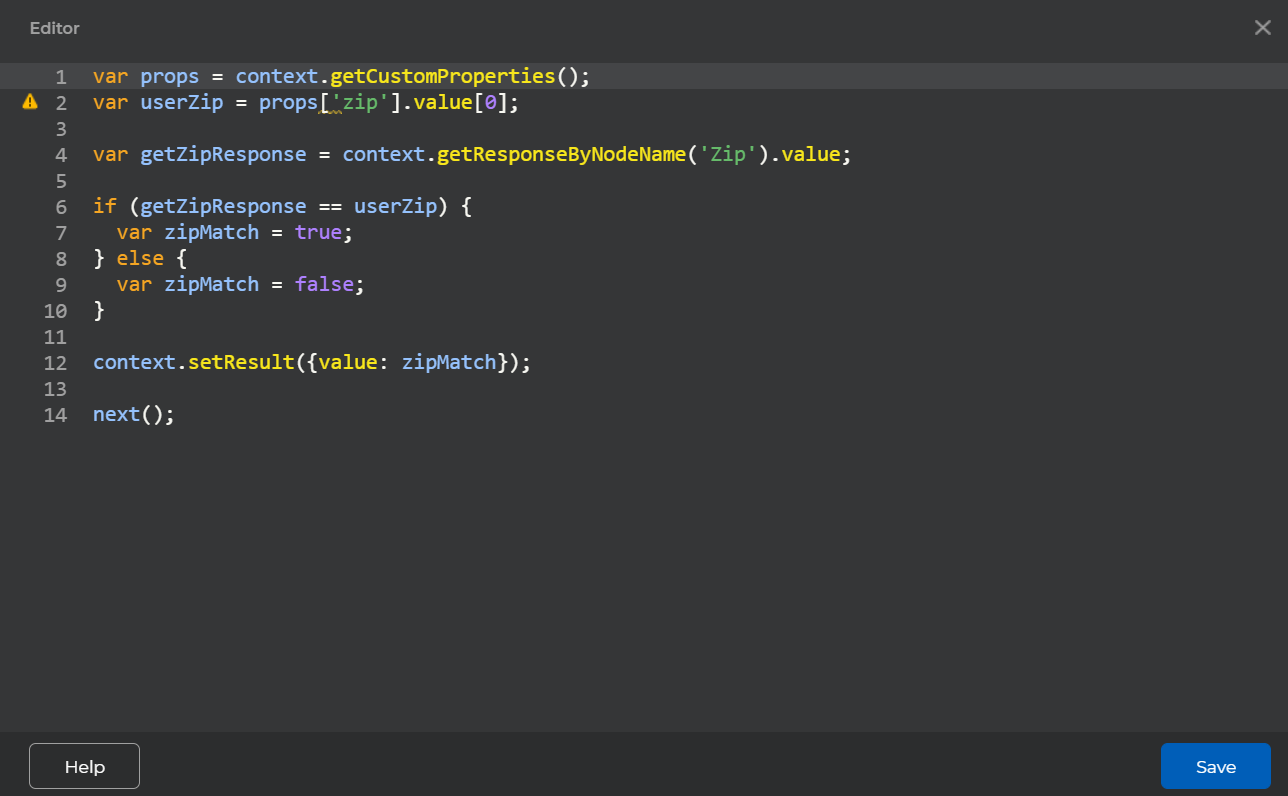
- Click Save.
The script appears in the Script node field. - If you want the script to run on the server, enable the Run on server option.
Example
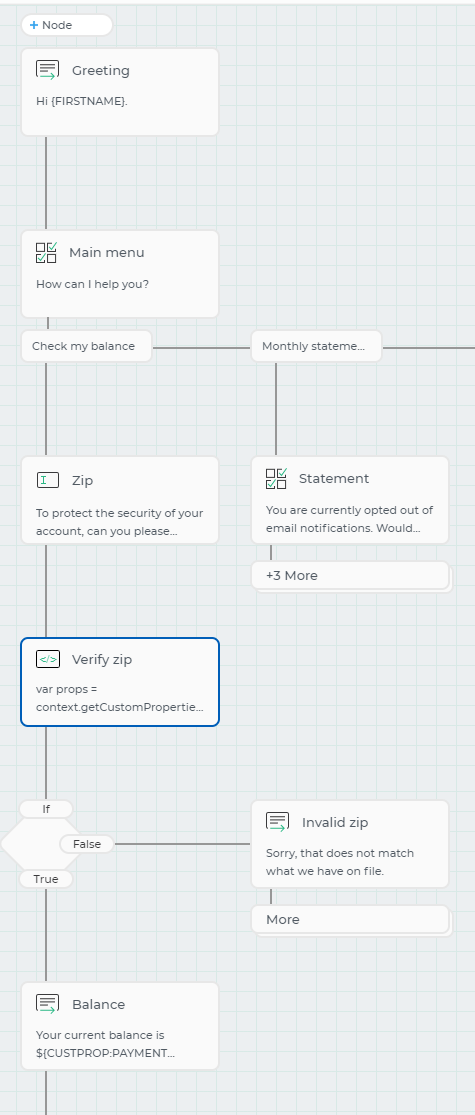
In the following bot, the Script node (Verify zip) is used to check if the ZIP Code provided by the customer in response to the Free Text Reply node (Zip) matches the ZIP Code that is saved on the customer's profile. If the codes match, the Conditional Logic node directs the customer to the No Reply node (Balance), which displays the balance of the customer.