Download PDF
Download page Navigating the Campaigns Editor.
Navigating the Campaigns Editor
The Campaigns editor lets you upload and manage campaigns, and modify the scope of campaigns displayed on this page.
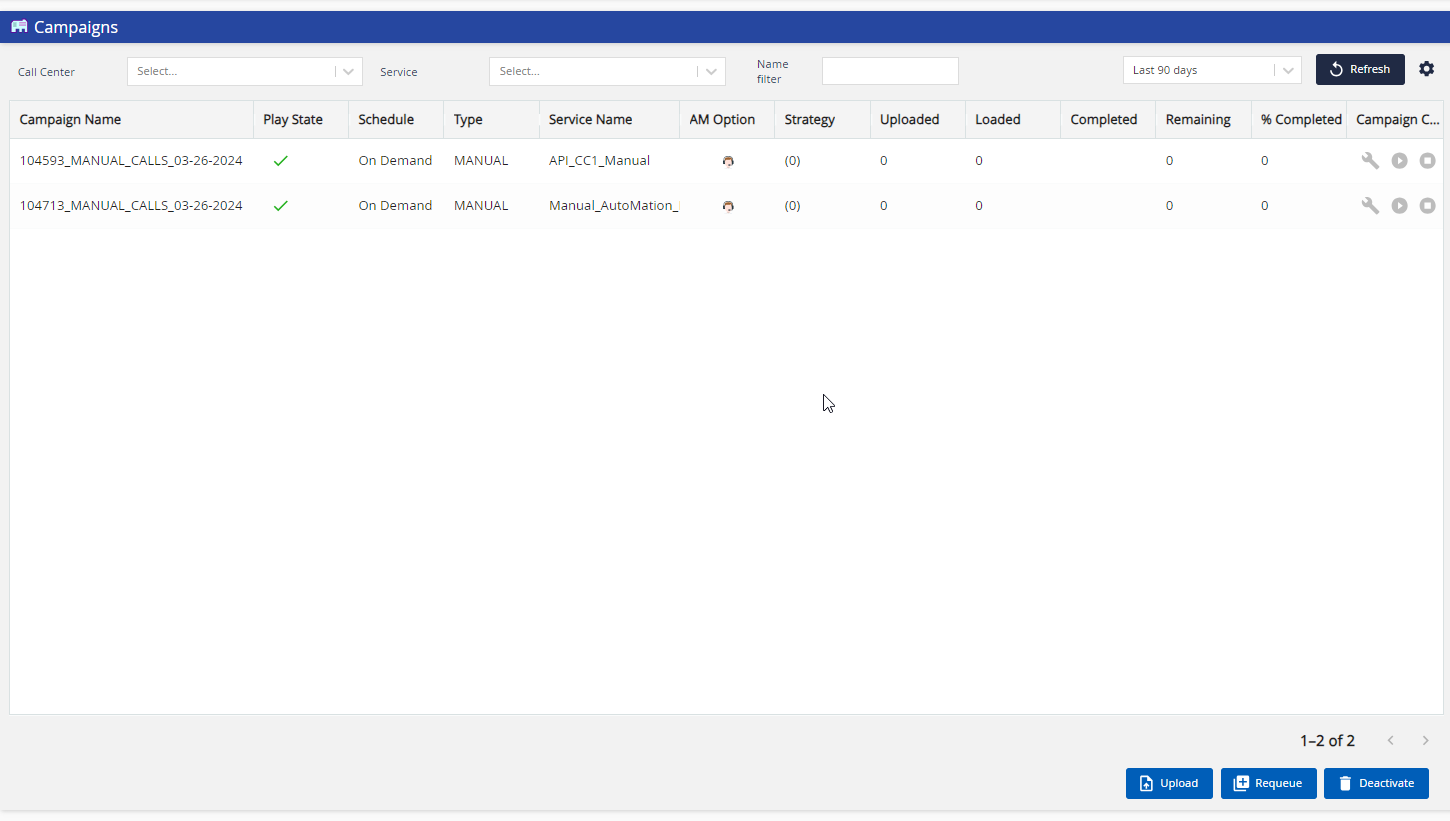
The following table describes the fields and columns that appear on the Campaigns window when working with campaigns.
| Column | Description |
|---|---|
| Campaign Name | Name of the uploaded campaign file. |
| Play State | Status of the campaign, such as Ready to build, Ready, Playing, Paused, Done, Reported, and Deactivated. To know what the symbol that appears in this column indicates, hover over it. |
Schedule | Type of schedule (that is, on-demand or scheduled) for running the campaign. |
| Type | Type of service for the campaign. |
| Campaign ID | A unique ID is automatically assigned to the campaign. |
| Call Center | The call center associated with the service. |
| Service Name | The service associated with the campaign. |
| Service ID | The service ID associated with the campaign. |
| Voice | Voice assigned to the campaign. |
| AM Option | The answering machine option for the campaign, such as Don't Leave Messages, Leave Messages, and Transfer all Connections. To know what the symbol that appears in this column indicates, hover over it. |
| Strategy | Strategy to contact the numbers in the campaign. |
Uploaded | Count of contacts in the campaign. |
| Loaded | Count of contacts whose numbers are to be contacted. Depending on the value in the Scrub column, the value in this column is either the same as that in the Uploaded column or less than that in the Uploaded column. |
| Completed | Count of contacts whose numbers are contacted. |
Remaining | Count of contacts whose numbers are remaining to be contacted.
|
| % Completed | Percentage of contacts whose phone numbers are contacted. |
| Date Modified | The date when the campaign was last modified. |
| Uploaded Date | The date when the campaign was uploaded. |
| Built Date | The date when the campaign was built. |
| Allow Append | Indicates if contacts are inserted through the campaign APIs. |
| Actual Start Time | Date and time when the campaign begins to run. |
| Actual End Time | Date and time when the campaign ends. |
Control | Contains the following icons to build, play, pause, or stop campaigns:
|
Scrub | Communication mode for which the phone numbers in the campaign are scrubbed. |
- Uploaded - Total number of contacts uploaded in the original campaign and all contacts that are appended in the campaign.
- Loaded - Total number of valid contacts in the original campaign and all contacts that are appended in the campaign.
- Completed - The number of contacts that have completed dialing.
- Remaining - The number of contacts that are yet to be dialed.
- %Completed - The percentage of contacts that have completed dialing.
- Loaded and Uploaded values are updated regardless of the campaign is playing or not.
- Timezone Breakdown for the campaign is also updated under the campaign's General tab.
Configuring the Display
- To configure the Campaigns table display, click the cog icon at the top right of the panel.
- The Customize Columns window appears. In the Customize Campaigns grid tab, you can choose the fields you want to be visible in the Campaigns table.
- To modify the order in which fields are displayed, click and select a field. Use the Move Up and Move Down buttons to organize the fields as desired.
- To configure the sort order of campaigns in the Campaigns table, choose a field from the Sort Order drop-down menu that campaigns must be sorted by (in descending order). If you prefer ascending order, click the Ascending check box next to the dropdown menu.
- To view the Campaigns in Hierarchal mode, select the Show Hierarchal Mode checkbox in the Tree View Option tab.
Click Ok to save the configuration.
To reset the campaigns grid to the default display configuration, click your profile picture icon at the top right of the screen. Select the GUI Settings option from the drop-down menu and then click the Reset GUI Settings button from the GUI Settings screen. Refresh your browser to finish resetting the display.
Filtering Campaigns
You can filter the campaigns using the display range dropdown that contains the following options:
- Today's Active: Displays all campaigns that are active on the current day
- Today's: A default option, which displays all campaigns uploaded on the current day
- Today's Unassigned: Displays all unassigned campaigns uploaded on the current day
- Last 7 days: Displays all campaigns uploaded in the last seven days
- Last 30 days: Displays all campaigns uploaded in the last 30 days
- Last 90 days: Displays all campaigns uploaded in the last 90 days
- Tomorrow's: Displays all campaigns that are scheduled to run the next day
Use the Call Center and Service dropdown options to filter the displayed campaigns by the selected values.
- To refresh the table, click Refresh.
- If more than 10 campaigns are present in the table, the Name search box appears. You can search for a campaign based on its name by entering at least the first three characters of the name in the search box.