Download PDF
Download page Examples of Basic Contact Flows.
Examples of Basic Contact Flows
This section includes instructions to help you create your first basic contact flows. Start with the Unattended Contact Flow before proceeding to the Attended Contact Flow.
Unattended Contact Flow
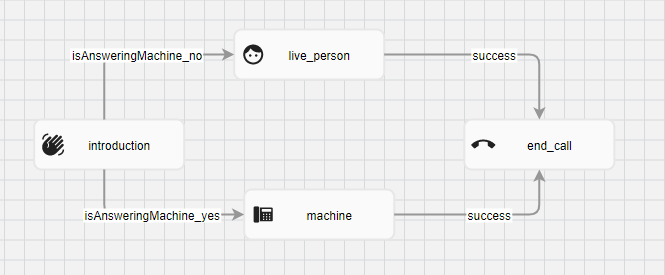
This contact flow dials a customer, performs answering machine detection (AMD), and routes to a message depending on the outcome. The contact flow created here could be applied to a message-blasting campaign where no agents sign in and no IVR navigation is needed. These instructions introduce Connectors, simple Modules, and the process of creating a contact flow. The end contact flow will look like this:
- Access
- Open the Contact Flow Engine from the Configure tab within the Messaging section. If this tool is not visible you do not have the correct User access - contact your administrator if this is in error.
- Create a Completely New Contact Flow
- Click Add.
- Assign the name "Basic Unattended".
- Select OK.
- First Module:
- Add the introduction module from the Basic module pane by dragging it into the canvas (dotted field). This module is where Answering Machine Detection occurs.
- Name the module "Intro".
- Make sure there is a check in the "Is First Module?" box.
- Select OK.
- Second Module:
- Add the live_person module to the canvas. This is used if a live person is detected. Position the module below the Intro module.
- The phrases (pieces of audio or TTS played to customer) and options in the "Message Properties" tab is what will be defaulted to the Messages created off this contact flow. They can be adjusted now or when you create and customize the Message.
- Name the module "Live".
- Select OK.
- Add the live_person module to the canvas. This is used if a live person is detected. Position the module below the Intro module.
- First Connector:
- Select the Connector button from the bottom left. This will open your Connector Setup screen.
- Choose Intro from the Source Module dropdown. This tells the connector where the logic flows from.
- Choose Live from the Target Module dropdown. This tells the connector where the logic flows to.
- Choose "Is Answering Machine" from the Event dropdown. This tells the connector that something happened during the Source Module that it should be aware of, in this case looking for sounds associated with an answering machine.
- The Value option will appear. The Event occurring during the Source Module will have some kind of outcome that you can select now. Because the Event was looking for an answering machine and our Target Module is Live (for live parties), select "No," as only live parties should move to the Target module at this point.
- Select "Hung Up in Opening (459)" from the Result dropdown. This tells the system what code to use in reporting if the connection is severed before completing the next module (don't listen to the full message). The next connector will set the Result if the module does complete (listens to the full message).
- Click OK.
- Reposition the modules by selecting with the mouse and dragging. Place them where you want that makes module titles and the connector labels legible.
- End Call module for Live
- Expand the "Advanced" module pane, at the bottom left, to view a larger group of modules.
- Drag the end_call module to the canvas and name "End" with an underscore between words as spaces are not allowed in module names. This module terminates the call if the customer does not hang up on their own or the prior module does not do it.
- Click OK.
- Add final connector for Live
- Select Connector, setting Live as Source and End as Target.
- Set the Event as Success and the Result as "Listened (316)". When a customer successfully listens to the entire message the system will assign the Listened code.
- Click OK, wrapping up the Live side of the contact flow.
- Add an Answering Machine module
- Drag the machine module near the intro module already part of your contact flow. This module is used to set the messaging if an answering machine is detected. If the module completes (whole message played) the system code "Machine, Left Message (461)" is assigned.
- Name the module "Machine" and click OK.
- Add Answering Machine Connector
- Select Connector, setting Intro as Source and Machine as Target.
- Choose "Is Answering Machine" from the Event dropdown. This time, set the value as Yes as it is an answering machine.
- Set the Result as "Partial Message Left (315)". If the connection is lost before the AM module completes this is the result code applied.
- Add connector from Machine
- Select Connector, setting Machine as Source and End as Target.
- Choose "Success" from the Event dropdown.
- Set Result as "Machine, Left Message (461)". With the complete message left this will be the result code applied.
- Saving and enacting contact flow
- Click on the Save button, then Deploy. If there is an existing contact flow with the name you specified an error will ask you to select a different name.
- Navigate to the Message Editor tool and (following the instructions there) create a message using your new contact flow. You can customize the phrases used to have different audio applied.
- Assign this Message to an unattended service, load a test file, and evaluate the outcome. Adjust the Message as desired.
Attended Contact Flow
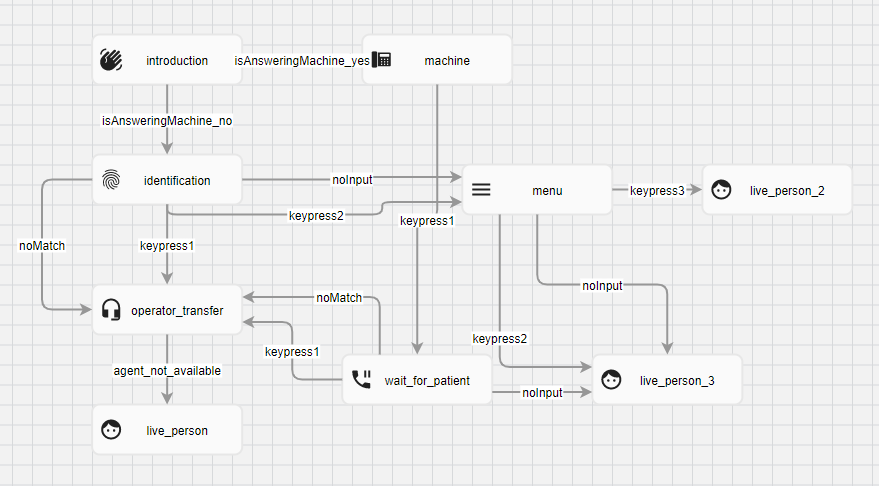
This contact flow dials a customer and asks for input confirming identity, then branches based on their keypress response. Depending on customer selection the call will jump into a "wait" loop, play one of two messages, or route from the IVR to an agent signed into the service. This example illustrates IVR selection branching, agent routing, and variable messaging. We will begin with the Basic Unattended contact flow we created as the starting point. Your final product will look something like this:
- Create a contact flow from the existing contact flow:
- Navigate to the Basic Unattended contact flow you created in the Contact Flow Engine.
- Click the Copy icon to create a clone of this contact flow to manipulate and build on.
- Assign the New Contact Flow Name “Basic Attended.”
- Give the New Contact Flow Description “Outbound IVR with branching logic.”
- Hit Copy and you will receive a message saying the clone was successful.
- Remove unneeded modules/connectors:
- Select the End_Live and Live modules and click the Delete Module(s)/Connector(s) button. This removes the modules and attached connectors while other modules remain intact.
- ID Confirmation Module and connector:
- Drag the identification module to the field, naming it “ID_Check”. View the Message Properties tab to see what phrase will play and the outcomes the customer is encouraged to select – 1 if they are the correct party, 2 if they are not.
- Click OK to add the module.
- Select Connector, setting Intro as Source and ID_Check as Target.
- Choose “Is Answering Machine” from the Event dropdown and Value toggle of “No”.
- Set Result of “Hung up in opening (459)”.
- Click OK.
- Right Party Selection - If the customer indicated they are the customer, or enters an invalid key, we want an agent to handle the call:
- Drag the operator_transfer module to the field, naming it “Agent_transfer”. With this module, the system will attempt to bridge to an agent. Click OK.
- Connector: ID_Check -> Agent_Transfer
- Event “Key Press,” Value= “1”. This means that if in the Source module (ID_Check) the person hits the 1 key this connector will move them to the Target module (Agent_Transfer).
- Result “Operator Transfer (476)”
- Connector: ID_Check -> Agent_Transfer
- Event “No Match”. This means that if in the Source module (ID_Check) the person hits a key that isn’t defined by another connector it will move them to the Target module (Agent_Transfer). This and the No Input event should be applied in all menu key press situations.
- Result “Operator Transfer (476)”
- Connector: ID_Check ->Machine
- Event “No Input”. This means that if in the Source module (ID_Check) if no key presses are entered, the call will move to the Machine message.
- Result “Listened (316)”
- Agent Unavailability Message – if the customer waits on hold until the service’s Max Wait time they will receive a message if supplied:
- Drag the live_person module to the canvas, name “Agent_Unavailable,” and click OK.
- Connector: Agent_Transfer -> Agent_Unavailable
- Event “Agent Not Available”
- Result “Operator Transfer (Abandoned Max Hold Time) (277)”
- Wrong Party Routing – if the customer indicates they are not who you are looking for, the IVR will route based on key press (defined by Connectors). In this example we will use options key 1 (wait for the right person), key 2 (the right person isn’t there), key 3 (wrong number), invalid key, or no input:
- Drag a menu module to the canvas and name it “Alternate_Party_Menu”. Position the module to the right of Agent_Transfer. Here your messaging will give the customer information on which key to press to proceed.
- Connector: ID_Check -> Alternate_Party_Menu
- Customers get to this step when they select 2 from the ID_Check (indicating they weren’t the right person).
- Event “Key Press,” Value = “2”
- Result “Hung Up After Validation (1032)”
- Wait for the right party (key 1):
- Drag wait_for_patient to canvas, name “Wait_for_Customer,” and click Ok. In the Message Properties tab, you can set the language for the “Wait” message and the number of times it will play the message waiting for the customer.
- Connector: Alternate_Party_Menu -> Wait_for_Customer
- To enter the wait loop the customer will select key 1.
- Event “Key Press,” Value = “1”
- Result “Disconnected (Timed Out During Validation) (1031)”
- Connector: Wait_for_Customer -> Agent_Transfer
- To EXIT the wait loop the customer will select key 1.
- Event “Key Press,” Value = “1”
- Result “Operator Transfer (Caller Abandoned Before Connect) (280)”
- Connector: Wait_for_Customer -> Agent Transfer
- To EXIT the wait loop the customer may enter an invalid key.
- Event “No Match”
- Result “Operator Transfer (Unidentified) (639)”
- Drag live_person module to the canvas below Wait_for_Customer, the name “Not_Available_Message”. Add default messaging a spouse or other person answering the customer’s phone should hear.
- Connector: Wait_for_Customer -> Not_Available_Message
- The IVR exits when the Wait message loops out.
- Event “No Input”
- Result “Customer Not Available (318)”
- Route to message if alternate party presses key 2 (the right person isn’t there):
- Connector: Alternate_Party_Menu -> Not_Available_Message
- Event “Key Press,” Value = “2”
- Result “Customer Not Available (318)”
- Connector: Alternate_Party_Menu -> Not_Available_Message
- Create and route to message if alternate party presses key 3 (wrong number):
- Drag the live_person module to the canvas below Alternate_Party_Menu, the name “Wrong_Party_Message”. Add the default messaging a wrong number dialed should hear.
- Connector: Alternate_Party_Menu -> Wrong_Party_Message
- Event “Key Press,” Value = “3”
- Result “Call Recipient Says Wrong Number (498)”
- Route to the agent if alternate party presses invalid key:
- Connector: Alternate_Party_Menu -> Agent_Transfer
- Event “No Match”
- Result “Operator Transfer (Caller Abandoned Before Connect) (280)”
- Connector: Alternate_Party_Menu -> Agent_Transfer
- Route to message if alternate party presses no key:
- Connector: Alternate_Party_Menu -> Not_Available_Message
- Event “No Input”
- Result “Customer Not Available (318)”
- Connector: Alternate_Party_Menu -> Not_Available_Message
- Saving and enacting contact flow
- Click on the Save button, then Deploy.
- Navigate to the Message Editor tool and (following the instructions there) create a message using your new contact flow. You can customize the phrases used to have different audio applied.
- Assign this Message to an attended service, load a test file, login as an agent, and evaluate the outcome. Adjust the Message as desired.
Basic Inbound Contact Flow
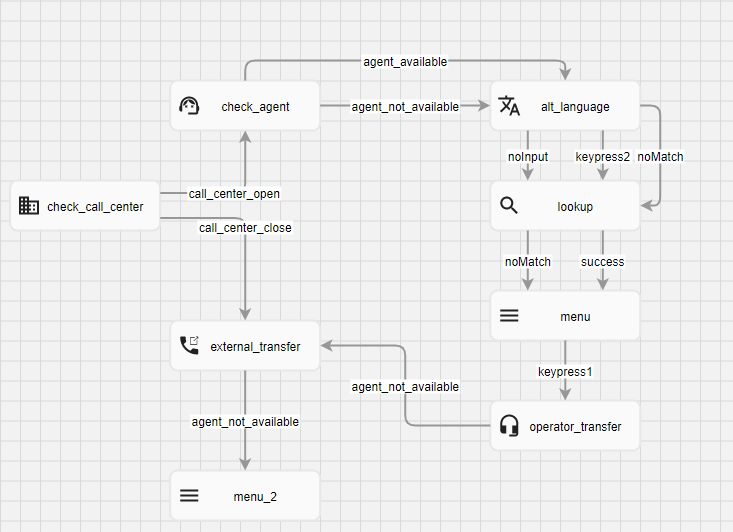
This contact flow directs the routing of customer calls through an inbound IVR. A customer’s call will undergo a series of condition checks. If the call occurs outside of open hours, or if there are no agents signed in, the call will be transferred to a voicemail number. During open hours callers will be prompted for language selection, hear messaging, and be connected to available agents. The following directions outline the creation of the default inbound contact flow seen in the diagram below:
- Access
- Open the Contact Flow Engine from the Configure tab within the Messaging section. If this tool is not visible you do not have the correct User access - contact your administrator if this is in error.
- Create a New Contact Flow
- Click Add.
- Assign a name, “Basic Inbound.”
- Select OK.
- First Module:
- Add the check_call_center module from the Advanced modules pane by dragging it into the canvas. This module is where Inbound Hours for the inbound service are checked to determine if the call is taking place during the defined Inbound Hours.
- Name the module “InboundHours.”
- Make sure there is a check in the “Is First Module?” box.
- Select OK.
- Second Module:
- Add the check_agent module from the “Advanced” modules into the canvas. This is used to determine whether agents are logged in or not.
- Name the module “AgentAvailability.”
- Select OK.
- First Connector:
- Select the Connector button from the bottom left.
- Choose InboundHours from the Source Module dropdown. This tells the connector where the logic flows from.
- Choose AgentAvailability from the Target Module dropdown. This tells the connector where the logic flows to.
- Choose “Call Center Open” from the Event dropdown.
- Select Hung Up in Opening (459) from the Result dropdown.
- Select OK.
- Third Module:
- Add the alt_language module from the Advanced modules into the canvas. This is used to provide an alternate language choice to the caller, usually Spanish however the language/voice talent can be selected in the message property portion of this module. Generally, the default_language is set to “Julie" which is the American English female voice talent and the alt_language is set to "Juanita" which is the Spanish female voice talent.
- Name the module “alt_language.”
- Select OK.
- Second and Third Connectors:
- Select the Connector button.
- Choose AgentAvailability from the Source Module dropdown.
- Choose alt_language from the Target Module dropdown.
- Choose “Agent Available” from the Event dropdown.
- Select Hung Up in Opening (459) from the Result dropdown.
- Select OK.
- Repeat this process for the third connector changing the Event to “Agent Not Available”
- Select OK.
- Fourth Module:
- Add the lookup module from the Advanced modules into the canvas. This is used to retrieve stored information about the telephone number.
- Input list of service ids to be used for lookup.
- Name the module “ani_lookup.”
- Select OK.
- Fourth, Fifth, and Sixth Connectors:
- Select the Connector button.
- Choose alt_language from the Source Module dropdown.
- Choose ani_lookup from the Target Module dropdown.
- Choose “Key Press” from the Event dropdown.
- Manually key “2” into the Value text box.
- Select Hung Up in Opening (459) from the Result dropdown.
- Select OK.
- Repeat steps a-c.
- Choose “No Input” from the Event dropdown.
- Again select Hung Up in Opening (459) from the Result dropdown.
- Select OK.
- Again repeat steps a-c.
- Choose “No Match” from the Event dropdown.
- Again select Hung Up in Opening (459) from the Result dropdown.
- Select OK.
- Fifth Module:
- Add the menu module from the Basic modules into the canvas. This type of module can be used in a variety of ways usually involving choices and key presses, but in this case, it will be used to store the welcome phrases.
- Name the module “welcome_message.”
- Select OK.
- Seventh and Eighth Connectors:
- Select the Connector button.
- Choose ani_lookup from the Source Module dropdown.
- Choose welcome_message from the Target Module dropdown.
- Choose “Success” from the Event dropdown.
- Select Hung Up in Opening (459) from the Result dropdown.
- Select OK.
- Repeat steps a-e changing the Event to “Failure”
- Select OK.
- Sixth Module:
- Add the operator_transfer module from the Basic modules into the canvas. This module is used for messaging and actions related to operator transfer.
- Name the module “operator_transfer.”
- Select OK.
- Ninth, Tenth, and Eleventh Connectors:
- Select the Connector button.
- Choose welcome_message from the Source Module dropdown.
- Choose operator_transfer from the Target Module dropdown.
- Choose “Key Press” from the Event dropdown.
- Manually key “1” into the Value text box.
- Select Operator Transfer (476) from the Result dropdown.
- Select OK.
- Repeat steps a-c.
- Choose “No Input” from the Event dropdown.
- Again select Operator Transfer (476) from the Result dropdown.
- Select OK.
- Again repeat steps a-c.
- Choose “No Match” from the Event dropdown.
- Again select Operator Transfer (476) from the Result dropdown.
- Select OK.
- Seventh Module:
- Add the external_transfer module from the Basic modules into the canvas. This module is used for transfers external of LiveVox, such as voicemail.
- Name the module “VoicemailTransfer.”
- Select OK.
- Twelfth, Thirteenth, and Fourteenth Connectors:
- Select the Connector button.
- Choose InboundHours from the Source Module dropdown.
- Choose VoicemailTransfer from the Target Module dropdown.
- Choose “Call Center Close” from the Event dropdown.
- Select Hung Up in Opening (459) from the Result dropdown.
- Select OK.
- Select the Connector button.
- Choose AgentAvailability from the Source Module dropdown.
- Choose VoicemailTransfer from the Target Module dropdown.
- Choose “Agent Not Logged In” from the Event dropdown.
- Select Hung Up in Opening (459) from the Result dropdown.
- Select OK.
- Select the Connector button.
- Choose operator_transfer from the Source Module dropdown.
- Choose VoicemailTransfer from the Target Module dropdown.
- Choose “Agent Not Available” from the Event dropdown.
- Select Operator Transfer Failed (No Agent Available) (768) from the Result dropdown.
- Select OK.
- Eighth Module:
- Add the menu module once again from the Basic modules into the canvas.
- Name the module ”operator_no_answer.”
- Select OK.
- Fifteenth Connector:
- Select the Connector button.
- Choose VoicemailTransfer from the Source Module dropdown.
- Choose operator_no_answer from the Target Module dropdown.
- Choose “Agent Not Available” from the Event dropdown.
- Select Operator Transfer Failed (No Answer) (283) from the Result dropdown.
- Select OK.
- Saving and enacting contact flow
- Click on the Save button, then Deploy.
- Navigate to the Message Editor tool and create a message using your new Contact Flow.
- Assign the message to an existing inbound service and dial the inbound number for testing. Adjust the Message as desired.
- You will need to contact the LiveVox Customer Care Team to procure a telephone number for any new inbound services.