Download PDF
Download page Agent Desktop: Desktop Native Tab.
Agent Desktop: Desktop Native Tab
The Desktop Native tab enables you to configure the Agent Desktop Native (ADN) application and screen recording. These options enable the full screen of an agent to be recorded. For more information on ADN, see Agent Desktop Native Installation the infosheet.
To access the Desktop Native tab, navigate to Configure > Agents > Agent Desktop >Add/Edit Agent Desktop> Desktop Native tab on LiveVox Portal.
Configuring ADN and Screen Recording Settings
To configure the settings for the Agent Desktop Native (ADN) application and screen recording:
On the Configure tab, go to Agents > Agent Desktop, and configure the following options on the Desktop Native tab:
| Section | Field | Description |
|---|---|---|
| Settings | Native Mode | Allows you to set the native desktop mode from the available drop-down options. Available options are:
|
| Update Strategy | Allows you to configure the native desktop update strategy. Available options are:
| |
| Whitelist Addresses | Allows you to define trusted domains. This mechanism allows blocking of all loading resources which do not match the whitelists. Click the link to open the Whitelist addresses configuration interface that allows you to view and manage the list of all the approved addresses for the Desktop Native application.
| |
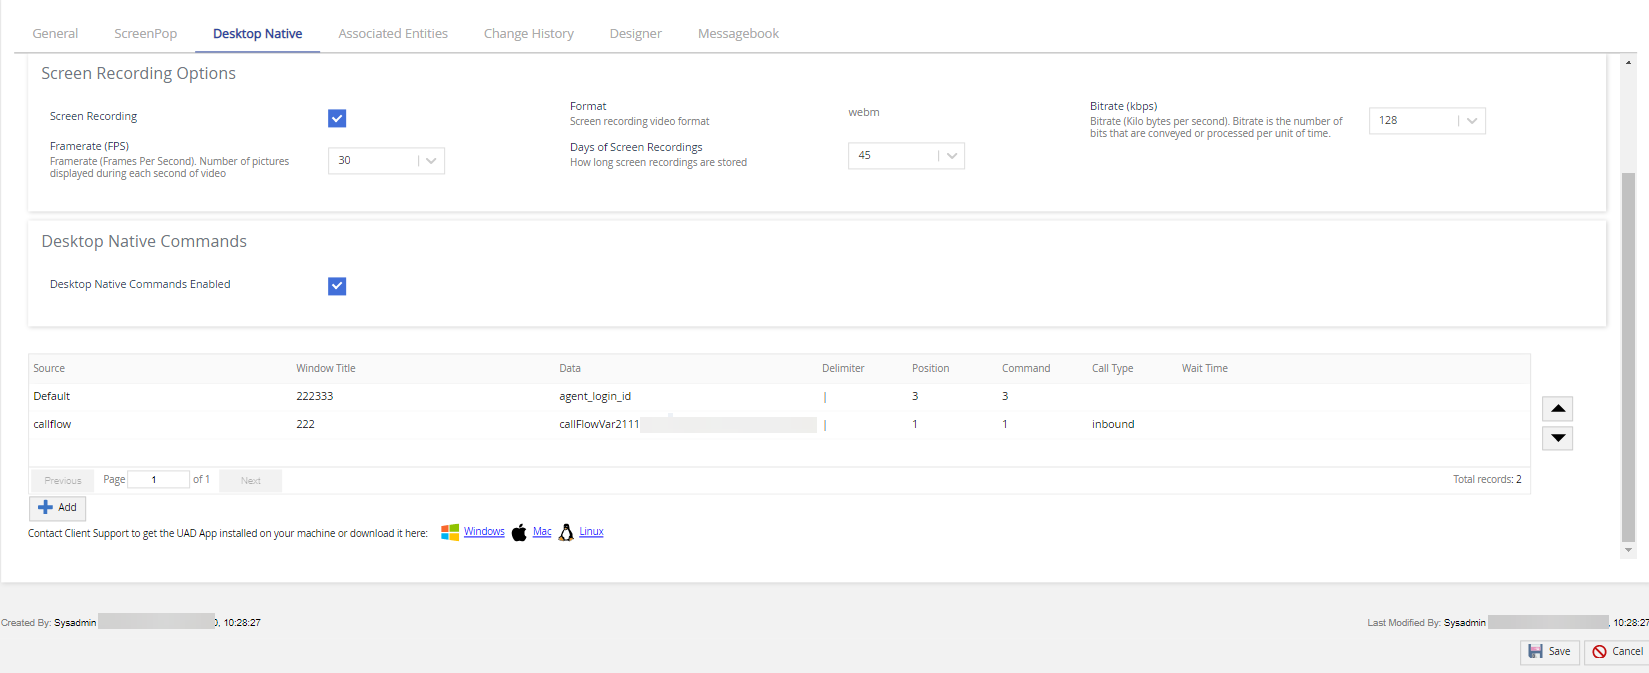
Screen Recording Options This section will be displayed only if agent screen recording is enabled internally by LiveVox. | Screen Recording Enabled | Allows the agents to record their full screen. |
| Format | The screen recording video format is WebM. | |
| Bitrate (kbps) | Allows you to set the number of bits that are conveyed per unit of time (kilobytes per second) for the screen recording video. The available options are 128 (Default value), 256, 512, and 1024. | |
| Framerate (FPS) | Allows you to set the number of frames displayed per second for a video. The available options are 10, 20, and 30 (Default value). | |
| Days of Screen Recordings | Allows you to configure the number of days the screen recordings are hosted on the platform. The available options are 3, 15 (Default value), 30, 45, 60, 90, and 180 days. |
- The Agent Screen Recording feature comes at an additional cost. Contact your Account team to enable this feature.
- The screen recording functionality requires Agent Desktop Native.
Desktop Native Commands
The Desktop Native Commands feature provides the ability to setup .Net and URL push. Once enabled, you can add, update, delete, move up, and move down the data entry.
Adding an Entry
To add new desktop native commands:
Click the Add button to add an entry.
The Add Entry pop-up appears: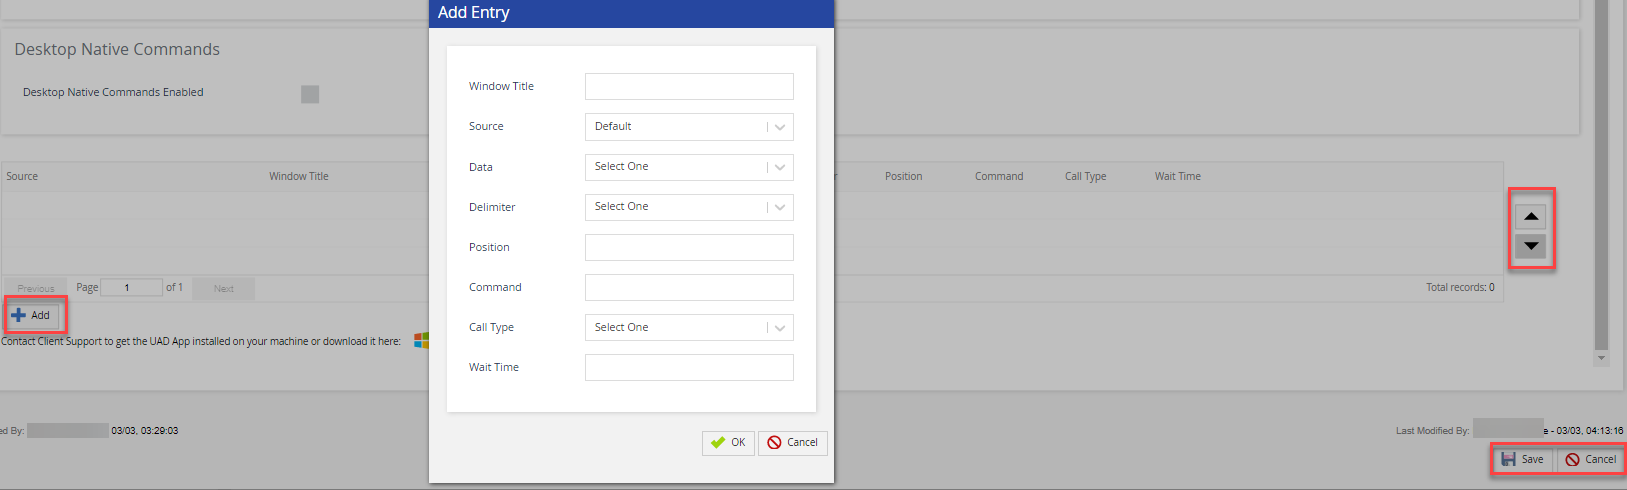
When adding a new entry, you are prompted to enter the following information:Field Description Window Title* Specify the window title which is the client application name. For Example, {push.txt - Notepad}. Source Select the data source option. Available options are Default, Contact, Contact Flow. If the Source is Default or Contact, fields are available in the Data drop-down (see above screenshot). If the Source is Contact Flow, you can configure the contact flow variables by clicking the link next to the Data field.
Data Select the data field from the drop-down list. Delimiter Select the value of the delimiter from the drop-down. Position Enter the position of entry. The first position begins at 0 and increments from there.

Delimiter and Position fields are applied only for custom fields.
Command Enter free-form .NET commands as a keystroke. The specified command will be applied to the Data field automatically.
Call Type Select the call type from the drop-down list and the available options are:
- Inbound
- Outbound
- Preview
If you select the Call Type as Select One, then any of the above call types is applicable.
Wait Time Enter the time in milliseconds which specifies the time to call the client application.
- Click OK to save the changes.
- Click the Save button to save the changes.
Deleting an Entry
To delete an entry:
- Select the row and click the
 (Delete) icon to delete an entry.
 - You will see that the color of the row changes to red.
- Click the Save button to save the changes.
Moving Up an Entry
To move the row up by one position:
- Select the required row and click the
 (Move Up) icon.
 - Click the Save button to save the changes.
Moving Down an Entry
To move the row down by one position:
- Select the required row, and click the
 (Move Down) icon.
 - Click the Save button to save the changes.
Modifying an Entry
- Double-click the entry which needs to be updated. The Edit Entry pop-up window appears.
- Modify the required fields. For more information about the fields, see the Adding an Entry section.
- Click OK to save the changes.
- Click the Save button.