Download PDF
Download page Review Interactions.
Review Interactions
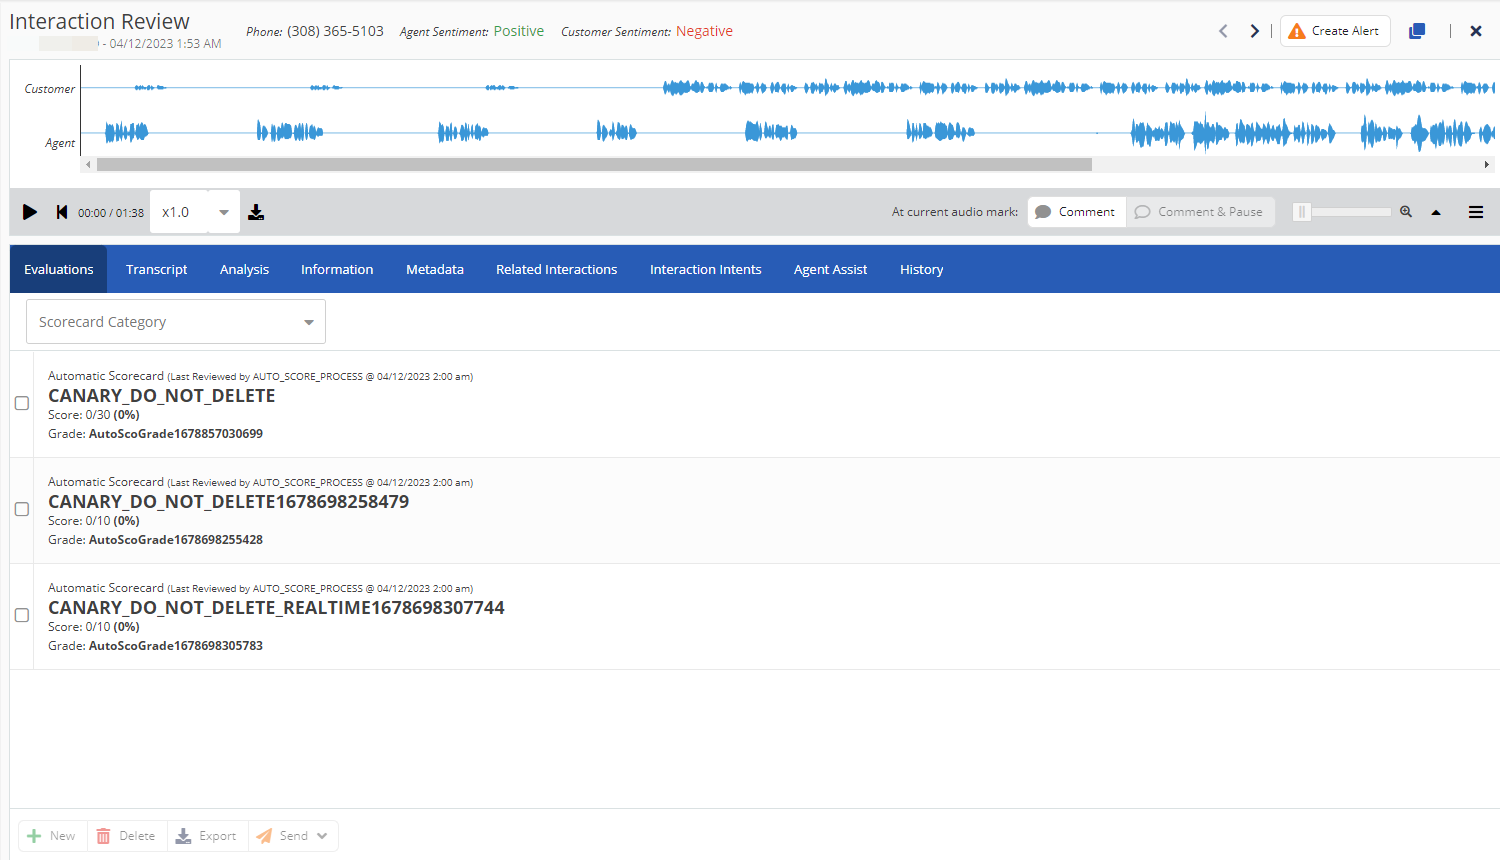
The Interaction Review screen provides comprehensive details related to the interaction such as the transcript and evaluation information. It also enables you to leave comments for other assessors, arbitrators, managers, and agents and contribute the evaluation to the e-learning library, which serves as a resource for training and quality management purposes.
For voice calls, you can listen to the call recording and also view the visualization of the selected voice interaction in a waveform.
To access the Interaction Review screen, navigate to the WFO tab, click SpeechIQ > Search and Score. On the Interactions List window, double-click the interaction that you want to review.
The Interaction Review window is displayed with detailed information about the interaction between the agent and the customer.
- You can use the forward/backward arrows (
 ) on the upper-right corner of the window to move to the next or previous recording.
 - The banner displays the name of the agent who performed the interaction with the customer, the date and time of the interaction, the phone number of the customer, the agent sentiment, and the customer sentiment.
- You can download the interaction in .mp3 format using the
 button.
 - You can download the transcript of the interaction in .pdf format. Under the Transcript tab, click
 to download the transcript.
Listening to an Audio Interaction
To listen to an audio interaction:
- On the Interaction Review screen, to listen to the recording, click
 .
.
The length of the audio is displayed next to the button. - Click
 to play the recording from the beginning.
 - You can adjust the playback speed, by clicking
 drop-down arrow, and then selecting the preferred speed. You can make the audio slower (0.50x) or faster (2.00x) as required.
 - You can download the interaction in .mp3 format using the button.
Adding Comment to an Interaction
To leave a comment to an audio interaction:
- On the Interaction Review screen, click
 . The Comment window pane is displayed.
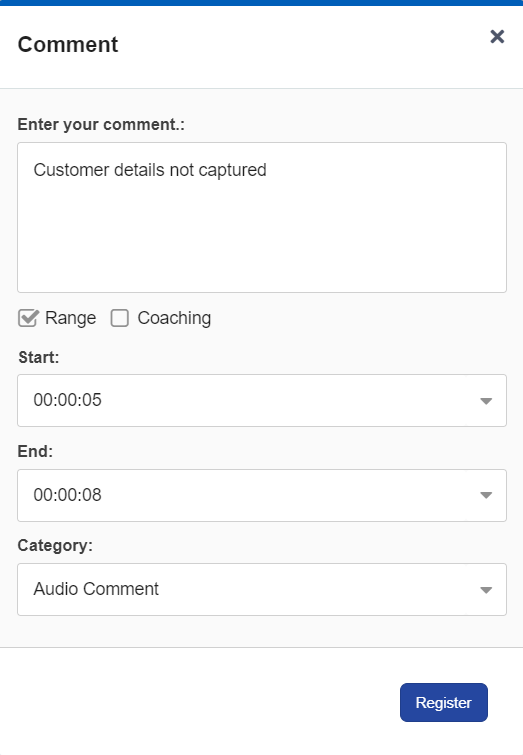
- In the Enter your comment: box, enter your comment:
- To mark a specific time range in the call to which the audio note is applicable, select the Range check box, and then select the Start time and End time.
- To use the audio note for coaching agents, select the Coaching checkbox.
- From the Category drop-down list, select an audio note category.
- Click Register.

To leave a comment without clicking the play/pause icon, when listening to the recording, use the Comment & Pause option.
Using the Actions Panel
You can use the Actions Panel to search for keywords, add tags, and view or provide audio notes. To access the Actions Panel, on the Search and Score window click ![]() .
. 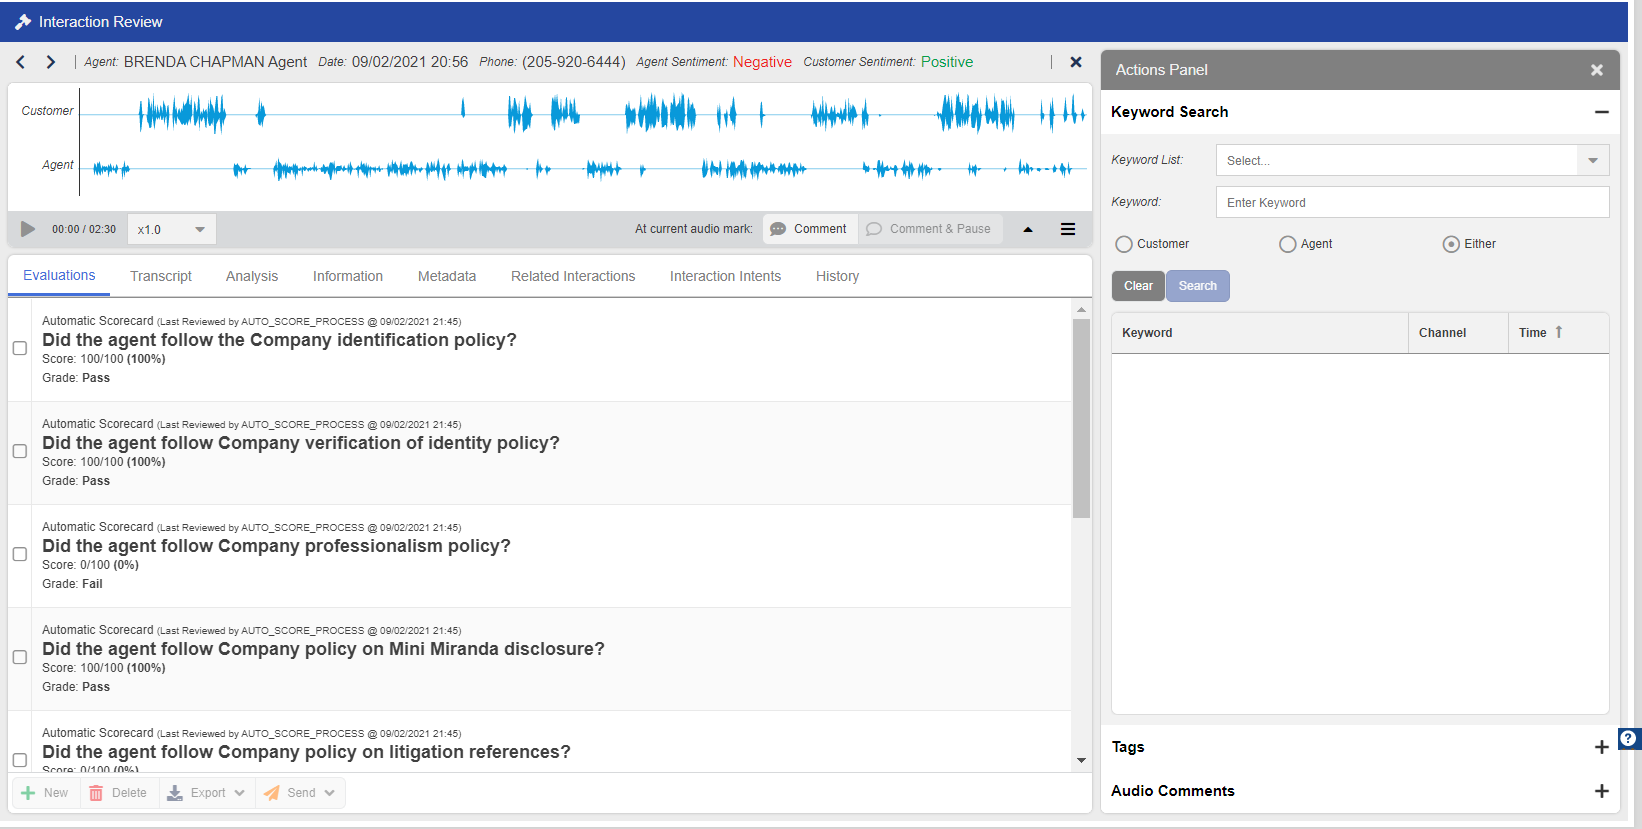
- Keyword Search: Enables you to search for keywords while listening to the call recording by typing keywords, separated by commas, or by selecting the existing keyword lists from the drop-down list. You can filter the search results by keywords used by the customer, agent, or either. You can search for any word, including the configured keywords.
If the keyword is part of the interaction, it is highlighted in the interaction along with details of the intent. A sample screenshot is shown below: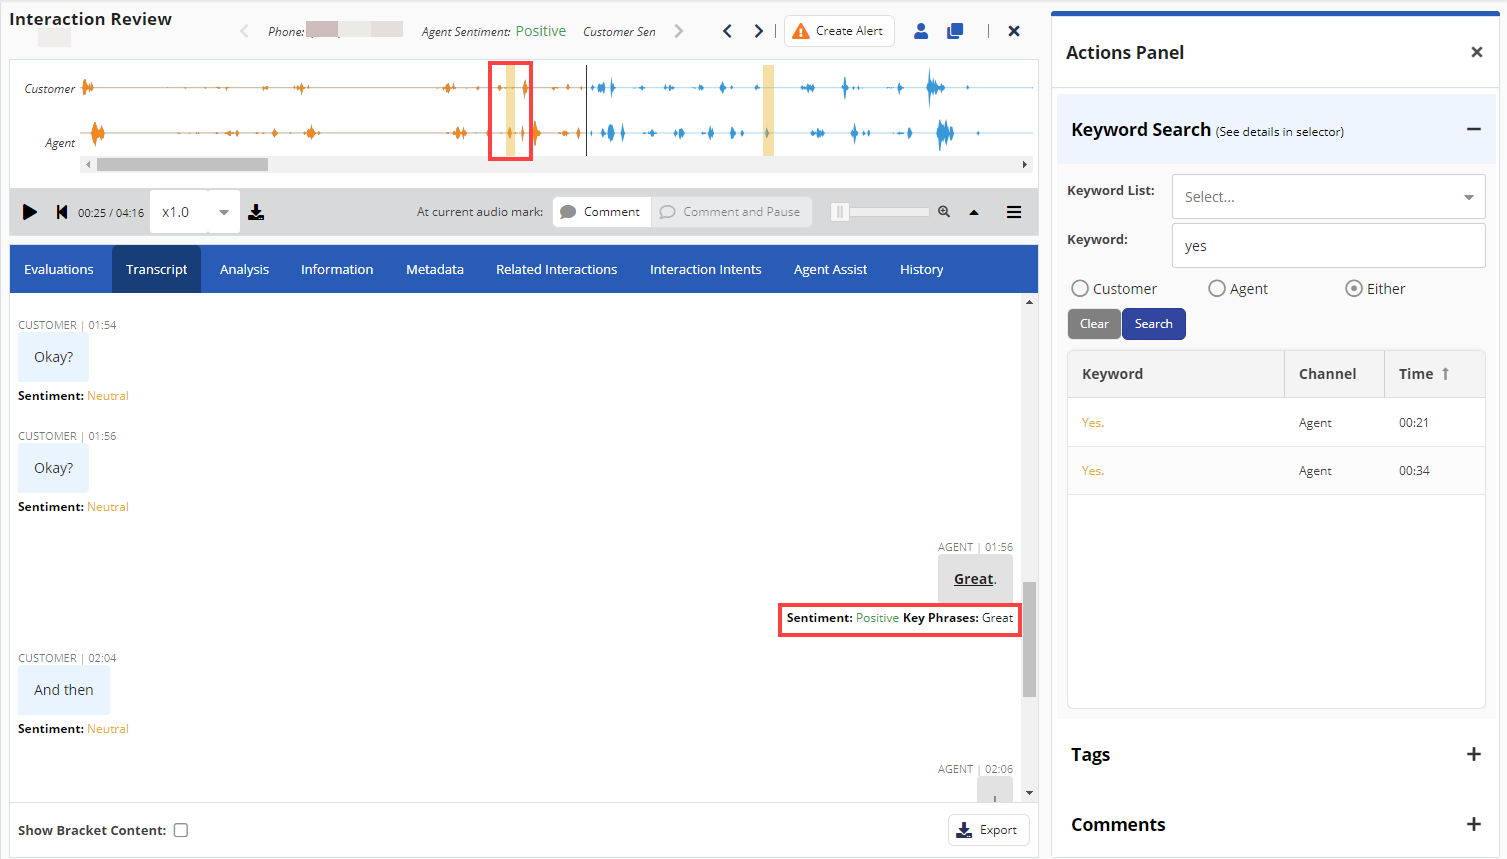
- Tags: Enables you to select tags from the drop-down list to group this interaction with related interactions.
- Audio Notes: Displays the audio notes created by all the assessors.
Interaction Review Tabs
You can view the detailed metrics and metadata related to the interaction as well as the recording using the different tabs on the Interaction Review window.
Following are the different tabs on the Interaction Review screen:
| Tab | Description |
|---|---|
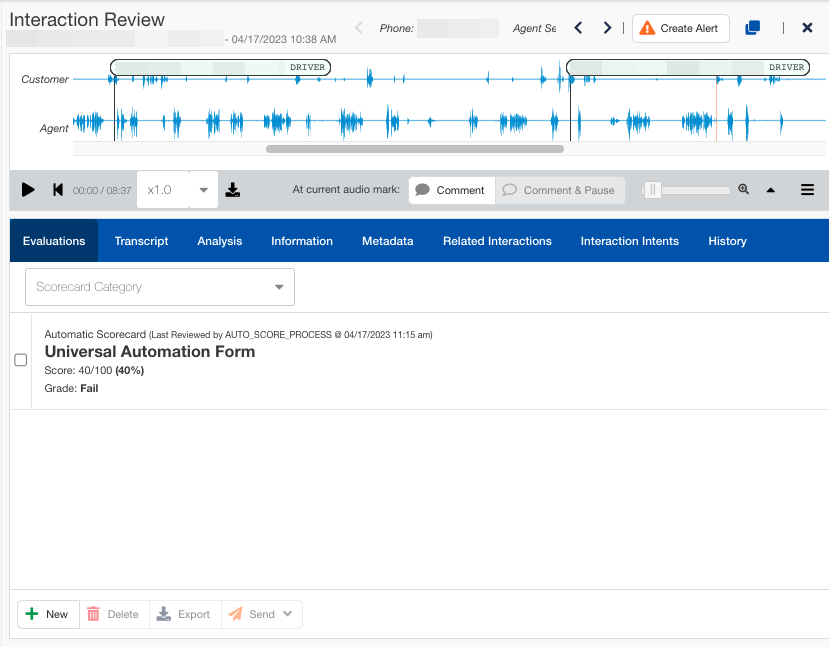
| Evaluations | Displays the evaluations provided by all assessors. The Evaluations tab is visible only if you are an assessor or an arbitrator. You can use this tab to view details of the scoring of an interaction and also score an interaction manually. |
| Transcript | Provides detailed text transcription of the voice call. |
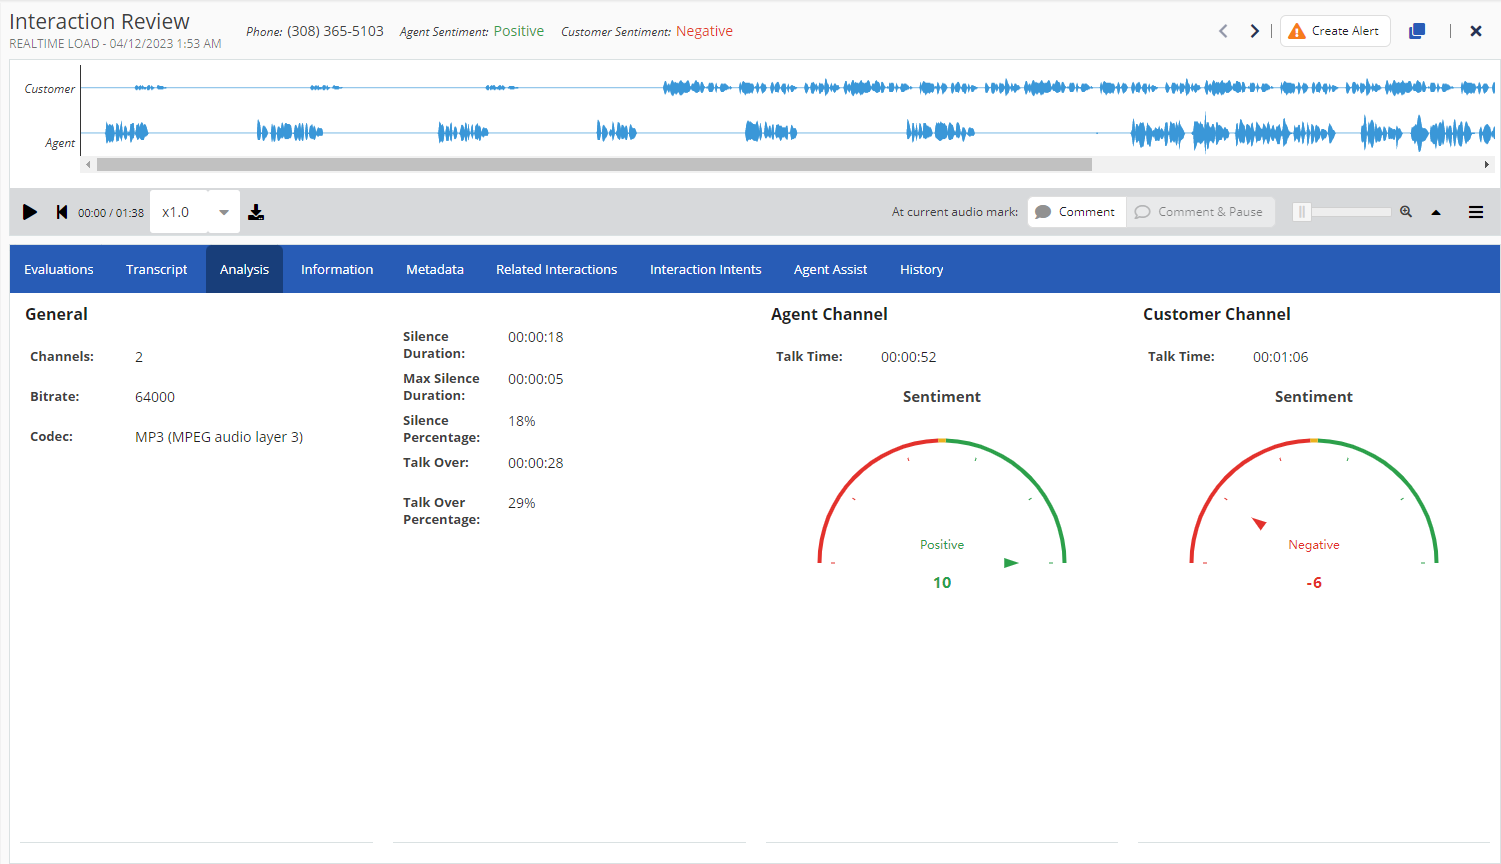
| Analysis | Provides the automatic call analysis information such as number of channels, bitrate, codec, silent duration and percentage and talk duration and percentage. Agent and customer channels are also analyzed for sentiment and talk time and are represented graphically. |
| Information | The General section displays information about the interaction. The type of information includes account, agent, campaign, call center, date, duration, interaction, language, phone, service, and skill. A skill acts as a label or category applied to interactions, enabling in their effective organization. For more information, see Skill Maintenance. |
| Metadata | Displays the metadata received with the recording and all other information related to the interaction, such as Agent Disposition, Agent Disposition ID, Call Session ID, Call Type, Campaign ID, Object ID, and Transaction ID. |
| Related Interactions | Displays the other interactions related to the recording (for example, a call recording from the same agent). The interactions related to the interaction is categorized into two categories - Related by Agent and Related by Phone Number. |
| Interaction Intents | Displays the possible call drivers populated by the system based on the configured intents or intent lists. The Name of the interaction Intent and the Driver Word details are displayed. |
| Agent Assist | Displays details of the rules applied during the interaction. Rule Name along with the Status is captured in this tab. |
| History | Displays the history of views and evaluations by all users on the interaction. |
| Video | Displays the screen recording of the interaction. This tab is active only if you have enabled screen recording. |
Manual Scoring
If you are assigned as an assessor or arbitrator, you can manually evaluate an interaction, in the Interaction Review window of SpeechIQ, by using the configured scorecards.
For information about how to assign assessors and arbitrators, see User Maintenance.
To score or evaluate an interaction:
- On the WFO tab, click SpeechIQ > Search and Score.
In the Search and Score window, double-click the interaction that you want to evaluate. The Interaction Review window appears displaying a visualization of the voice interactivity between the customer and the agent, in a waveform.
- Click on the play/pause icon (
 ) to listen to the recording.
 On the Evaluations tab, click New. A new evaluation section appears. In the Scorecard field, select a scorecard.
If the New button is inactive, go to Conversation Configuration >User Maintenance to verify that you are assigned as an Assessor or an Arbitrator. For more information about your user roles, see User Maintenance.
- Alternatively:
- Click the Filter (
 )icon.
 - Select the scorecard category from the Category drop-down list.
- Select the Show Services Assigned Only checkbox, if you want to filter the scorecards which are assigned to any service.
Click Filter.
The questions added to the selected scorecard appear.
For information about how to create a scorecard, add grades and questions to a scorecard, and assign scorecards, see Scorecards.
- Click the Filter (
- Select the required answers for the questions. The grade and score appear on the header row.
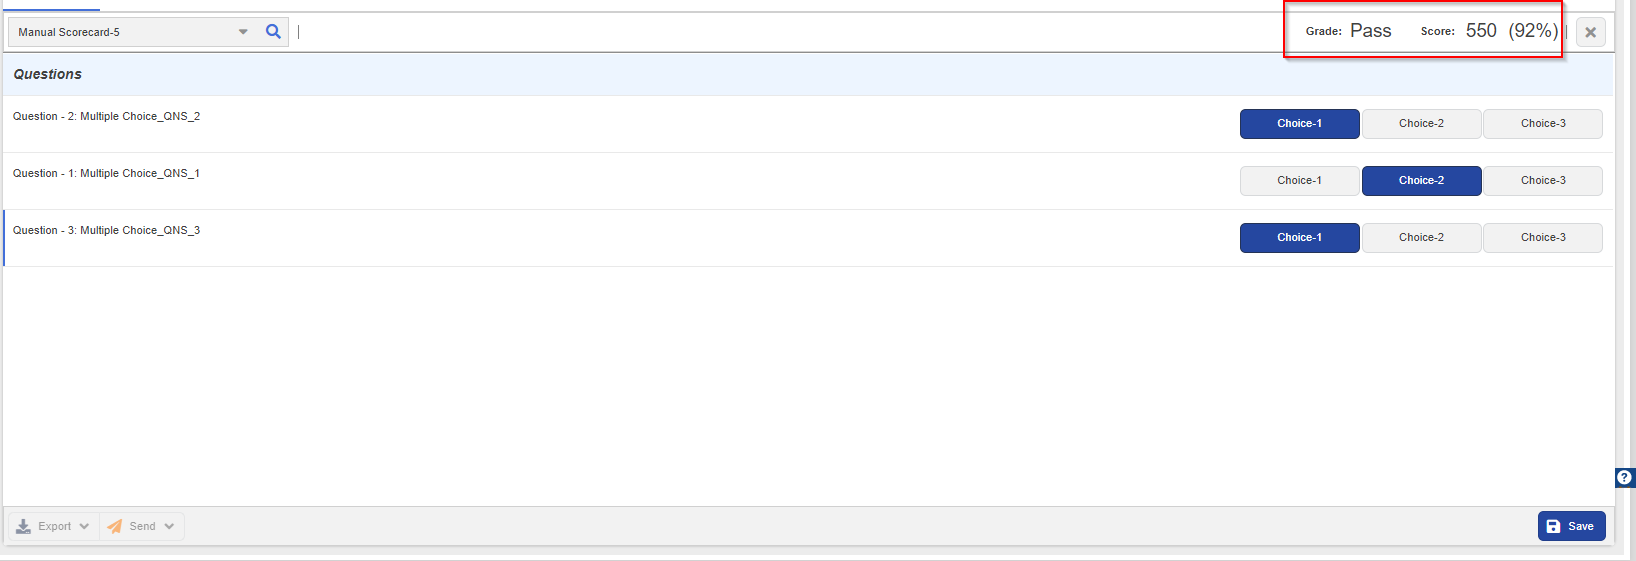
To add comments, double-click the question, and then enter comments in the Comments section.

In the General Comment and Question Comment sections, you can enter general comments related to the interaction and comments specific to the scorecard questions, respectively.
- Click Save.
Your evaluation report is added to the interaction.
- To delete an evaluation report, select the evaluation report by clicking the checkbox, and then click Delete.
- To export an evaluation report to a Microsoft Excel workbook click Export (
 ).
). - To send the evaluation report for coaching the agent:
- On the Evaluations tab, click Send.
- Select Coach Task.
- Define the priority and the due date.
- Click Create.
The learning task is assigned to the agent.
- To send the evaluation report to the e-learning library:
- On the Evaluations tab, click Send.
- Select e-Learning Library.
- Enter a name for the training.
- Select the category and the section.
- Click Create.
The learning module is added to the e-learning library.