Download PDF
Download page Creating Agent Profile.
Creating Agent Profile
For an agent to interact with customers, you must create a profile for the agent. The profile contains the following information:
- Credentials that the agent can use to log on to their Agent Desktop
- Phone number to establish an audio path
- Communication channels (for example, SMS, email, or chat), skills (for example, English or Spanish), services, and schedule assigned to the agent
To create a profile for an agent:
- On the Configure tab, go to Agents > Agents.
The Agents window appears. - On the General tab, click Add.
The Agent Details window appears.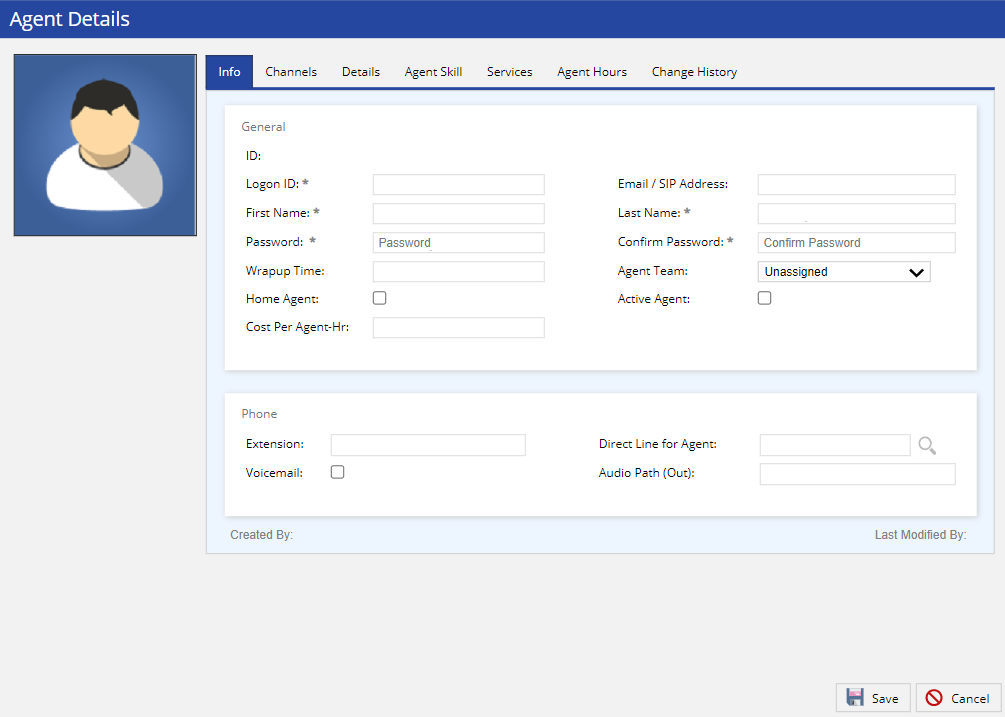
- If you want to add a profile picture for the agent:
- Hover over the avatar, and then click Change Profile Picture.
The Change Profile Picture window appears. - Select an avatar or upload an image by using the Upload a file button, and then click Save.
- Hover over the avatar, and then click Change Profile Picture.
On the Info tab, specify values in the following fields as required.
Section Field Description General Logon ID Unique name used by the agent to log on to their Agent Desktop.

- Aside from letters and numbers, you can enter an underscore (_) and a dot (.) in the field.
- Do not enter more than 20 characters in the field.
Email / SIP Address Email address or Session Initiation Protocol (SIP) address of the agent. First Name First name of the agent. Last Name Last name of the agent. Password
Password used by the agent to log on to their Agent Desktop.
Depending on the password strength set in the Password Strength field on the Security tab of the Client window, the value in this field must be a minimum of eight or 12 characters, containing at least one digit, one letter, and one special character (not required for a medium password strength). In addition, the value must not match any of the previous four passwords.
Confirm Password Value in the Password field. Wrapup Time Length of time that the agent can spend in the Wrapup state between calls. By default, this time is unlimited, which allows agents to remain in the Wrapup state until they specify a termination code.
When the defined wrapup time elapses, the agent is placed in the Not Ready state and the call is terminated with a generic Operator Transfer result.
Agent Team Team to which the agent is assigned. Home Agent Enables the agent to change the phone number when logging on to their Agent Desktop. Active Agent
Enables the agent to log on to their Agent Desktop. Cost Per Agent-Hr Hourly cost for the agent. Phone Extension Extension number of the agent extension, which are between three and seven digits.
Direct Line for Agent Inbound phone number that is used as the direct line for the agent. If the agent is a Knowledge Worker, this number acts as the agent's caller ID.
You can search for and assign an inbound number as the direct line by using
next to the field.
Voicemail Enables the voicemail option for the agent (including the option to accept or reject inbound calls) through which a caller can leave a voicemail for the agent, depending on the Contact Flow. Audio Path (Out)
Phone number to establish the audio path for the agent. This field is optional.

If the Audio Path (Out) field is not configured for agents who do not use the Call Using Computer option, they cannot log on to the Agent Desktop.
On the Channels tab, click the following icons as required:
The voice channel (
 ) is assigned to the agent by default.
- SMS Channel (
 ): Assigns the SMS channel to the agent, enabling the agent to handle SMSes from their Agent Desktop. When you click this icon, the Max SMS Threads field appears. This field indicates the number of unresolved SMS threads that the agent can handle. The default value in the field is 5. You can select any value between 1 and 10.
 - Email Channel (
 ): Assigns email channel to the agent, enabling the agent to handle emails from their Agent Desktop. When you click this icon, the Max Email Threads field appears. This field indicates the number of unresolved email threads that the agent can handle. The default value in the field is 10. You can select any value between 1 and 10.
 - Chat Channel (
 ): Assigns chat channel to the agent, enabling the agent to handle chats from their Agent Desktop. When you click this icon, the Max Active Chats field appears. This field indicates the number of unresolved chat threads that the agent can handle. The default value in the field is 5. You can select any value between 1 and 10.
- SMS Channel (
To specify a value for the custom fields, on the Details tab, double-click the row displaying a custom field, specify a value in the field in the Customize Fields window, and then click Ok.
The Details tab appears if custom fields are associated with the Agent entity in the Fields window. For more information, see Fields Settings.
To assign skills to the agent, on the Agent Skill tab:
In the Available section, select the skills that you want to assign to to the agent.
- To assign all skills to the agent, click Assign All.
- To remove an assigned skill, in the Assigned section, select the skill.
- To remove all skills assigned to the agent, click Remove All.
The selected skills appear in the Selected section.
Select a proficiency.
The value Proficiency 1 is considered the highest proficiency (level of expertise), whereas Proficiency 10 is considered the lowest. For example, calls that require an agent to possess the English skill are routed first to the agent whose proficiency is 1 for the English skill.
To assign services to the agent, on the Services tab, in the Available section, select the services that you want to assign to to the agent.
- You can search for a service by using the Search box.
- To assign all services to the agent, click Assign All.
- To remove an assigned service, in the Assigned section, select the service.
- To remove all services assigned to the agent, click Remove All.
To assign a schedule to the agent, on the Agent Hours tab:
Clear the Not Available checkbox next to the days when you want to the agent to be available for work.
Specify the period during which you want to the agent to be available for work by moving the slider as required.
- Available period for a day is 00:00 to 24:00.
- The slider scale is 15 minutes.
- For a given day of the week, the period during which the agent is available (based on your selection) and the corresponding total number of hours appear in the Availability and Total time fields, respectively.

Click OK, and then, in the Agents window, click Save.
A profile is created for the agent, and it appears on the General tab of the Agents window.
- You can modify the profile by double-clicking the row containing the profile (on the General tab).
- The Change History tab of the Agent Details window displays all the changes made to the profile.
- You can use the Scheduled Callback tab of the Agent Details window to view and modify the schedule of the callbacks assigned to the agent. For more information, see Managing Scheduled Callbacks.
Demo
For more information, see the View and Add Agents demo: