Download PDF
Download page Creating an API.
Creating an API
You can send requests/responses to connect with the application programming interfaces (APIs) using the Functions feature. These requests/responses serve various purposes, allowing you to fetch, add, remove, or update data from LiveVox to other clients or web pages. Your requests can include parameters, authentication details, and any necessary data in the request body.
You can open up to six (API and Request) tabs in the API window.
You can create and integrate an API with the Script/Designer feature.
To create an API:
- Access Functions
Click the
 Add API icon.
A message appears, and an API is created under the client's function library.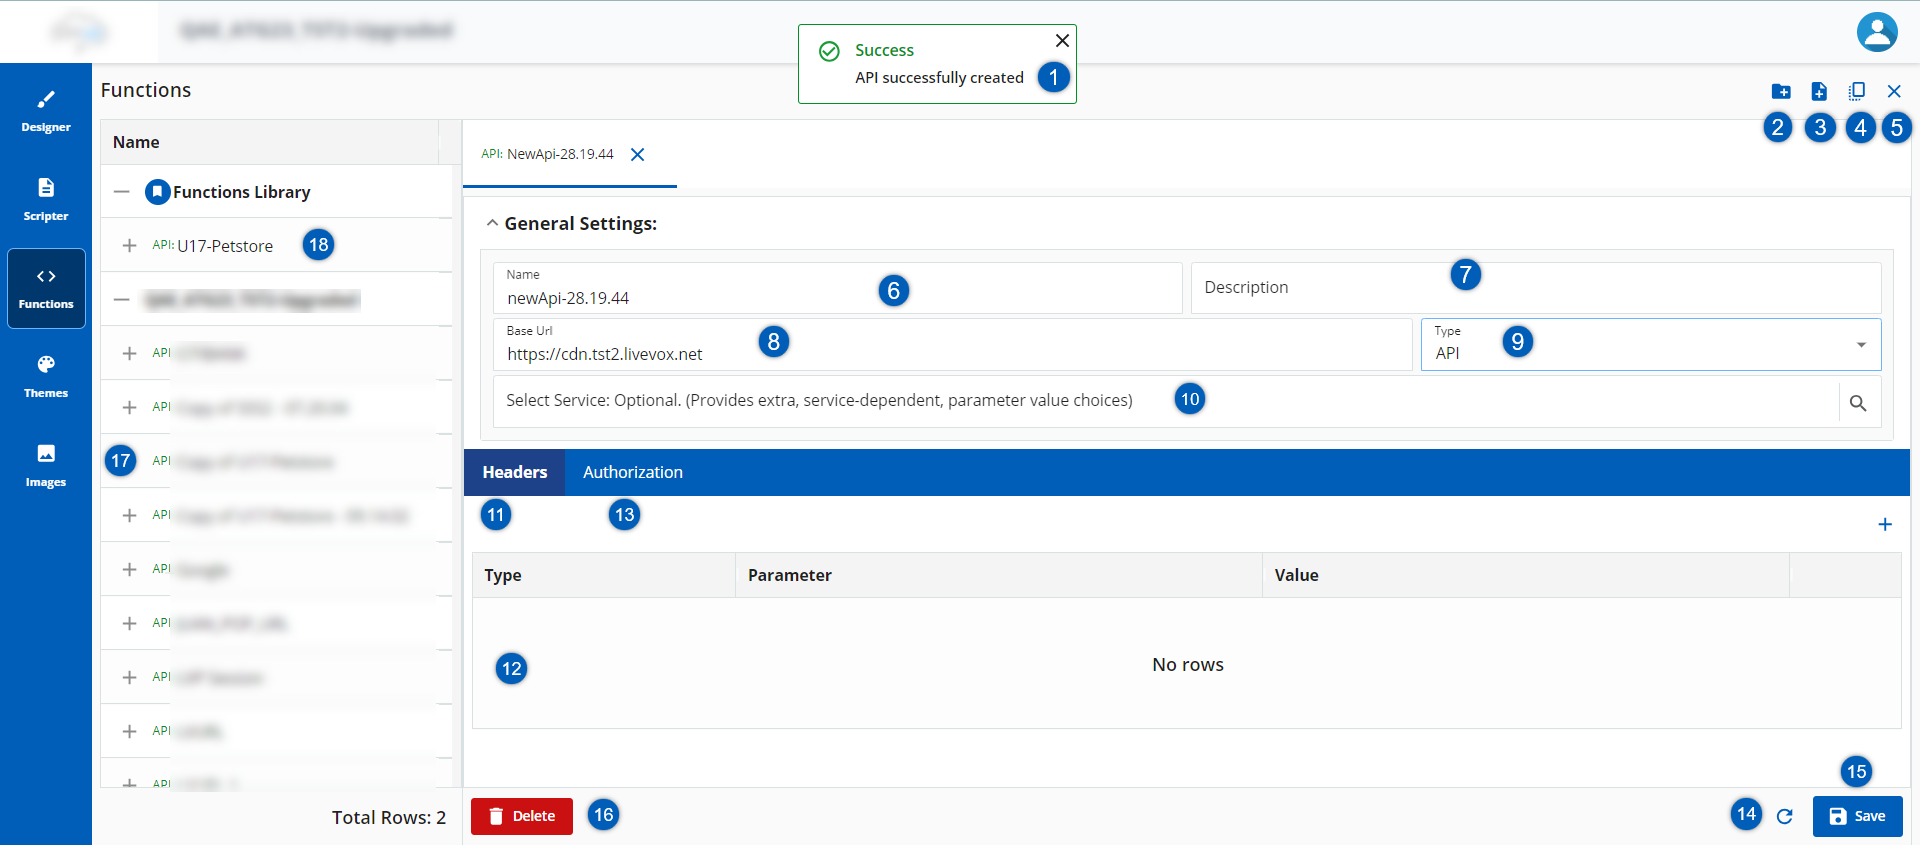
Numbered Item Description 
Message: A success message box appears when you create an API 
Create API: To create a new API, click the Add API
icon.
Add Request: Click the Add Request
 icon to add a new request under an API.
Copy API: To copy and create an API, click the Copy
 icon, and a duplicate of the existing API is created.
You are prompted to rename the API when you copy an API.

Exit: To exit from the API window, click the Close icon. 
Name: Specify an API name. This is a mandatory field.

Description: Specify the description for an API. 
Base URL: All API endpoints are relative to the base URL. For example, https://www.livevox.com is the base URL. 
Type: Select the Type from the drop-down list.
For the Fall 23 release, only API type is supported. Slack and Teams will be available in a future release.

Service: You can associate the API with a service. 
Header: You must specify the API Header. To specify the headers, click the Add Icon
 .
For more information on API headers, see the Adding a Header section.
.
For more information on API headers, see the Adding a Header section.
Header Details: The header information appears in this area. 
Authorization: Select the Authorization Type if you want the function call to be authenticated. You must select one of the following authorization protocols for the agent to use to log on to the application whose URL is specified:
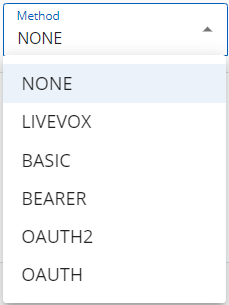
NONE: This indicates that no authentication is required to access the API. The API is publicly accessible without any authentication credentials.
- LiveVox: The LiveVox option appears if the value in the Base URL field contains livevox.
BASIC: Basic authentication is a simple method where the client sends a username and password as part of the request header. These credentials are often encoded in base64 format.
BEARER: Bearer Token Authentication is a method where the client includes a token (usually a long, randomly generated string) in the request header. This token is obtained from the API provider and is used to authenticate the client. Bearer tokens are commonly used in Open Authorization (OAuth 2.0) authentication for securing API access.
- OAUTH (Open Authorization): OAuth is primarily used for authorization. It allows a user (resource owner) to grant a third-party application (client) limited access to their resources without sharing their credentials.
- OAUTH2: OAuth 2.0 is widely used for enabling secure access to web APIs, including those offered by major service providers, such as Google, Facebook, and Microsoft. It's also used in Single Sign-On (SSO) scenarios.

Refresh: To refresh the screen, click the
 button.
Save: Click Save to save the information.

Delete: To delete an API, click the Delete button.

Client APIs: Client-specific APIs are listed here.

System APIs: System-loaded APIs appear here. - Specify the Name and Description for the API.
- Specify the Base URL. For example, https://www.livevox.com.
- Select the API type from the list.
For the Fall 23 release, only API type is supported. Slack and Teams will be available in a future release.
You can assign an API to a service by choosing a service from the Select Service drop-down list if required.
This is an optional parameter. You can create an Event from a Designer or Script and integrate an API.- To specify the Header information, click icon. For information on headers, see Adding a Header.
- To specify the Authorization information, click icon. For more information on Authorization, see Adding Authorization.
- After adding the relevant information, click Save.