Download PDF
Download page Use Segmentation to Filter and Create your Campaigns.
Use Segmentation to Filter and Create your Campaigns
Within Contact Manager, use Advanced Filter to Search for a Subset of Contact Records and Manually Build a Campaign
1. Navigate to Configure > Contacts > Contacts
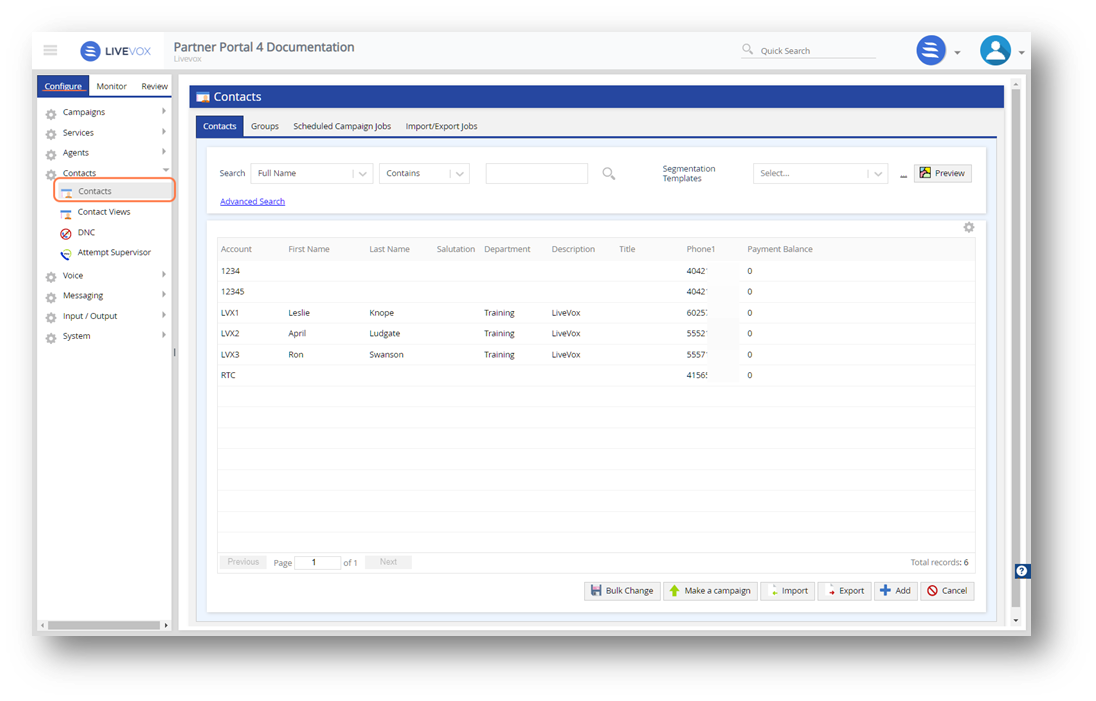
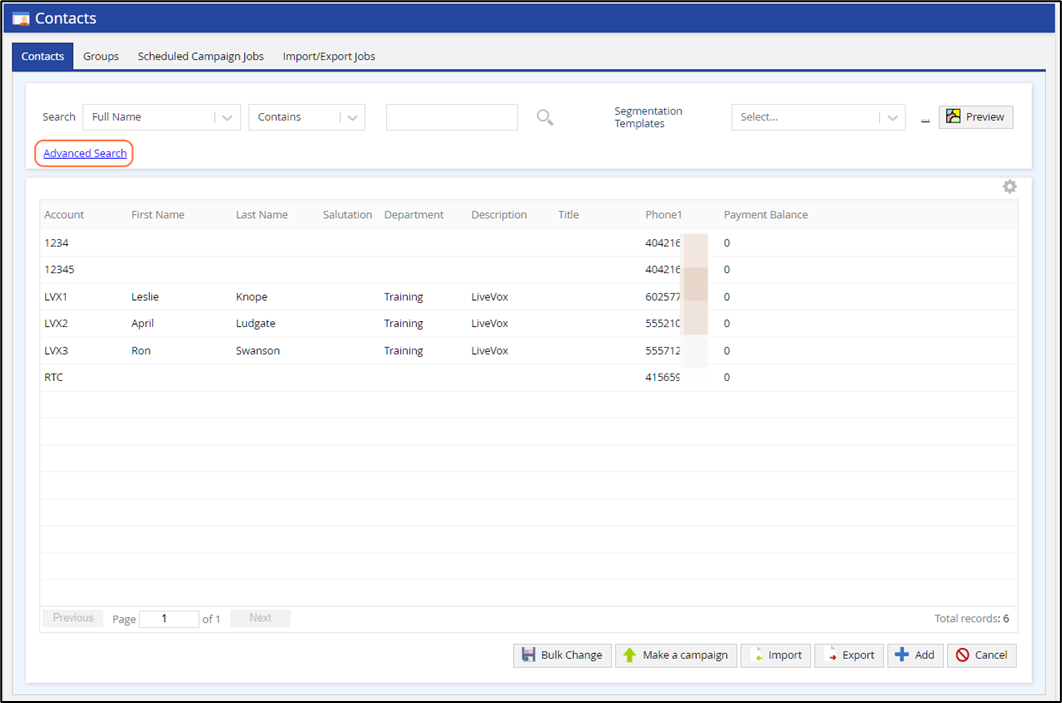
2. From the Contacts window, click on Advanced Search
3. Advanced Search window, click on Add Filter
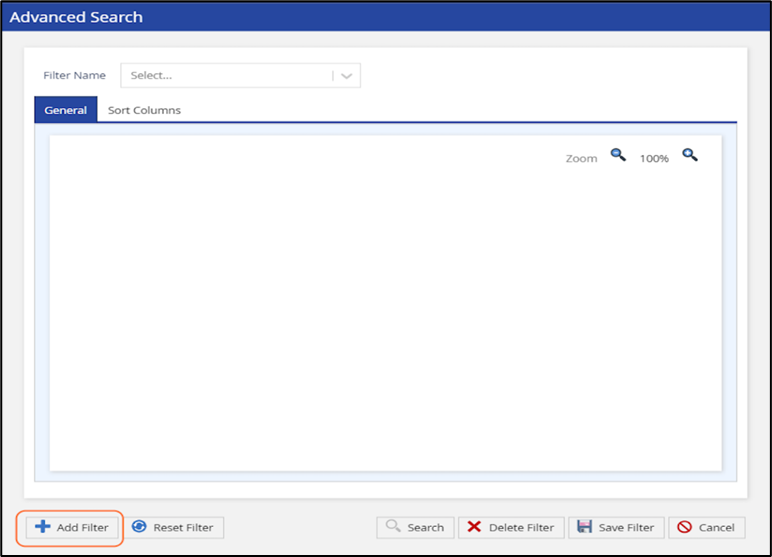
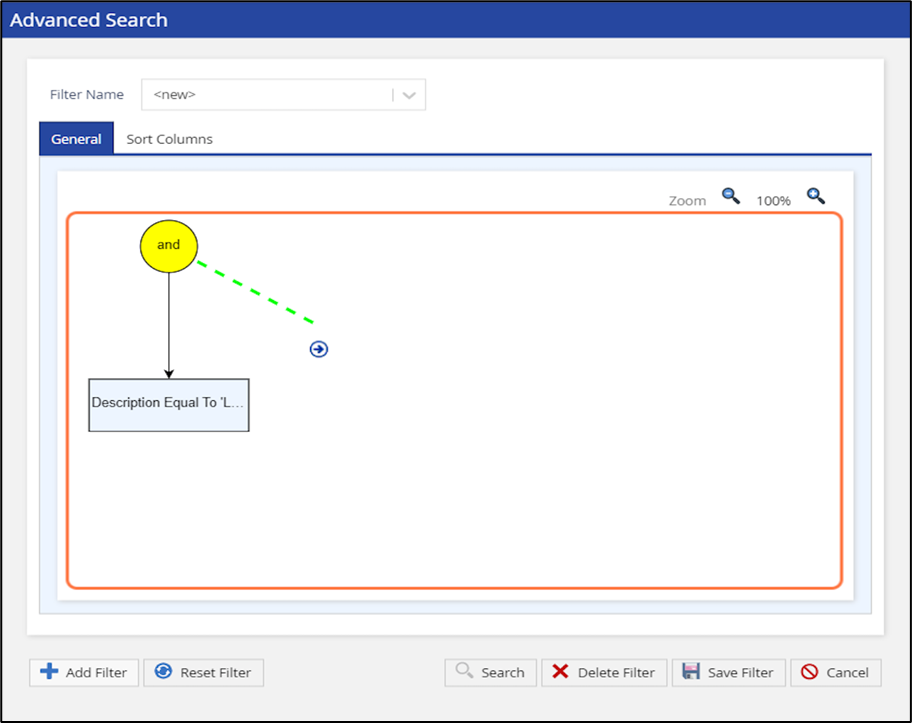
4. The yellow AND circle appears for you to add your rules (conditions).
To add the first rule (filtering condition), hover over the yellow AND circle, click and drag the arrow, then release as shown below.

5. Add Rule window:
- Logical Operator: leave as 'None', to keep AND
- (Additionally, you may choose OR which we will discuss later)
- Note: leave off, unless you want this rule (condition) to be negated
- Field: choose your first contact field from the list of standard and/or custom fields available
- Comparison: based on the contact field type (String/Digits/Boolean), the comparison drop-down menu will give you options to choose from, to complete the rule.
- Value: enter the criteria, from your input filter, this field refers to
- The value may be case-sensitive depending on the Comparison choice
- Click Ok to save the rule
The example below shows we are adding the first rule as 'Department equals LiveVox'.
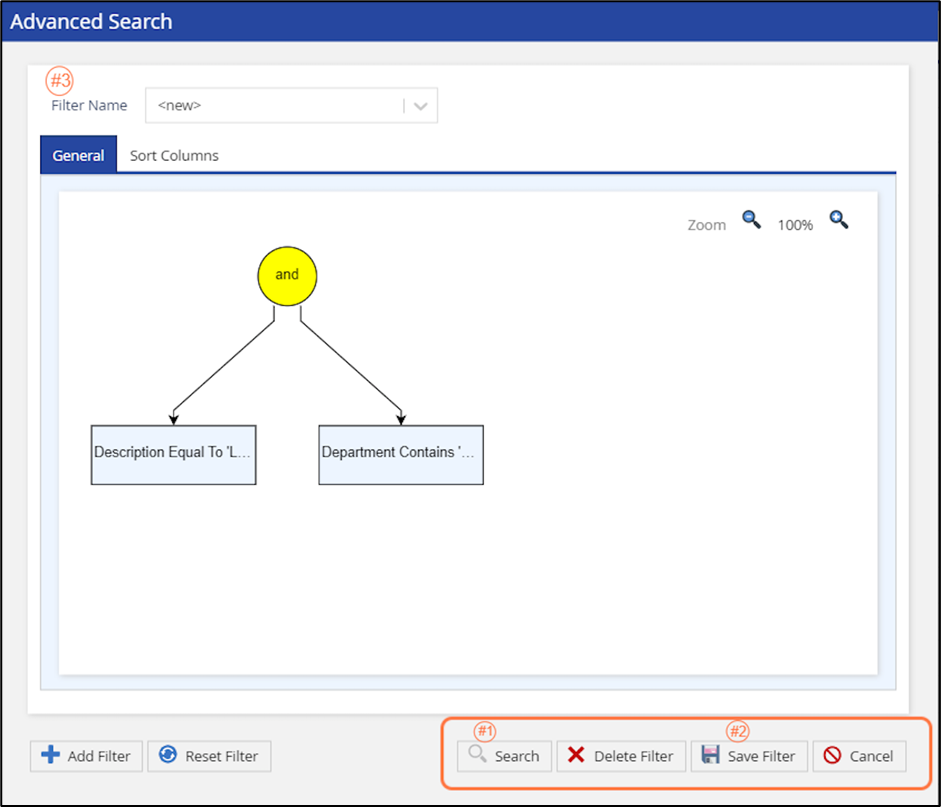
6. To Add an Additional Rule (condition):
Hover over the yellow AND circle, click and drag the arrow, then release as shown below.
7. Once all rules (conditions) have been added:
- Click the Search button
- Runs the Advanced Filter against the full list of contact records and produces a list of the contact records that match
- Please note the contact record must match all the rules contained within the Advanced Filter you created.
This will take you back to the main Contacts window. To save the advanced filter you created and use it at a later time, reopen the Advanced Search window:
2. Click the Save Filter button
- This makes the Advanced Filter available for future use
- Saved Advanced Filters are only available to the person who created it and within the same web browser.
3. Your saved filters will be in the Filter Name drop down list
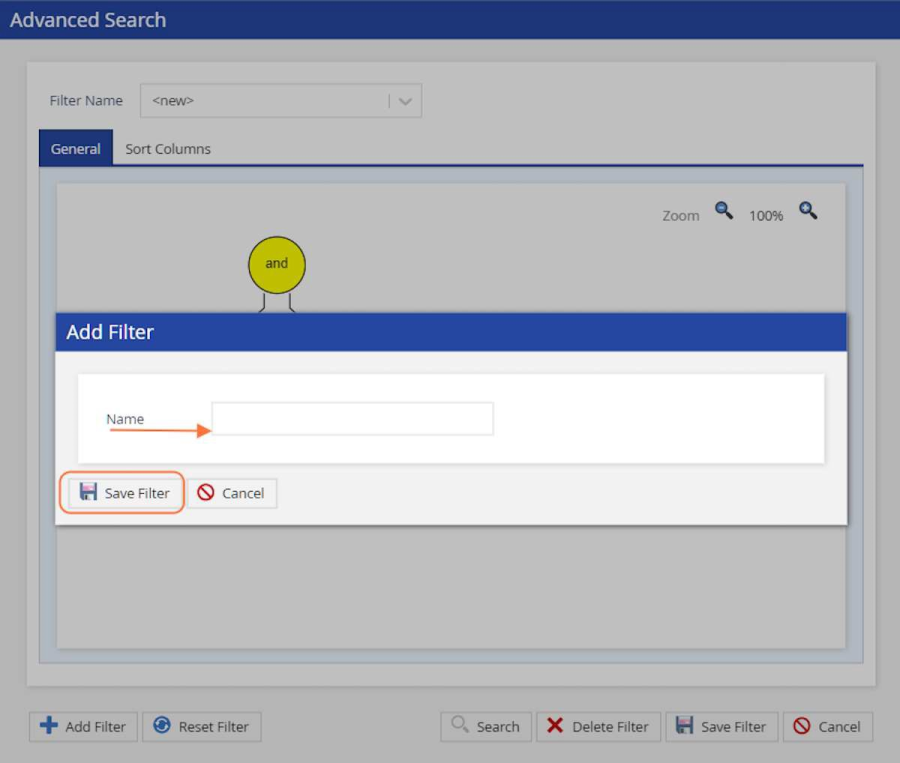
8. Once you click the Save Filter button the Add Filter box will pop up
- Enter the Name of your Advanced Filter
- Click on Save Filter
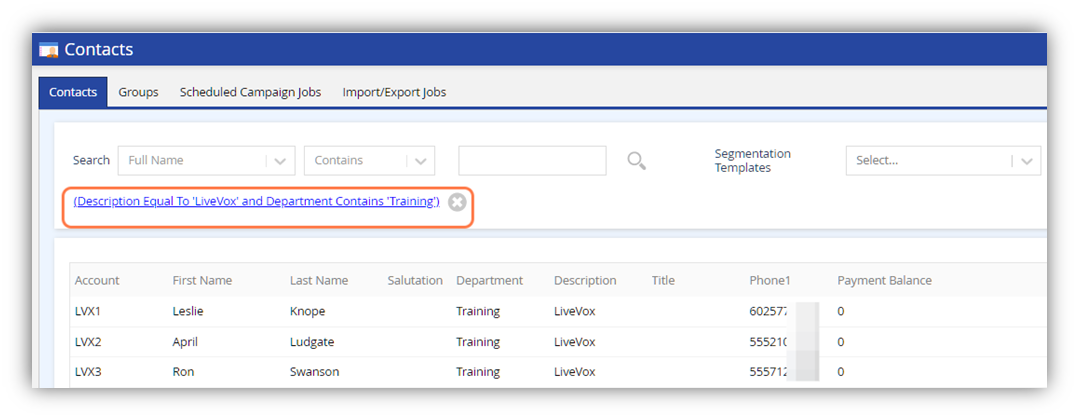
9. Once you click the Search button, the Contacts window will present the matching records
- The search criteria appears in blue font with an 'X' next to it
- Click the 'X' to remove the search criteria and return to your full list of contact records
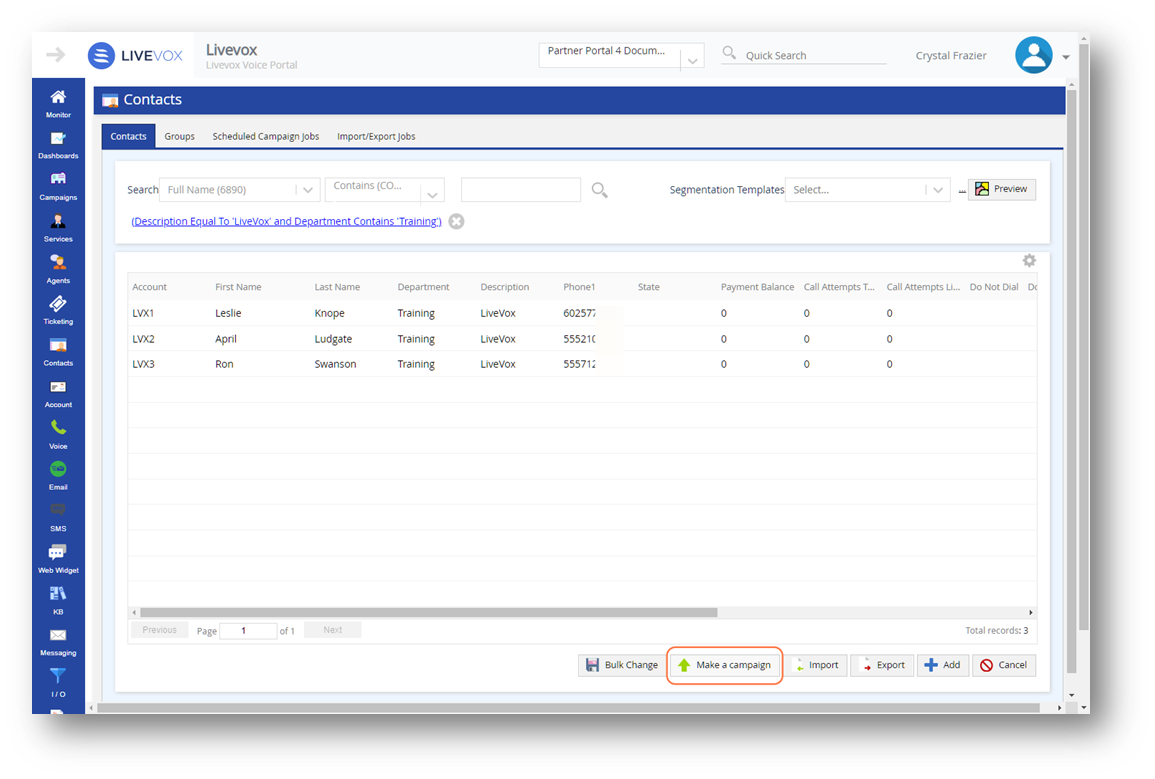
Based on the Advanced Filter we built (Description equals 'LiveVox' and Department contains 'Training'), 3 records have returned.
To create a campaign based on these results, click on Make a campaign
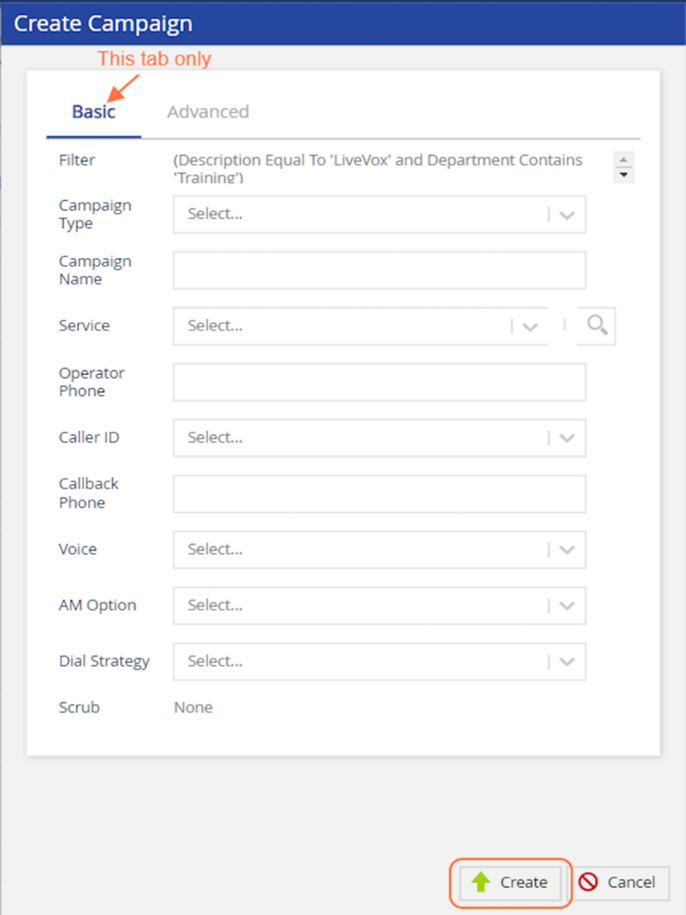
1. Create Campaign window:
Fill out all the fields from the Basic tab, then click Create
- Filter: auto populates the Advanced Search criteria used
- Campaign Type: choose the type of campaign to build
- 'Outbound' includes preview, quick connect and message only
- Campaign Name: enter the name that will be used for viewing, editing, and reporting
- Service: choose the service name this campaign will be assigned to
These fields may be auto populated based on service settings:
- Operator Phone
- Caller ID
- Callback Phone
- Voice
- AM Option (Answering Machine Option)
- Dial Strategy
- Scrub
For detailed information on Service Settings, please visit: https://docs.livevox.com/productdocumentation/admin-guides/latest/introduction-to-livevox/configuring-client-sites-call-centers-services-and-business-units/working-with-the-services-editor/navigating-the-services-editor/services-settings-tab
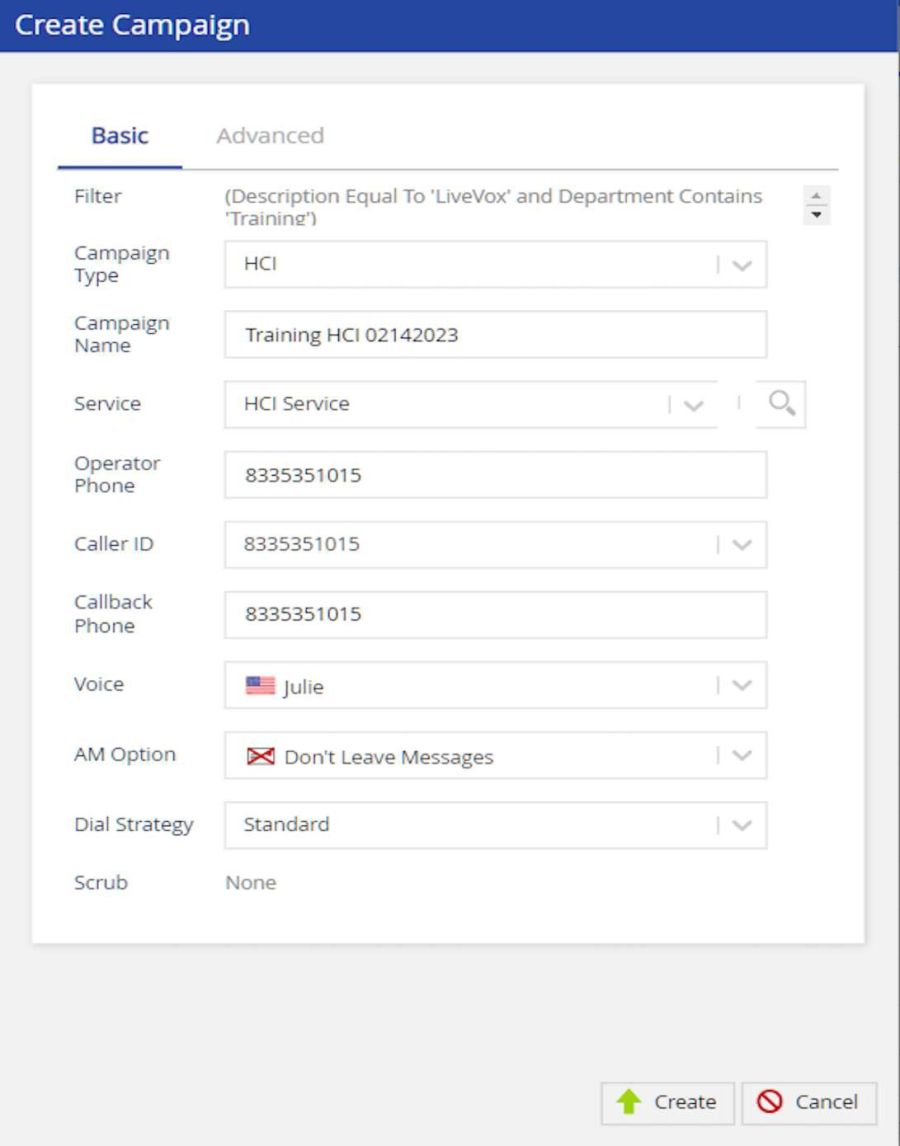
Here is an example of an HCI (Human Call Initiator) campaign:
2. Navigate to Configure > Campaigns > Campaigns
After creating the campaign, you will need to finalize the 'build' and 'play' when ready.
Here you will see a list of all your created outbound campaigns, as well as, any inbound or scheduled callback services that are available, based on your call center open/close settings.
The example below shows only the outbound campaign we created 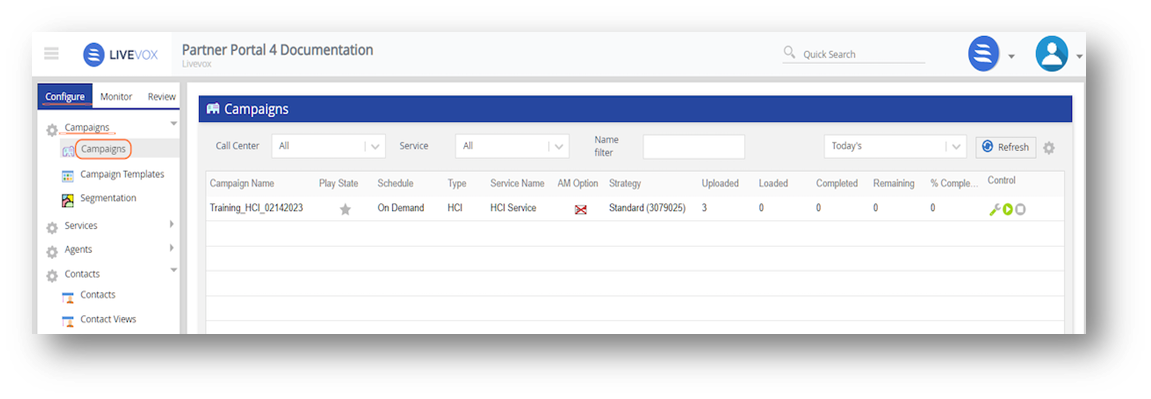
3. Campaigns window:
The Controls show 3 icons: wrench, play and stop
- To finalize the campaign 'build', click on the wrench icon

- Click the play icon
 when you are ready to run the campaign
 - Once in a play state, the button will appear as a pause icon

- Use this to temporarily stop running the campaign
- To stop the campaign indefinitely, click the stop button

- Once stopped, the campaign may not run again, and the record outcomes/results will appear in reporting
- If you have records that were not-attempted, you may choose to 'requeue' or 'build a new campaign' that includes the non-attempted records

You have now created a manual campaign by using the Advanced Filter option within Contact Manager.
Use Segmentation to Build Campaign Filters that may be used for Scheduled (automated) Campaign Jobs
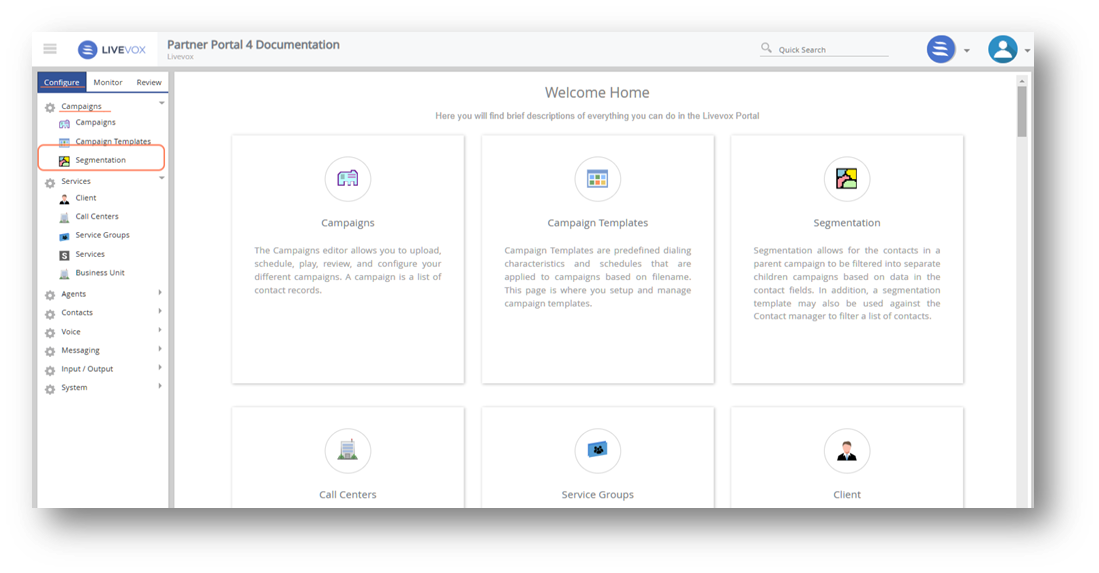
1. To build a Segmentation, navigate to Configure > Campaigns > Segmentation
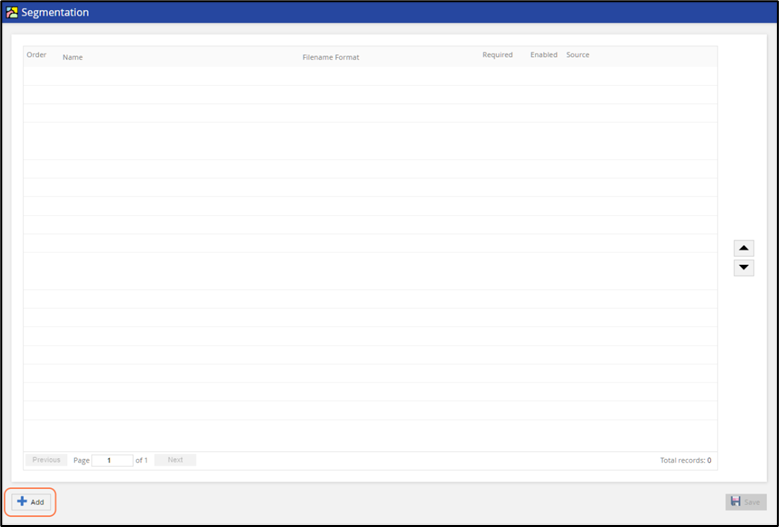
2. From the Segmentation window, click on Add
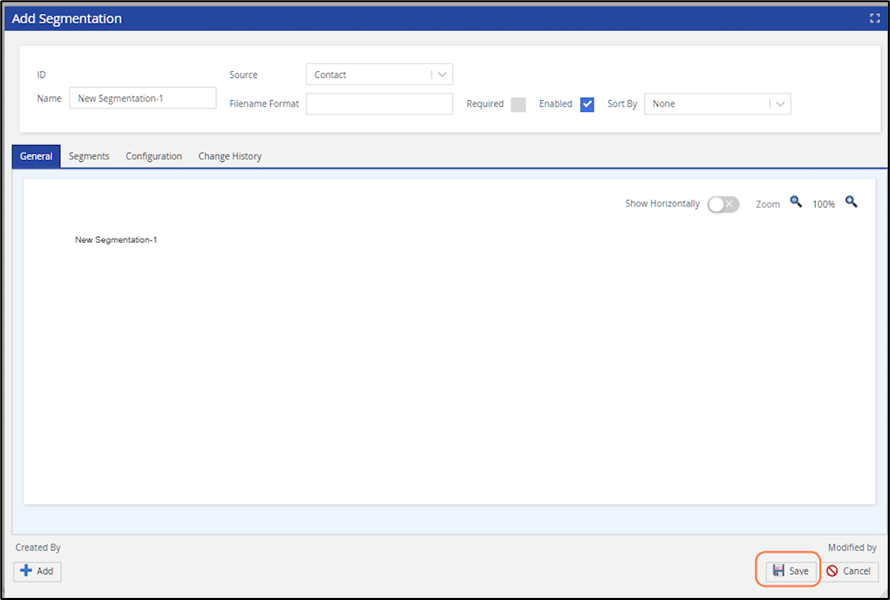
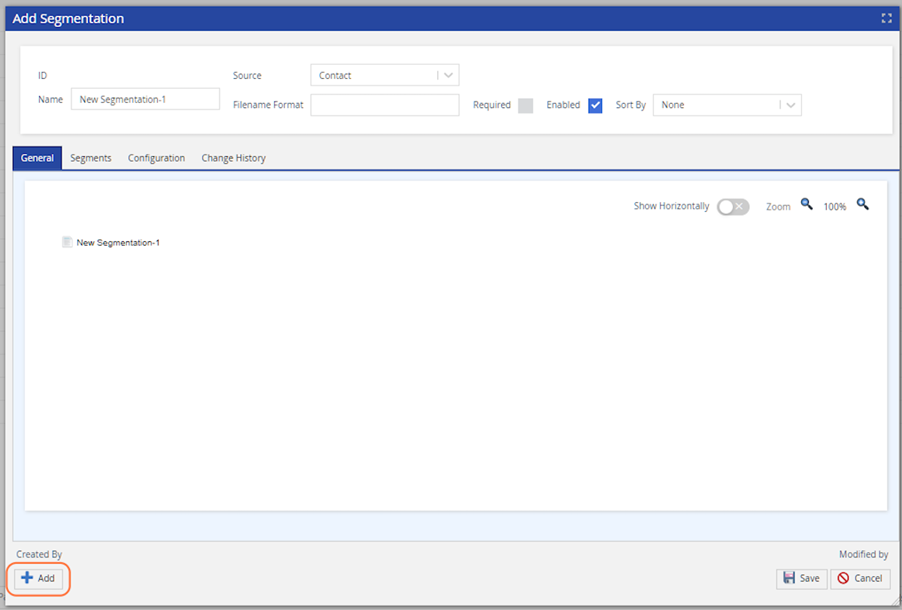
3. Add Segmentation Window:
- Name your Segmentation
- Source: choose Contact
- Contact: applies to contact manager record
- Transaction: (Legacy method) applies to campaign file uploads
- Filename Format: required if you use the source 'Transaction', for the imported campaign file to be recognized by Segmentation
- Required: used for the source 'Transaction'
- Check if automation used
- Leave unchecked for manually built campaigns only
- Enabled: check the box if you want this Segmentation to be available for use
- Sort By: if you are using the source 'Contact', you can choose a contact field to sort your Segmentation view
- Show Horizontally: switches from the standard vertical view
- Zoom: enlarge or reduce the visual
- Click on Save when you are done adding campaigns (segments) to this Segmentation
4. To add a segment, click the Add button, from the Add Segmentation window.
5. Add Segment Window:
Fill out the top section of your segment:
- Name your segment (campaign).
- We chose 'Campaign_1' for the example below.
- Description: you can copy/paste the name here or add more detail to define the segment (campaign) name.
- Disposition: whether the segment (campaign) will be excluded from the Segmentation run. If excluded, records that fit this segment criteria will not be created into a campaign.
- Sort By: define a segment (campaign) sorting by a contact field
To add the first rule (filtering condition), hover over the yellow AND circle, click and drag the arrow, then release as shown below.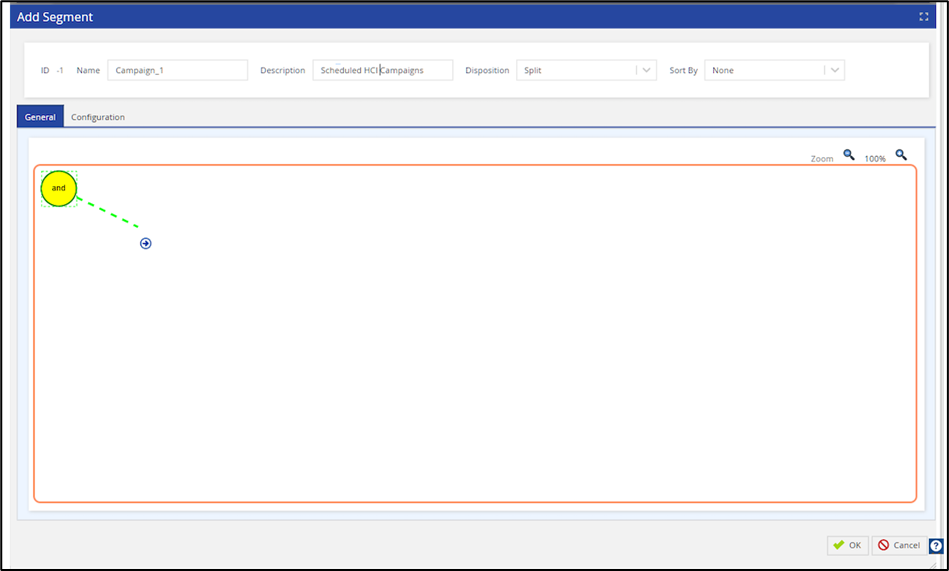
6. Add Rule Window:
- Logical Operator: leave as 'None', to keep AND
- Additionally, you may choose OR which we will discuss later
- Not: leave off, unless you want this rule (condition) to be negated
- Field: choose your first contact field from the list of standard and/or custom fields available
- Comparison: based on the contact field type (String/Digits/Boolean), the comparison drop- down menu will give you options to choose from, to complete the rule.
- Value: enter the criteria, from your input filter, this field refers to
- The value may be case sensitive depending on the Comparison you choose
- Click Ok to save the rule
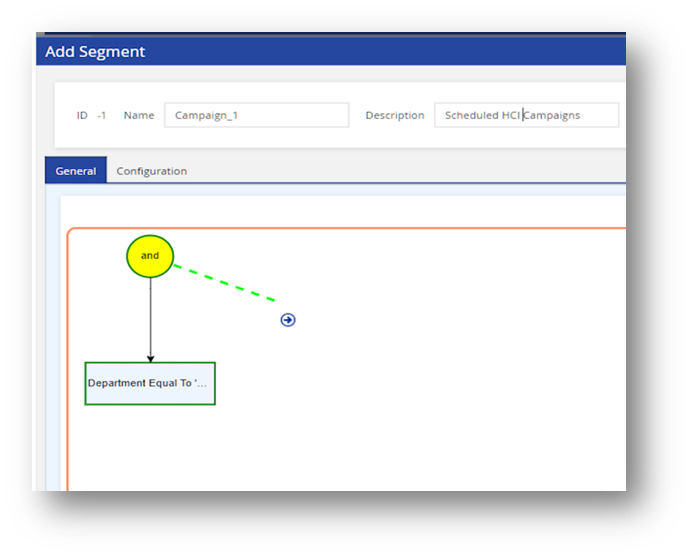
The example below shows we are adding the first rule as 'Department equals LiveVox'.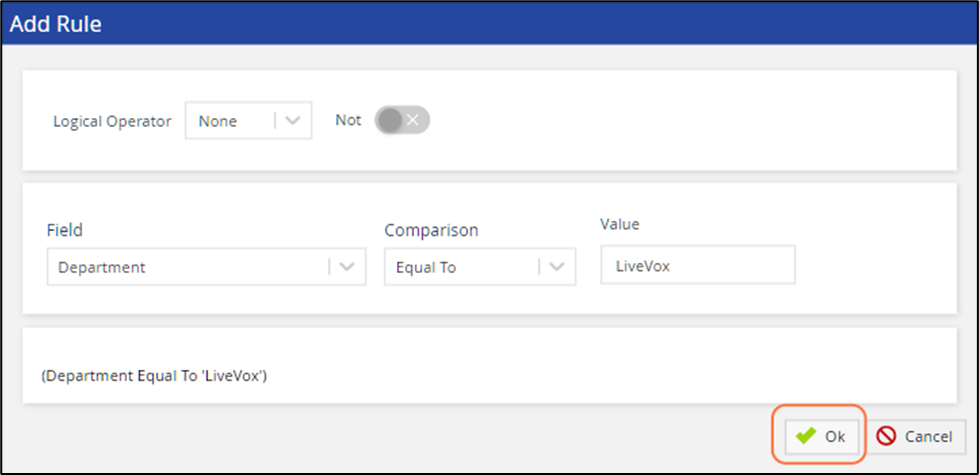
7. To Add an Additional Rule (condition):
Hover over the yellow AND circle, click and drag the arrow, then release as shown below.
8. Add Rule Window:
For this example, we chose the field 'Phone 1 Cell Consent'. This field type is 'boolean', so the comparison and value options are different from the first rule (condition) we created.
The example below shows we are adding the second rule to be 'Phone 1 Cell Consent = Enabled'.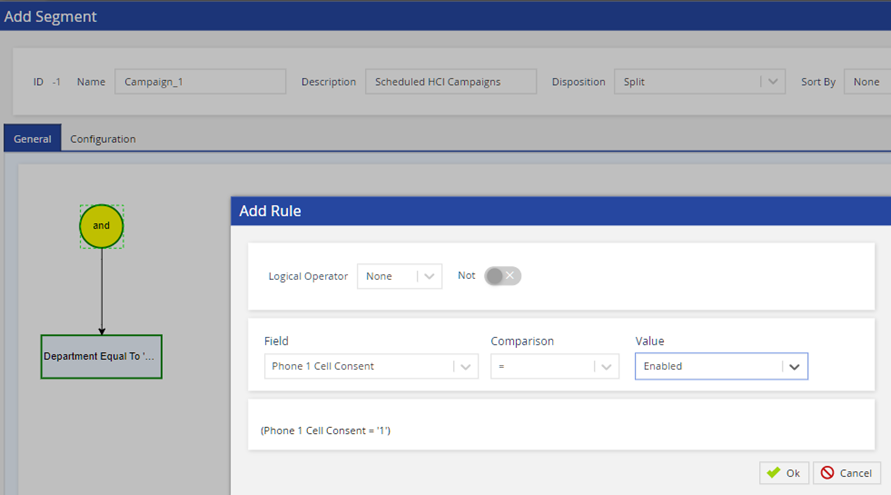
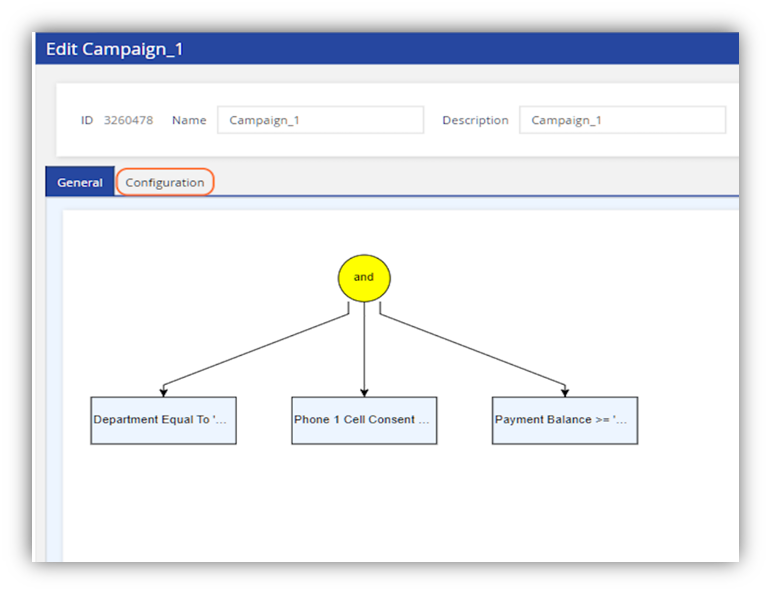
9. Once all rules (conditions) have been added, click Ok to save the segment (campaign).
This campaign will include contact records with 'Department equal to 'LiveVox', Phone 1 Cell Consent = 'Enabled' and Payment Balance >= '500'.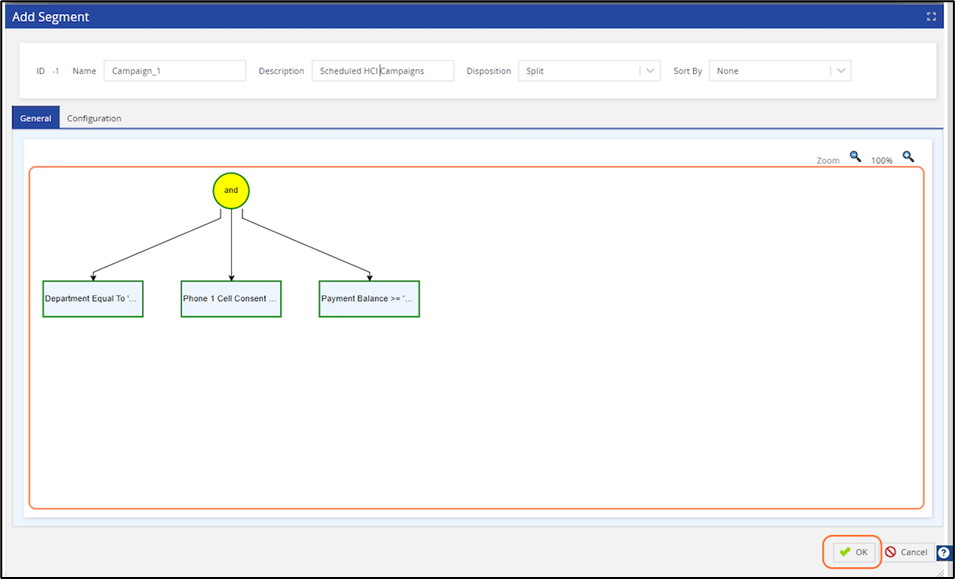
10. From this window you may choose to Add a new segment or click Save once completed
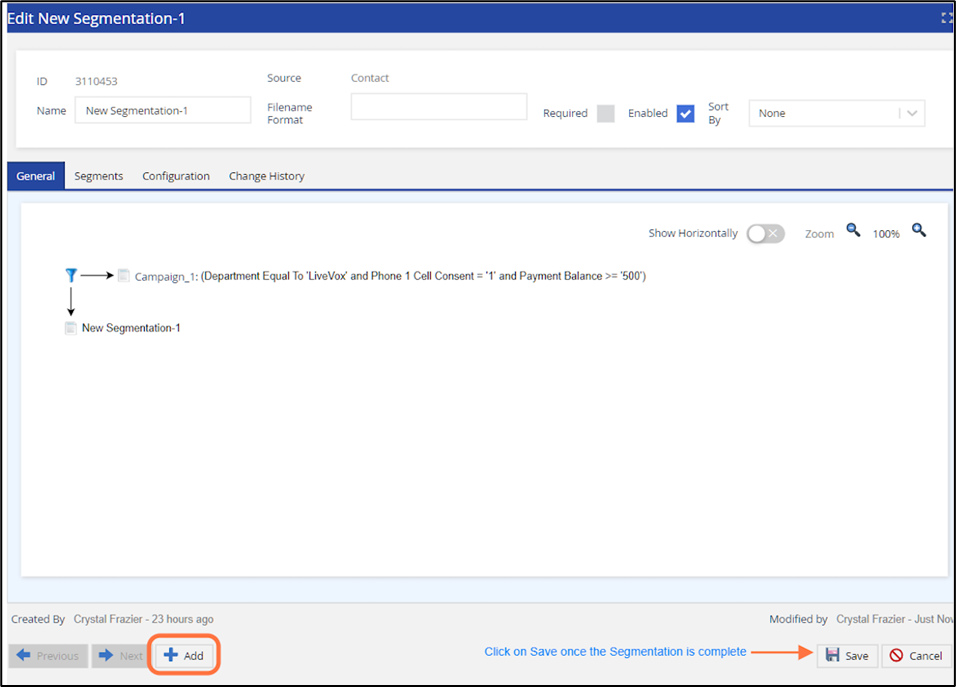
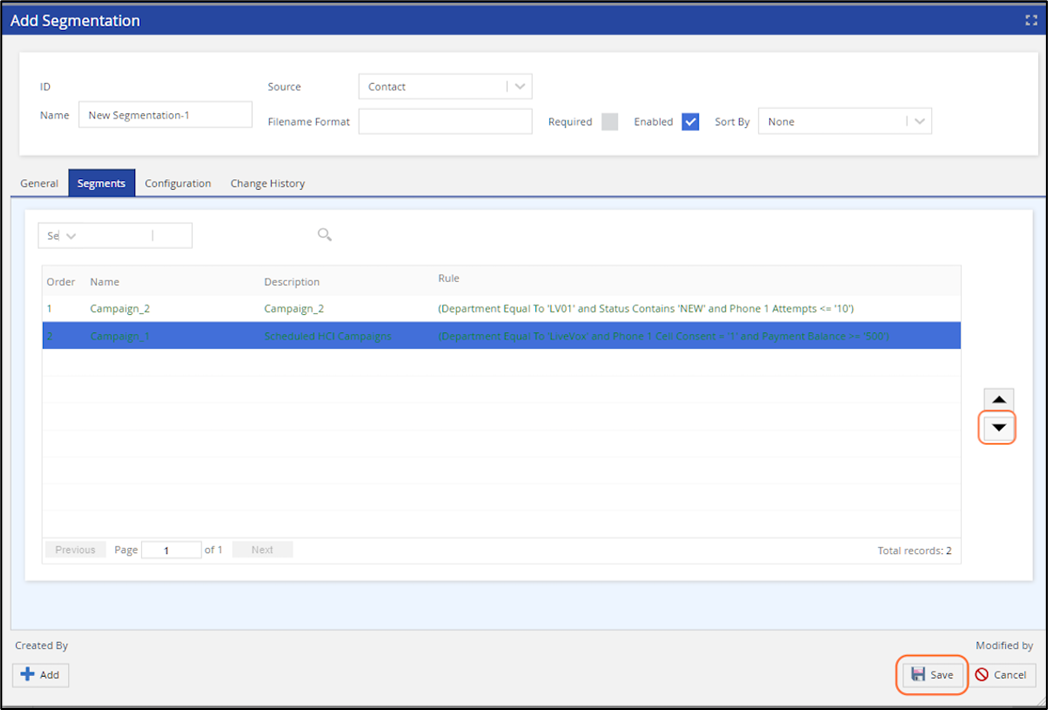
You may Edit the Segments (Campaigns) from the Segments Tab:
- Copy or delete a segment (campaign), then click Save.
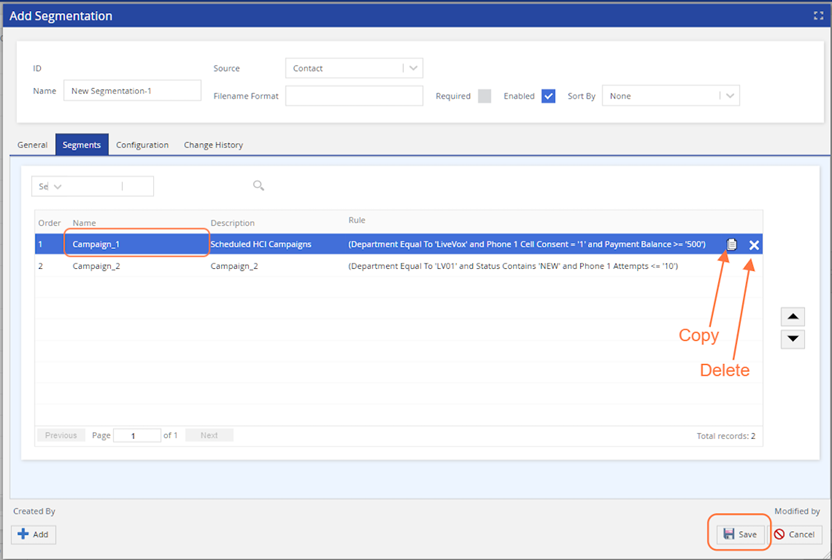
- Reorder the segments (campaigns) to change the priority of filtering your campaign records.
- Click the segment line item to highlight, then click the arrows on the right, to reorder.
- In the example below, we moved 'Campaign_1' below 'Campaign_2'.
- When this Segmentation runs, the contact records will filter into 'Campaign_2', first. If the contact records do not match, they will filter into 'Campaign_1', and so forth.
- The edits are reflected in green font, until you click the Save button.
11. Once you have completed your segment edits, click on Save to save the Segmentation.

Configure the service settings for the entire Segmentation or individual Segments (campaigns)
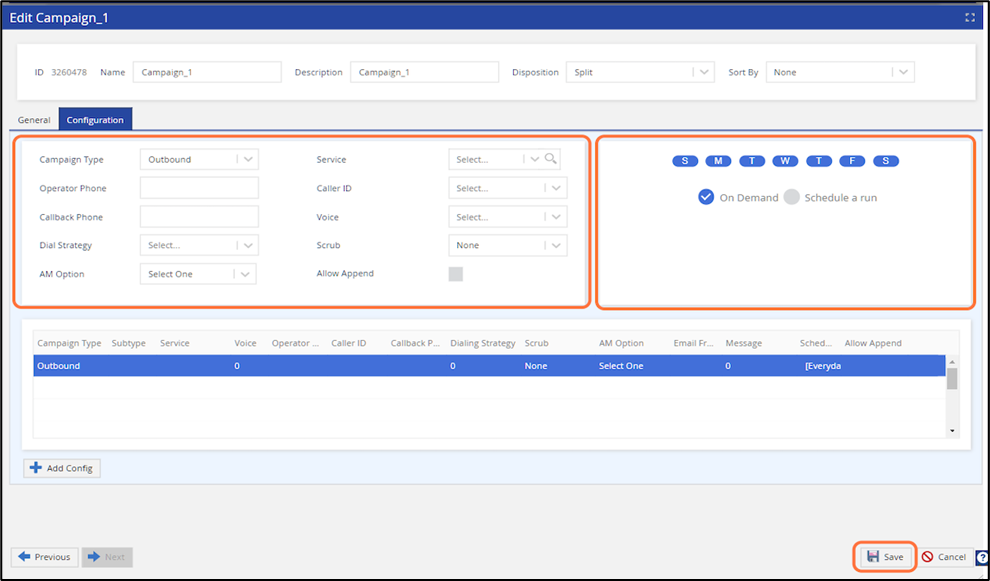
1. To configure the service settings for the entire Segmentation, which includes all segments (campaigns), click on the Configuration tab.
You will notice the 'Name' reflects our Segmentation name, so we can confirm this configuration is being done for the entire Segmentation.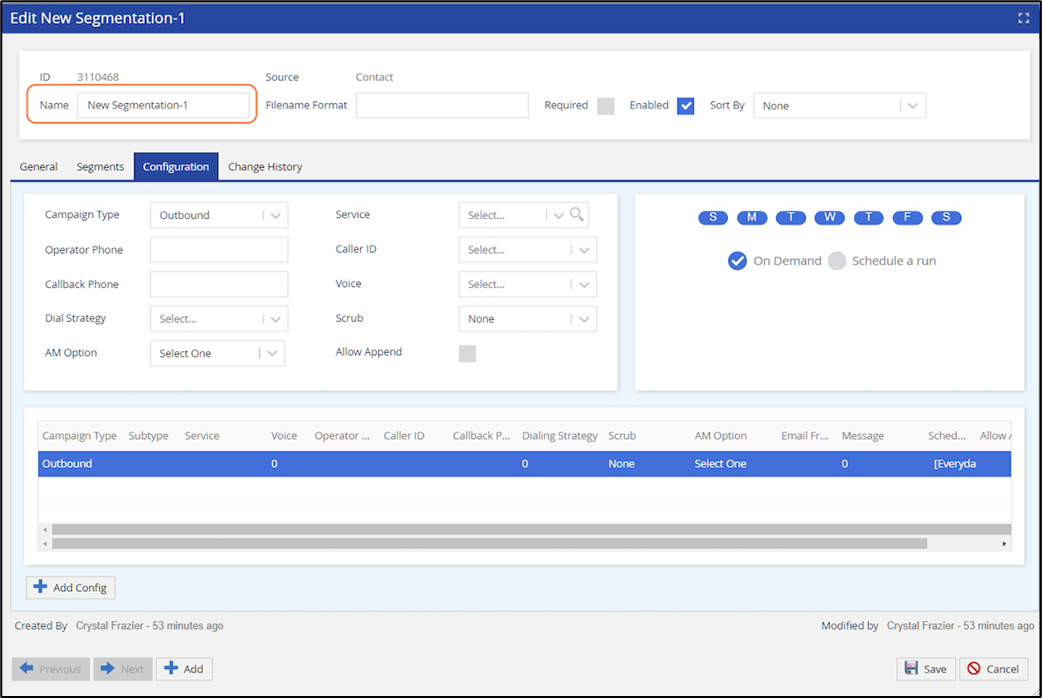
Fill out the highlighted section below with the appropriate Service Settings:
- Campaign Type: choose the type of campaign to build
- 'Outbound' includes preview, quick connect and message only
- Service: choose the service name this campaign will be assigned to May be auto populated based on service settings:
- Operator Phone
- Caller ID
- Callback Phone
- Voice
- Dial Strategy
- Scrub
- AM Option (Answering Machine Option)
- Allow Append: check this box if you are appending campaign records via API (Application Programming Interfaces)
For detailed information on Service Settings, please visit: https://docs.livevox.com/productdocumentation/admin-guides/latest/introduction-to-livevox/configuring-client-sites-call-centers-services-and-business-units/working-with-the-services-editor/navigating-the-services-editor/services-settings-tab

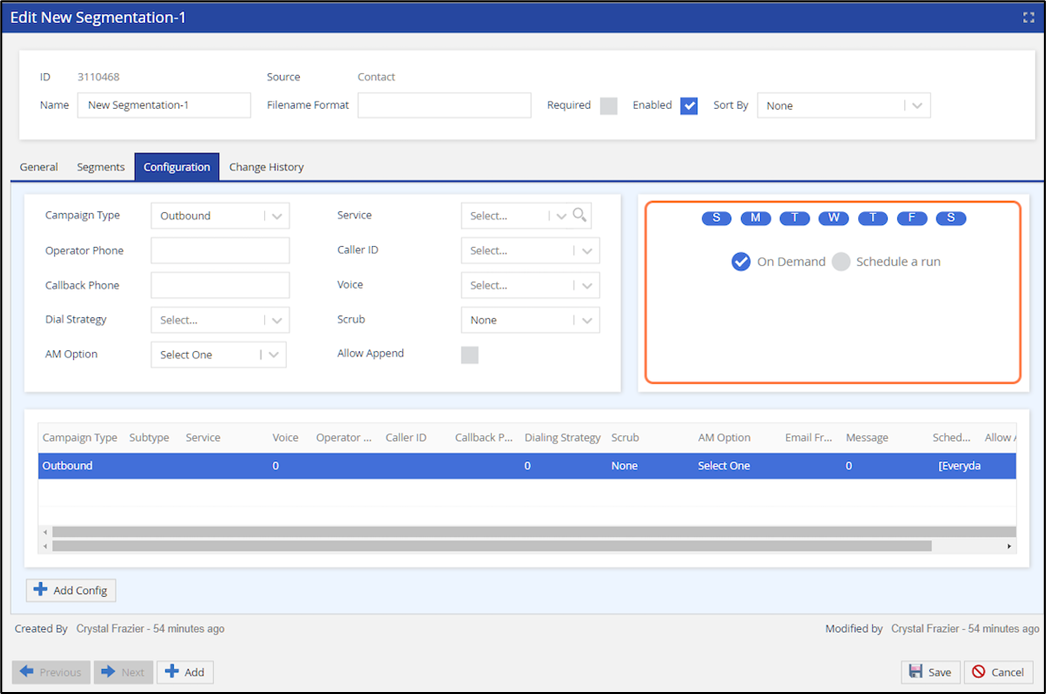
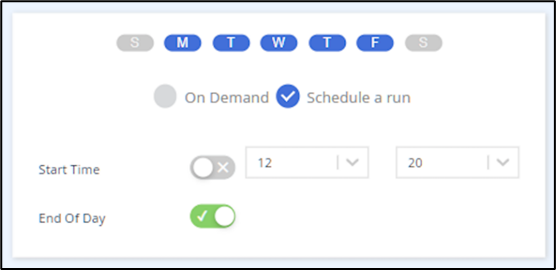
- Next, you may choose to create this campaign "On Demand" or "Schedule a run"
- On Demand: the campaign will be created, but you will be required to 'build' and 'play' the campaign when you are ready
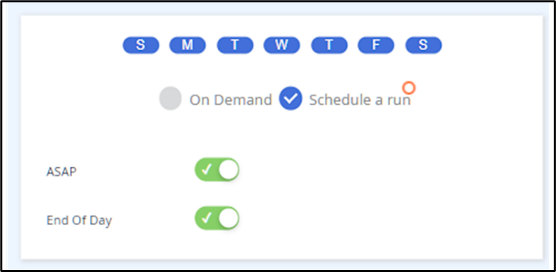
- Schedule a run:
- Allows you to choose 'ASAP' or a specific time to start playing the campaign automatically
- End of Day will stop once your call center closes, or you can choose a specific time to stop 'playing' the campaign.
2. To configure the service settings for an individual segment (campaign):
- Double-click on the segment to open the Segment Window

- Click on the Configuration tab
You will notice the 'Name' reflects our Segment name, so we can confirm this configuration is being done for the individual segment (campaign).
- Fill out the required fields then click on Save
Create the Scheduled Campaign Job
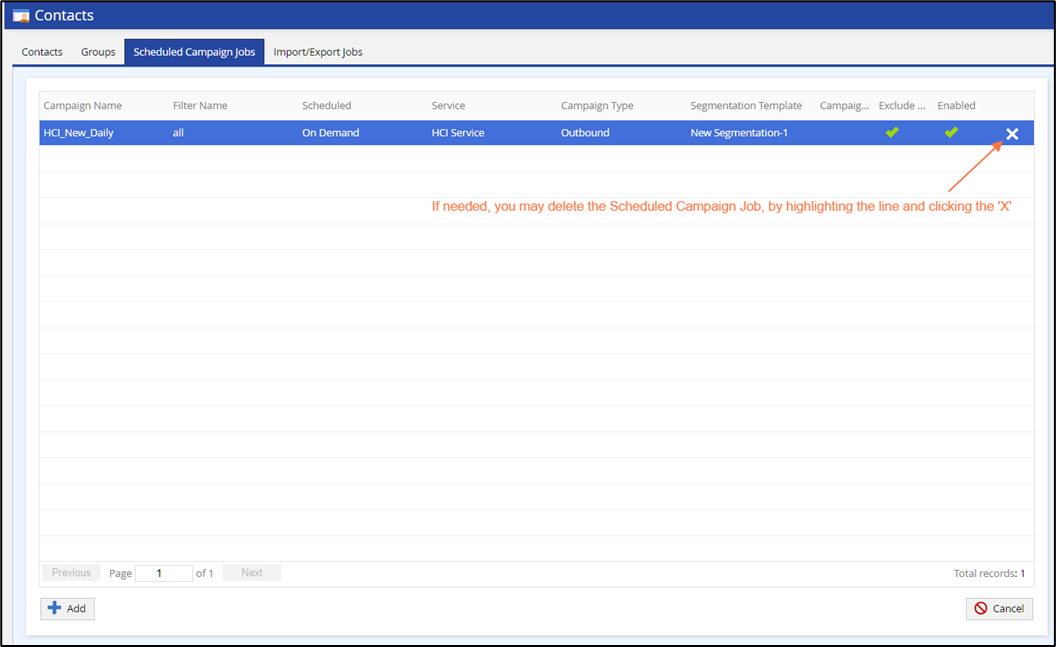
1. Navigate to Configure > Contacts > Contacts
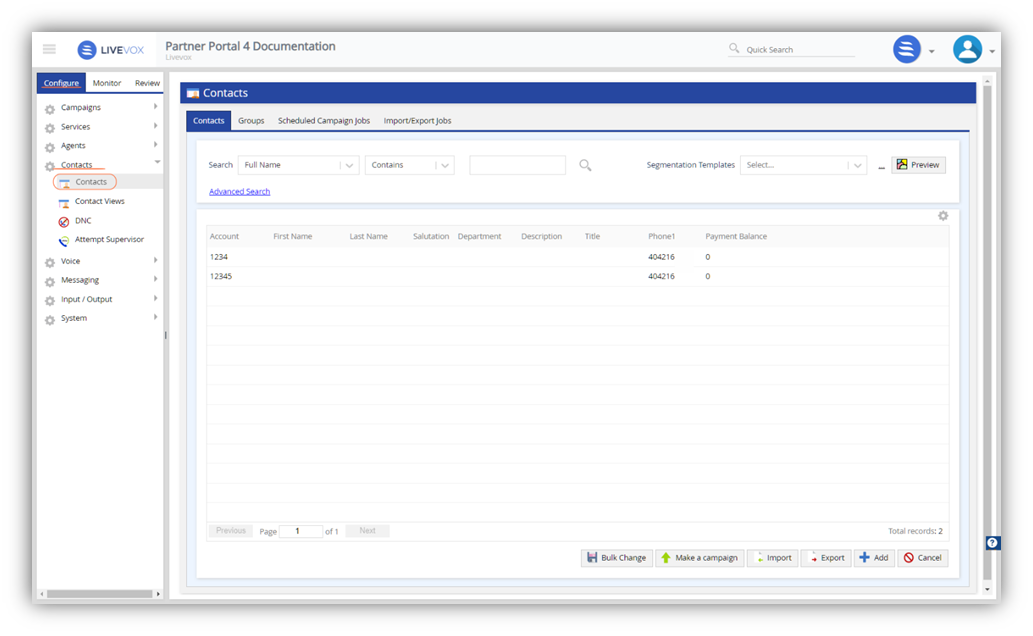
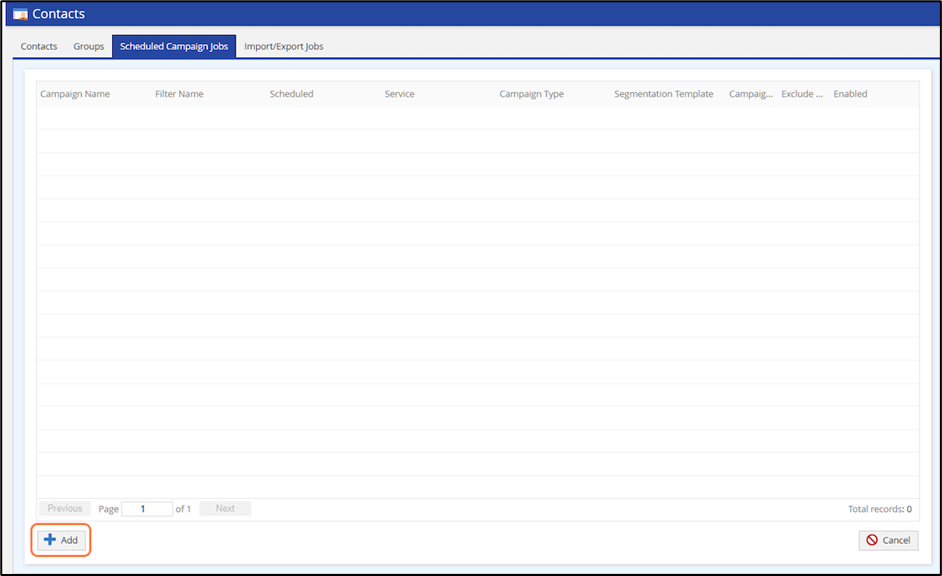
2. From the Contacts window, click on Scheduled Campaign Jobs tab
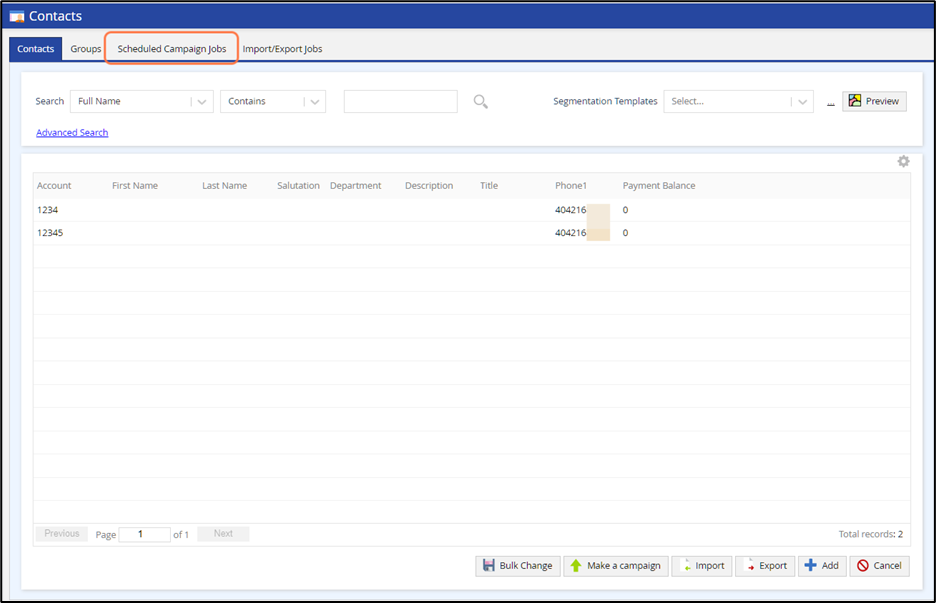
3. Click on Add
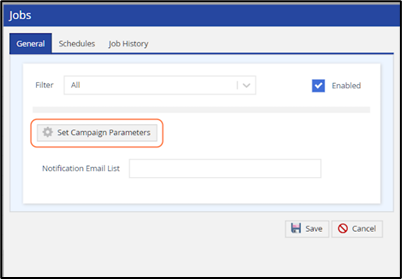
4. From the Jobs window > General tab > Click on Set Campaign Parameters
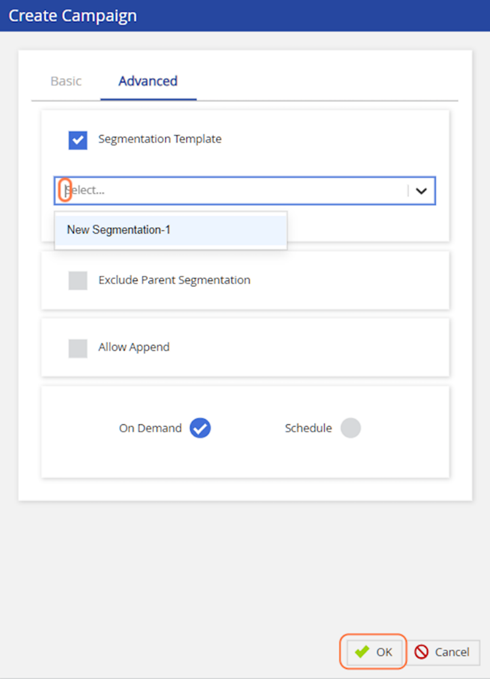
5. From the Create Campaign window: Click on the Advanced tab first
- Check the box for Segmentation Template
- Choose your Segmentation name from the drop-down menu
- Exclude Parent Segmentation: check this box if you do not want to create a parent campaign
- A parent campaign consists of all the contact records that did not build into the individual segments (campaigns).
- Allow Append: check this box if you will be adding new records to the active campaign via API
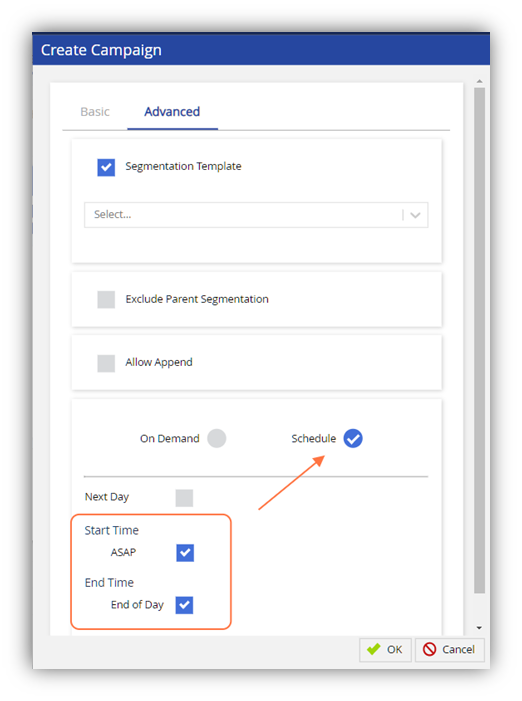
- Choose 'On Demand' or 'Schedule' to complete the Campaign Job
- Click Ok to save the Campaign Job, once both tabs (Advanced and Basic) have been filled out
On Demand or Schedule:
- On Demand: the campaign will be created, but you will be required to 'build' and 'play' the campaign when you are ready
- Schedule:
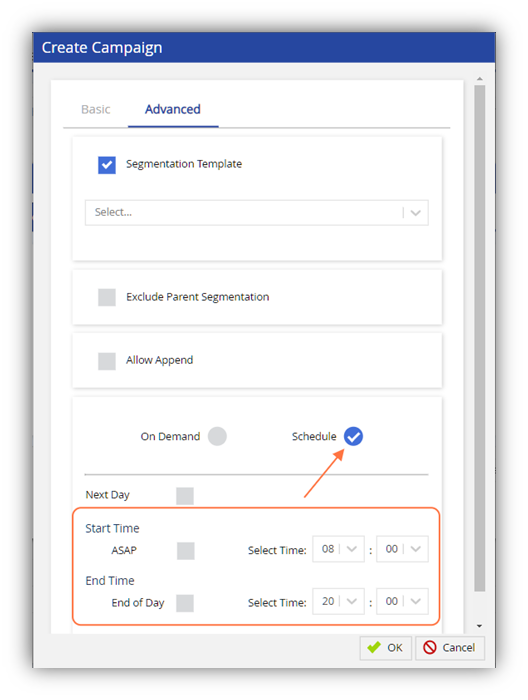
- Allows you to choose 'ASAP' or a specific time to start playing the campaign automatically
- End of Day will stop once your call center closes, or you can choose a specific time to stop 'playing' the campaign
6. Click on the Schedule check box
7. Before you finish, from the same Create Campaign window:
- Fill out all the fields under the Basic tab
- We have already set this configuration within the Segmentation, but the LiveVox portal requires something to be filled out here.
- Please know that the data you enter here will be ignored, because we chose to enable Segmentation on the Advanced tab.
Click Ok to save the Campaign Job, once both tabs (Advanced and Basic) have been filled out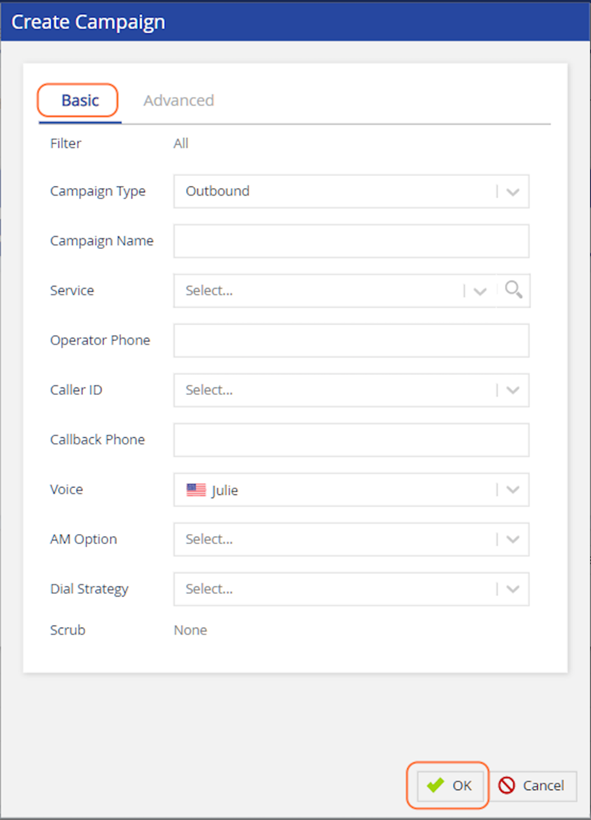
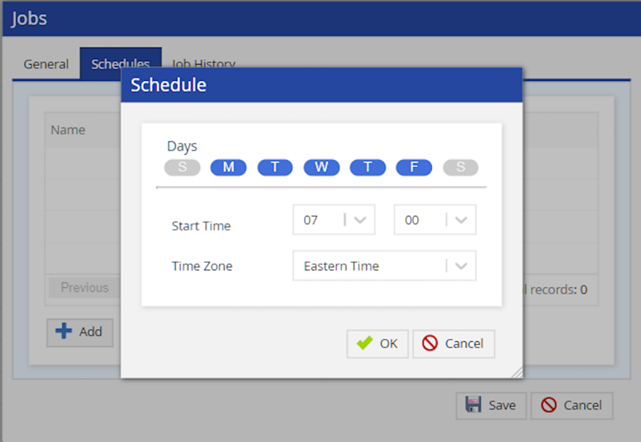
8. From the Jobs window > Schedules tab > Click on Add
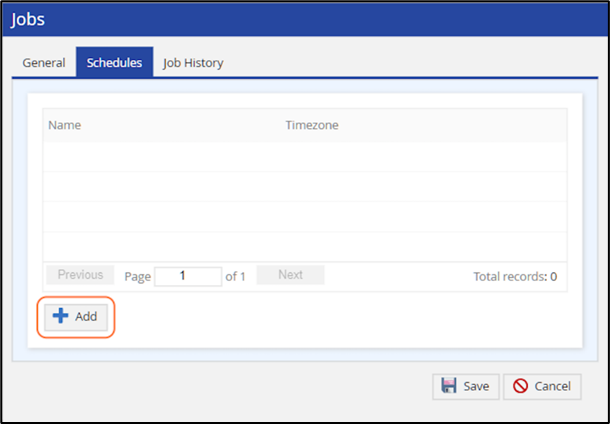
9. Add Schedule:
- Days: click the days you want this Campaign Job Schedule to run
- Start Time: add the time for this Campaign Job Schedule to start
- Time Zone: choose the time zone for your Start Time (the portal's default is Eastern Time)
Please keep in mind:
- This job should run after your contact records file (contact import job) has completed its import into Contact Manager
- This job may take 10-30 minutes to complete, depending on the amount of data
Click Ok to save
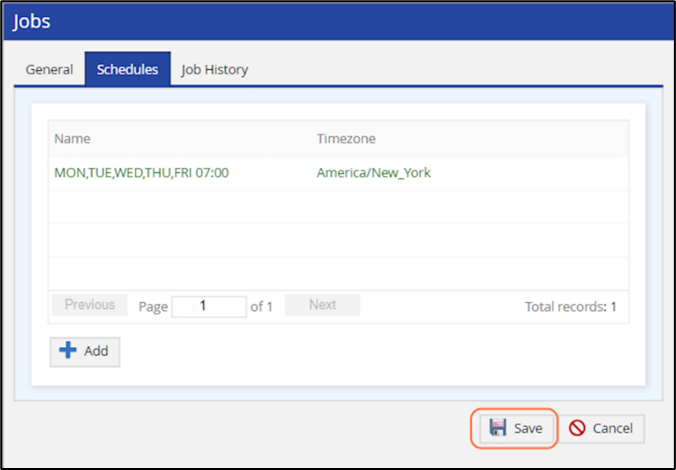
10. Click on Save to complete the Campaign Job Schedule
You will notice the schedule is in green font, until you Save
You have now completed creating a Scheduled Campaign Job.