Download PDF
Download page Outbound Dialing Service Configuration.
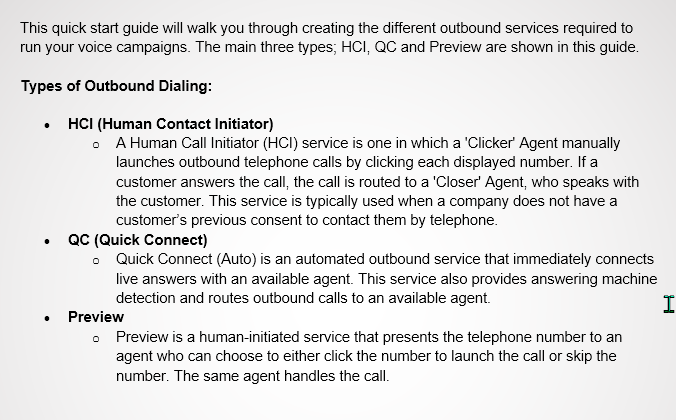
Outbound Dialing Service Configuration
Helpful Links:
- Additional Services in LVP: https://help.livevox.com/quick-start/understanding-service-types?from_search=110437462#human-call-initiator-hci-3
- Details on overall Campaign Management: https://docs.livevox.com/productdocumentation/admin-guides/u17/campaign-management
Navigate to HCI Outbound Dialing
Navigate to QC Outbound Dialing
Navigate to Preview Outbound Dialing
HCI Outbound Dialing
First, we need to locate an existing HCI service to copy and create the new service. The portal does not allow you to create a new service, only copy. New services may be created by LiveVox with a Customer Care request if required.
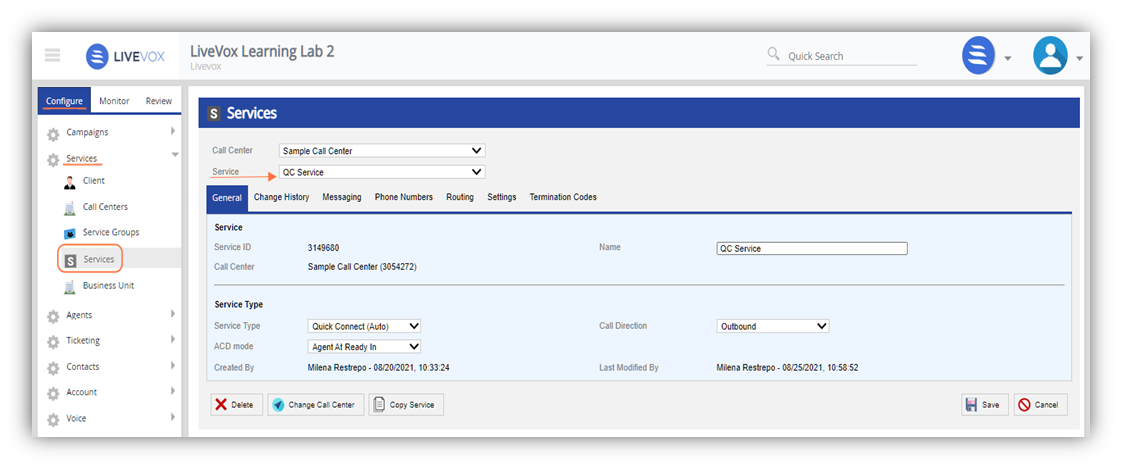
1. Navigate to Configure > Services > Services
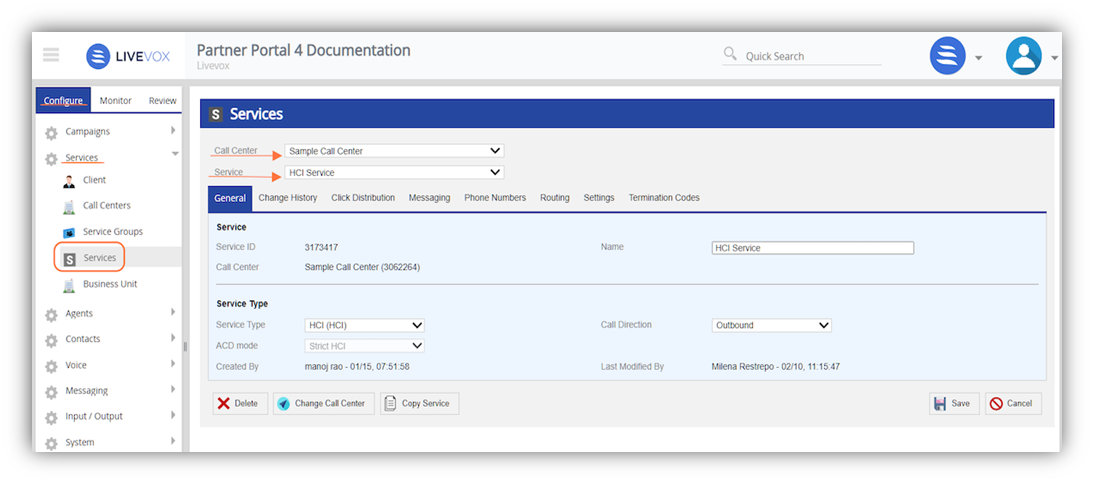
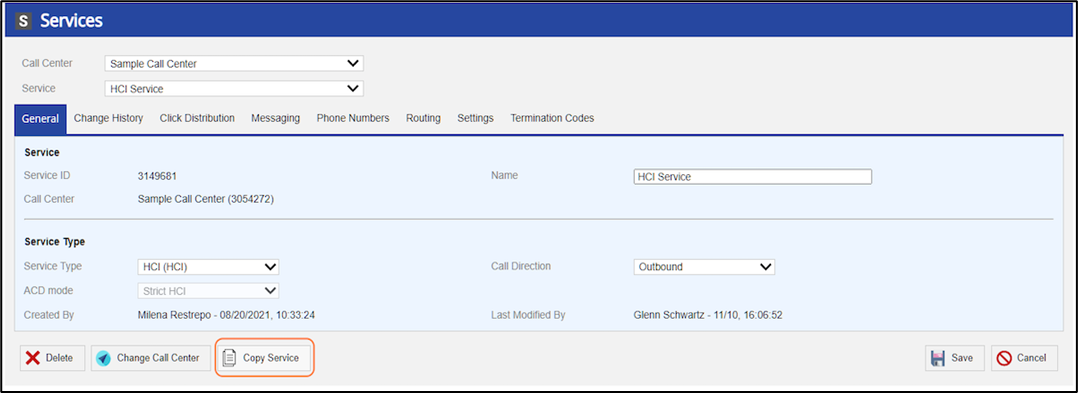
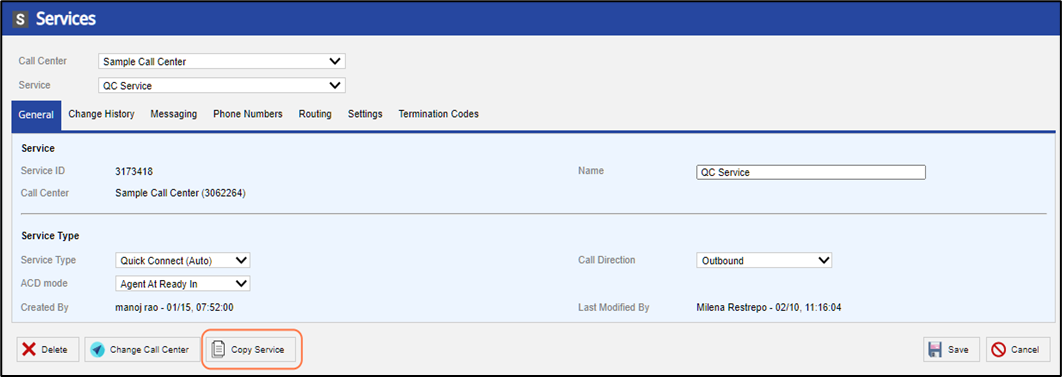
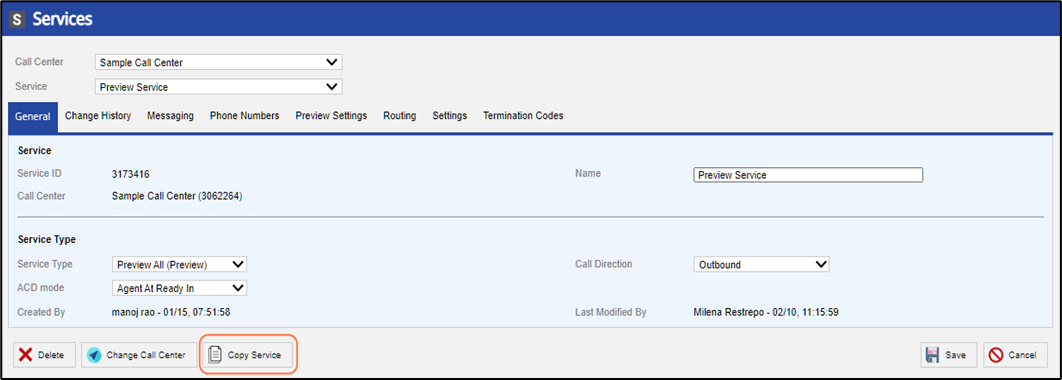
2. From the Services window, click on the Copy Service button
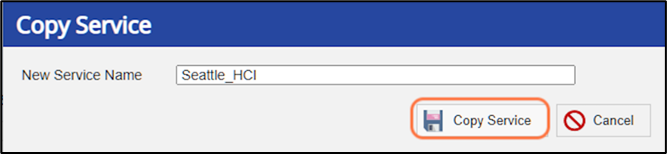
3. Give the new service a name and click Copy Service to save
4. The image below shows the new service 'Seattle_HCI', under the Sample Call Center. Next, we will move this service to the appropriate call center, 'Learning Lab'.
Click on the Change Call Center button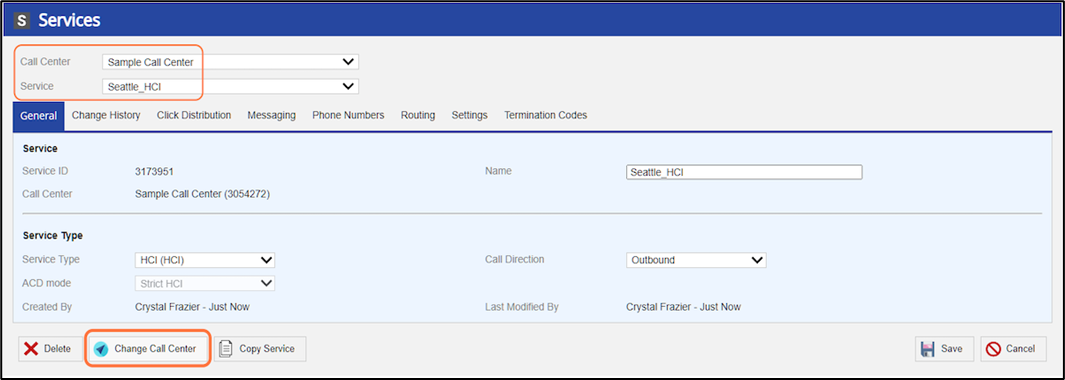
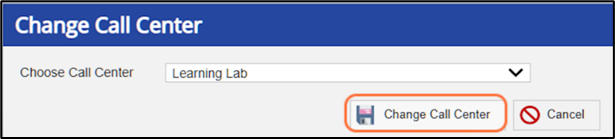
5. Change Call Center pop-up box
- Chose the call center you want the service to appear under
- In this example, we will choose "Learning Lab" from the drop-down menu
- Click Change Call Center to save
6. Refresh your web browser window
You will now find the newly created service, 'Seattle_HCI' located under call center 'Learning Lab'.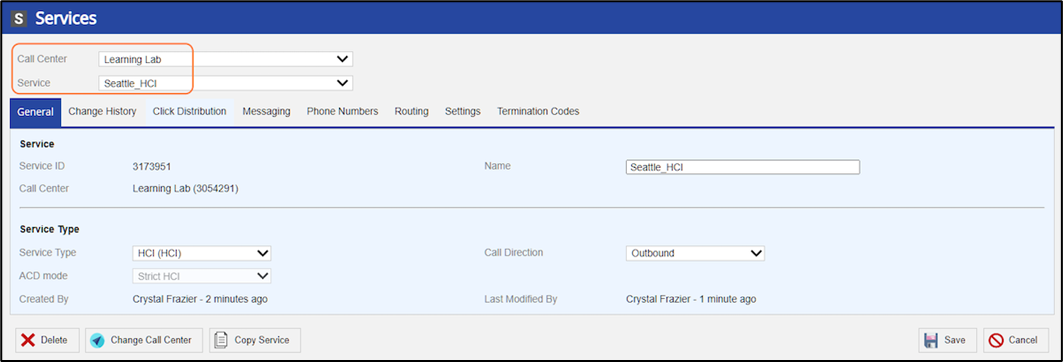 9
9
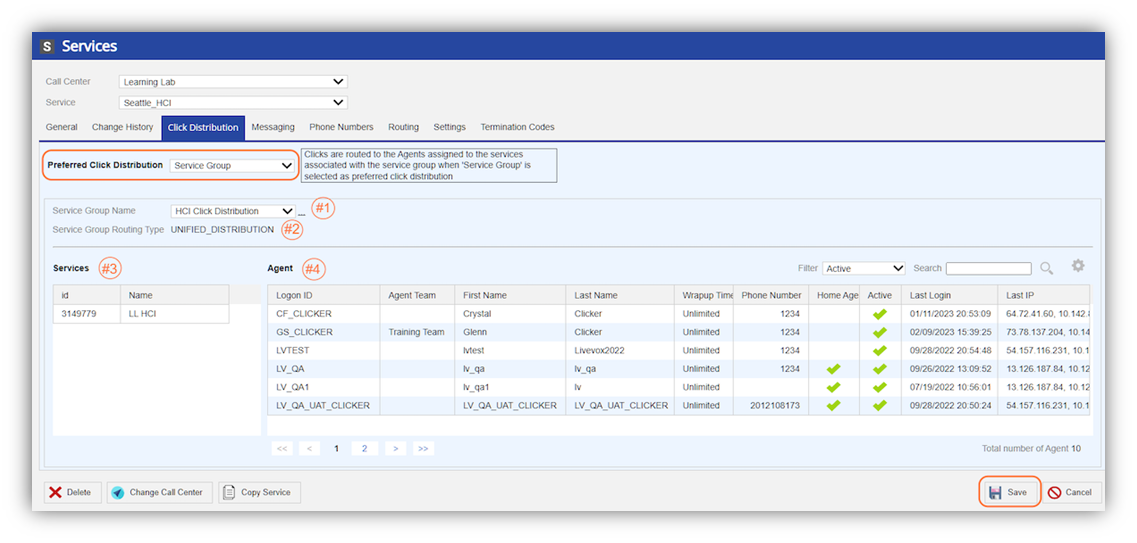
7. Navigate to the Click Distribution tab
This tab provides two options for routing your campaign records to "Clicker Agents" that will dial the records.
Preferred Click Distribution > Service
Service:
- Used when the Clickers will log into this specific service (Seattle_HCI)
- Click the Save button after changes made.

Preferred Click Distribution > Service Group
Service Group:
- Used when the Clickers log into a 'central' HCI service to receive records from multiple HCI services
- This is helpful if you have a limited number of Clickers, but many HCI services
- Click the Save button after changes made.
- Service Group Name:
- Choose from the list of service groups
- Service Group Routing Type:
- Populates the setting based on the service group configuration, from the Service Group window
- Services:
- Displays the services that are assigned to the service group
- Agent:
- Displays the agents that are assigned to the services
To learn more about Service Groups, please visit: https://docs.livevox.com/productdocumentation/admin-guides/latest/introduction-to-livevox/configuring-client-sites-call-centers-services-and-business-units/managing-service-groups
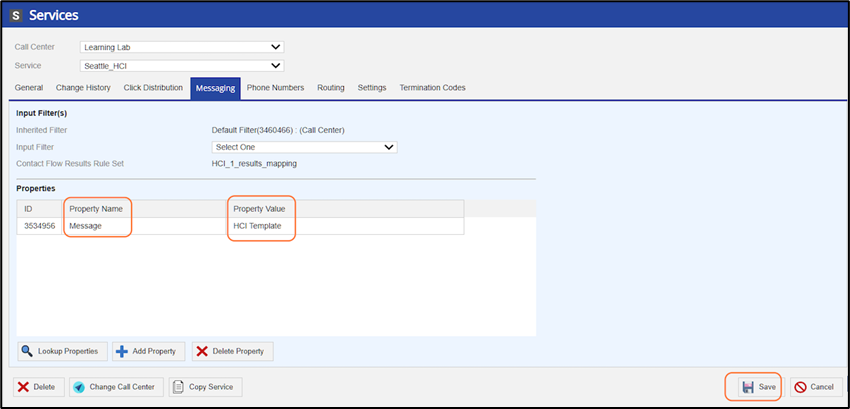
8. Navigate to the Messaging tab
This tab assigns the outbound message template to the service. A 'message template' contains any phrases heard by customers and call routing modules.
Properties
- Make sure the Property Name "Message" is listed
- Make sure the Property Value displays your HCI message template
- The standard configuration is shown below
Click the Save button after changes made.
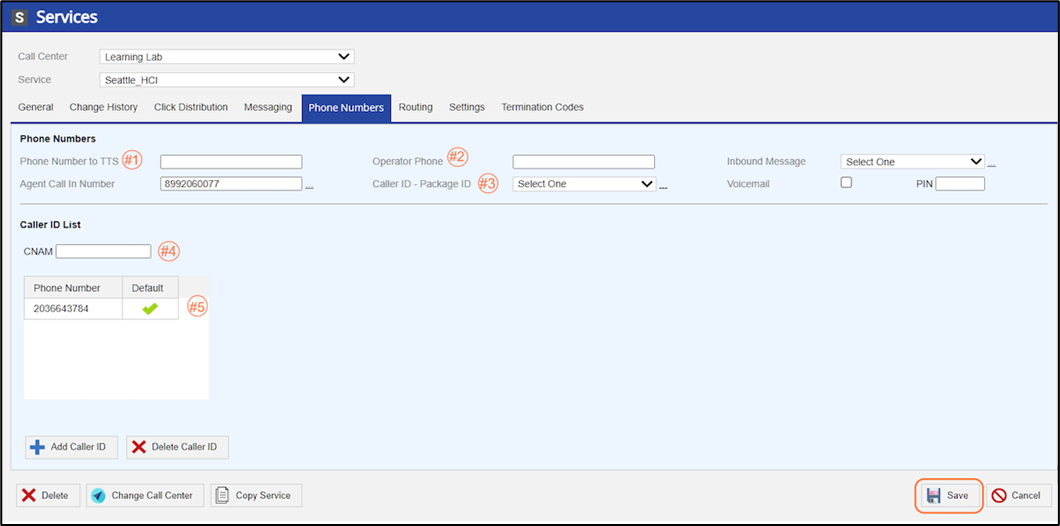
9. Navigate to the Phone Numbers tab
This tab defines the phone numbers used for the service.
- Phone Number to TTS:
- The number used in answering machine messages for text to speech (TTS)
- Operator Phone:
- The number used when dialing, using extensions rather than direct lines (DIDs)
- For Manual services, the Operator Phone will function as the Caller ID
- Caller ID - Package ID:
- The list of CID packages that contains Local Caller ID numbers (depending on geography), Toll-Free numbers, or a combination of both. These numbers can be displayed on the call recipient's caller ID. Clicking on the link to the right of the Caller ID - Package ID field will take you to the CID Package screen. This screen displays a list of CID numbers for the selected package.
- For more information, view the CID Package section of our Administrative Guide, located in our Help Center: https://docs.livevox.com/productdocumentation/admin-guides/latest/voice/cid-package
- CNAM:
- Outbound calls can be configured with customized CNAM (Caller NAMe) information (the alphanumeric description displayed on the Caller ID interface for consumers or businesses). This field supports 15 printable ASCII characters (A-Z, 0-9).
- Campaigns using CID Package or File-Based caller ID will not use this number.
- Default Caller ID:
- The list of phone numbers that can be set (Default option) to appear on the call recipient's Caller ID display.
Click the Save button after changes made.
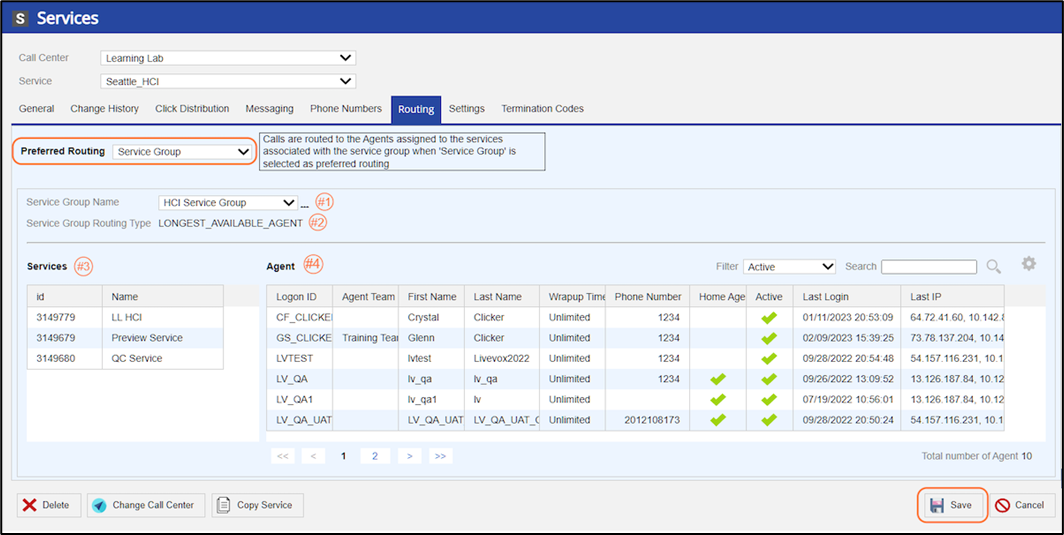
10. Navigate to the Routing tab:
This tab determines the routing of customer calls to agents.
Preferred Routing > Service Group
Service Group
- Calls are routed to an agent that is assigned to one of the services associated with the chosen service group.
- This is helpful because the service group can contain multiple services, which means you can route customer calls to agents across those multiple services, rather than agents being required to all login to the same place.
- Service Group Name:
- Choose from the list of service groups
- Service Group Routing Type:
- Populates the setting based on the service group configuration, from the Service Group configuration window
- Services:
- Displays the services that are included within the service group
- Agent:
- Displays the agents that are assigned to the services Click the Save button after changes made.
To learn more about Service Groups, please visit: https://docs.livevox.com/productdocumentation/admin-guides/latest/introduction-to-livevox/configuring-client-sites-call-centers-services-and-business-units/managing-service-groups
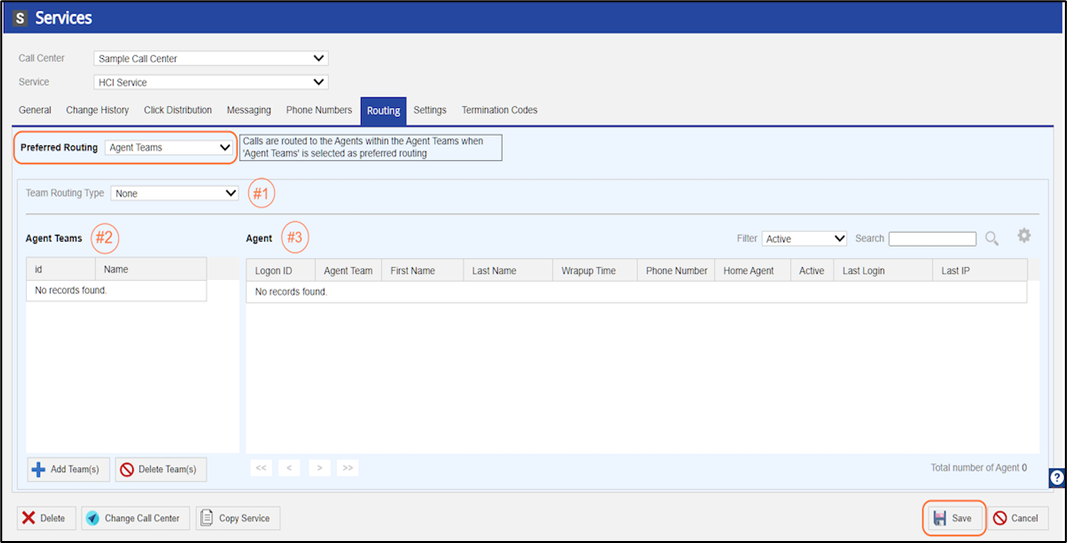
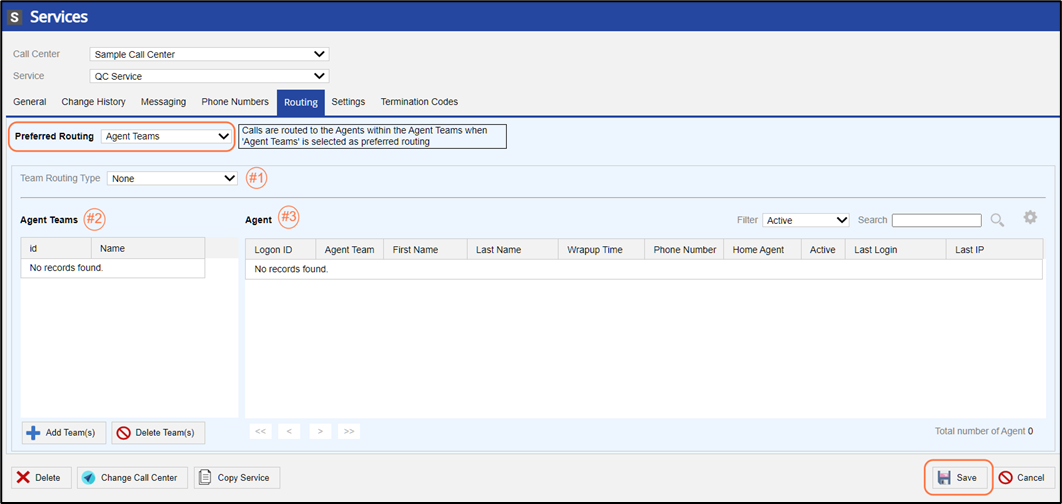
Preferred Routing > Agent Teams
Agent Teams
- Uses a team or group of agents, rather than a service to route calls to the appropriate agents.
- This works just like the Service Group routing but offers another organization method for grouping agents.
- Team Routing Type: choose from the list in the drop-down menu
- Agent Teams: Displays the Agent Teams associated with the Preferred Routing
- Agent: Displays the agents that are assigned to the teams Click the Save button after changes made.
11. Navigate to the Settings tab:
Once you are finished, click the Save button.
For detailed information on the Settings tab, please visit: https://help.livevox.com/quick-start/configuring-client-level-service-settings?from_search=110658195
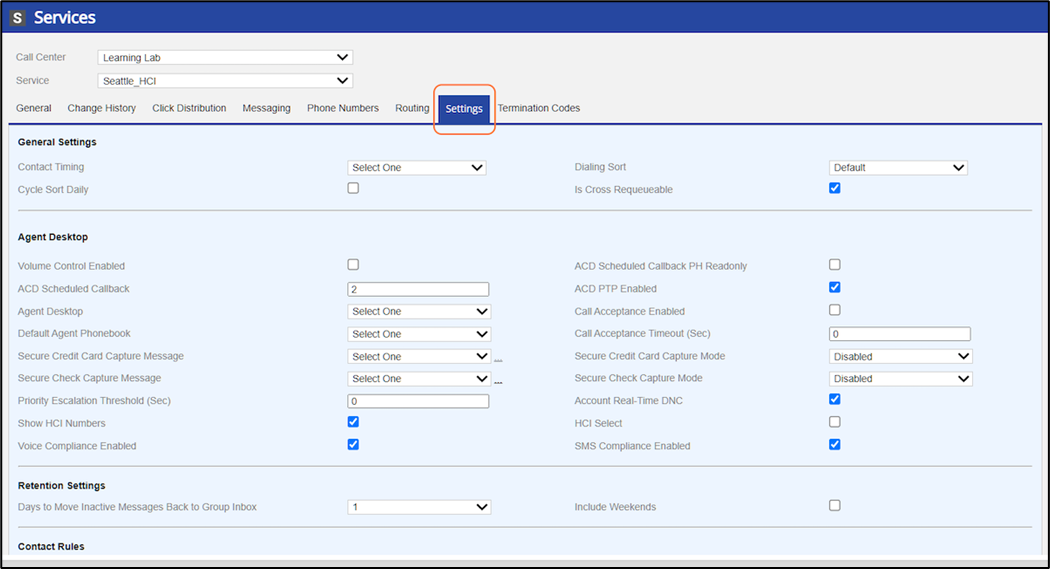

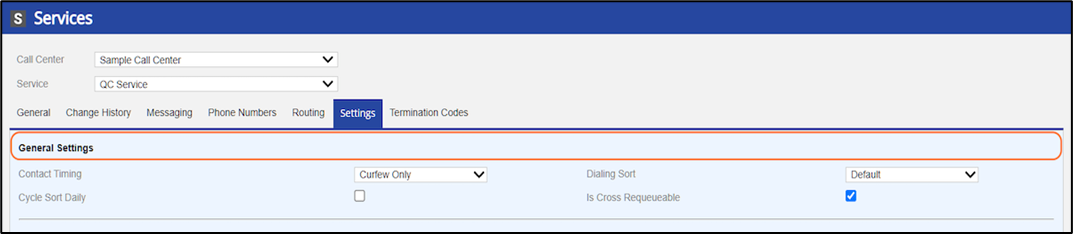
General Settings:
- Contact Timing: the default dialing restrictions for outbound contacts
- Dialing Sort: choose the order in which the numbers are dialed in a campaign
- We recommend using 'Default' or 'Campaign Round Robin', which supports dialing multiple campaigns simultaneously.
- Cycle Sort Daily: check this box to allow the system to choose a different dialing sort method daily
- Is Cross Requeueable: keep this box checked to have the option to requeue these contact records, into a new campaign later in the day
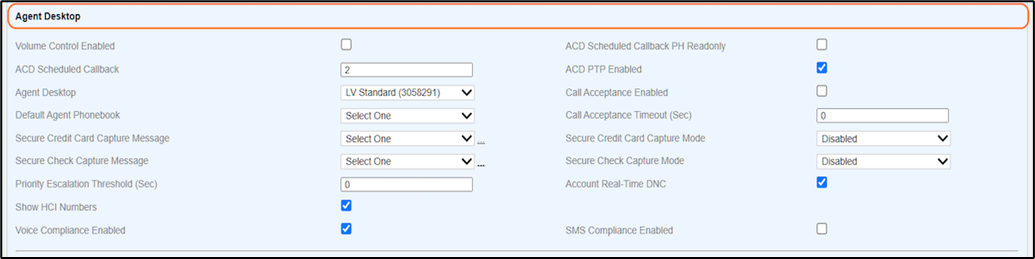
Agent Desktop:
We will focus on the standard fields of this section.
- Volume Control Enabled: give the agent access to a mute button and volume controls for their microphone
- ACD PTP Enabled: keep this box checked to prompt the agent to fill out the dollar amount associated to the Promise to Pay termination code.
- Agent Desktop: choose the associated agent desktop that will be used to handle calls from this service
- If you do not choose an option, the default will be whichever agent desktop is assigned at the call center-level (LV_Standard)
- Default Agent Phonebook: choose the associated agent phonebook that will be available to agents associated with this service
- Account Real-Time DNC: keep this box checked to allow Do Not Call (DNC) validations before the call may be made
- Show HCI Numbers: keep this box checked to display the phone numbers to the clicker agent
- Voice Compliance Enabled: keep this box checked for all calls made, to be forced to comply with the dialing rules assigned to this service
Retention Settings: used for inbound SMS, Email and Chats

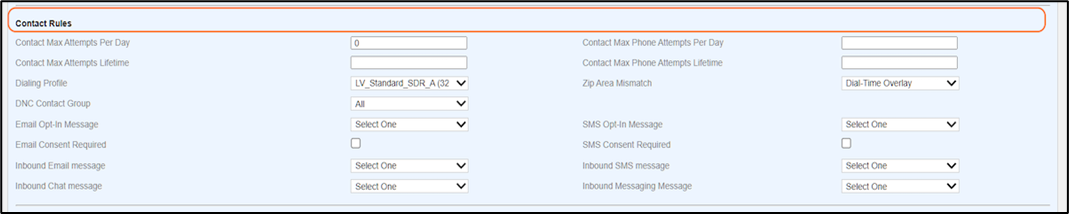
Contact Rules:
- Contact Max Attempts Per Day: set the maximum number of outbound dialing attempts per day, for any phone number associated with an account
- Contact Max Phone Attempts Per Day: set the maximum number of times Account+Phone match can be attempted per day
- Contact Max Attempts Lifetime: set the total number of times a unique Account may be attempted
- Contact Max Phone Attempts Lifetime: set the total number of times a unique Account+Phone match may be attempted
- Dialing Profile: associate the dialing profile that should be used for this service
- The standard profile is already assigned (LV_Standard_SDR_A)
- To build a new Dialing Profile, please visit: https://help.livevox.com/campaign-management/creating-or-modifying-dialing-profiles-and-dialing-strategies?from_search=110662614
- Zip Area Mismatch: determines the logic used to compare the Account's zip code to an area code before dialing
- Dial-Time Overlay is the standard option assigned: Enhanced zip area mismatch coverage to include all time zones between Atlantic (GMT-4) and American Samoa (GMT-11). Start and end times for mismatched scenarios are dynamically set where the start time is based on the Westernmost open hours and end time is based on the Easternmost closed hours.
- Zip Area Mismatch: determines the logic used to compare the Account's zip code to an area code before dialing
KPI Settings: adjust the service level formula used in Reporting

Defaults:
- Voice ID: choose the voice talent used for the campaigns that run on this service
- not required for HCI campaigns
- AM Option: choose the answering machine detection setting for the service
- We recommend the "Don't Leave Messages" setting
- If an answering machine is detected, no message is left, and the call is disconnected
- We recommend the "Don't Leave Messages" setting
- Scrub: provides the option to include or separate wireless and landline phones due to specific strategy needs
- Scrub options:
- None (0): This is the default option and if selected no scrub occurs.
- Wireless (1): Scrubs all wireless phone numbers so that all landline numbers can be dialed.
- Landline (2): Scrubs all landline numbers so that all wireless phone numbers can be dialed.
- Scrub options:
- Voice ID: choose the voice talent used for the campaigns that run on this service

Call Recording:
- Call Recording Enabled: this box will be checked if call recording is included in your service agreement
- Call Recording Bitrate: refers to the audio resolution
- 16-bit is the standard setting for voice calls
- 32/64-bit will be selected if Speech Analytics is enabled
- Record External Transfers: keep this box checked if you want the call to continue being recorded when the call is transferred off the LiveVox platform (external party) until the call is terminated.
- Days of Call Recordings: this field is configured by LiveVox and refers to the number of days your call recordings can be viewed in the Reporting section of the platform

Advanced Features:
- Leave No Messages: enables the system to automatically disconnect the call, upon answering machine detection
- Not used for HCI campaigns
- Append Campaigns Report at End of Day: reports the campaign results at the end of the day, rather than when the campaign is stopped or completed
- Caller ID Source ID: the phone number pulsed as the caller id for the service
- Leave as Fixed - uses one of the service's static options from the Phones tab under the Configure panel
- Operator Phone Source ID: the phone number used when bridging whisper agents
- Leave as Fixed
- Callback Phone Source ID: the phone number used in messages
- Leave as Fixed
- Leave No Messages: enables the system to automatically disconnect the call, upon answering machine detection

Navigate to the Termination Codes tab:
Termcode Enabled: keep this box checked to enable the use of termination codes on this service The termination codes displayed here are the ones assigned to this service. To change or add
termination codes, navigate to the Termination Codes window under Configuration.
For help configuring your termination codes, please visit: https://docs.livevox.com/productdocumentation/admin-guides/u17/introduction-to-livevox/managing-agents-and-agent-desktops/termination-code-configuration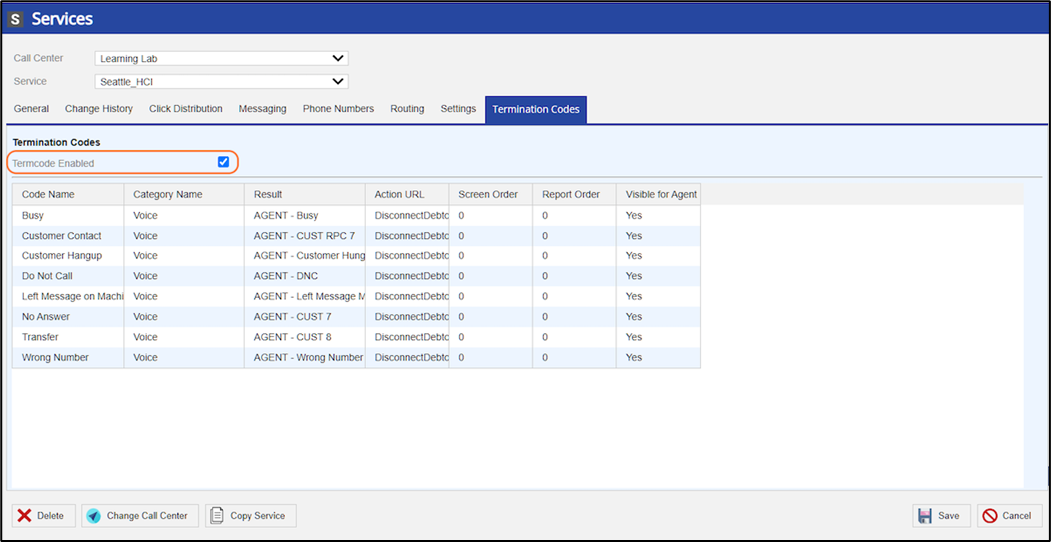
12. Be sure to Save, before you navigate away from the Services window.

QC Outbound Dialing
First, we need to locate an existing QC service to copy and create the new service. The portal does not allow you to create a new service, only copy. New services may be created by LiveVox with a Customer Care request, if required.
1. Navigate to Configure > Services > Services
2. From the Services window, click on the Copy Service button
3. Give the new service a name and click Copy Service to save
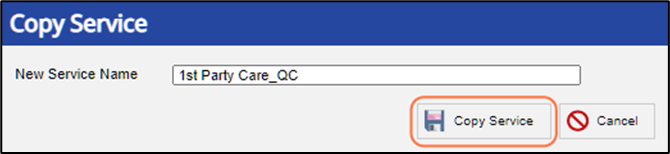
4. The image below shows the new service '1st Party Care_QC', under the Sample Call Center. Next, we will move this service to the appropriate call center, 'Learning Lab'.
Click on the Change Call Center button
5. Change Call Center pop-up box
- Chose the call center you want the service to appear under
- In this example, we will choose "Learning Lab" from the drop-down menu
- Click Change Call Center to save

6. Refresh your web browser window
You will now find the newly created service, '1st Party Care_QC' located under call center 'Learning Lab'.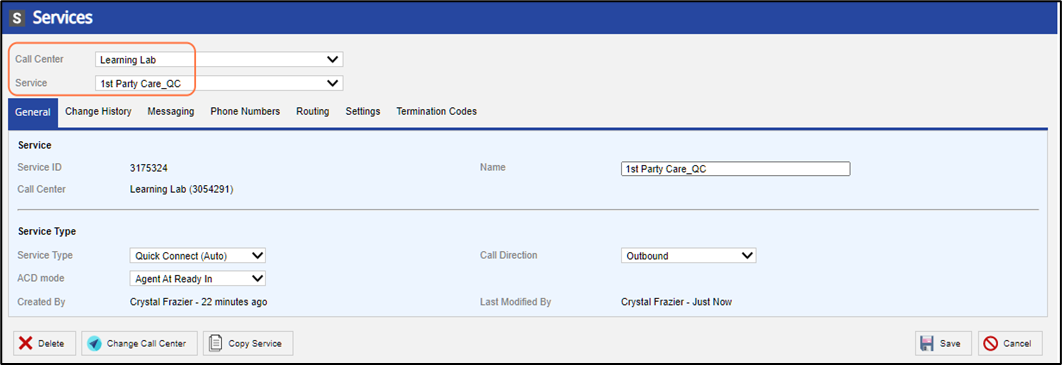
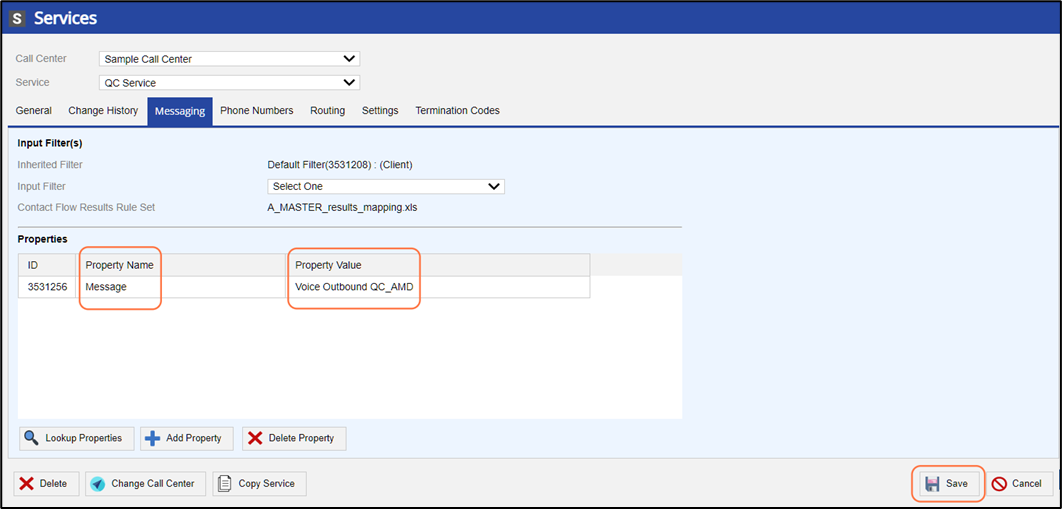
7. Navigate to the Messaging tab
This tab assigns the outbound message template to the service. A 'message template' contains any phrases heard by customers and call routing modules.
Properties
- Make sure the Property Name "Message" is listed
- Make sure the Property Value displays your QC message template
The standard configuration is shown below
Click the Save button after changes made.
8. Navigate to the Phone Numbers tab
This tab defines the phone numbers used for the service.
- Phone Number to TTS:
- The number used in answering machine messages for text to speech (TTS)
- Operator Phone:
- The number used when dialing, using extensions rather than direct lines (DIDs)
- For Manual services, the Operator Phone will function as the Caller ID
- Caller ID - Package ID:
- The list of CID packages that contains Local Caller ID numbers (depending on geography), Toll-Free numbers, or a combination of both. These numbers can be displayed on the call recipient's caller ID. Clicking on the link to the right of the Caller ID - Package ID field will take you to the CID Package screen. This screen displays a list of CID numbers for the selected package.
- For more information, view the CID Package section of our Administrative Guide, located in our Help Center: https://docs.livevox.com/productdocumentation/admin-guides/latest/voice/cid-package
- CNAM:
- Outbound calls can be configured with customized CNAM (Caller NAMe) information (the alphanumeric description displayed on the Caller ID interface for consumers or businesses). This field supports 15 printable ASCII characters (A-Z, 0-9).
- Campaigns using CID Package or File-Based caller ID will not use this number.
- Default Caller ID:
- The list of phone numbers that can be set (Default option) to appear on the call recipient's Caller ID display.
Click the Save button after changes made.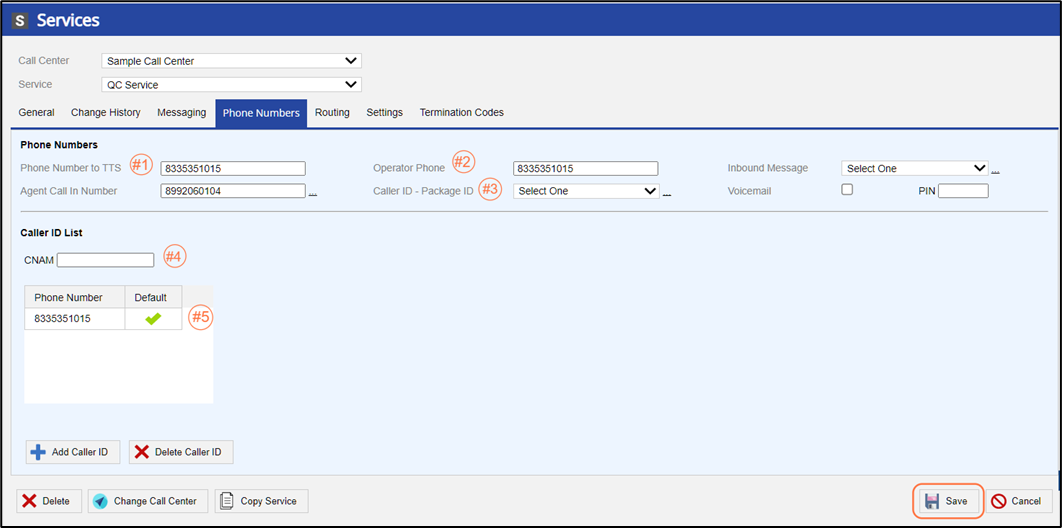
9. Navigate to the Routing tab:
This tab determines the routing of customer calls to agents.
Preferred Routing > Service
- Service: Calls are routed to an agent logged in to this specific service
- Agent: Displays the agents associated with the service. These are the agents who have been granted the ability to "log into" the service directly via the Agents configuration.
- Click the Save button after changes made.
To learn more about Service Groups, please visit: https://docs.livevox.com/productdocumentation/admin-guides/latest/introduction-to-livevox/configuring-client-sites-call-centers-services-and-business-units/managing-service-groups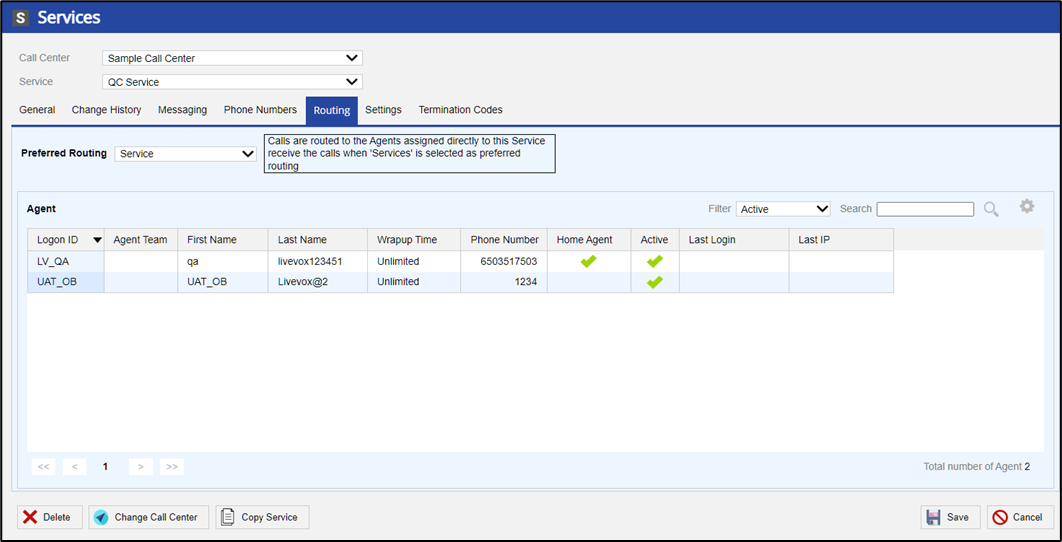
Preferred Routing > Service Group
Service Group
- Calls are routed to an agent that is assigned to one of the services associated with the chosen service group.
- This is helpful because the service group can contain multiple services, which means you can route customer calls to agents across those multiple services, rather than agents being required to all login to the same place.
- Service Group Name:
- Choose from the list of service groups
- Service Group Routing Type:
- Populates the setting based on the service group configuration, from the Service Group configuration window
- Services:
- Displays the services that are included within the service group
- Agent:
- Displays the agents that are assigned to the services
To learn more about Service Groups, please visit: https://docs.livevox.com/productdocumentation/admin-guides/latest/introduction-to-livevox/configuring-client-sites-call-centers-services-and-business-units/managing-service-groups
Click the Save button after changes made.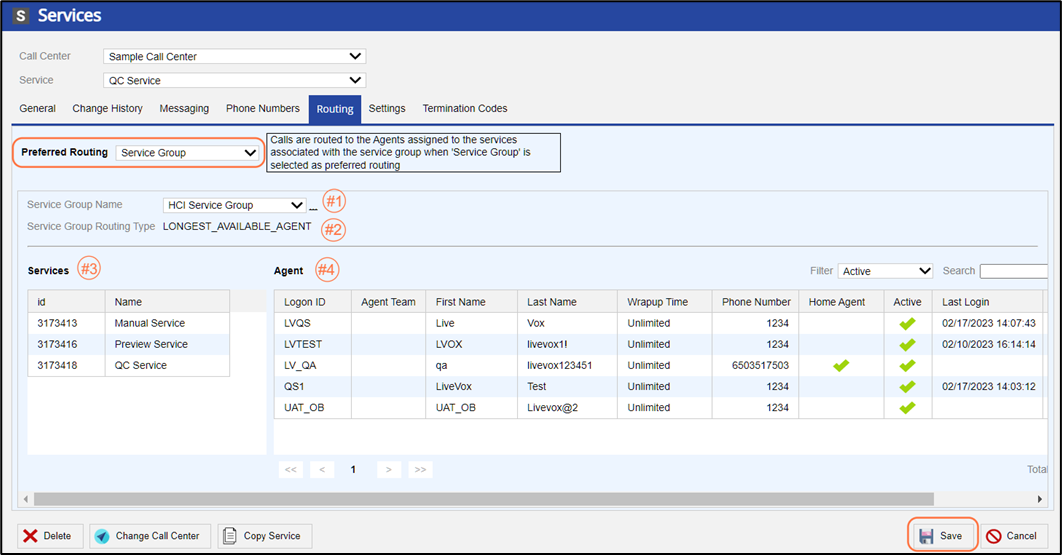
Preferred Routing > Agent Teams
Agent Teams
- Uses a team or group of agents, rather than a service to route calls to the appropriate agents.
- This works just like the Service Group routing but offers another organization method for grouping agents.
- Team Routing Type: choose from the list in the drop-down menu
- Agent Teams: Displays the Agent Teams associated with the Preferred Routing
- Agent: Displays the agents that are assigned to the teams
Click the Save button after changes made.
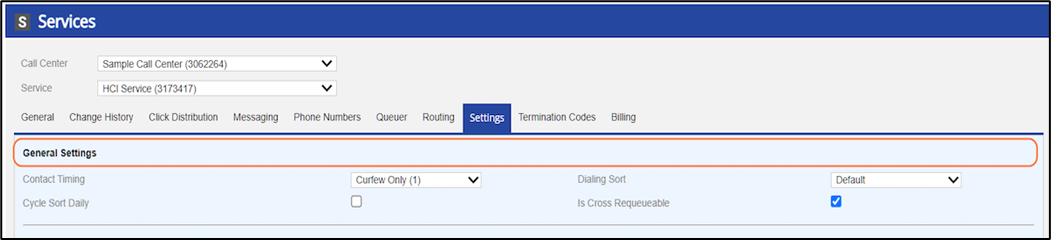
10. Navigate to the Settings tab:
Once you are finished, click Save.
For detailed information on the Settings tab, please visit: https://help.livevox.com/quick-start/configuring-client-level-service-settings?from_search=110658195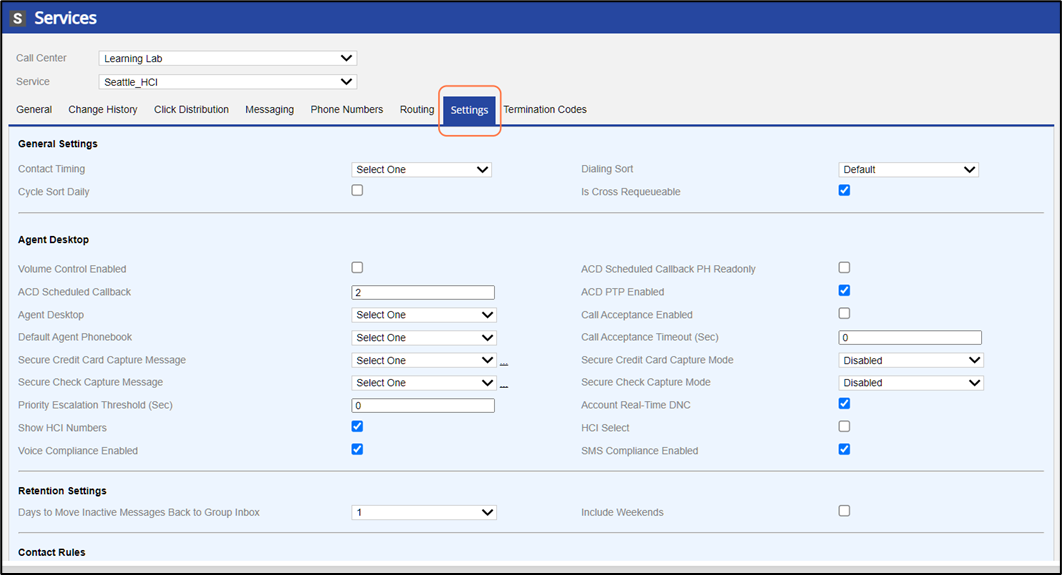

General Settings:
- Contact Timing: the default dialing restrictions for outbound contacts
- Dialing Sort: choose the order in which the numbers are dialed in a campaign
- We recommend using 'Default' or 'Campaign Round Robin', which supports dialing multiple campaigns simultaneously.
- Cycle Sort Daily: check this box to allow the system to choose a different dialing sort method daily
- Is Cross Requeueable: keep this box checked to have the option to requeue these contact records, into a new campaign later in the day
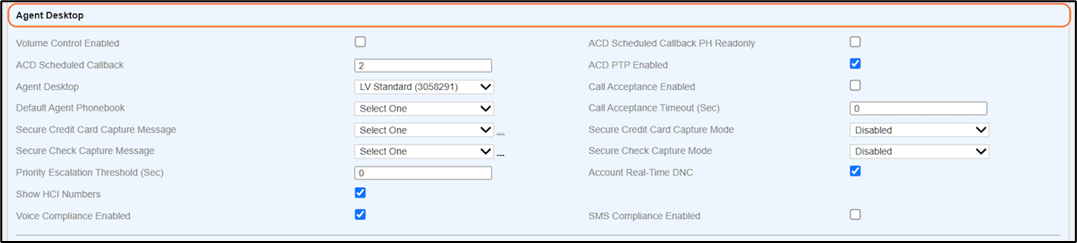
Agent Desktop:
We will focus on the standard fields of this section.
- Volume Control Enabled: give the agent access to a mute button and volume controls for their microphone
- ACD PTP Enabled: keep this box checked to prompt the agent to fill out the dollar amount associated to the Promise to Pay termination code.
- Agent Desktop: choose the associated agent desktop that will be used to handle calls from this service
- If you do not choose an option, the default will be whichever agent desktop is assigned at the call center-level (LV_Standard)
- Default Agent Phonebook: choose the associated agent phonebook that will be available to agents associated with this service
- Account Real-Time DNC: keep this box checked to allow Do Not Call (DNC) validations before the call may be made
- Show HCI Numbers: keep this box checked to display the phone numbers to the clicker agent
- Voice Compliance Enabled: keep this box checked for all calls made, to be forced to comply with the dialing rules assigned to this service
Retention Settings: used for inbound SMS, Email and Chats:

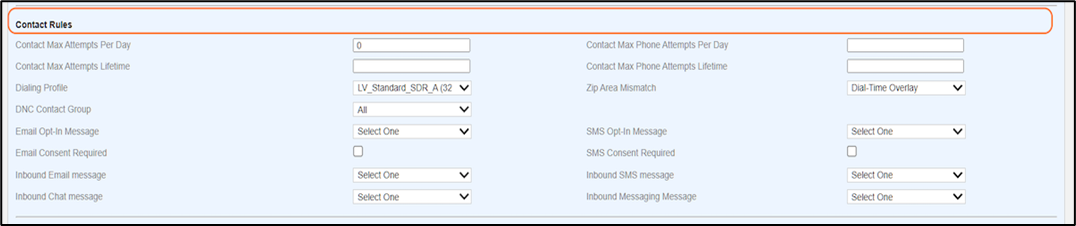
Contact Rules:
- Contact Max Attempts Per Day: set the maximum number of outbound dialing attempts per day, for any phone number associated with an account
- Contact Max Phone Attempts Per Day: set the maximum number of times Account+Phone match can be attempted per day
- Contact Max Attempts Lifetime: set the total number of times a unique Account may be attempted
- Contact Max Phone Attempts Lifetime: set the total number of times a unique Account+Phone match may be attempted
- Dialing Profile: associate the dialing profile that should be used for this service
- The standard profile is already assigned (LV_Standard_SDR_A)
- To build a new Dialing Profile, please visit: https://help.livevox.com/campaign-management/creating-or-modifying-dialing-profiles-and-dialing-strategies?from_search=110662614
- Zip Area Mismatch: determines the logic used to compare the Account's zip code to an area code before dialing
- Dial-Time Overlay is the standard option assigned: Enhanced zip area mismatch coverage to include all time zones between Atlantic (GMT-4) and American Samoa (GMT-11). Start and end times for mismatched scenarios are dynamically set where the start time is based on the Westernmost open hours and end time is based on the Easternmost closed hours.
KPI Settings: adjust the service level formula used in Reporting:

Defaults:
- Voice ID: choose the voice talent used for the campaigns that run on this service
- Not required for HCI campaigns
- AM Option: choose the answering machine detection setting for the service
- We recommend the "Don't Leave Messages" setting
- If an answering machine is detected, no message is left, and the call is disconnected
- We recommend the "Don't Leave Messages" setting
- Voice ID: choose the voice talent used for the campaigns that run on this service
- Scrub: provides the option to include or separate wireless and landline phones due to specific strategy needs
- Scrub options:
- None (0): This is the default option and if selected no scrub occurs.
- Wireless (1): Scrubs all wireless phone numbers so that all landline numbers can be dialed.
- Landline (2): Scrubs all landline numbers so that all wireless phone numbers can be dialed.

Call Recording:
- Call Recording Enabled: this box will be checked if call recording is included in your service agreement
- Call Recording Bitrate: refers to the audio resolution
- 16-bit is the standard setting for voice calls
- 32/64-bit will be selected if Speech Analytics is enabled
- Record External Transfers: keep this box checked if you want the call to continue being recorded when the call is transferred off the LiveVox platform (external party) until the call is terminated.
- Days of Call Recordings: this field is configured by LiveVox and refers to the number of days your call recordings can be viewed in the Reporting section of the platform

Advanced Features:
- Leave No Messages: enables the system to automatically disconnect the call, upon answering machine detection
- Not used for HCI campaigns
- Append Campaigns Report at End of Day: reports the campaign results at the end of the day, rather than when the campaign is stopped or completed
- Caller ID Source ID: the phone number pulsed as the caller id for the service
- Leave as Fixed - uses one of the service's static options from the Phones tab under the Configure panel
- Operator Phone Source ID: the phone number used when bridging whisper agents
- Leave as Fixed
- Callback Phone Source ID: the phone number used in messages
- Leave as Fixed
- Leave No Messages: enables the system to automatically disconnect the call, upon answering machine detection

Navigate to the Termination Codes tab:
Termcode Enabled: keep this box checked to enable the use of termination codes on this service The termination codes displayed here are the ones assigned to this service. To change or add
termination codes, navigate to the Termination Codes window under Configuration.
For help configuring your termination codes, please visit: https://docs.livevox.com/productdocumentation/admin-guides/u17/introduction-to-livevox/managing-agents-and-agent-desktops/termination-code-configuration 
13. Be sure to Save, before you navigate away from the Services window.

Preview Outbound Dialing
First, we need to locate an existing QC service to copy and create the new service. The portal does not allow you to create a new service, only copy. New services may be created by LiveVox with a Customer Care request, if required.
1. Navigate to Configure > Services > Services
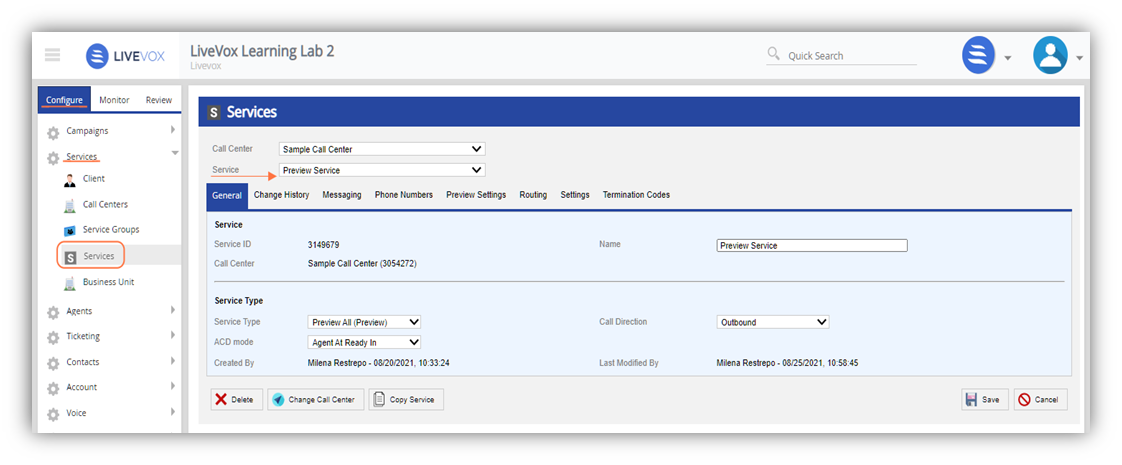
2. From the Services window, click on the Copy Service button
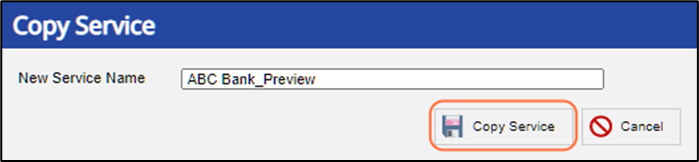
3. Give the new service a name and click Copy Service to save
4. The image below shows the new service 'ABC Bank _Preview', under the Sample Call Center. Next, we will move this service to the appropriate call center, 'Learning Lab'.
Click on the Change Call Center button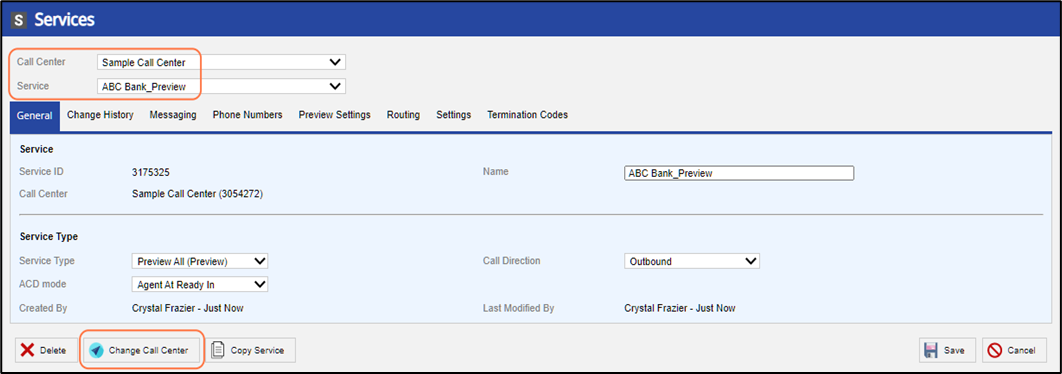
5. Change Call Center pop-up box
- Chose the call center you want the service to appear under
- In this example, we will choose "Learning Lab" from the drop-down menu
- Click Change Call Center to save

6. Refresh your web browser window
You will now find the newly created service, 'ABC Bank_Preview' located under call center 'Learning Lab'.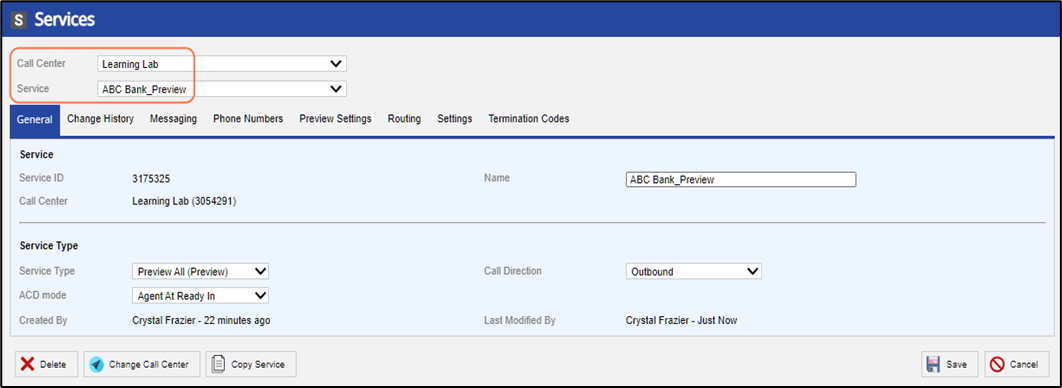
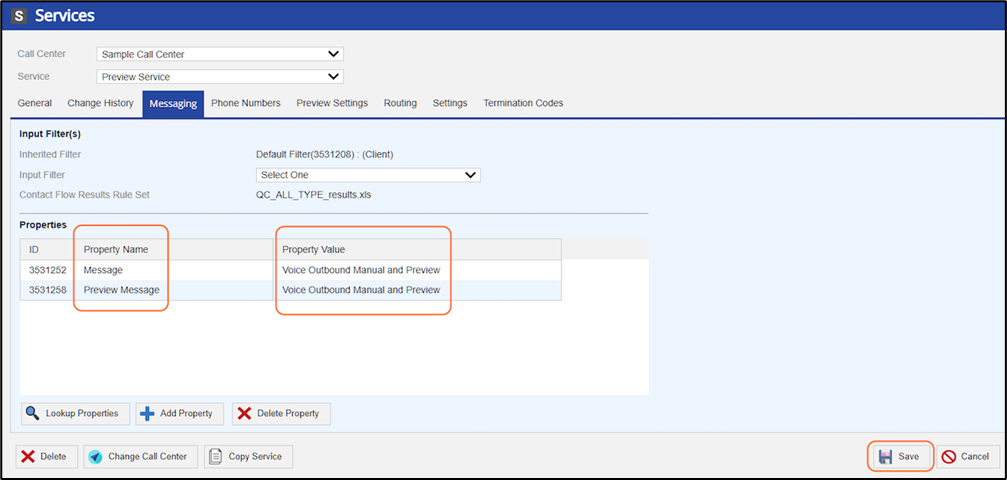
7. Navigate to the Messaging tab:
This tab assigns the outbound message template to the service. A 'message template' contains any phrases heard by customers and call routing modules.
Review the Properties, then Click the Save button after any changes are made.
- Make sure the Property Name "Message" and "Preview Message" are listed
- Make sure the Property Value displays your Preview message templates
The standard configuration is shown below
8. Navigate to the Phone Numbers tab:
This tab defines the phone numbers used for the service.
- Phone Number to TTS:
- The number used in answering machine messages for text to speech (TTS)
- Operator Phone:
- The number used when dialing, using extensions rather than direct lines (DIDs)
- For Manual services, the Operator Phone will function as the Caller ID
- Caller ID - Package ID:
- The list of CID packages that contains Local Caller ID numbers (depending on geography), Toll-Free numbers, or a combination of both. These numbers can be displayed on the call recipient's caller ID. Clicking on the link to the right of the Caller ID - Package ID field will take you to the CID Package screen. This screen displays a list of CID numbers for the selected package.
- For more information, view the CID Package section of our Administrative Guide, located in our Help Center: https://docs.livevox.com/productdocumentation/admin-guides/latest/voice/cid-package
- CNAM:
- Outbound calls can be configured with customized CNAM (Caller NAMe) information (the alphanumeric description displayed on the Caller ID interface for consumers or businesses). This field supports 15 printable ASCII characters (A-Z, 0-9).
- Campaigns using CID Package or File-Based caller ID will not use this number.
- Default Caller ID:
- The list of phone numbers that can be set (Default option) to appear on the call recipient's Caller ID display.
Click the Save button after changes made.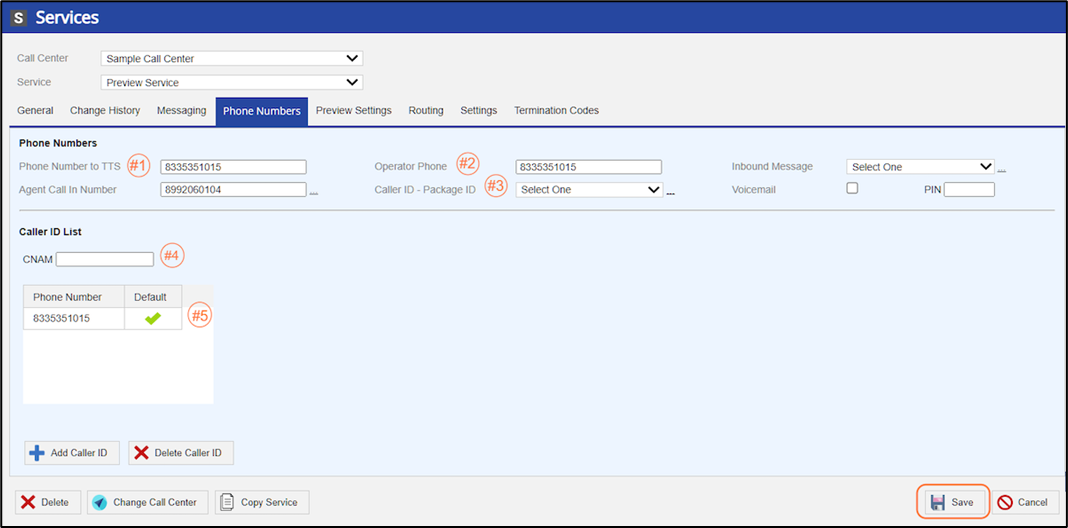
9. Navigate to the Preview Settings tab:
This tab determines the actions during a Preview campaign.
- Preview Mode: predetermined setting when you create a Preview type campaign.
- Preview Manual Allowed: Check this box if you want to grant the agent the ability to dial a number manually, rather than using only the phone number that popped up for the Preview call.
- Preview Skip Allowed: Check this box if you want to grant the agent the choice to "skip" an account. If an account is skipped at the agent's request, the record will move to the end of the campaign and become available to dial again.
- Preview Auto Completion: Check this box if you want the agent to dial all numbers on the current account, before presenting the next account number.
- The 'Preview Manual Allowed' checkbox must be enabled to disable this feature
- Preview Timeout: The number of seconds before the agent must dial a phone number on the account, before the preview default action occurs.
- Preview Default Action: if no action is taken and the timeout reaches zero, the record will be considered "skipped". A record of your interaction will be recorded in the database and the agent's status will change to "Not Ready".
- Preview Confirm Dial: Controls the level of agent intervention required before the call is launched.
- Dial Button: secondary confirmation of the number
- 10 Digit Entry: 10-digit manually entry

10. Navigate to the Routing tab:
This tab determines the routing of customer calls to agents.
Preferred Routing > Service
- Service: Calls are routed to an agent logged in to this specific service
- Agent: Displays the agents associated with the service. These are the agents who have been granted the ability to "log into" the service directly via the Agents configuration.
- Click the Save button after changes made.
To learn more about Service Groups, please visit: https://docs.livevox.com/productdocumentation/admin-guides/latest/introduction-to-livevox/configuring-client-sites-call-centers-services-and-business-units/managing-service-groups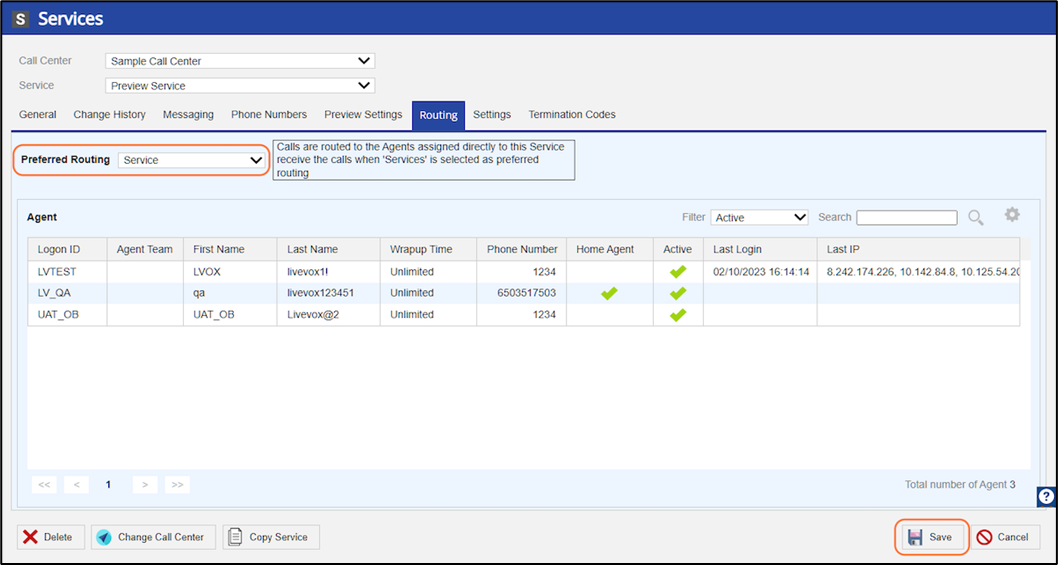
Preferred Routing > Service Group
Service Group
- Calls are routed to an agent that is assigned to one of the services associated with the chosen service group.
- This is helpful because the service group can contain multiple services, which means you can route customer calls to agents across those multiple services, rather than agents being required to all login to the same place.
- Service Group Name:
- Choose from the list of service groups
- Service Group Routing Type:
- Populates the setting based on the service group configuration, from the Service Group configuration window
- Services:
- Displays the services that are included within the service group
- Agent:
- Displays the agents that are assigned to the services
Click the Save button after changes made.
To learn more about Service Groups, please visit: https://docs.livevox.com/productdocumentation/admin-guides/latest/introduction-to-livevox/configuring-client-sites-call-centers-services-and-business-units/managing-service-groups
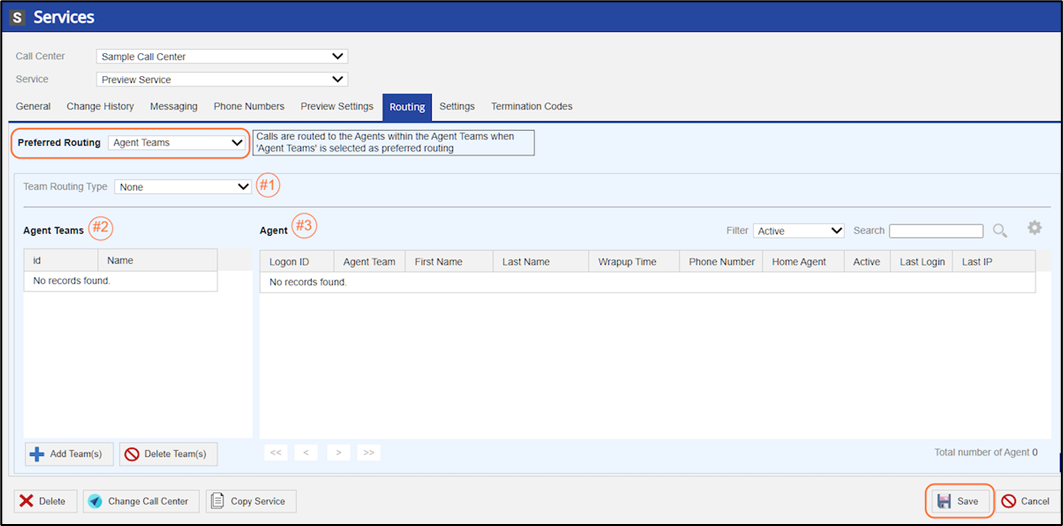
Preferred Routing > Agent Teams
Agent Teams
- Uses a team or group of agents, rather than a service to route calls to the appropriate agents.
- This works just like the Service Group routing but offers another organization method for grouping agents.
- Team Routing Type: choose from the options in the drop-down menu
- Agent Teams: Displays the Agent Teams associated with the Preferred Routing
- Agent: Displays the agents that are assigned to the teams
Click the Save button after changes made.
11. Navigate to the Settings tab:
Once you are finished, click the Save button.
For detailed information on the Settings tab, please visit: https://help.livevox.com/quick-start/configuring-client-level-service-settings?from_search=110658195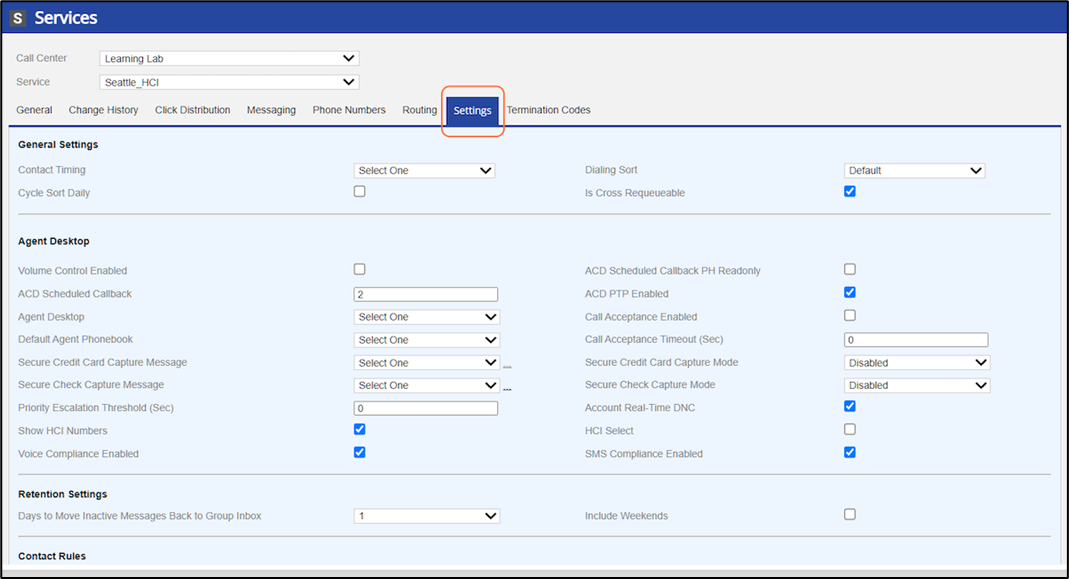

General Settings:
- Contact Timing: the default dialing restrictions for outbound contacts
- Dialing Sort: choose the order in which the numbers are dialed in a campaign
- We recommend using 'Default' or 'Campaign Round Robin', which supports dialing multiple campaigns simultaneously.
- Cycle Sort Daily: check this box to allow the system to choose a different dialing sort method daily
- Is Cross Requeueable: keep this box checked to have the option to requeue these contact records, into a new campaign later in the day

Agent Desktop:
We will focus on the standard fields of this section.
- Volume Control Enabled: give the agent access to a mute button and volume controls for their microphone
- ACD PTP Enabled: keep this box checked to prompt the agent to fill out the dollar amount associated to the Promise to Pay termination code.
- Agent Desktop: choose the associated agent desktop that will be used to handle calls from this service
- If you do not choose an option, the default will be whichever agent desktop is assigned at the call center-level (LV_Standard)
- Default Agent Phonebook: choose the associated agent phonebook that will be available to agents associated with this service
- Account Real-Time DNC: keep this box checked to allow Do Not Call (DNC) validations before the call may be made
- Show HCI Numbers: keep this box checked to display the phone numbers to the clicker agent
- Voice Compliance Enabled: keep this box checked for all calls made, to be forced to comply with the dialing rules assigned to this service

Retention Settings: used for inbound SMS, Email and Chats

Contact Rules:
- Contact Max Attempts Per Day: set the maximum number of outbound dialing attempts per day, for any phone number associated with an account
- Contact Max Phone Attempts Per Day: set the maximum number of times Account+Phone match can be attempted per day
- Contact Max Attempts Lifetime: set the total number of times a unique Account may be attempted
- Contact Max Phone Attempts Lifetime: set the total number of times a unique Account+Phone match may be attempted
- Dialing Profile: associate the dialing profile that should be used for this service
- The standard profile is already assigned (LV_Standard_SDR_A)
- To build a new Dialing Profile, please visit: https://help.livevox.com/campaign-management/creating-or-modifying-dialing-profiles-and-dialing-strategies?from_search=110662614
- Zip Area Mismatch: determines the logic used to compare the Account's zip code to an area code before dialing
- Dial-Time Overlay is the standard option assigned: Enhanced zip area mismatch coverage to include all time zones between Atlantic (GMT-4) and American Samoa (GMT-11). Start and end times for mismatched scenarios are dynamically set where the start time is based on the Westernmost open hours and end time is based on the Easternmost closed hours.
- Zip Area Mismatch: determines the logic used to compare the Account's zip code to an area code before dialing

KPI Settings: adjust the service level formula used in Reporting

Defaults:
- Voice ID: choose the voice talent used for the campaigns that run on this service
- not required for HCI campaigns
- AM Option: choose the answering machine detection setting for the service
- We recommend the "Don't Leave Messages" setting
- If an answering machine is detected, no message is left, and the call is disconnected
- We recommend the "Don't Leave Messages" setting
- Scrub: provides the option to include or separate wireless and landline phones due to specific strategy needs
- Scrub options:
- None (0): This is the default option and if selected no scrub occurs.
- Wireless (1): Scrubs all wireless phone numbers so that all landline numbers can be dialed.
- Landline (2): Scrubs all landline numbers so that all wireless phone numbers can be dialed.
- Scrub options:
- Voice ID: choose the voice talent used for the campaigns that run on this service

Call Recording:
- Call Recording Enabled: this box will be checked if call recording is included in your service agreement
- Call Recording Bitrate: refers to the audio resolution
- 16-bit is the standard setting for voice calls
- 32/64-bit will be selected if Speech Analytics is enabled
- Record External Transfers: keep this box checked if you want the call to continue being recorded when the call is transferred off the LiveVox platform (external party) until the call is terminated.
- Days of Call Recordings: this field is configured by LiveVox and refers to the number of days your call recordings can be viewed in the Reporting section of the platform

Advanced Features:
- Leave No Messages: enables the system to automatically disconnect the call, upon answering machine detection
- Not used for HCI campaigns
- Append Campaigns Report at End of Day: reports the campaign results at the end of the day, rather than when the campaign is stopped or completed
- Caller ID Source ID: the phone number pulsed as the caller id for the service
- Leave as Fixed - uses one of the service's static options from the Phones tab under the Configure panel
- Operator Phone Source ID: the phone number used when bridging whisper agents
- Leave as Fixed
- Callback Phone Source ID: the phone number used in messages
- Leave as Fixed
- Leave No Messages: enables the system to automatically disconnect the call, upon answering machine detection

Navigate to the Termination Codes tab:
Termcode Enabled: keep this box checked to enable the use of termination codes on this service The termination codes displayed here are the ones assigned to this service. To change or add
termination codes, navigate to the Termination Codes window under Configuration.
For help configuring your termination codes, please visit: https://docs.livevox.com/productdocumentation/admin-guides/u15/introduction-to-livevox/managing-agents-and-agent-desktops/termination-code-configuration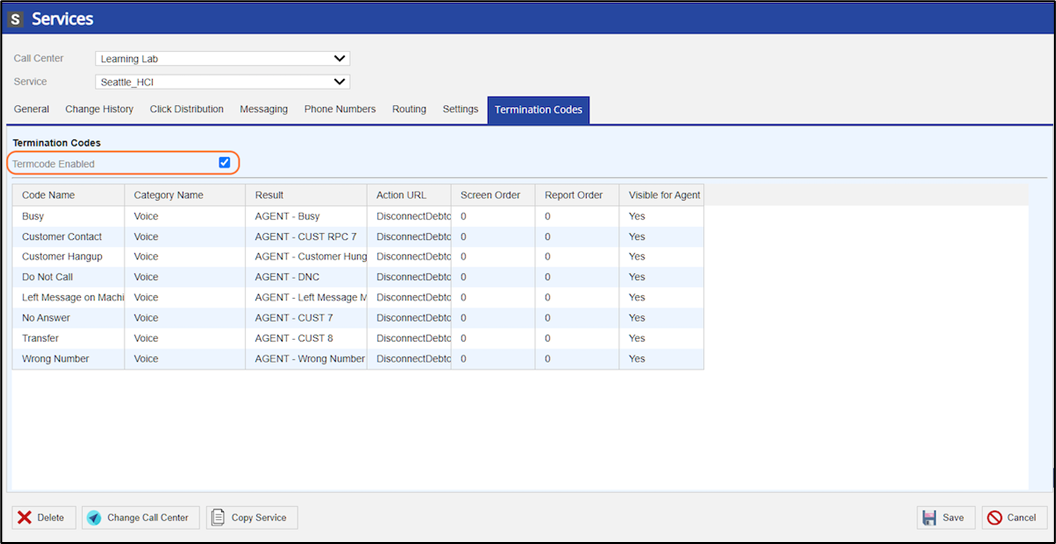
12. Be sure to Save, before you navigate away from the Services window.

Now that your service is configured, you can create your campaign and run your campaign.
To create a Manual or a Scheduled Campaign, please review the next section: Use Segmentation to Filter and Create Your Campaigns.