Download PDF
Download page Secure Payment Capture Infosheet.
Secure Payment Capture Infosheet
The LiveVox Secure Payment Capture (SPC) feature allows agents to securely capture and process customer payments over the phone by protect sensitive customer information. This feature must be enabled by permitted users. When using SPC, consumers are asked to enter their payment information through their telephone keypad.
Agents can use this feature from Agent Panel, Agent Panel with Extended Panel or Agent Panel with Designer.
Call and Screen Recordings are automatically paused with the initiation of the Basic Secure Payment Capture and resumed after the process of capturing the payment. There is no logging of Secure Payment Capture data.
When an agent enters Advanced Secure Payment Capture, the Call and Screen Recordings are no longer paused as the agent will only hear flat sounds in place of dual-tone multi-frequency signaling (DTMF) tones.
Secure Payment Capture Using Agent Desktop Widgets
Secure Payment Capture using Agent Desktop Widgets allows agents to speak the required instructions directly to the consumer and guide the consumer through the payment information gathering process in a more personal and “live” way to ensure a great consumer experience.
The following SPC widgets available in Unified Agent Desktop (UAD):
- Credit Card Basic widget
- Check Basic widget
- Credit Card Advanced widget
- Check Advanced widget
These widgets are available to agents once permitted user enables them.
If basic or advanced SPC widgets are configured for a Credit Card or Check, then those respective configurations will be available for the agents.
Configuring SPC Widgets
Permitted users can configure message prompts and other payment details which enables agents to guide the consumer through the payment information-gathering process by speaking the required instructions directly to the consumer. T To configure these widgets, navigate to Configure > Agents > Agent Desktop and double click the agent desktop with extended panel for which you want to configure the SPC widgets.
Credit Card Basic Widget
The Credit Card Basic widget allows configuring message prompts and card types. To add a Credit Card Basic widget:
- Select the Credit Card Basic widget from Available Widgets and click the Add button from the Extended Panel tab. The Add screen appears.
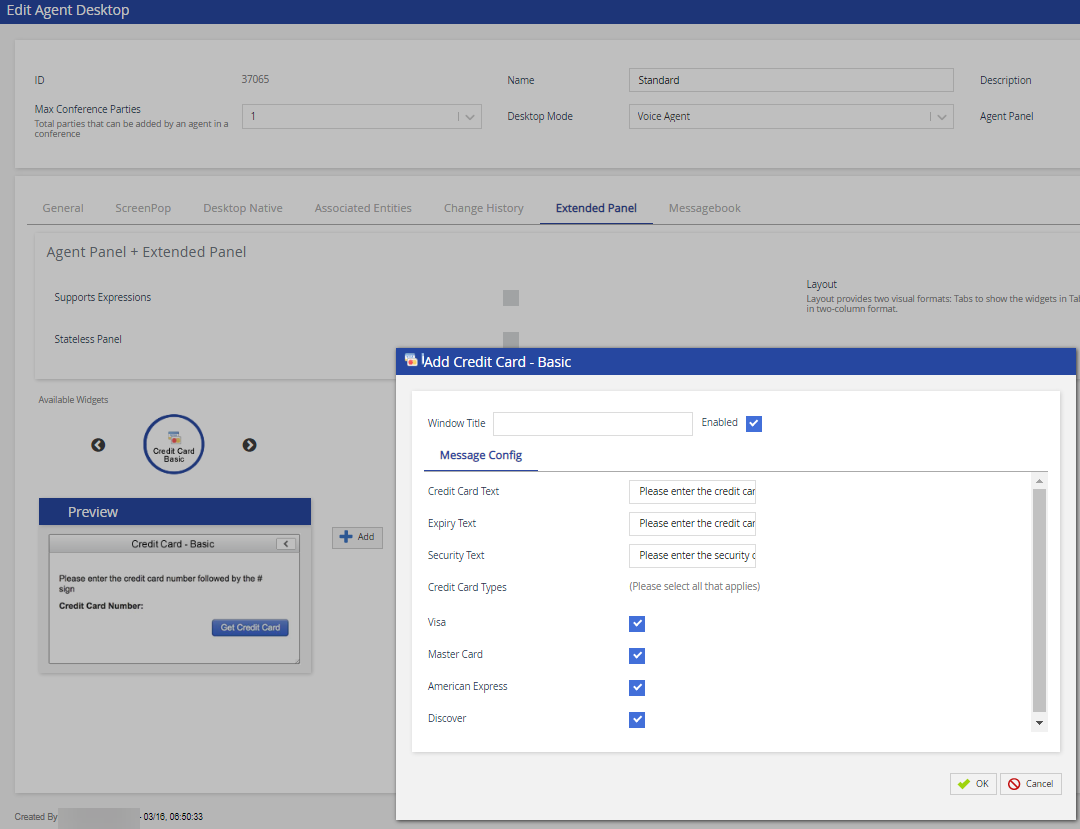
- Enter the widget name in the Window Title text-box.
- Select the Enabled checkbox to enable the widget on the extended panel of Agent Desktop
- Enter the message prompt for the credit card number in Credit Card Text text-box.
- Enter the message prompt for the credit card expiration date in the Expiry Text text-box.
- Enter the message prompt for the security code in the Security Text text-box.
- Under Credit Card Types, permitted users can select from the below card types to capture the payment:
- Visa
- Master Card
- American Express
- Discover
- Click OK to save the changes.
Check Basic widget
The Check Basic widget allows permitted users to configure message prompts for agents. To add a Check Basic widget:
- Select the widget from Available Widgets and click the Add button on the Extended Panel tab. The Add screen appears.
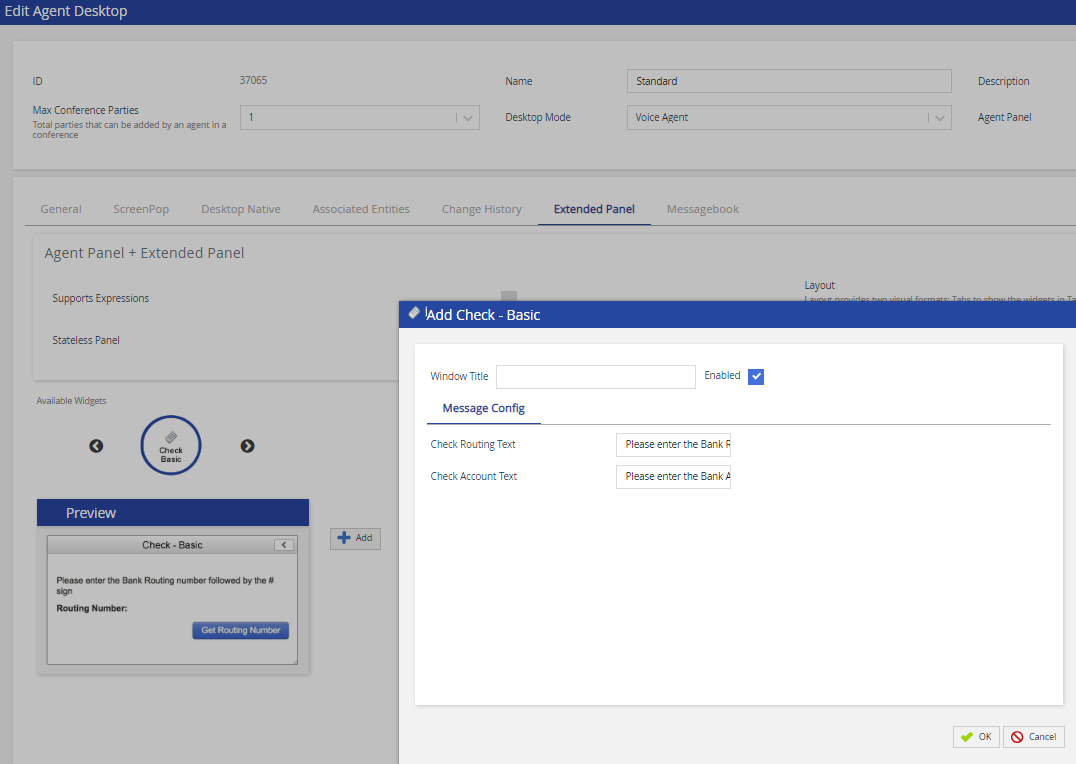
- Enter the widget name in the Window Title text-box.
- Select the Enabled checkbox to enable the widget on the extended panel of the Agent Desktop.
- Enter the message prompt for routing number in the Check Routing Text text-box.
- Enter the message prompt for account number in the Check Account Text text-box.
- Click OK to save the changes.
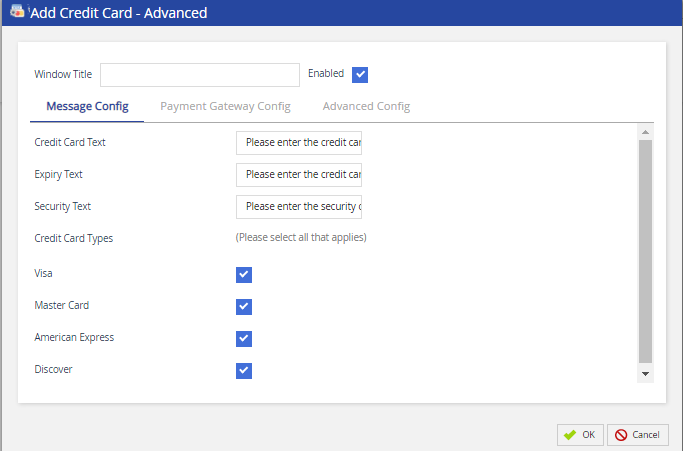
Credit Card Advanced widget
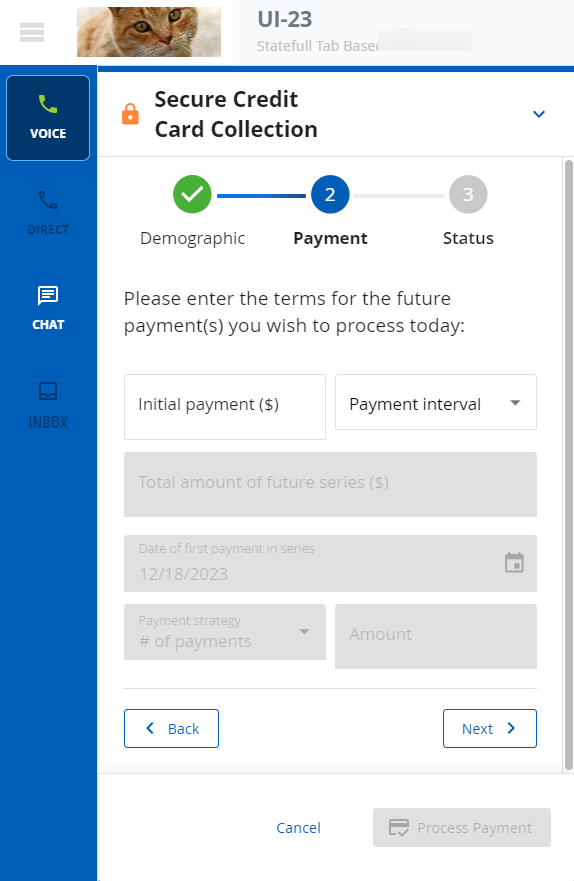
The Credit Card Advanced widget allows users to set message prompts for agents, Card types, Payment Gateway, and Advanced configurations. It enables agents to guide the consumer through the payment information-gathering process by speaking the required instructions directly to the consumer, specifying the consumer demographic, as well as make payment arrangements.
Advanced configuration requires web service integration with your payment processor's gateway via web service APIs.
To add the Credit Card Advanced widget:
- Select the widget from Available Widgets and click the Add button on the Extended Panel tab. The Add screen appears.
- Enter the widget name in the Window Title text-box.
- Select the Enabled checkbox to enable the widget on the extended panel of Agent Desktop
- Users can configure the below tabs.
Message Config - Allows to configure agent prompts and card types (refer above screen).
- Credit Card Text - Enter the message prompt for the credit card number.
- Expiry Text - Enter the message prompt for the credit card expiration date.
- Security Text - Enter the message prompt for the security code.
- Credit Card Types - Select from the below card types to capture the payment.
- Visa
- Master Card
- American Express
- Discover
- Payment Gateway Config - Allows configuring the web service URL, response keys, success or failure values to be extracted from the response, and additional parameters when sending the request.
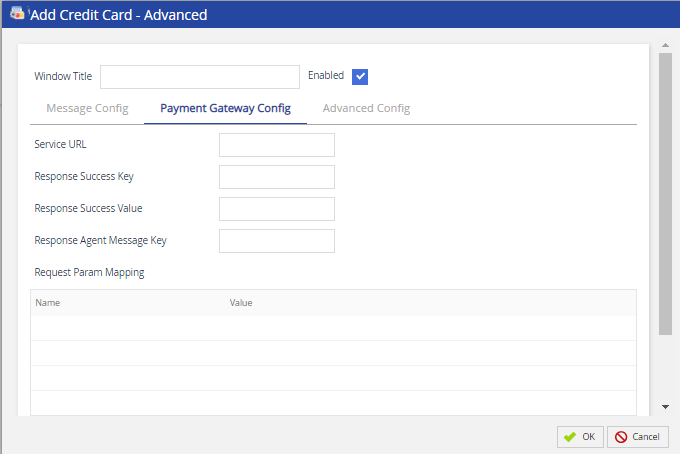
- Service URL - Enter the URL of the payment gateway.
- Response Success Key - Enter the name of the key variable which will be searched in the response for interpreting the success or failure of the request.
- Response Success Value - Enter the expected value of success key which will be treated as the success of the request.
Response Agent Message Key - If response variables are activated, enter the name of the key variable which will be searched in the response for interpreting as an agent message.

Please contact customercare@livevox.com to activate all response variables for use in the Response Agent Message Key.
- Request Param Mapping - Allows configuring additional parameters that will be passed when making the request to the payment gateway. Use Add and Delete buttons to configure the additional parameters.
- Advanced Config - Allows configuring payment gateway connectivity-related parameters which will be used when calling the HTTPS API of the payment gateway.
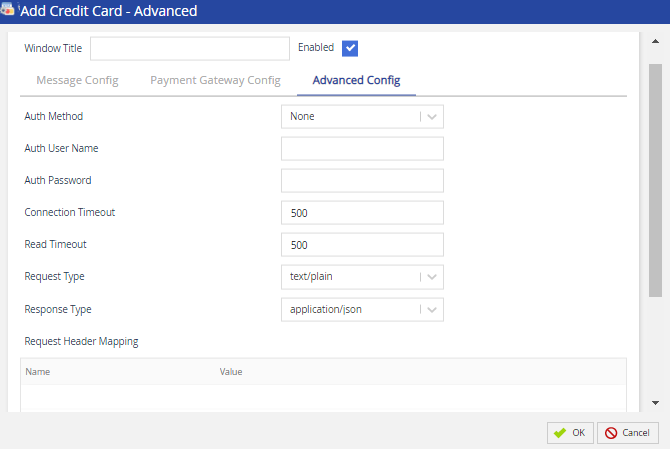
- Auth Method - Select the authorization method from the drop-down menu used to connect to the payment gateway. Available options are None and Basic.
Auth User Name - Enter the authorized user name for accessing the payment gateway.
- Auth Password - Enter the password for your Auth User Name.
- Connection Timeout - Enter the time in milliseconds which will be used as a timeout when making the connection to the payment gateway.
- Read Timeout - Enter the time in milliseconds which will be used as a timeout when waiting for the response from the payment gateway.
- Request Type - Select the value from the drop-down which will be used as content type to send the HTTPS request to the payment gateway.
- Response Type - Select the value from the drop-down which will be used as the content type for the response received from the payment gateway.
- Request Header Mapping - Allows configuring parameters that will be passed in HTTPS Header when making the request to the payment gateway. Use Add and Delete buttons to configure the additional parameters.
- Click OK to save the changes.
Check Advanced widget
The Check Advanced widget allows users to set Message prompts for agents, Payment Gateway, and Advanced configurations. It enables an agent to guide the consumer through the payment information-gathering process by speaking the required instructions directly to the consumer, specifying the consumer demographic, as well as make payment arrangements.
Advanced configuration requires web service integration with your payment processor's gateway via web service APIs.
To add the Check Advanced widget:
- Select the widget from Available Widgets and click the Add button on the Extended Panel tab. The Add screen appears.
- Enter the widget name in the Window Title text box.
- Select the Enabled checkbox to enable the widget on the extended panel of Agent Desktop
- Users can configure the following tabs:
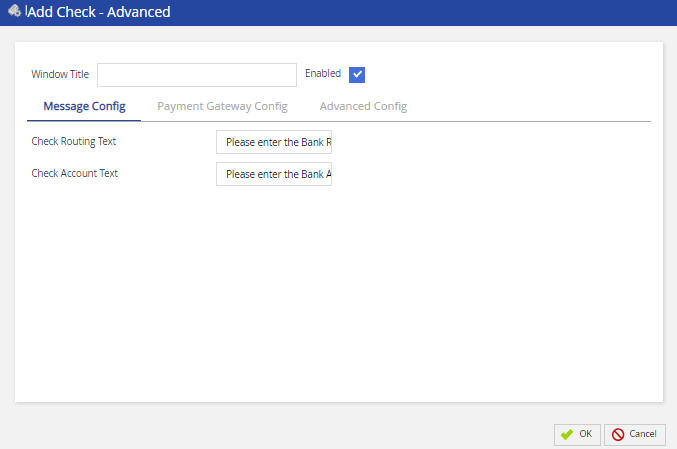
Message Config - Allows configuring agent prompts (see the above screenshot).
- Check Routing Text - Enter the message prompt for the routing number.
- Check Account Text - Enter the message prompt for the account number.
- Payment Gateway Config - Allows configuring the web service URL, response keys, success or failure values to be extracted from the response, and additional parameters when sending the request.
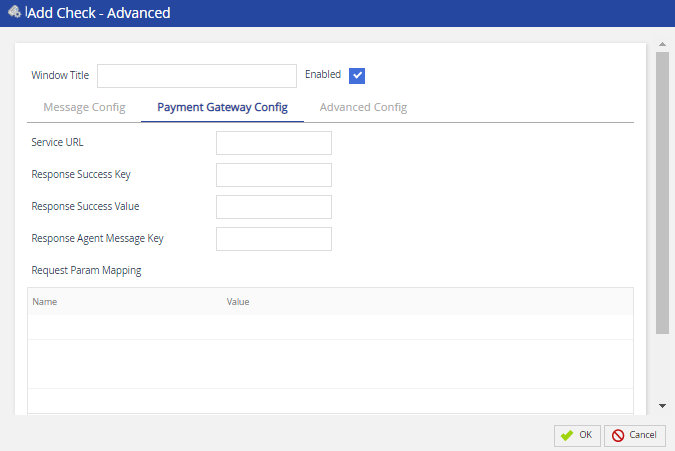
- Service URL - Enter the URL of the payment gateway.
- Response Success Key - Enter the name of the key variable that will be searched in the response for interpreting the success or failure of the request.
- Response Success Value - Enter the expected value of the success key which will be treated as the success of the request.
Response Agent Message Key - If response variables are activated, enter the name of the key variable which will be searched in the response for interpreting as an agent message.
Please contact customercare@livevox.com to activate all response variables for use in the Response Agent Message Key.
- Request Param Mapping - Allows configuring additional parameters that will be passed when making the request to the payment gateway. Use Add and Delete buttons to configure the additional parameters.
- Advanced Config - Allows configuring payment gateway connectivity-related parameters that will be used when calling the HTTPS API of the payment gateway.
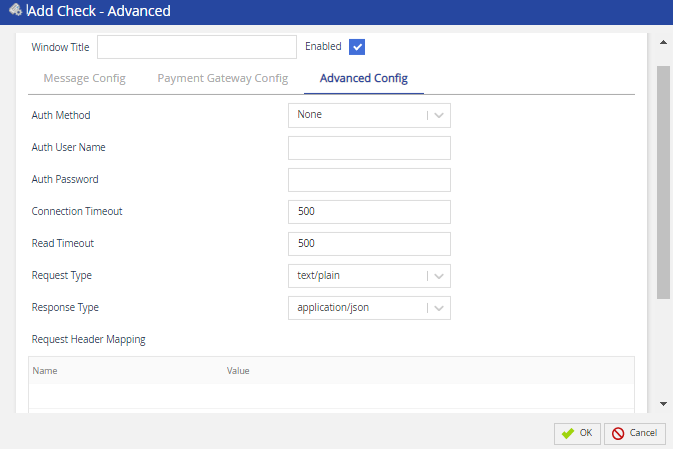
- Auth Method - Select the authorization method from the drop-down menu which will be used to connect to the payment gateway. The available options are None and Basic.
- Auth User Name - Enter the authorized user name for accessing the payment gateway.
- Auth Password - Enter the password for your Auth User Name.
- Connection Timeout - Enter the time in milliseconds which will be used as a timeout when making the connection to the payment gateway.
- Read Timeout - Enter the time in milliseconds which will be used as a timeout when waiting for the response from the payment gateway.
- Request Type - Select the value from the drop-down which will be used as content type to send the HTTPS request to the payment gateway.
- Response Type - Select the value from the drop-down which will be used as the content type for the response received from the payment gateway.
- Request Header Mapping - Allows configuring parameters that will be passed in HTTPS Header when making the request to the payment gateway. Use Add and Delete buttons to configure the additional parameters.
- Click OK to save the changes.
Interoperability of SPC Widgets
Permitted users can enable the SPC functionality on Agent Panel, Agent Panel with Extended Panel or Agent Panel with Designer. To enable the functionality:
- Navigate to Configure > Agents > Agent Desktop.
- Select the desktop (associated with the standard agent desktop service) from the displayed list of agent desktops and double-click the required agent desktop.
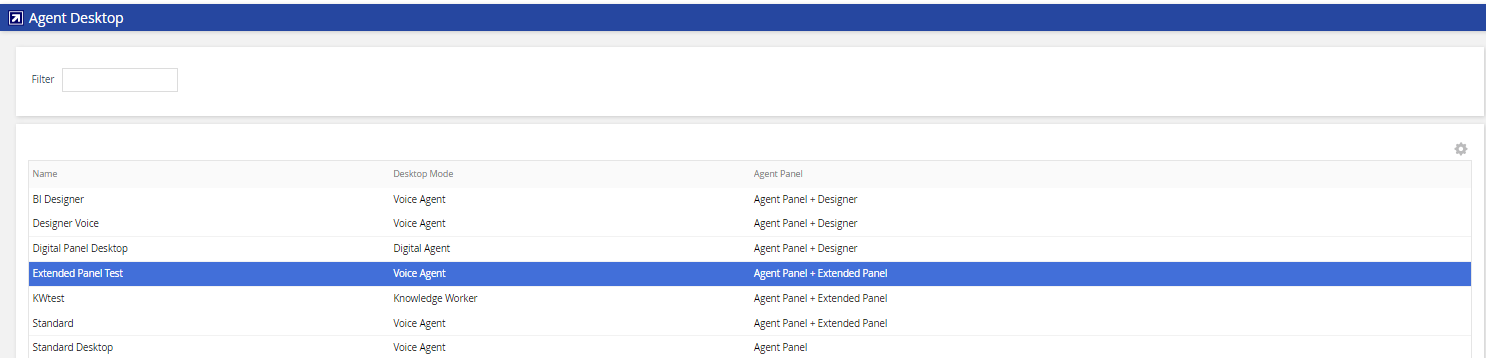
- Select the Agent Panel + Extended Panel option.
- Add Secure Payment Capture widgets.
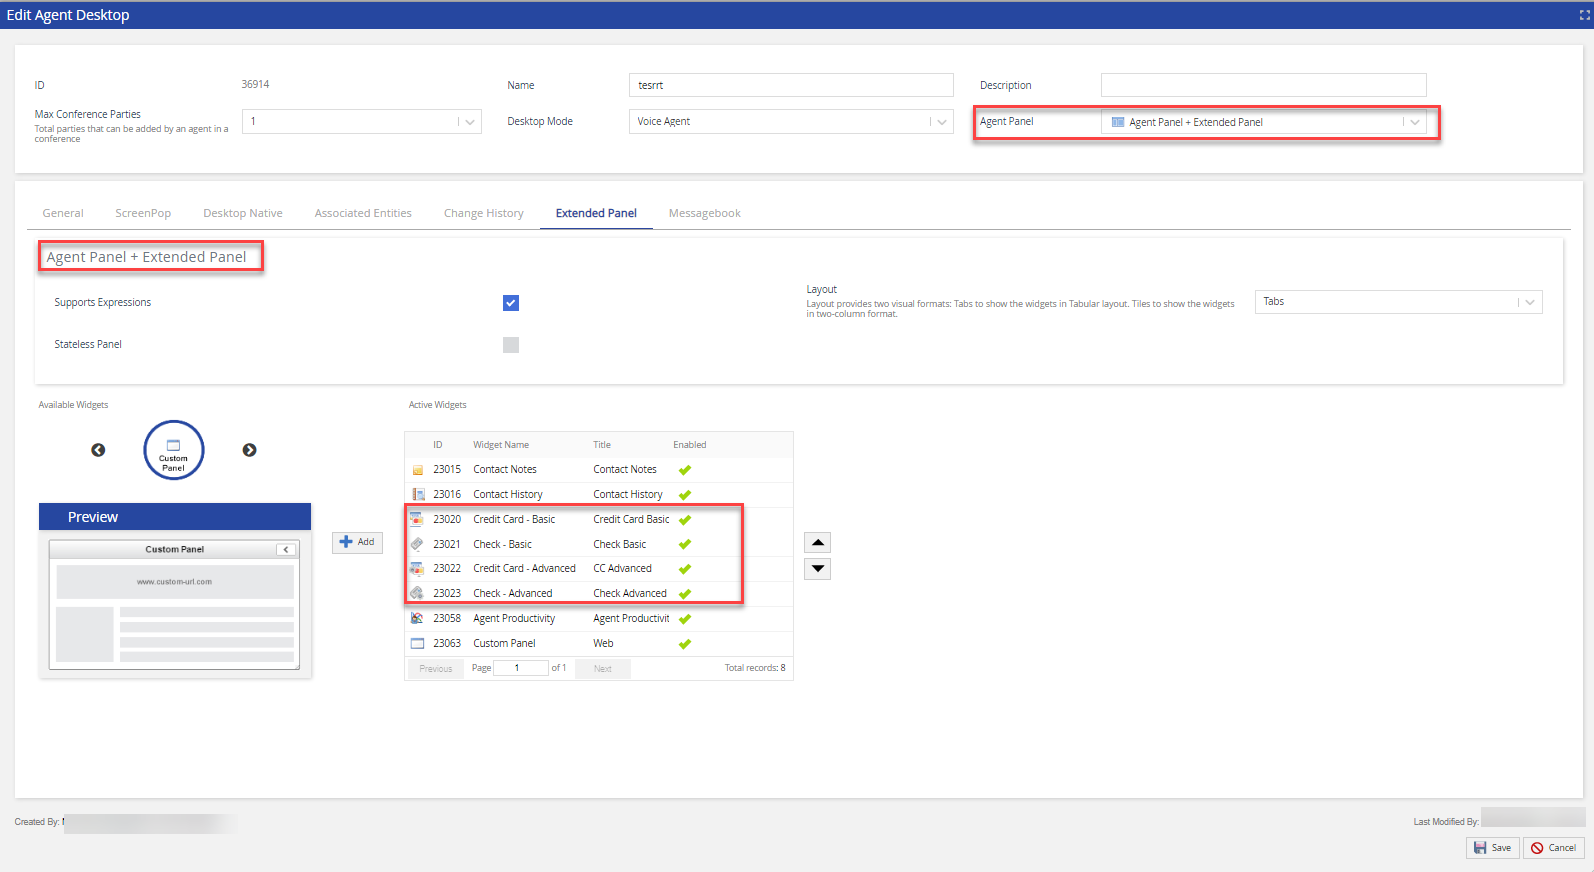
Click the Save button. - Select the Agent Panel option for the same desktop.
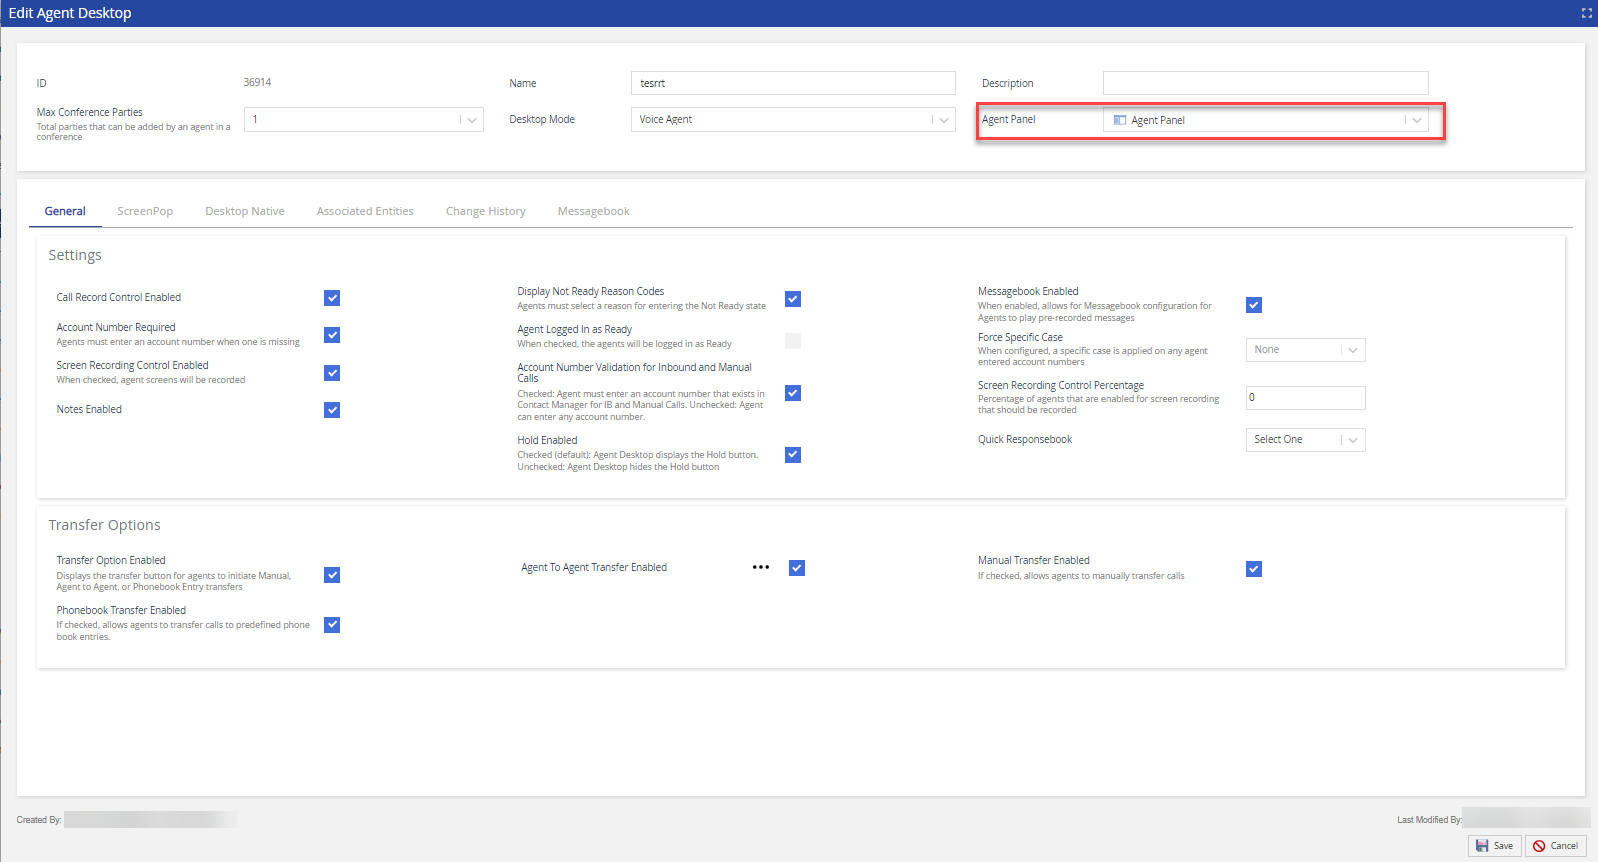
- Click the Save button.
To enable the functionality on Agent Desktop with Designer:
- Navigate to Configure > Agents > Agent Desktop.
- Select the desktop (associated with the designer desktop service) from the Desktops drop-down menu.
- Select the Agent Panel + Extended Panel option.
- Add Secure Payment Capture widgets.
- Click the Save button.
- Select the Agent Panel + Designer option for the same desktop.

- Click the Save button.
- Navigate to the Designer tab.
- Select the required designer desktop from the Designer Desktop drop-down menu.
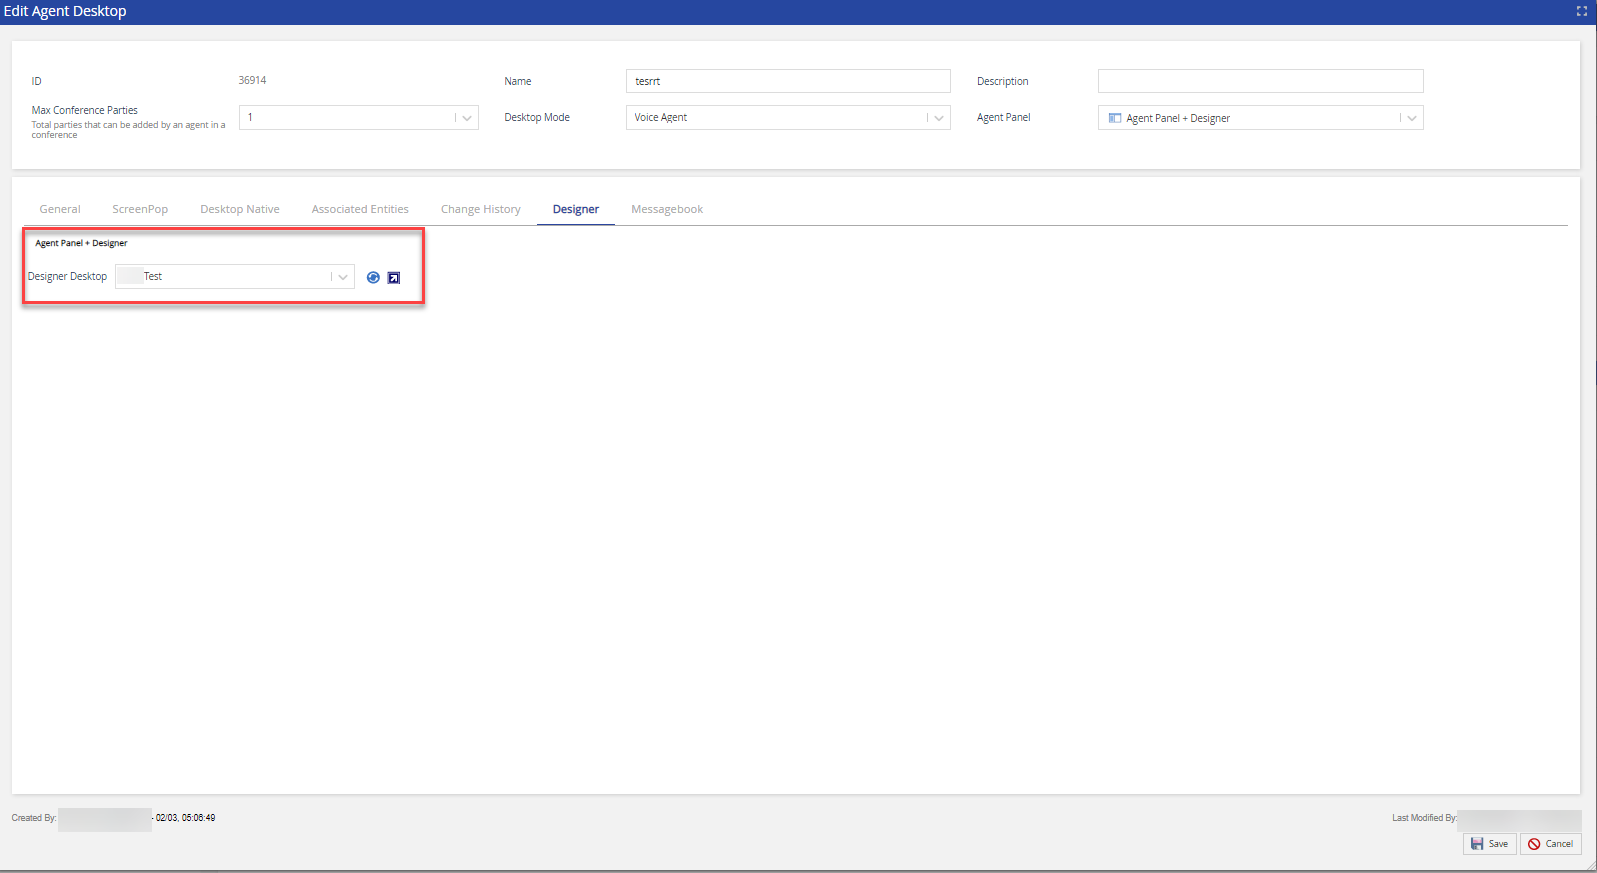
- Click the Save Agent Desktop button.
Using SPC Widgets from Agent Desktop
SPC widgets are available on Agent Panel, Agent Panel with Extended Panel, or Agent Panel with Designer desktop.
If the SPC widget is enabled, agents can guide the consumer through the payment information-gathering process by speaking the required instructions directly to the consumer.
To initiate Secure Payment Capture, one or more of the following widgets must be configured by permitted users and available on the Agent desktop:
- Credit Card Basic
- Check Basic
- Credit Card Advanced
- Check Advanced
Once configured, agents are presented with the credit card (![]() ) or check (
) or check (![]() ) control buttons.
) control buttons.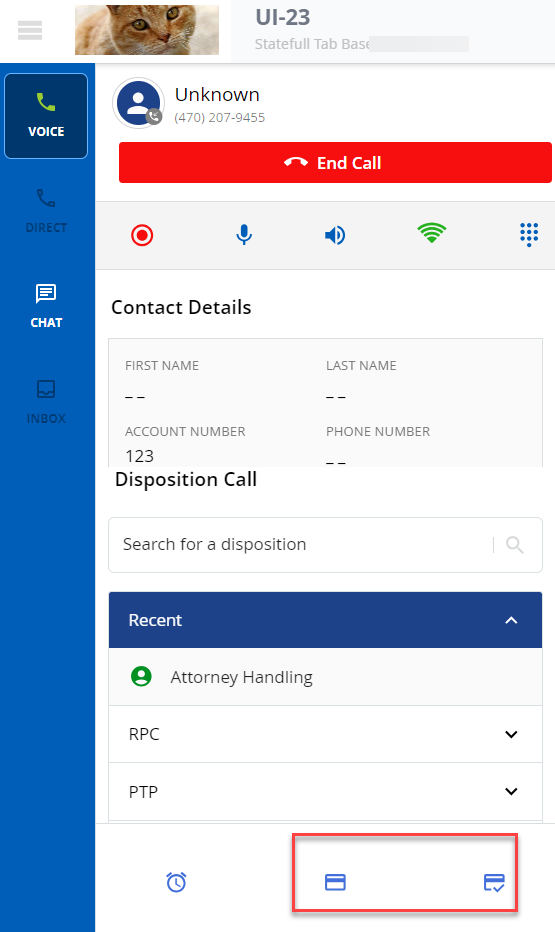
Clicking on the credit card (![]() ) or check (
) or check (![]() ) control buttons opens the widgets on the screen.
) control buttons opens the widgets on the screen.
Credit Card Basic
After clicking the credit card (![]() ) button, the configured Credit Card Basic widget is launched on your screen as shown below. Clicking Cancel removes the Credit Card Basic payment screen from your screen.
) button, the configured Credit Card Basic widget is launched on your screen as shown below. Clicking Cancel removes the Credit Card Basic payment screen from your screen.
If configured, agents can capture the payment for Visa, Master, American Express, or Discover cards.
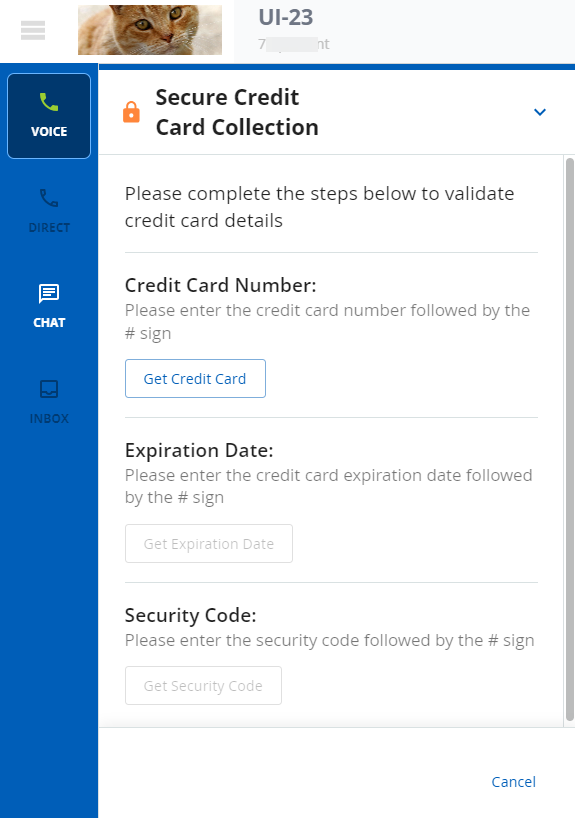
- Read the configured message prompt to the consumer to get the Credit Card Number. The Consumer enters their credit card number using the telephone keypad. When the consumer enters a valid credit card number, it is reflected on the screen.
- Read the configured message prompt to the consumer for the Expiration Date of the credit card. The Consumer enters their credit card expiration date using the telephone keypad. When the consumer enters a valid credit card expiration date, it is reflected on the screen.
- Read the configured message prompt to the consumer to get the Security Code of the credit card. The consumer enters their credit card security code using the telephone keypad.
Check Basic
After clicking the check (![]() ) button, the configured Check Basic widget appears on your screen as shown below. Click Cancel to close the Check Basic payment screen.
) button, the configured Check Basic widget appears on your screen as shown below. Click Cancel to close the Check Basic payment screen.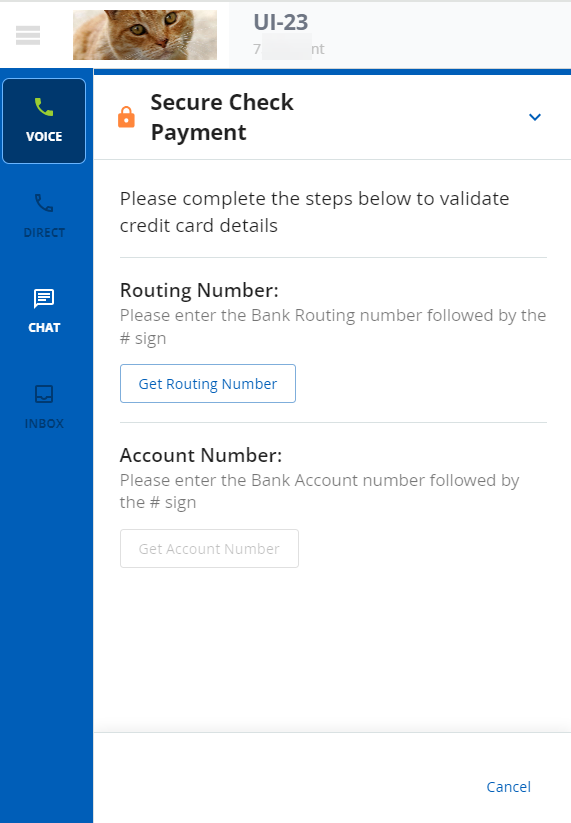
- Read the configured message prompt to the consumer to get the Routing Number. The consumer enters their routing number using the telephone keypad. When the consumer enters their routing number, it is reflected on the screen.
- Read the configured message prompt to the consumer to get the Account Number. The consumer enters their account using the telephone keypad. When the consumer enters a valid account number, it is reflected on the screen.
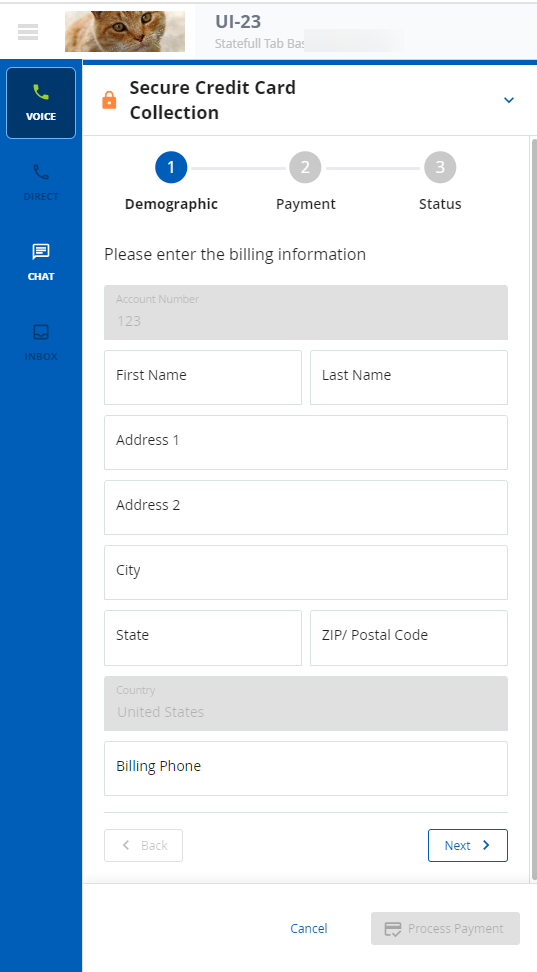
Credit Card Advanced
After clicking the credit card (![]() ) button, the configured Credit Card Advanced widget appears on your screen as shown below. Click the Next or Back buttons to move to the next or previous field. Click the Process Payment button to complete the transaction. Clicking Cancel removes the Credit Card Advanced payment screen from your screen.
) button, the configured Credit Card Advanced widget appears on your screen as shown below. Click the Next or Back buttons to move to the next or previous field. Click the Process Payment button to complete the transaction. Clicking Cancel removes the Credit Card Advanced payment screen from your screen.
If configured, agents can capture the payment for Visa, Master, American Express, or Discover cards.
- The below screenshot shows the consumer Demographic tab of the Credit Card Advanced widget. Enter the billing information as it relates to the specific payment card.
- The below screenshot shows the Payment tab of the Credit Card Advanced widget. Enter the consumer payment information.
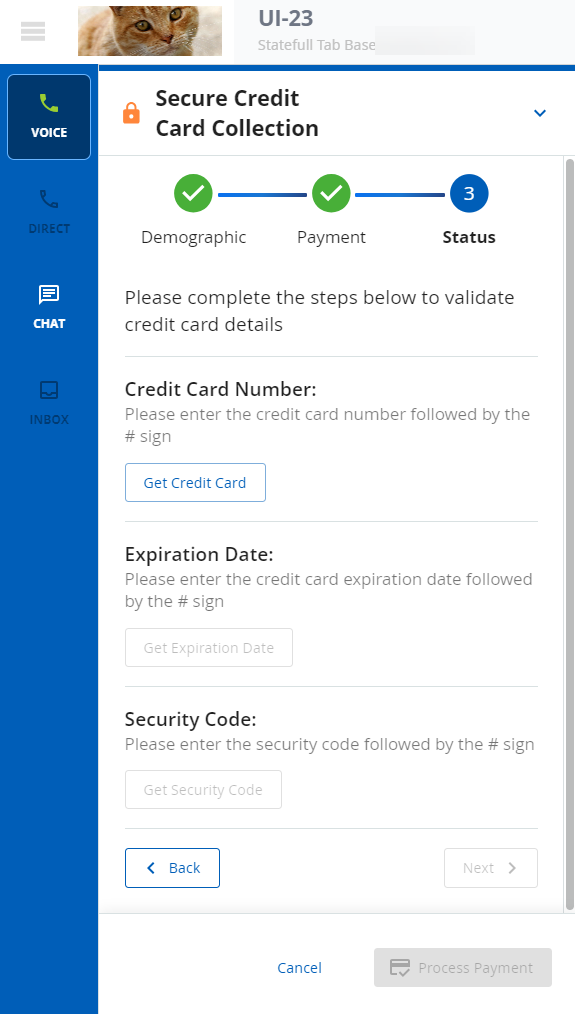
- The below screenshot shows the Status tab of the Credit Card Advanced widget.
- Follow the same procedure as with the Credit Card Basic widget.
- However, the payment details do not appear as these details are masked in the Credit Card Advanced widget. Instead, agents can see an 'Obtained' message on agent desktop once the consumer successfully enters their information.
- Once all the details are obtained, click the Process Payment button.
- A confirmation message (success/failure) appears on the screen.
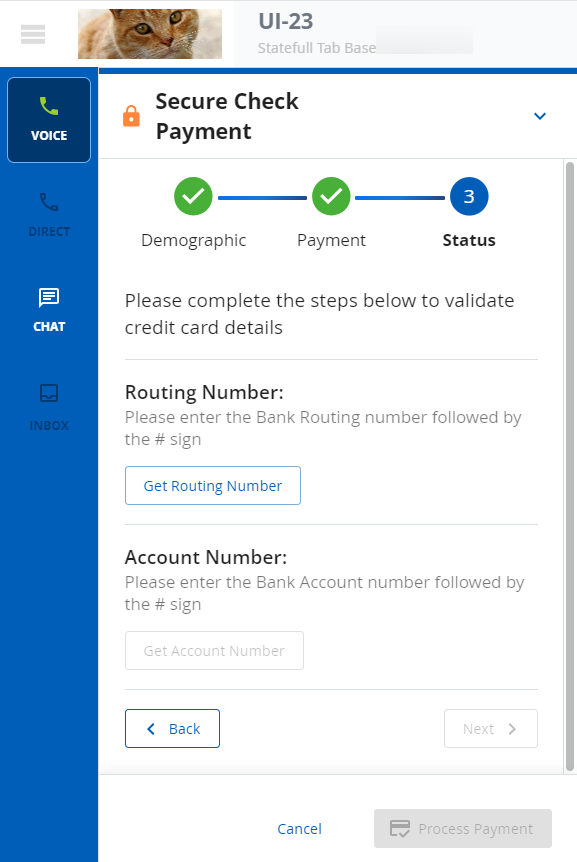
Check Advanced
After clicking the check (![]() ) button, the configured Check Advanced widget is launched as shown below. Click the Next or Back buttons to move to the next or previous field. Click the Process Payment button to complete the transaction. Clicking Cancel removes the Check Basic payment screen from your screen.
) button, the configured Check Advanced widget is launched as shown below. Click the Next or Back buttons to move to the next or previous field. Click the Process Payment button to complete the transaction. Clicking Cancel removes the Check Basic payment screen from your screen.
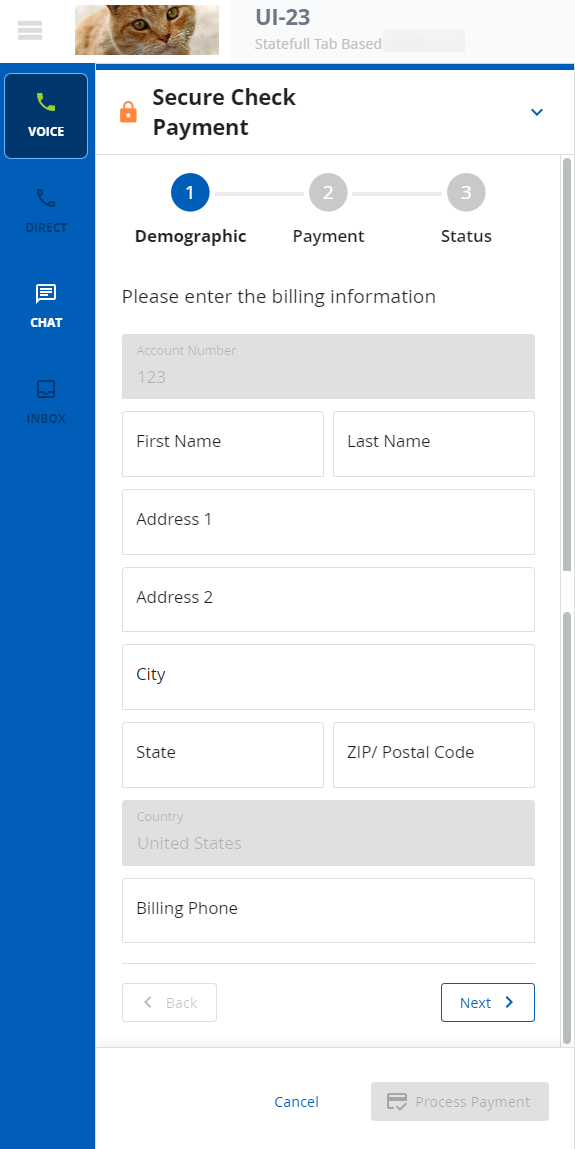
- The below screenshot shows the consumer Demographic tab of the Check Advanced widget. Enter the billing information
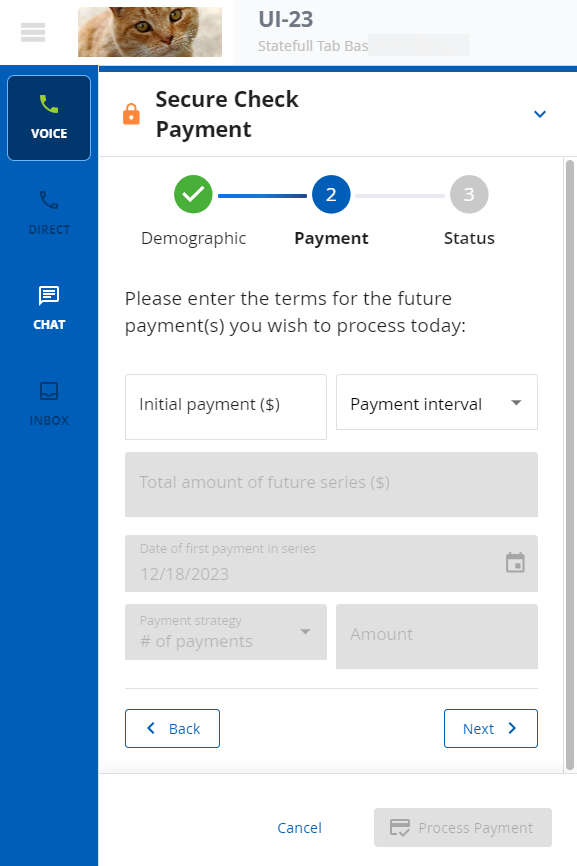
The below screenshot shows the Payment tab of the Check Advanced widget. Enter the consumer payment information.
The below screenshot shows the Status tab of the Check Advanced widget.
- Follow the same procedure as with the Check Basic widget.
- However, the payment details do not appear as these details are masked in the Check Advanced widget. Instead, agents can see an 'Obtained' message on the agent desktop once the consumer successfully enters their information.
- Once all the details are obtained, click the Process Payment button.
- A confirmation message (success/failure) appears on the screen.
LiveVox Customer Care Contacts
24 Hour Customer Care Line: (888) 477-3448
LiveVox Customer Care Email: customercare@livevox.com
This document is an unpublished work protected by the United States copyright laws and is proprietary to LiveVox, Inc. (“LiveVox”). Disclosure, copying, reproduction, merger, translation, modification, enhancement, or use by anyone other than authorized employees, clients or licensees of LiveVox, and its affiliate companies, without the prior written consent of LiveVox, is prohibited. This document is intended as a guide to assist users of systems provided by LiveVox, and does not constitute the provision by LiveVox of any legal or compliance advice. Compliance by authorized clients or licensees of LiveVox with any and all applicable local, state, federal, or foreign laws and regulations is the sole responsibility of those authorized clients or licensees. Further, features and services that rely on third Party performance are subject to the errors and omissions of those third Parties, over which LiveVox has no control. LiveVox therefore disclaims any and all liability resulting from or arising out of any services supplied by or through any third Party vendor or any acts or omissions of the applicable third Party vendor. Additionally, LiveVox makes no representations or warranties with respect to the accuracy of content supplied by Parties other than LiveVox.
For Internal and Client Use only