Download PDF
Download page Scheduler.
Scheduler
The Scheduler section enables you to view your schedule, request to swap assignments, and request leaves.
Your manager must enable the Scheduler feature for it to be visible to you.
Viewing Your Schedule
To view your schedule:
On the Agent Desktop, navigate to the Scheduler tab to display the calendar for the current month and the schedules assigned to you. Customization options for the calendar range, containing the day, date, month, and year are available below the calendar.

Use the customization options to view the required dates.
- If your manager has configured break reminders, depending on the configuration of the reminder, you will receive notifications about your shift start or end, or break start or end.
View the schedule details for a specific month, for two weeks, for a week, or one day. If you view the schedule for a specific day, you can also view the duration for that schedule in increments of 5, 10, or 15 minutes. Click
 to select the schedule duration. Specify the dates using
  .
.
Click the Expanded button.

The schedules on the calendar expand, displaying the following information:- Time off requests, if any, along with the details of the requests.
- Schedule details, such as name, start and end time, break time, and assignment swap requests, if any.
- Click Refresh to refresh the information on the calendar.
Mobile App
You can use the Mobile Agent to view your schedule on your phone.
- To view your schedule, tap the accordion menu and select Week, Month, or Day. Your schedule appears in a weekly calendar by default. Scroll through the calendar to view other dates.
- To view a day’s schedule in a 24-hour format, tap a date in the calendar that is highlighted by a blue dot. The assignments are displayed by time slots.
- To view the assignment details for a given date, tap the date, and then tap the scheduled assignment. The details include Date, Time, Call Center, and Area.
Requesting Assignment Swapping
You can swap your assignments with other agents based on the availability of matching schedules.
To swap your assignment, ensure that an agent with a desired assignment timing is available.
To request a shift swap:
- On the agent desktop, navigate to the Scheduler tab, and double-click the date containing the assignment you want to swap.
Click the Make a swap request tab.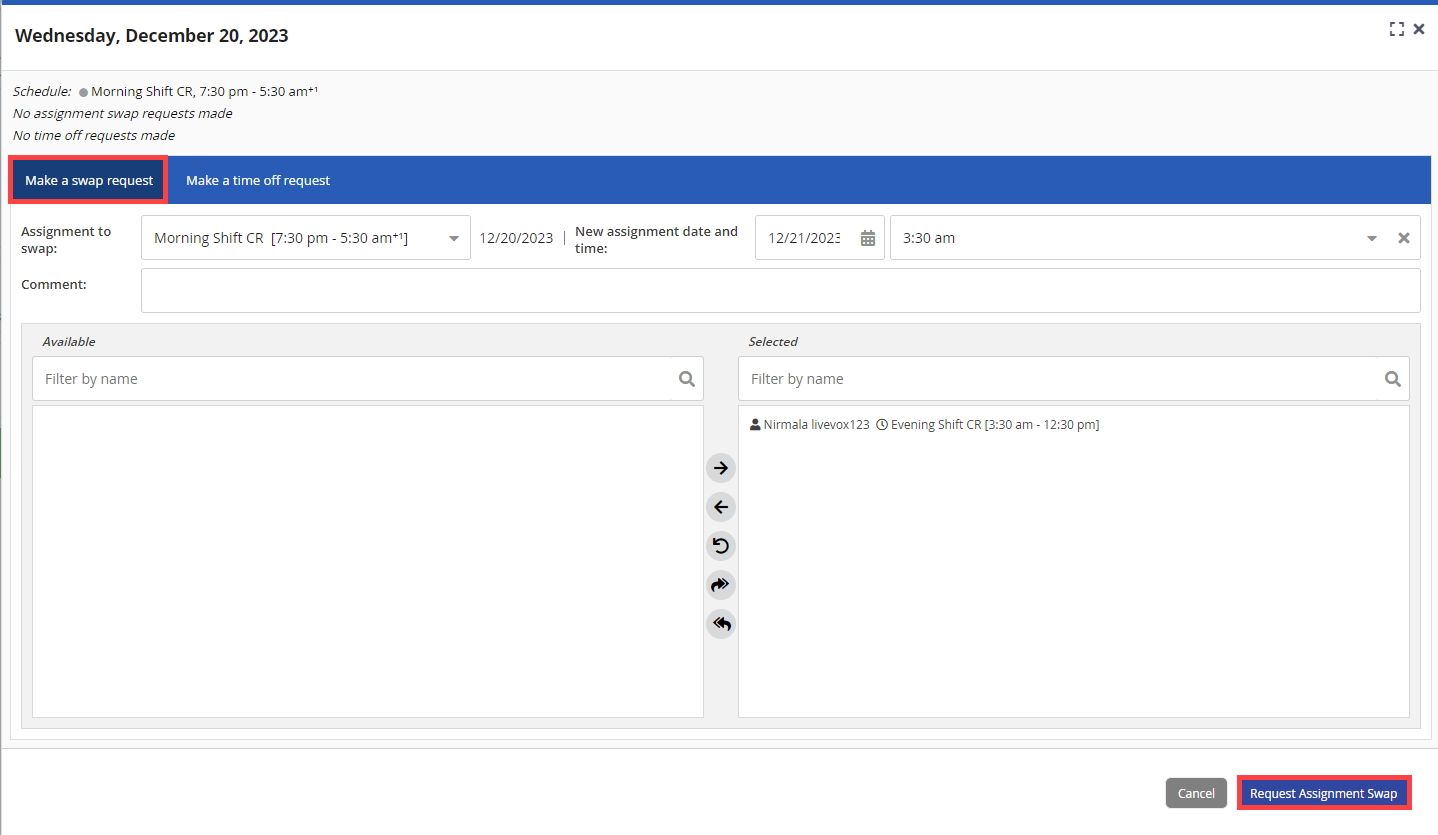
Specify values in the following fields:
Assignment to swap: By default, this field contains the assignment that you double-clicked. You can, however, change the assignment.
New assignment date and time: Select the date and the time for which you want to change your assignment.
Comment: If required, enter the reason for swapping your assignment.
The names of the agents whose assignments overlap with your desired assignment, along with the assignment period, appear in the Available list. Select the agent in the Available list and move that agent to the Selected list using the arrows.
You can move multiple agents to the Selected list.
- Click Request Assignment Swap.
The assignment swapping request is sent to the agents that you selected.
The swap request is displayed to the agent with whom you want to swap the assignment as a Swap Task in their Work Queue.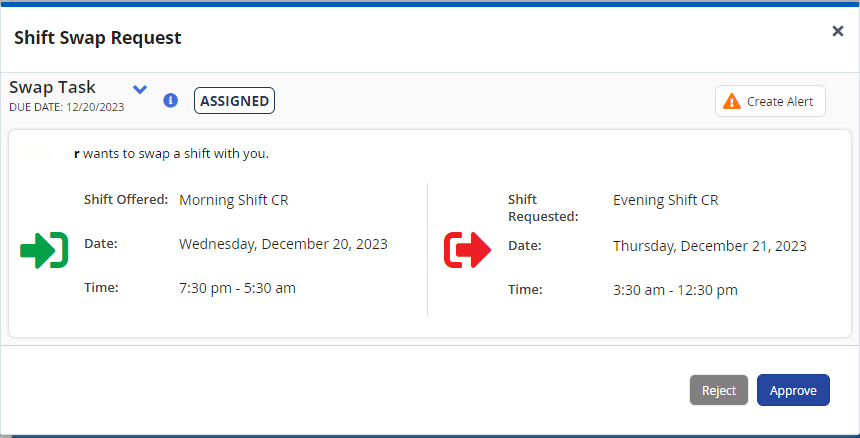
The agent who receives your request can Approve or Reject the request.
Swapping requests might require manager approvals depending on the workflow configured.
Mobile App
You can use the Mobile Agent to request swapping of assignment.
To request a assignment swap:
- Tap the required date, and then tap the assigned assignment.
- In the Assignment Detail view, tap the Swap button to view the available assignments.
- Select the New Assignment date to view the available assignments, which may include the assignments offered by other agents, and open or new assignments created by your manager.
- Depending on the availability, select the required assignments, and then tap Request Swap.
Viewing the Status of an Assignment Swapping Request
To view the status of an assignment swapping request:
- On the agent desktop, navigate to the Scheduler tab, and click Sent Agent Requests.
- On the Sent Agent Requests window, click the Assignment Swap tab to display all your shift-swapping requests.
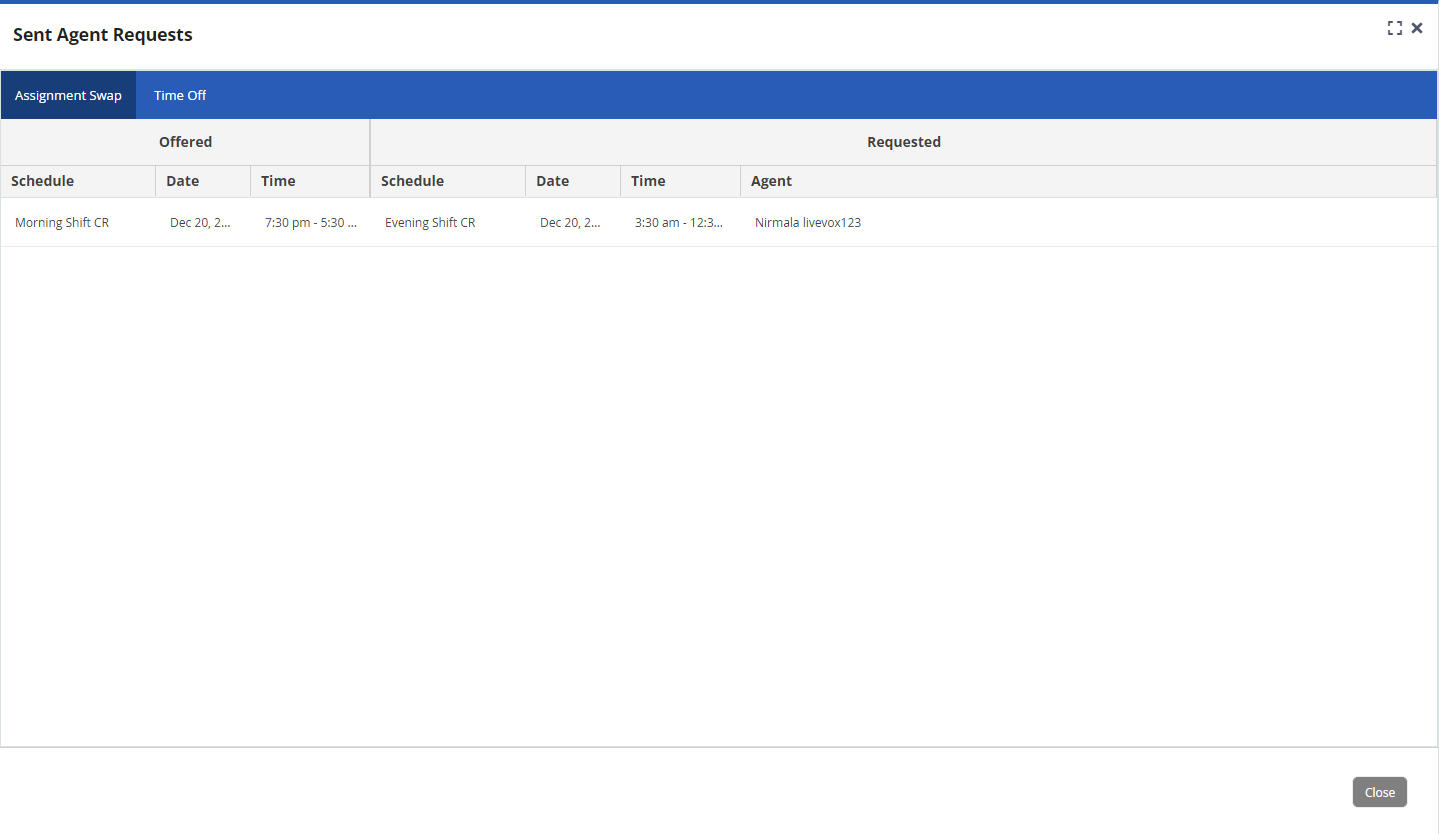
The following information is displayed:Column Description Offered Schedule: Schedule name being offered.
- Date: Date of the offered schedule.
- Time: Time of the offered schedule.
Requested - Schedule: Schedule name being requested.
- Date: Date of the requested schedule.
- Time: Time of the requested schedule.
- Agent: Name of the agent with whom you requested a schedule swap.
Requesting Time Off
To request time off:
- On the agent desktop, navigate to the Scheduler tab, and double-click the date for which you want to apply for leave.
Click the Make a time off request tab.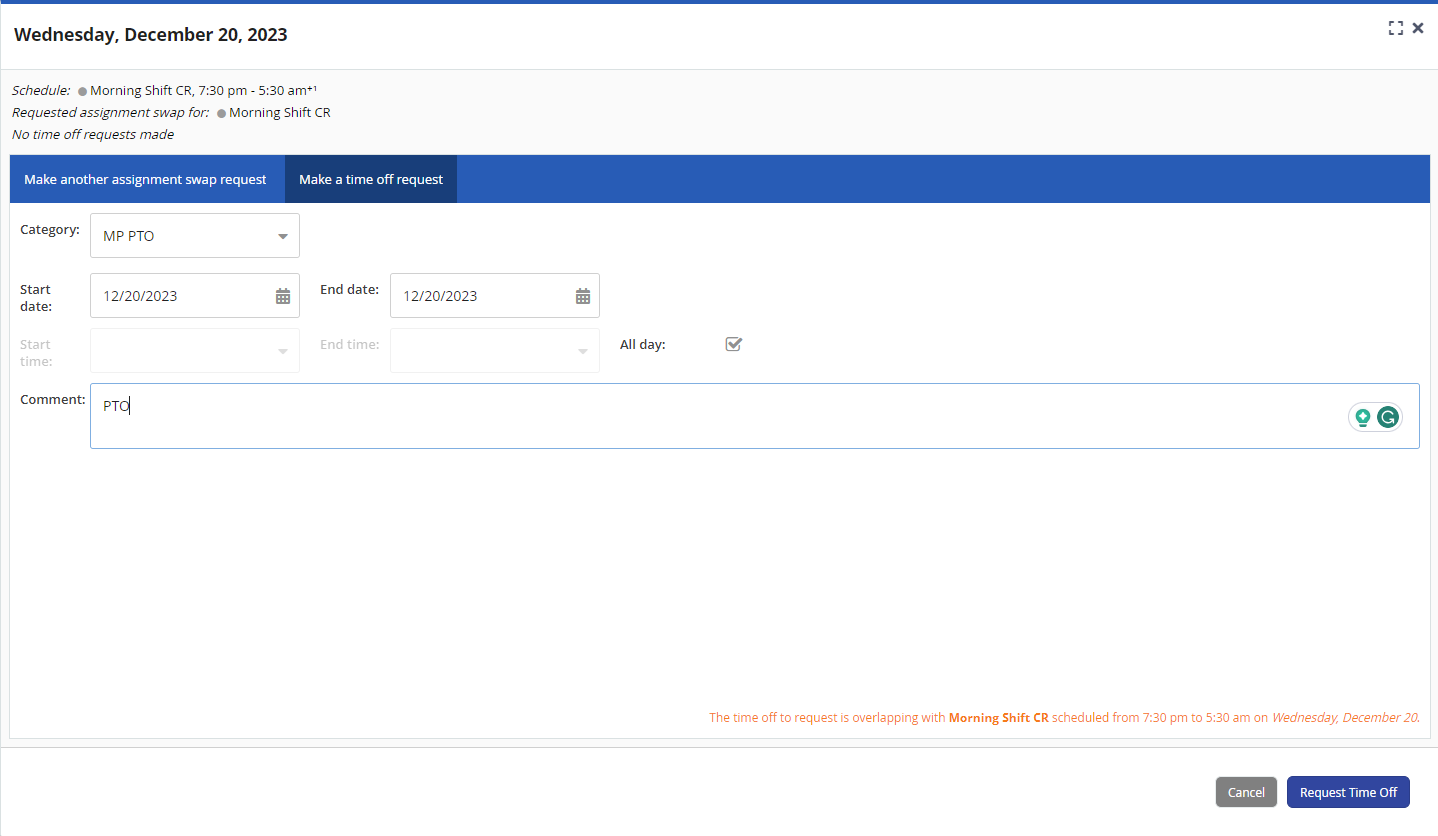
Specify values in the following fields.
Field Description Category Select the leave type. Start date By default, this field contains the date that you selected. You can, however, change the date. End date By default, this field contains the date that you selected. You can, however, change the date. Start time and End time These fields are disabled by default. To apply for leave for a short period, clear the All day checkbox, and then enter the Start time and End time. All day This checkbox is selected by default, indicating that you want to take leave for the entire duration of the specified dates. To apply for leave for a shorter period of time, clear the checkbox and select the Start time and End time. Comment Enter comments if any. - Click Request Time Off.
The leave request is created.
Leave requests might require manager approvals depending on the workflow configured.
Viewing the Status of a Time Off Request
To view the status of a time off request:
- In the Scheduler tab, click Sent Agent Requests.
- On the Sent Agent Requests window, click the Time Off tab to display all your time off requests.
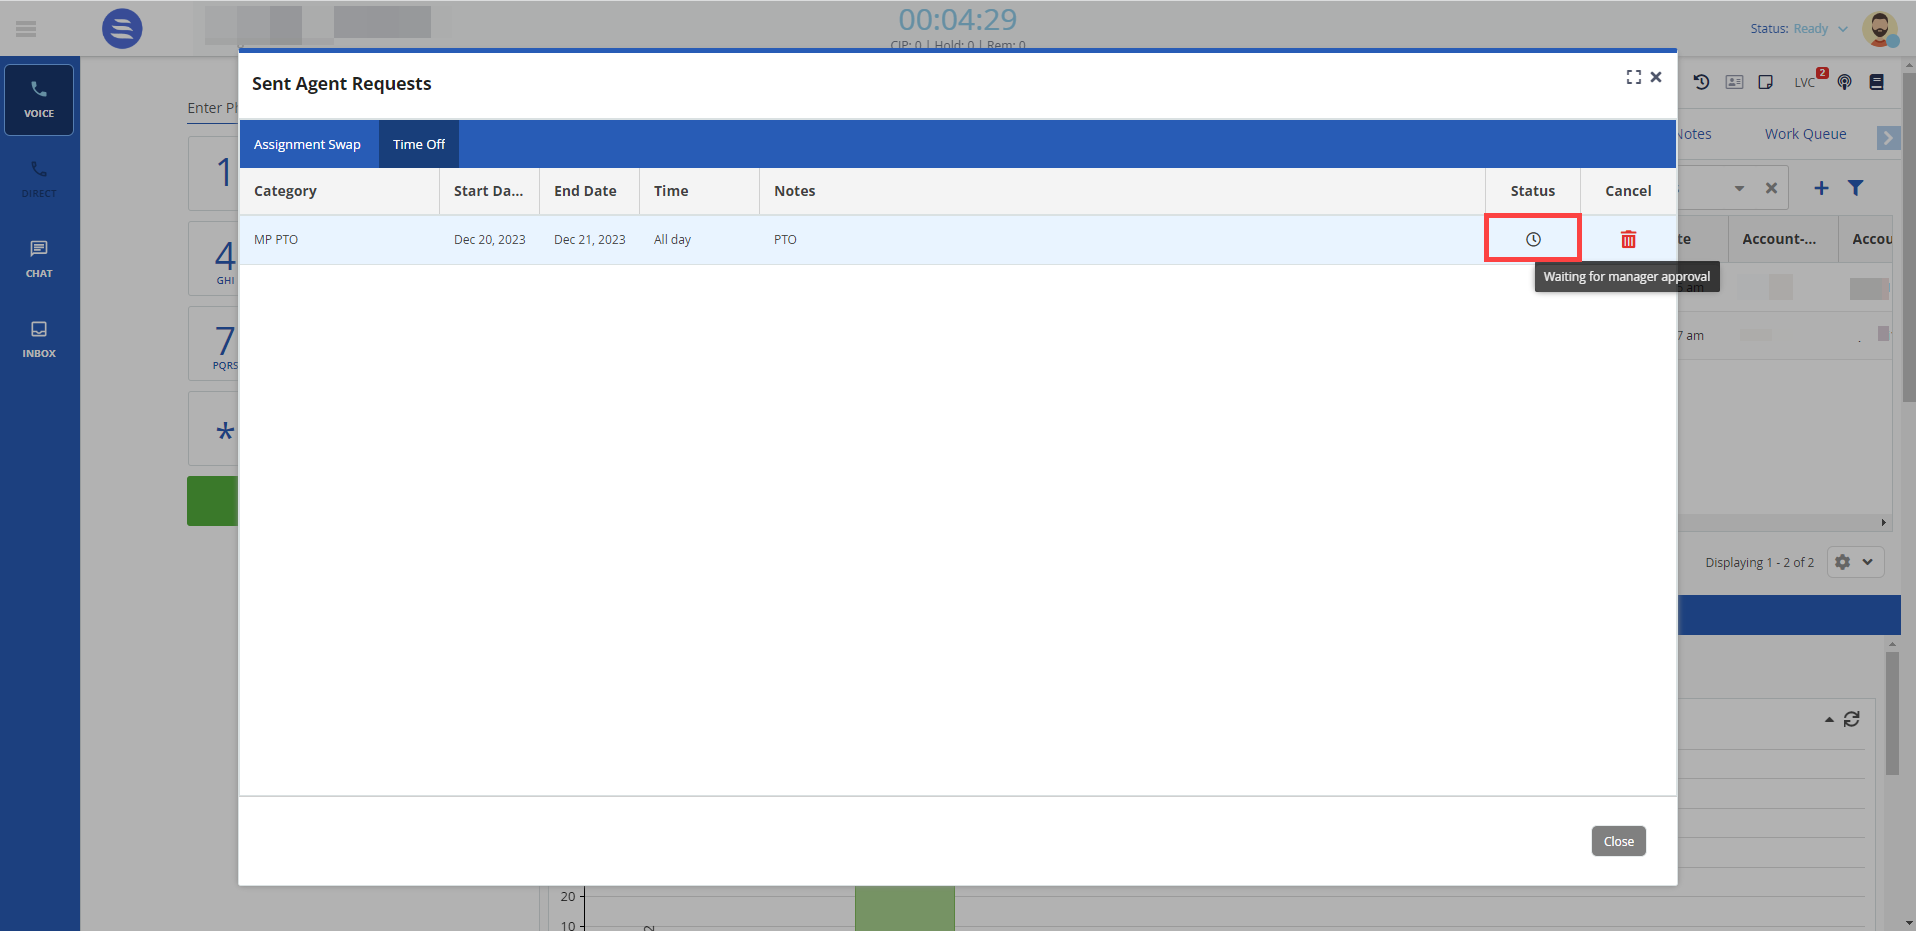
The table displays the following columns:- Category
- Start Date
- End Date
- Time
- Notes
- Status
- Cancel
- Select the time off request for which you want to view the status and hover your mouse over
 in the Status column.
The status of the request is displayed.
Canceling a Time Off Request
To cancel a time off request:
- In the Scheduler tab, click Sent Agent Requests.
- On the Sent Agent Requests window, click the Time Off tab to display all your time off requests.
- In the row displaying the time off request that you want to delete, in the Status column, click
 .
. - Click Yes to confirm.
The time off request is deleted.