Customers
This section covers the steps to configure and set the property values for the Customer components. The Customers section in contains the following components:
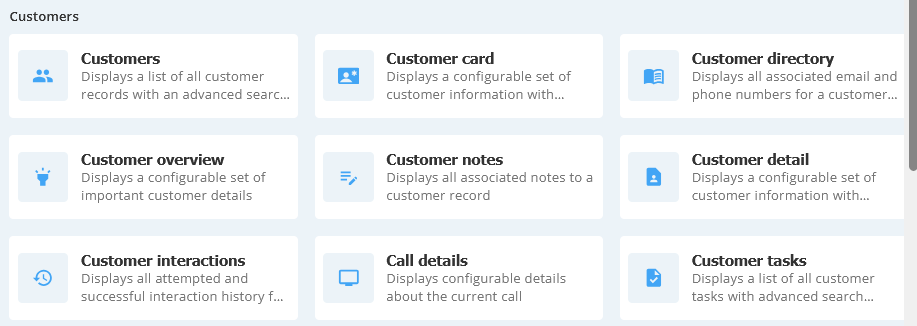
Customer component provides a list of all the customers for an agent. Customer list contains all the options that are displayed in the image.
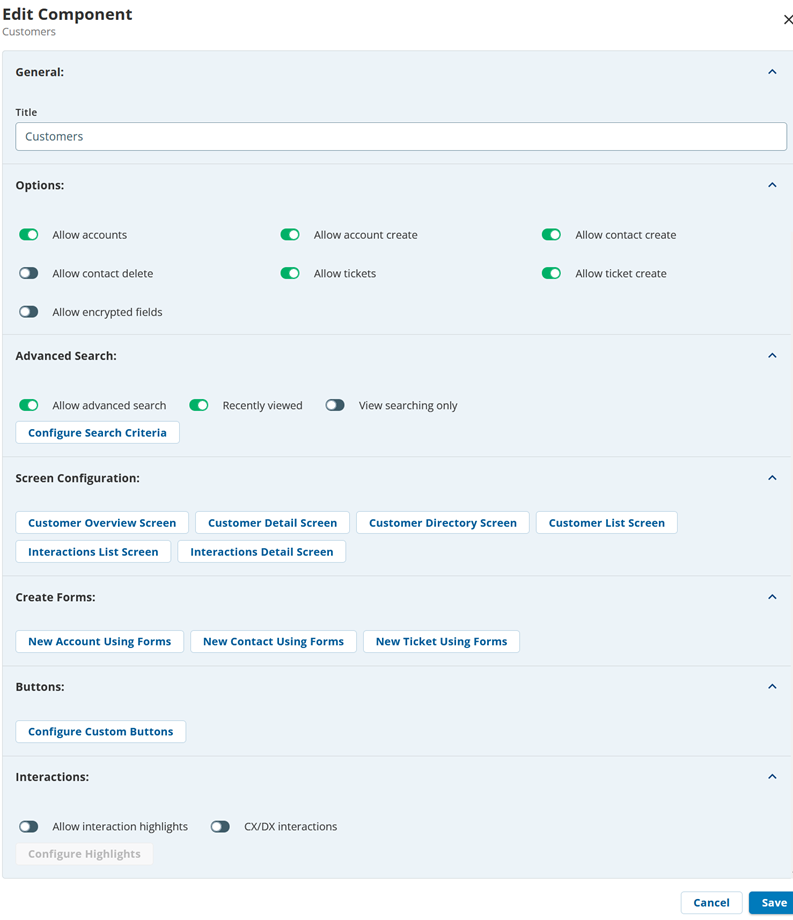
To configure and set the Customers component:
- Click the Customers component.
The contact information appears on the page. - Select the Customers component on the canvas, then click the gear icon.
The component properties for Contacts are listed here:Number Property Available Features Description 
Title Title You can change the default title of an component. When you change the title, the component name on the canvas is updated to the new title. For example, you can change the title from Customers to Contact, and the name is updated on the tab on the canvas. 
Options Allow accounts
Allow account create
Allow customer create
Allow customer delete
Allow tickets
Allow ticket create
Allow encrypted fieldsYou can allow agents to create or delete accounts, customers, and tickets. 
Advanced Search Allow advanced search
Recently viewed
View searching only
- Advanced Search and Search Criteria: Specifies if a search box, along with
 , appears for the selected components. When you enable this feature, the Configure Search Criteria button is enabled. By default, a set of fields is selected in the search criteria window. You can customize what fields you can search and the operators they can use..
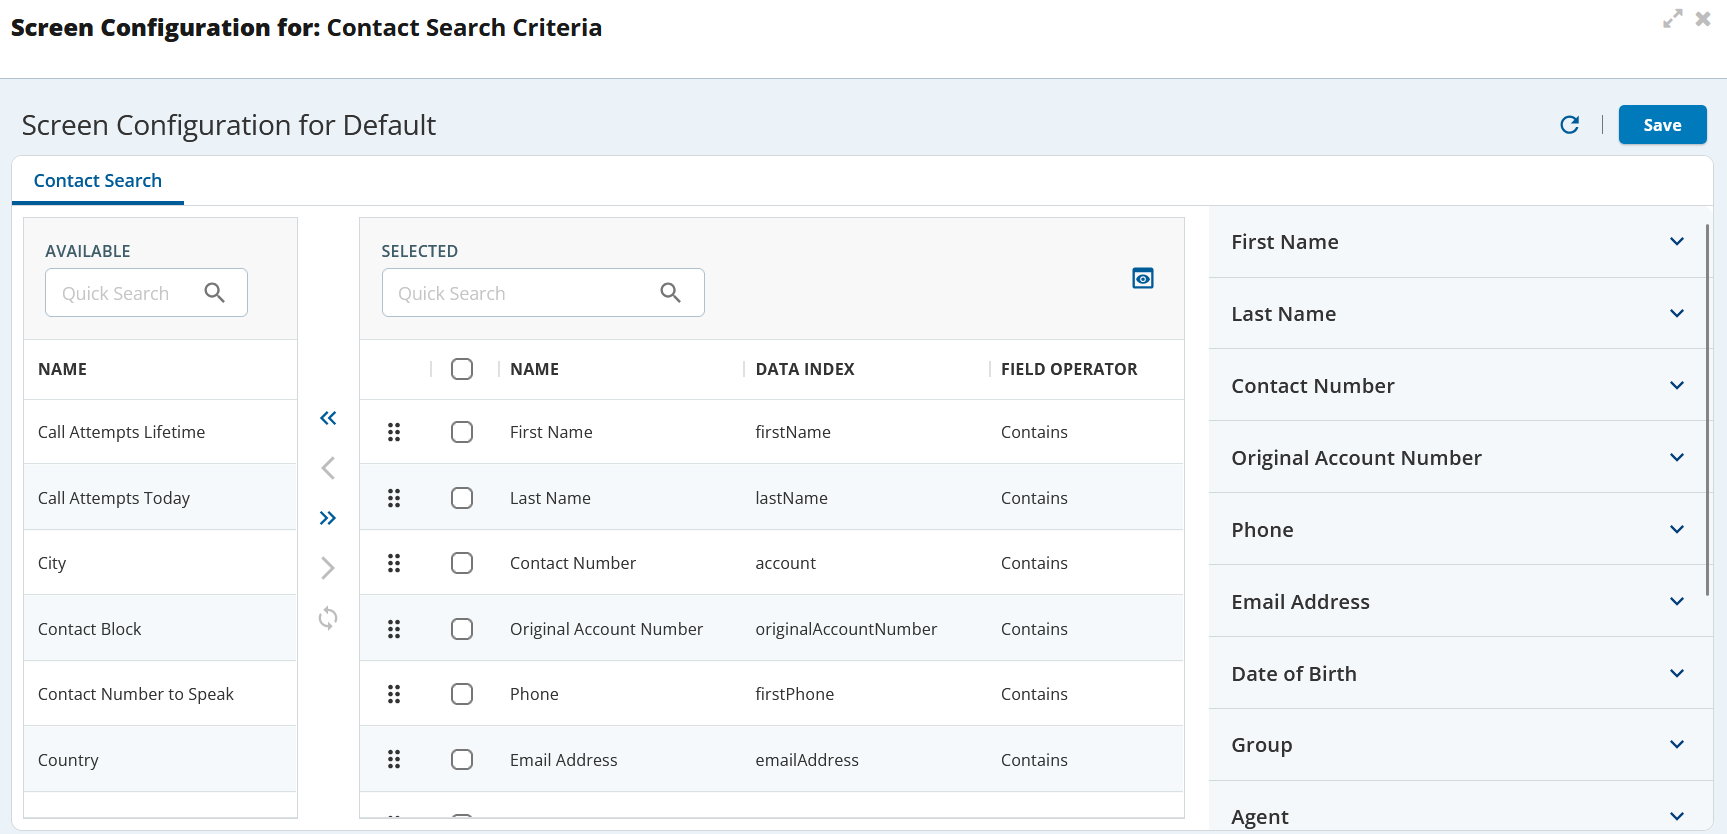
- Recently Viewed: This enables you to search the recently viewed records.
- View searching only: Agents can filter records only from the view assigned to them.

Screen Configuration Customer Overview Screen
Customer Detail Screen
Customer Directory Screen
Customer List Screen
Interaction List Screen
Interaction Detail Screen
- Customer Detail Screen: Enables you to configure the Detail tab of a customer.
- Customer Overview Screen: Enables you to configure the main area of a customer.
- Customer Directory Screen: Enables you to configure different channels such as phone numbers, email, SMS, and provide labels to phones.
- Customer List Screen: Enables you to configure fields from the Contact Manager.
- Interaction Detail Screen: Enables you to configure the details of a contact, account, or ticket.
- Interaction List Screen: Enables you to configure a selected number of fields of a contact, account, or ticket.

Forms New Customer using Forms
To create forms, select the forms from the Available Forms list, move them to the Selected Forms list, and Save the changes.


Buttons Custom Buttons
You can use the Custom Buttons option and create an event. For more information on creating an Event, see Events .

When you create a button, an event is created in the Events tab.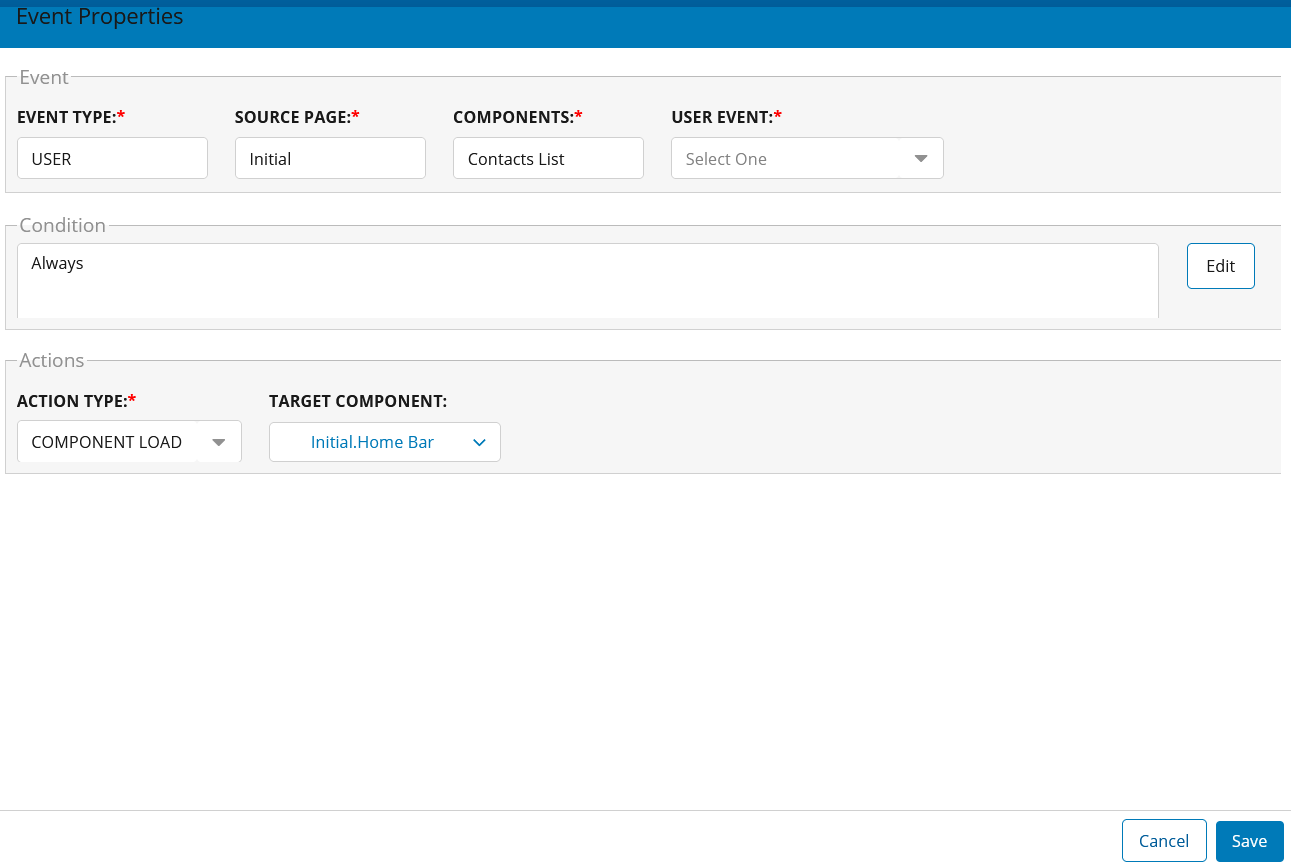

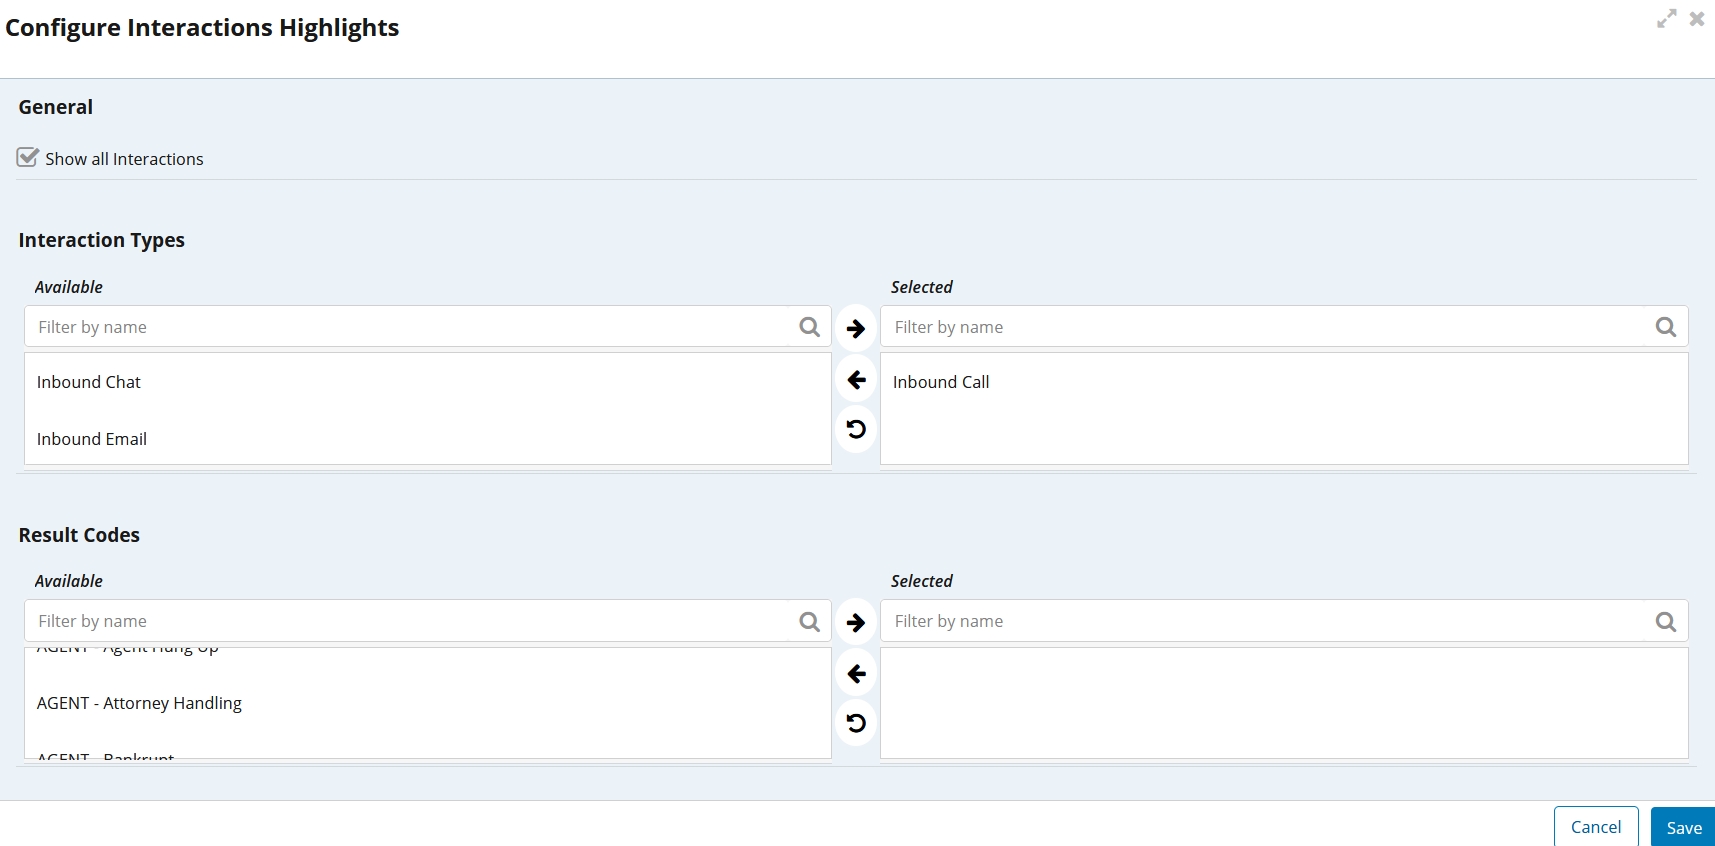
Interactions Allow Highlights Configure Highlights
CX/DX Interactions
If the option is disabled, only the default options are visible to an agent. If enabled, an agent can view the configured interaction highlights for the interaction types and set the result codes.
- Advanced Search and Search Criteria: Specifies if a search box, along with
- After updating the required fields, click Save.
The Card component highlights customer-relevant information in a unified interface.
To configure and set the Card component:
- Click the Card component.
The Customer Card window appears. - Select the Customer Card component on the canvas, then click the gear icon.
The following table provides information about the available properties and the corresponding descriptions.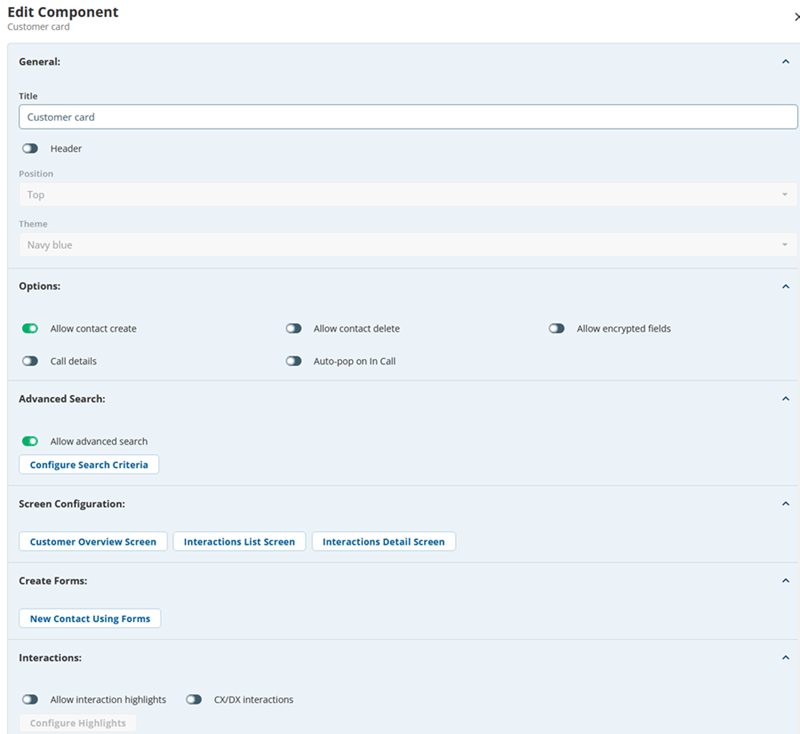
Number Property Available Features Description Title Title You can change the default title of an component. When you change the title, the component name on the canvas is updated to the new title. For example, you can change the title from Customer Highlight to Highlight, and the name is updated on the tab on the canvas. Options Allow Customer Creation
Allow Customer Deletion
Allow Encrypted Fields
Display List on EmptyYou can configure these options to enable your agents to create, delete customers and to perform other updates in the Customers section.
Advanced Search Allow Advanced Search
Configure Search Criteria
You can use the available parameters to search for a customer. Screen Configuration Customer Overview Screen
Interaction List Screen
Interaction Detail Screen
You can configure the fields for the Customer Highlight in the Agent Workspace Premium. The configurations are used from the Contact Manager
To configure fields in the Customer Highlight window:
- Select the Customer Highlight feature, and then click the Properties tab.
- Click the Highlight Screen button.
The field Configuration for: Customer Highlight window appears.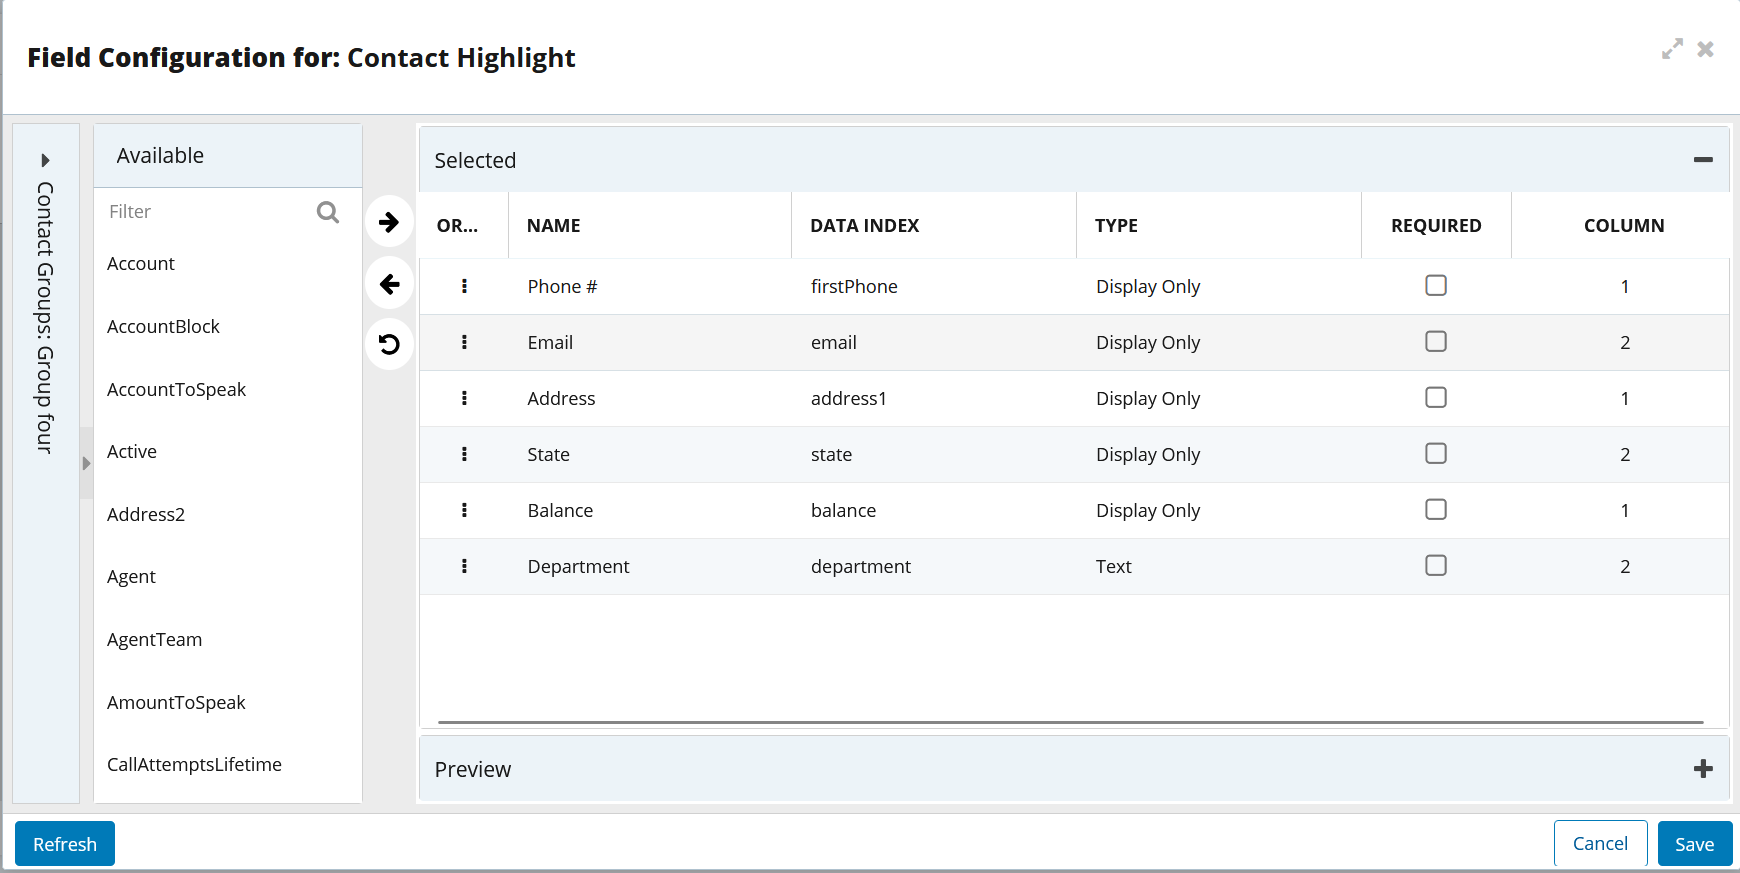
- Select fields from the Available options list and move them to the Select option.
- For easier navigation, use the Customer Groups: <Group Name> fields and move the fields.

The Customer Groups: <Group Name> fields are a collapsible preview option. You can click this option to minimize it.
- After updating the fields, click Save.
The changes are updated in the Customer Highlight tab.
Create Forms Create Forms You can enable your agents to create a contact by using the available forms.
Interactions Allow Highlights
CX/DX Interactions
Configure Highlights
You can configure interaction highlights by using the available interaction types.
- After updating the required information, click Save.
The Directory consists of the email and number of an agent. You can configure view, edit, or hide options in the screen configuration window.
To configure and set the Directory component on Agent Workspace Premium:
- Click the Directory component.
The Directory information appears on the Agent Workspace Premium. - Select the Customer Directory component on the canvas, then click the gear icon.
The properties for the Customer Directory are shown.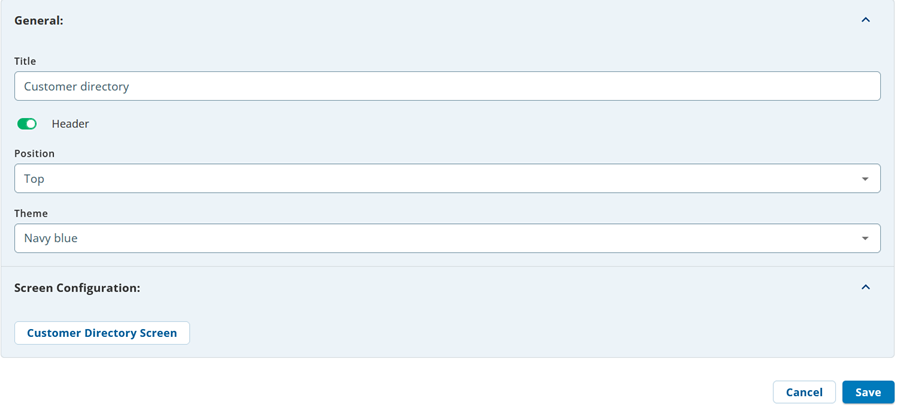
Number Property Available Features Expected Result Title Title You can change the default title of an component. When you change the title, the component name on the canvas is updated to the new title. For example, you can change the title from Contact Directory to Contact Directory Details, and the name is updated on the tab on the canvas.
Screen Configuration Customer Directory Screen To configure fields in the Customer Directory window:
- Click the Customer Directory Screen button.
The Screen Configuration for: Customer window appears.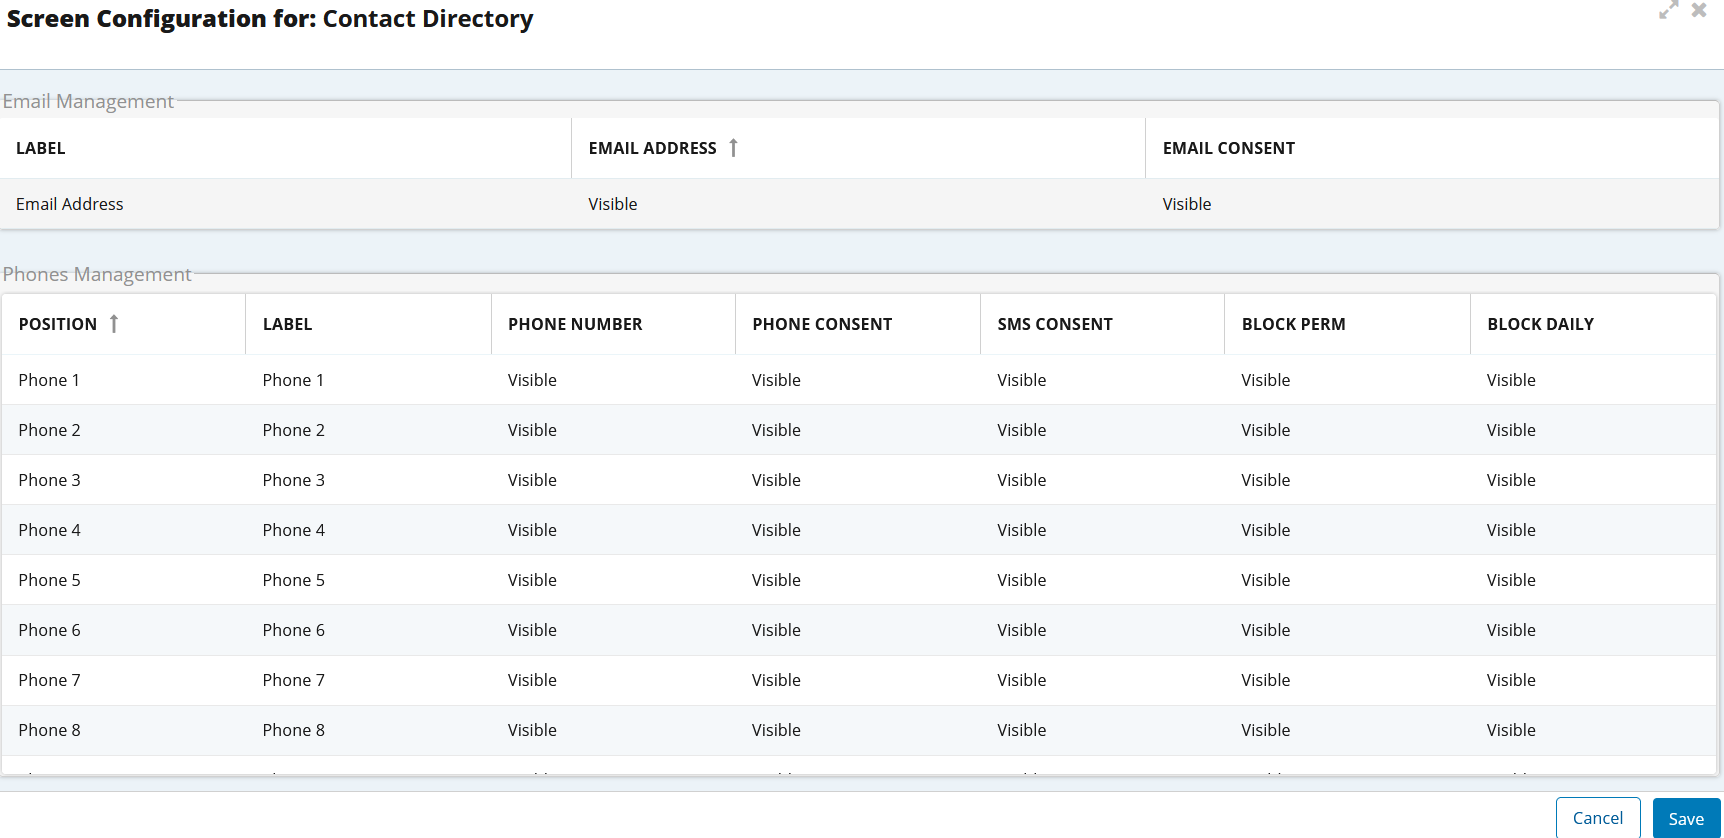
You can create unique screen configurations for agents based on the customer groups. This is designed for clients with diverse portfolios and ensures that clients are assigned to agents with specific portfolios or customer groups who can view or edit the fields.
Enables you to perform the following actions through the Screen Configuration window:
- Enable or disable phone, email, and SMS consent.
- Specify labels for the phone fields (regardless of how they are labeled in Contact Manager).
- Define which phone numbers to display for agents by enabling or disabling the phone fields.
- You can configure Email Management and Phone Management through the Screen Configuration window. Based on the configuration you set, the agent can view the phone numbers.
By default, all the phone numbers are visible; you must manually set this option to the Hidden, Visible, and Read Only options.
- After updating the fields, click Save.
The changes are updated in the Contacts tab.
- Click the Customer Directory Screen button.
- After updating the required information, click Save.
The Overview section lets you configure key customer details, such as the phone number, email address, payment balance, and other essential information.
To configure and set the Overview component on the Agent Workspace Premium:
- Click the Overview component.
The Customer overview window appears on the Agent Workspace Premium. - Select the Customer overview component on the canvas, then click the gear icon.
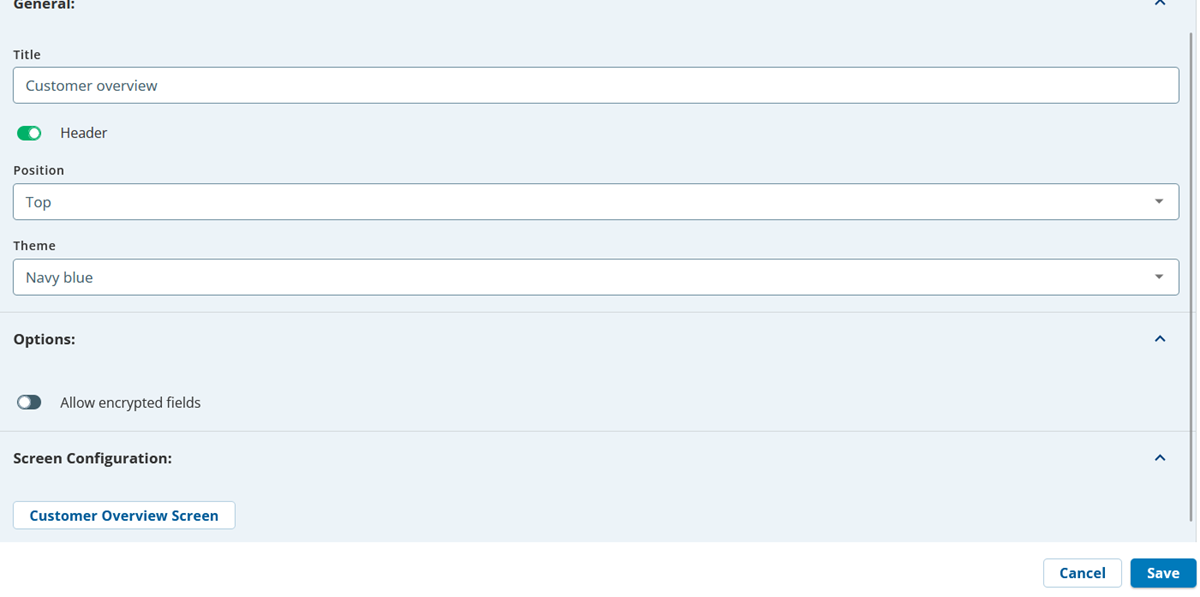
Number Property Available Features Expected Result Content Title You can change the default title of an component. When you change the title, the component name on the canvas is updated to the new title. For example, you can change the title from Customer overview to Highlight, and the name is updated on the tab on the canvas. Position Header, Header Position, and Theme To change the current formatting, change the Header Position and Theme. When you enable the Header Position option and select the Header Position in the drop-down menu, the header position is updated. Options Allow encrypted fields
When you enable this option, you can create five encrypted fields. The data type of these fields should be a string.
Agents have only read access to these fields.
Screen Configuration Customer Overview Screen The configurations are used from the Contact Manager
To configure fields:
- Select the Customer overview window, and then click the gear icon.
The Edit Component window appears. - Click the Customer Overview Screen button.
The Screen Configuration for Customer window appears. - From the list of available groups, select a group for which you want to configure the fields.
- Select fields from the Available options list and move them to the Select option.
- After updating the fields, click Save.
- Select the Customer overview window, and then click the gear icon.
- After updating the required information, click Save.
An agent can add notes during or after a call with a customer. This option acts as a notepad for an agent during a customer interaction.
To configure and set the Customer Notes component on the Agent Workspace Premium:
- Click the Notes component.
The Notes component appears on the Agent Workspace Premium page. - Select the Customer Notes component on the canvas or page, and then click the Properties tab.
The properties of the Customer Notes are shown.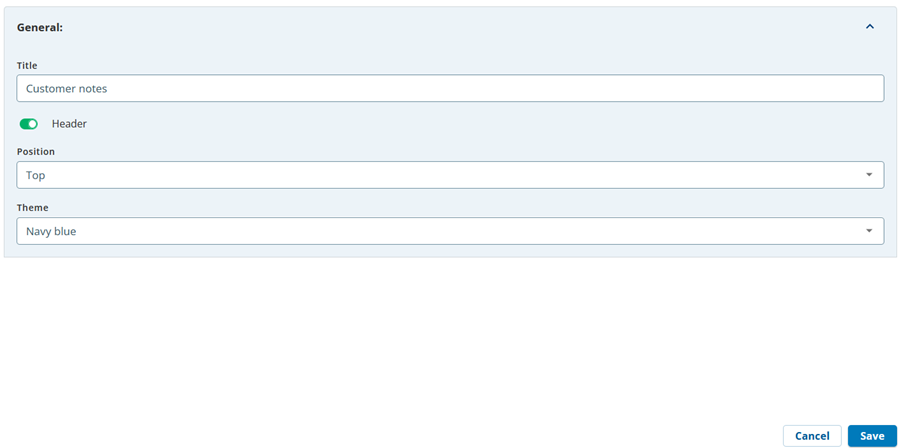
Number Property Available Features Expected Result Content Title You can change the default title of an component. When you change the title, the component name on the canvas is updated to the new title. For example, you can change the title from Customer Notes to Notes, and the name is updated on the tab on the canvas or page.
Styles Header, Header Position, and Theme To change the current formatting, change the Header Position and Theme. When you enable the Header Position option and select the Header Position in the drop-down menu, the header position is updated. - After updating the required information, click Save.
The contact information of a selected customer is listed in the Customer Detail section. When you add this option, an agent can access the configured information on the agent's desktop during calls.
To configure and set the Detail component:
- Click the Detail component.
The Details component appears. - Select the Details component on the canvas, and then click the gear icon.
The properties for the Contact Details are shown.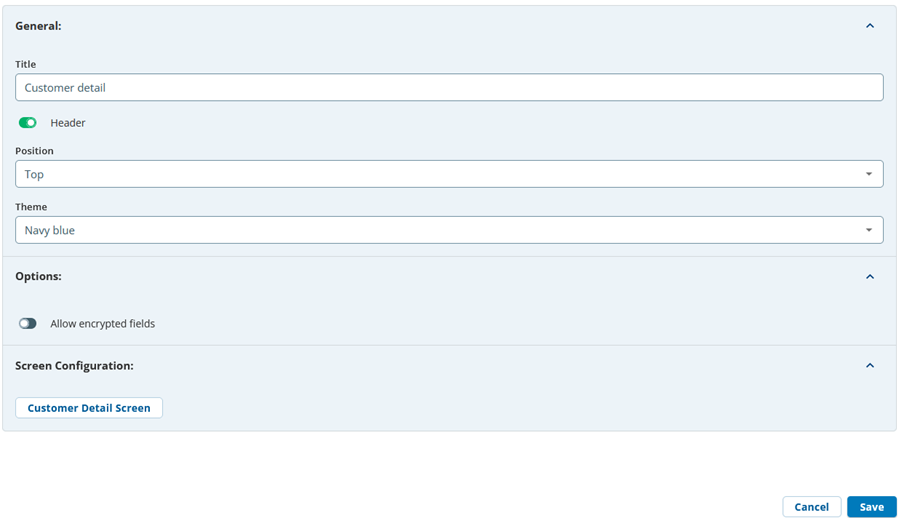
Number Property Available Features Expected Result General Title
Position
Theme
You can change the default title of an component. When you change the title, the component name on the canvas is updated to the new title. For example, you can change the title from Contact Detail to Contact Information, and the name is updated on the tab on the canvas.
Screen Configuration Customer Detail Screen You can configure the fields for the Customer Detail in the Agent Workspace Premium.
- Select the Customer Detail feature and then click the gear icon tab.
- From the list of available groups, select a group for which you want to add screen configuration.
- You can select fields from the Available options list and move them to the Select option.
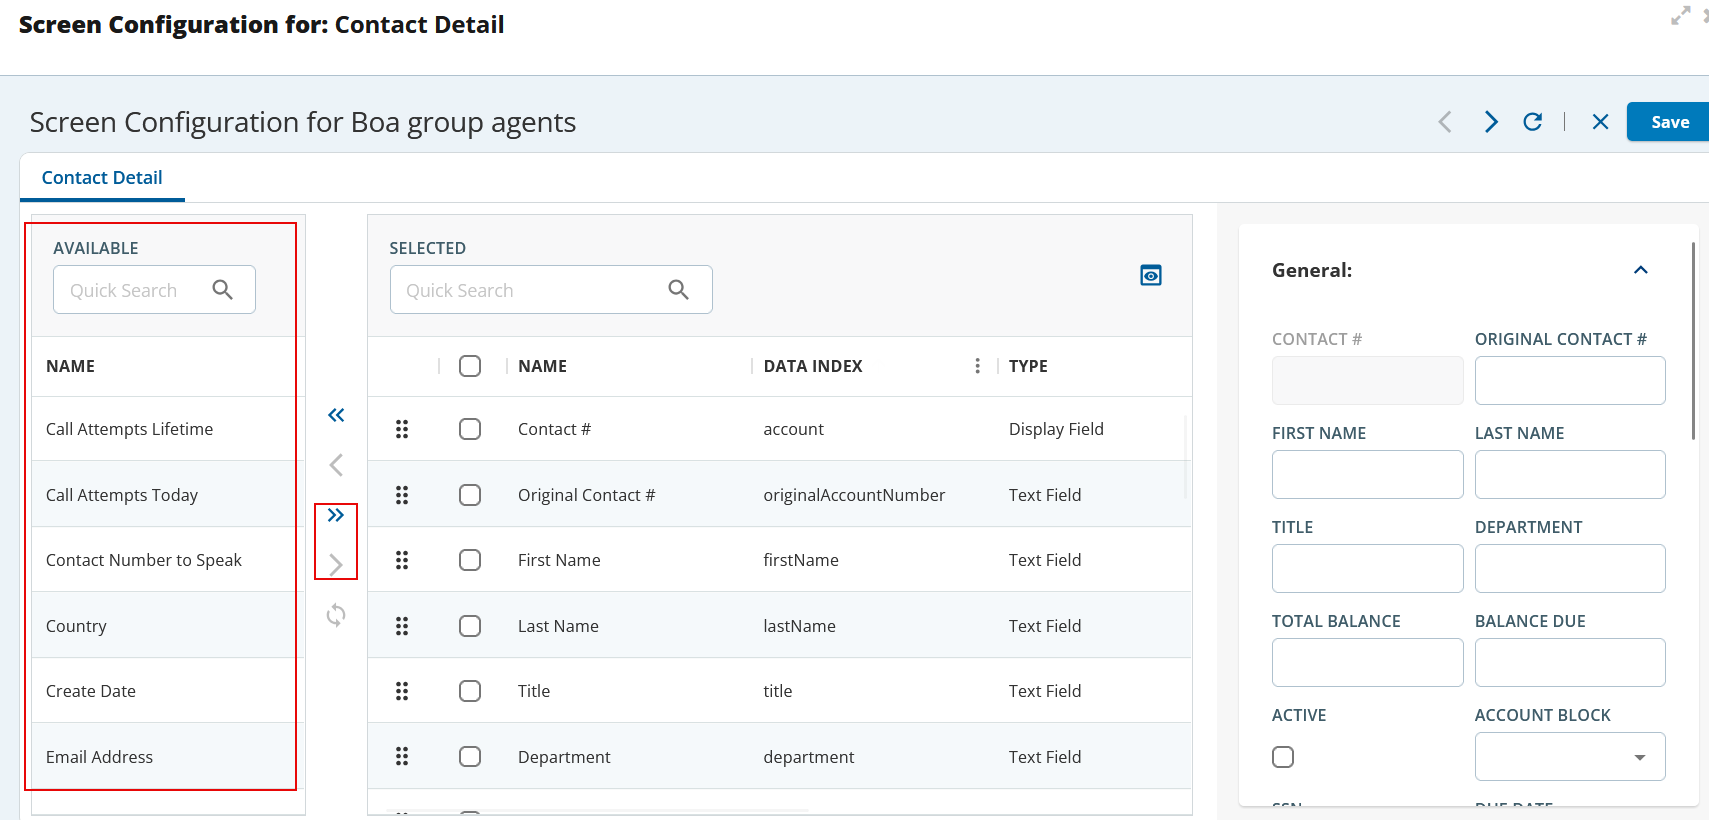
- After updating the fields, click Save.
The changes are updated in Contact Details.
Options When you enable this option, the encrypted fields are enabled when you a view a contact.
The Interactions component displays all contact interactions with the customer.
To configure and set the Contact Interactions component:
- Click the Interactions component.
The Interactions component appears. - Select the Contact Interactions component in the canvas or page, then click the Properties tab.
The properties of the Contact Interactions are shown.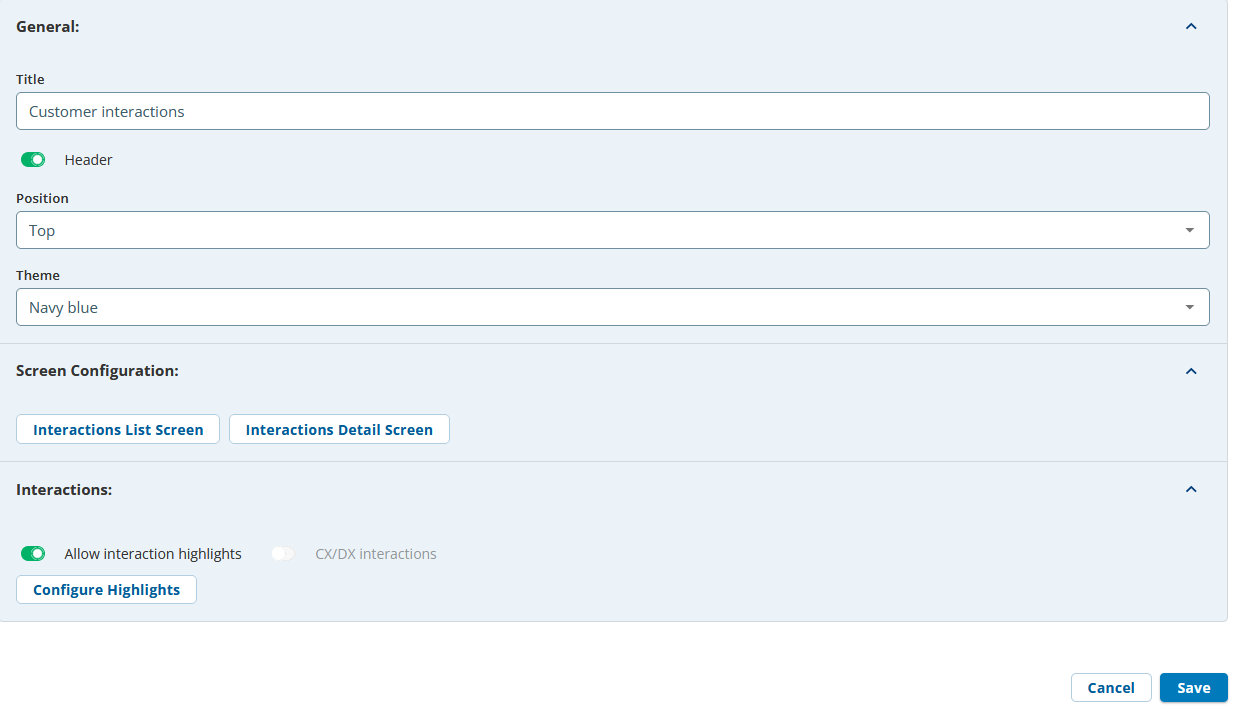
Property Available Features Expected Result General Title
Header
Header Position
Theme
You can change the default title of an component. When you change the title, the component name on the canvas is updated to the new title. For example, you can change the title from Contact Interactions to Interactions, and the name is updated on the tab on the canvas or page.
To change the current formatting, change the Header Position and Theme. When you enable the Header Position option and select the Header Position in the drop-down menu, the header position is updated.
Screen Configuration Interaction List Screen
Interaction Details Screen
The Interactions List screen allows you to define what columns you want agents to see when the agents are looking at an interaction list. You can also include interactions that are done outside the platform.
The Interaction Detail screen allows you to define the interaction details that are displayed based on the interaction type. For example, if you want to display details of a call, you can configure details such as call center name, contact date, call start and end time.
Interactions Allow Highlights You can configure the fields for the Contact Interactions in the Agent Workspace Premium.
- Enable the Allow interaction highlights option and click the Configure Highlights button.
The Configure Interaction Highlights window appears. - Enable the Show all Interactions option. This option allows you to see all types of interactions.
- Interaction Types: You can select fields (Interaction Types) from the Available options list and move them to the Selected options list.
- Result Codes: You can select the required Result Codes from the Available options list and move them to the Selected options list.
- After updating the fields, click Save.
The changes are updated on the Contact Interactions page or tab.
- Enable the Allow interaction highlights option and click the Configure Highlights button.
You can add the Call Details component to the Designer canvas. This option displays a list of call details for specific channels.
To configure and set the Call Details:
- Click the Call Details component.
The Call Details component appears. - Select the Call Details component on the canvas or page, then click the Properties tab.
The properties of the Call Details are shown.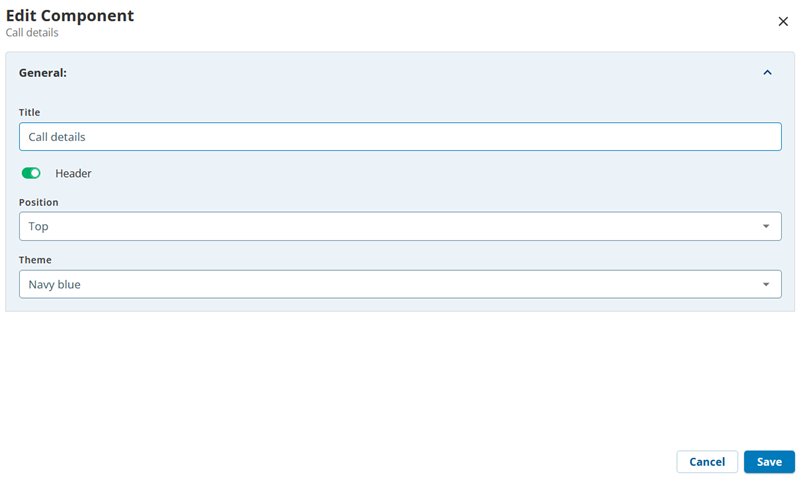
Number Property Available Features Expected Result Content Title You can change the default title of an component. When you change the title, the component name on the canvas is updated to the new title.
Styles Header, Header Position, and Theme To change the current formatting, change the Header Position and Theme. When you enable the Header Position option and select the Header Position in the drop-down menu, the header position is updated.
You can add the Customer Tasks component to the canvas. This option displays a list of all contact tasks associated with a contact with an advanced search function for an agent. This option allows an agent to create a new task, set priority, and view the status of the tasks.
To configure Customer Tasks:
- Click the Customer Tasks component.
The Customer Tasks component appears. - On the Customer Tasks window, click the gear icon.
The properties of the Customer Tasks are shown.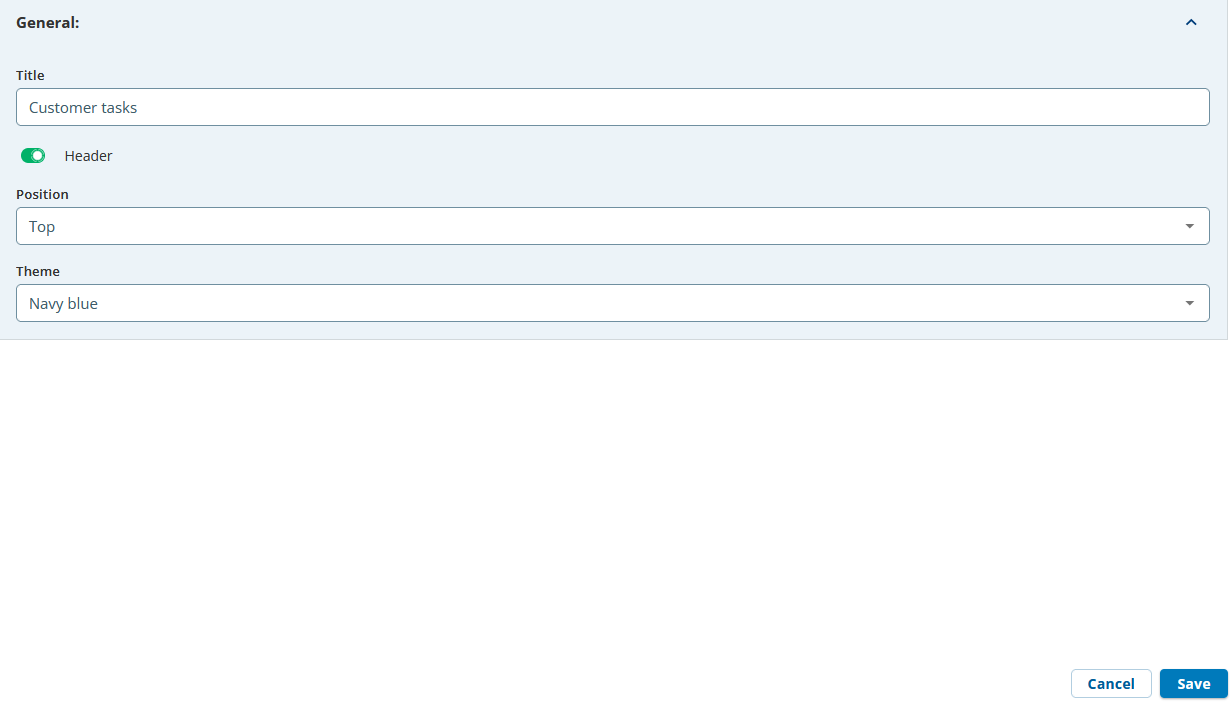
Number Property Available Features Expected Result General Title You can change the default title of an component. When you change the title, the component name on the canvas is updated to the new title.
General Header, Header Position, and Theme To change the current formatting, change the Header Position and Theme. When you enable the Header Position option and select the Header Position in the drop-down menu, the header position is updated.