Configuring Workflows
A defined workflow ensures that all tickets are handled in a consistent and timely manner. You can automate a workflow for tickets so that they undergo a standard process that reduces manual work, saves time, and minimizes errors, thereby getting a quicker resolution.
The Workflows tab of the Ticketing Config window enables you to configure workflows for tickets based on certain conditions that you define when the ticket is created or updated or when a nightly run is initiated. When you set the workflow to run nightly, the process starts automatically without manual interference. 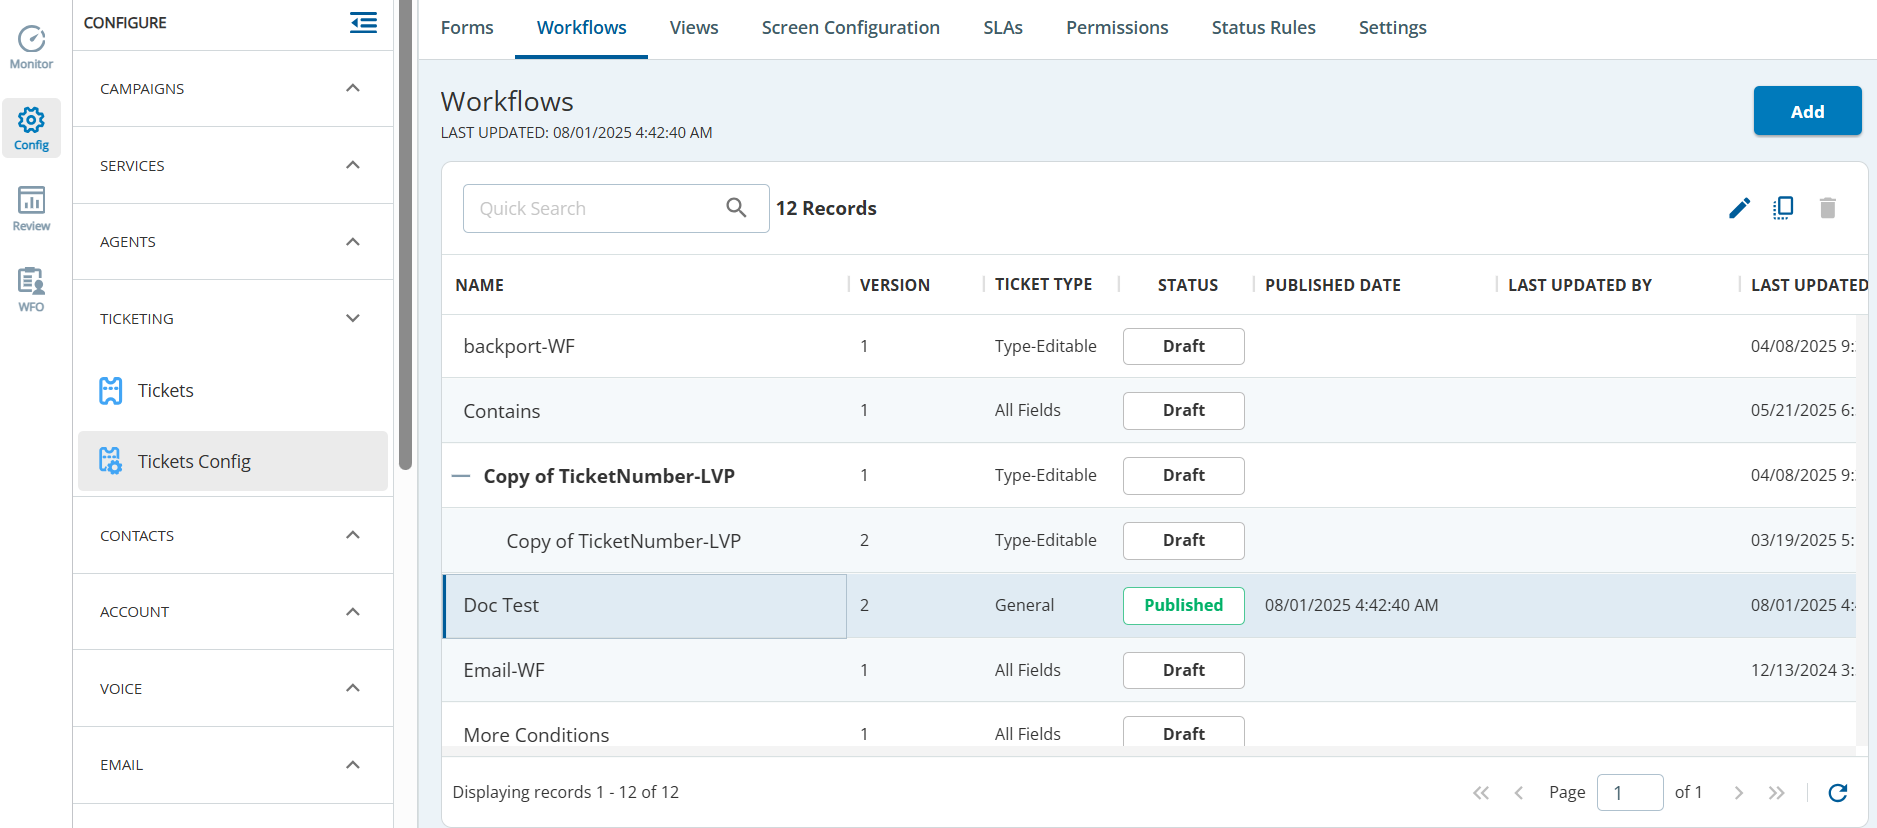
An individual workflow consists of Settings, Design, Activity, and Change History subtabs.
Configuring the Workflows
You can configure a ticketing workflow to generate any of the following events:
- Send an email or SMS
- Create a work queue task
- Update a field in a ticket
- Call an API function
- Stop the workflow
You create a workflow for different ticket types by clicking the  icon which consists of the following subtabs:
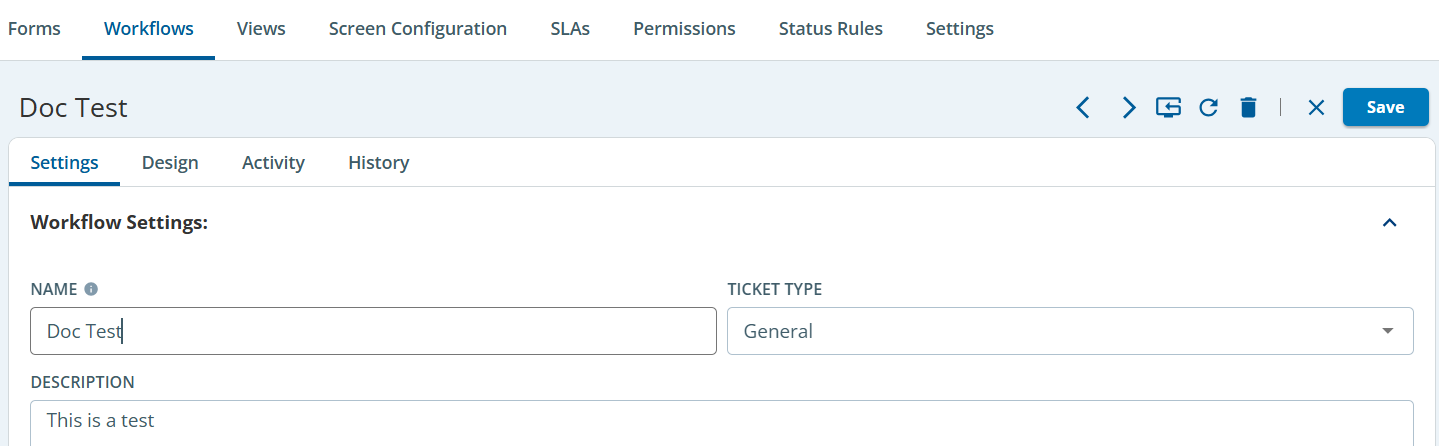
- Settings: Enables you to specify workflow settings.
- Design: Enables you to configure a workflow for a form.
- Activity: Enables you to view all the tickets to which a workflow is applied.
History: Enables you to view all the changes made to a workflow.
Creating and Designing a Workflow
To create and design a workflow:
- On the Workflows tab, click Add.
- On the Settings tab, specify values in the following fields:
- Name: Name for the workflow.
Ticket Type: Ticket type to which you want the workflow to be applied (for example, bug, support, project, work order, and others).

Ensure that the value that you specify in this field is not used in the respective field of a published workflow. For example, in an existing workflow for a certain ticket type, do not create the workflow for the same ticket type, because this will overwrite the workflow.
Description: Description of the workflow. This field is optional.
- Click Save.
The ticket workflow is created.
On the Design subtab, click the Add Event button.

The Event Trigger window appears: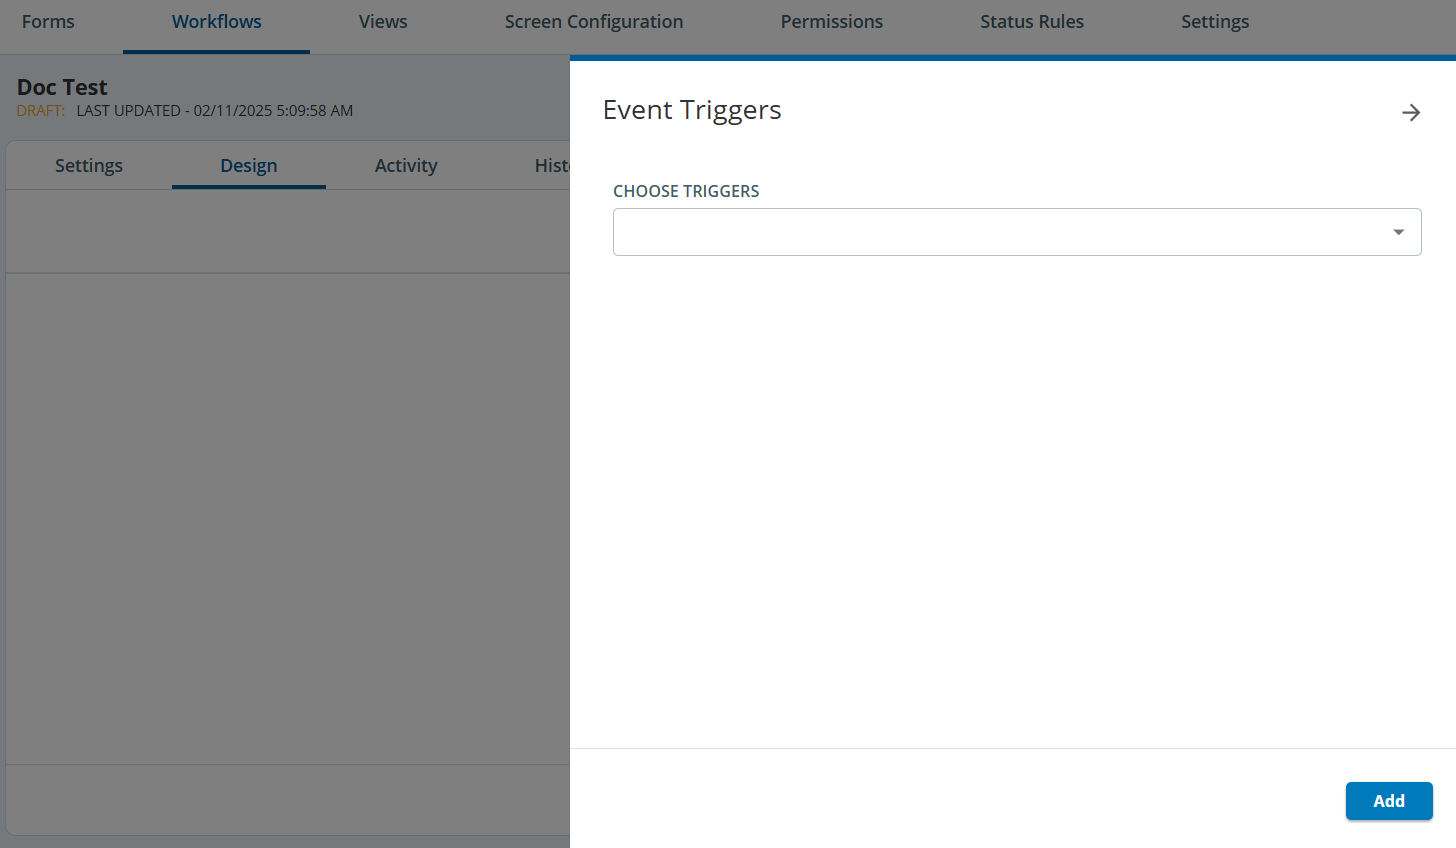
Specify values in the following sections as required.
Section
Field
Description
Event Triggers
CHOOSE TRIGGERS Actions to trigger the workflow (for example, when the ticket is created or updated, or when a nightly run is initiated).
The Triggers field contains the following options:
- Create Ticket
- Nightly Run
- Update Ticket
When you select the Update Ticket trigger, any update in the ticket does not trigger the workflow. The workflow is triggered only when a specific field in the ticket is updated.
Select the required options. Click Add, and Events are added.
Event Condition
Properties for the tickets for which you want the workflow to be applied.

If you want the actions always to execute, you can save the conditions without any criteria.
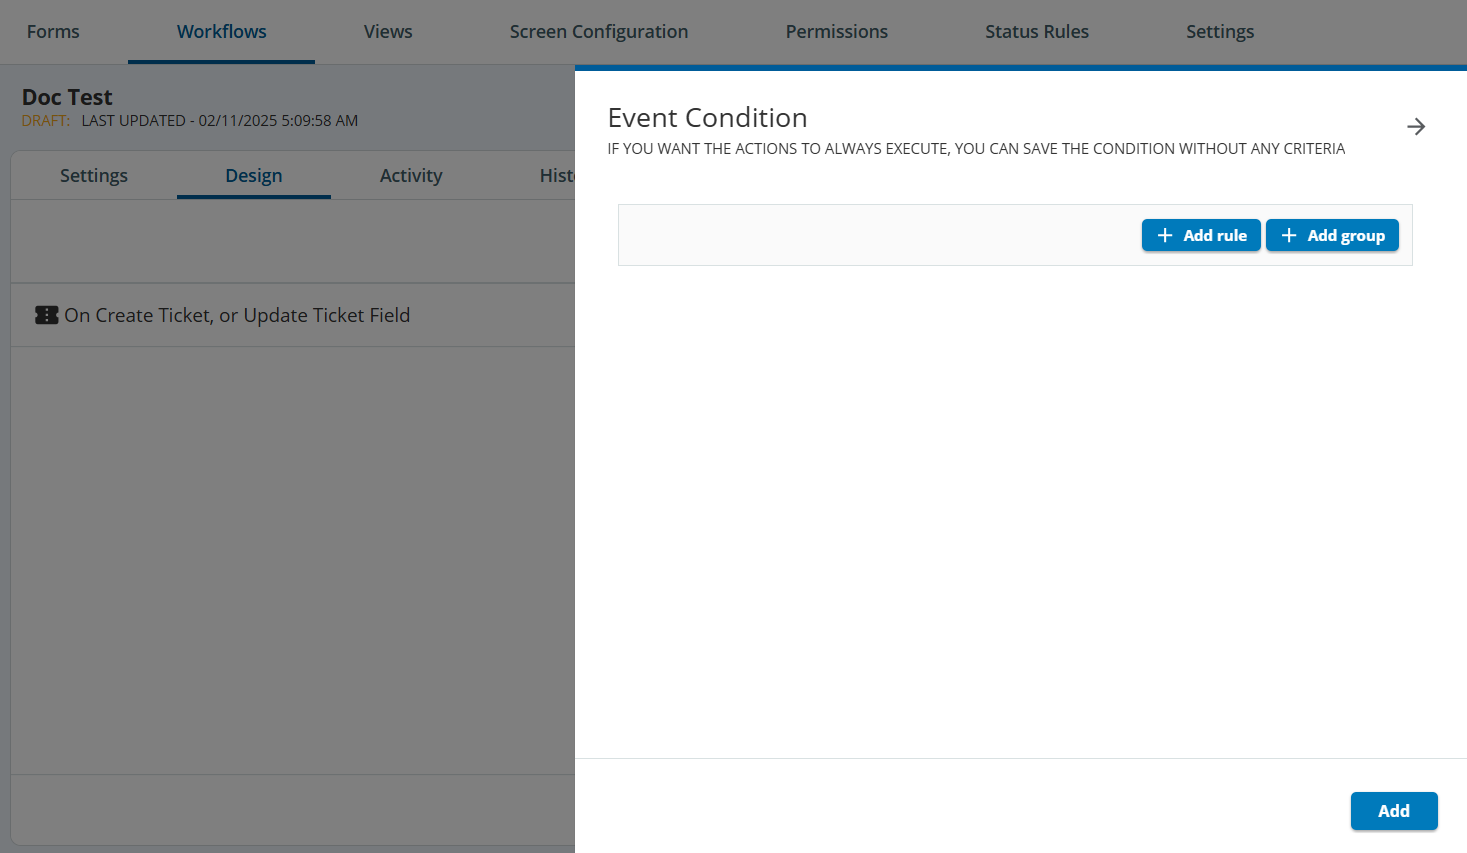
To add criteria:
Specify properties for tickets by using the following buttons:
Add Rule: Adds a rule.
Add Group: Adds a group for whom the conditions should be applied.
- When you add a Rule or Group, you can specify the logical operator (and/or) with which to connect the expressions by using the AND and OR links.
- To delete a Rule or Group, click the delete button next to the rule or group.
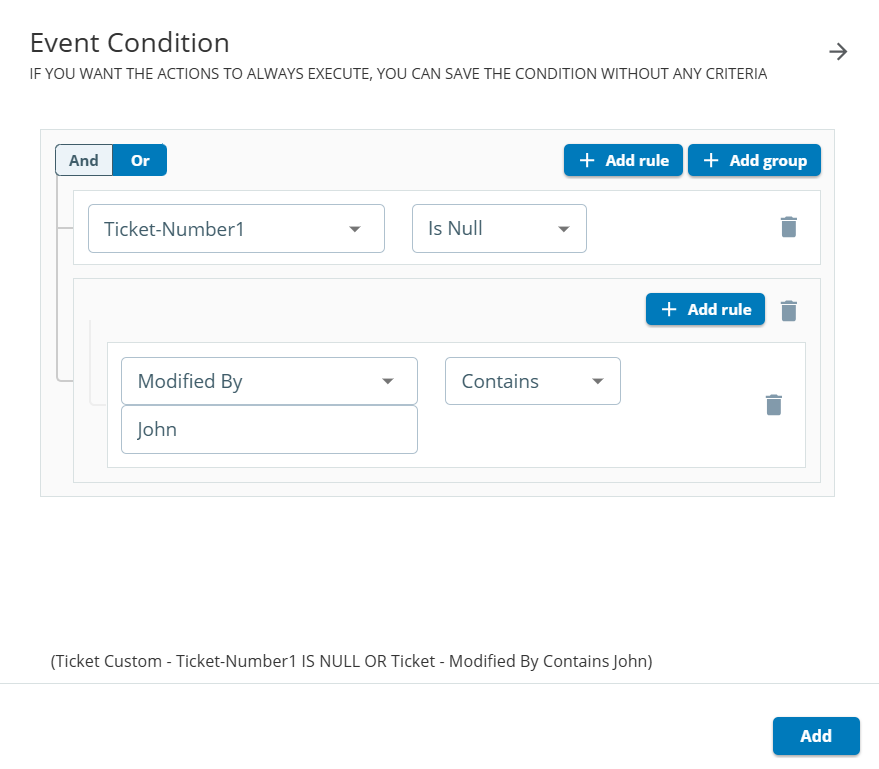
- Click Add.
Event Action
Action Type Resulting actions for the workflow.
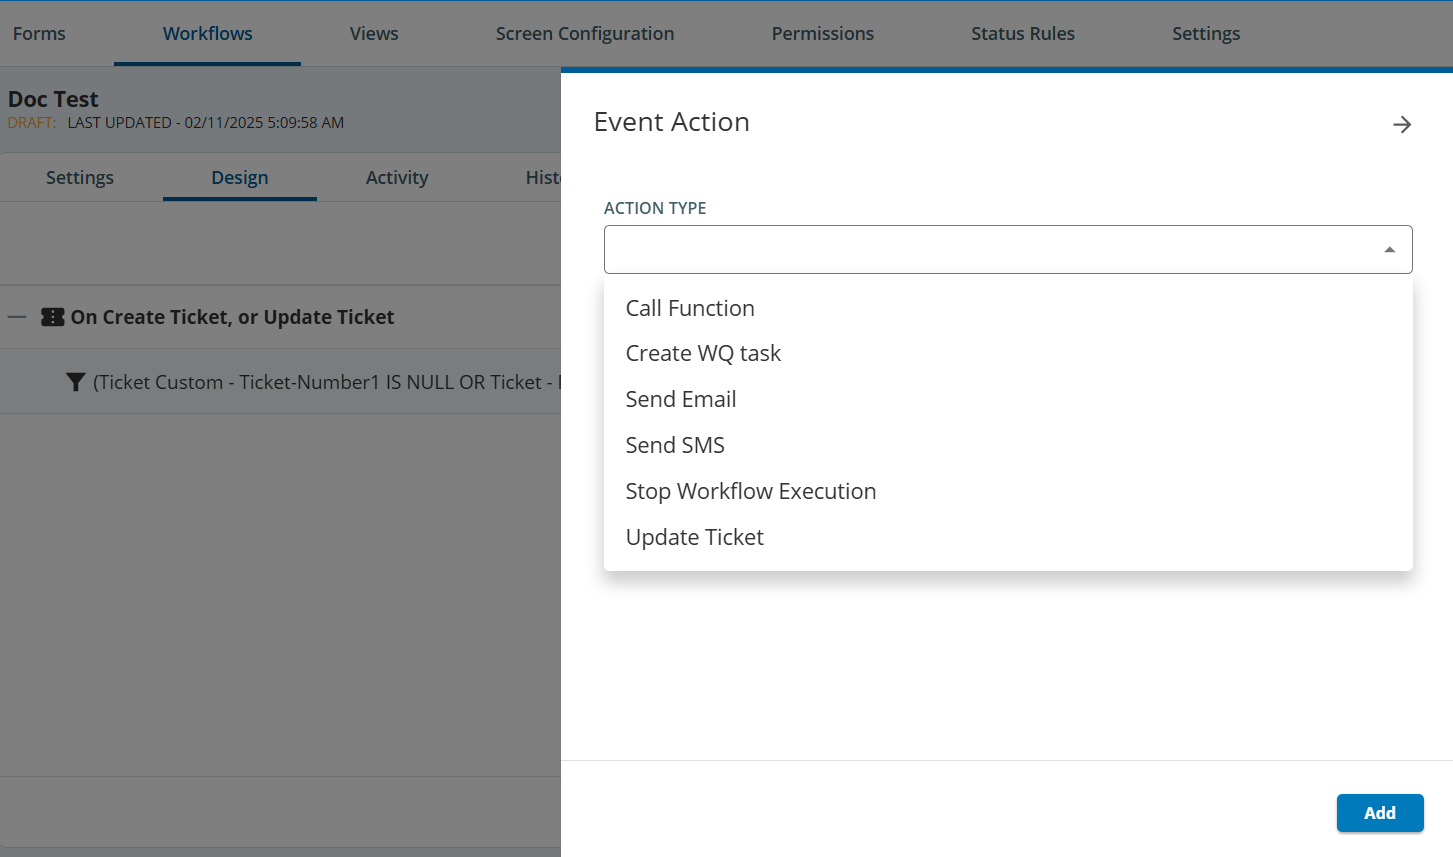
The Action Type field contains the following options:
- Call Function: Calls an API function. Select the Call Function as an action type and the required API method.
- Create WQ Task: Creates a work queue task.
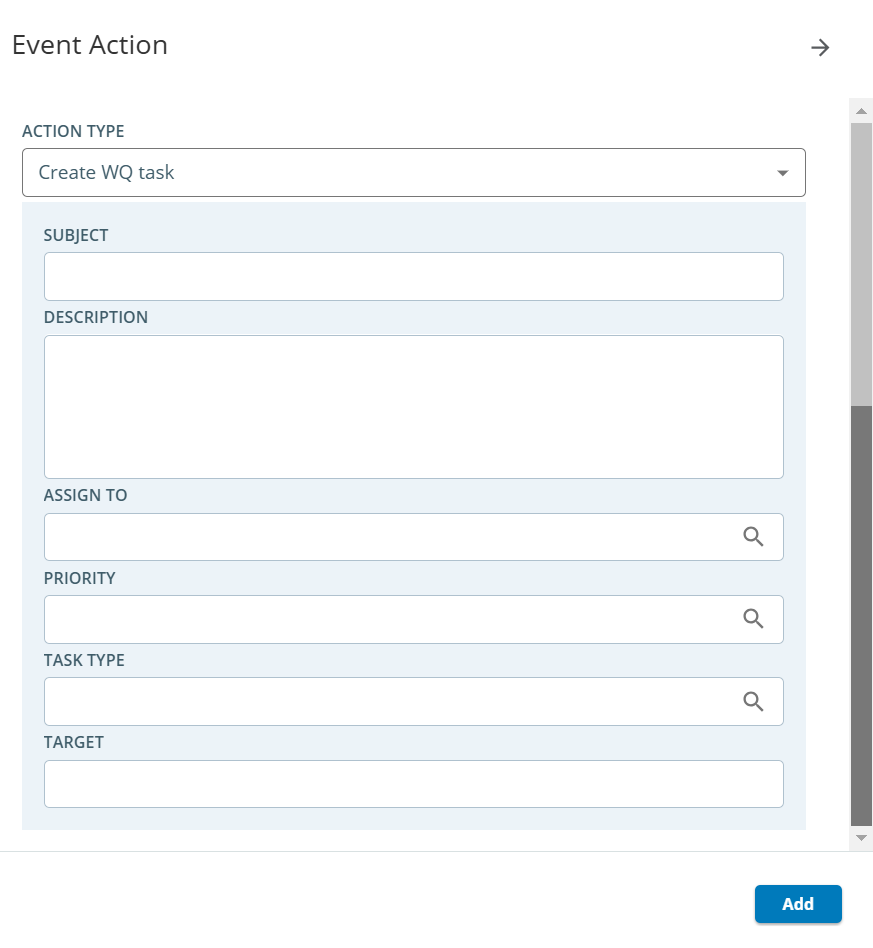
When creating a work queue task, you can specify the following fields:- SUBJECT: Subject of the task.
- DESCRIPTION: Description of the task.
- ASSIGN TO: Assign the task to the user or team.
- PRIORITY: Priority of the task.
- TASK TYPE: Type of the task. For example, Email, CallBack, or SMS.
- TARGET: Target of the event action. For example, include the email address in the ticket.
- Send Email: Sends an email.
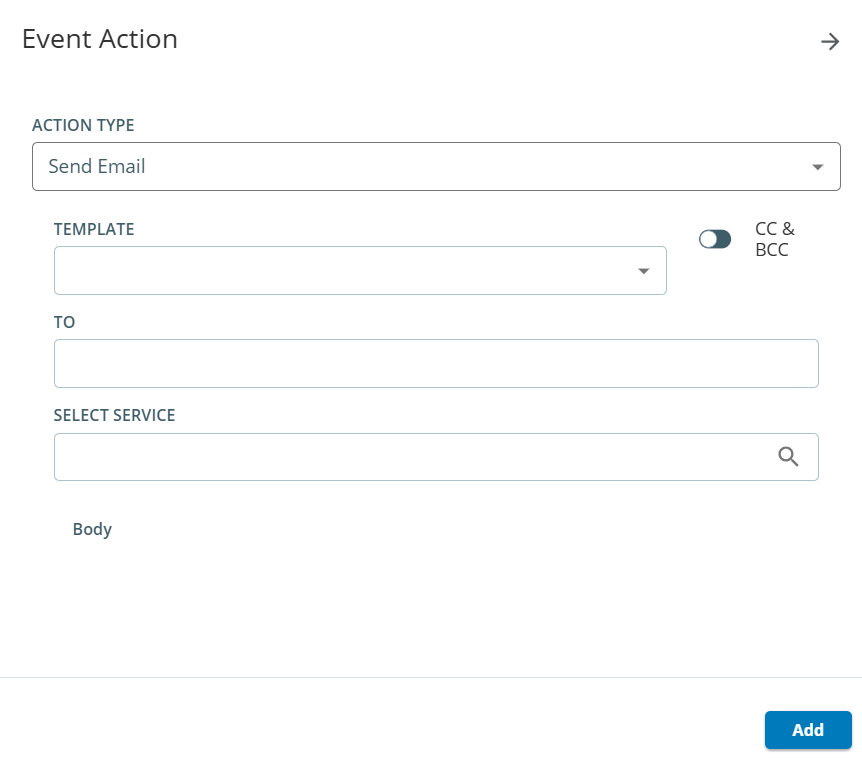
When creating the Send Email action, you can specify the following fields:TEMPLATE: Enables you to select an email template. The message in the selected template appears in the section.
- CC and BCC: Enables you to add CC and BCC email addresses. This is available in both the Template and free-form options.
- TO: Enables you to specify an email address, number, or select one of the following options:
- contact.email: Email address of the contact associated with the ticket.
- ticket.email: Email address associated with the ticket.
- SELECT SERVICE: Select the service to send an email.
- Body: Body of the email.
Send SMS: Sends an SMS.
SMS notifications generated through a ticket workflow are not saved in the Interaction table. In addition, they comply with the SMS suppression list.
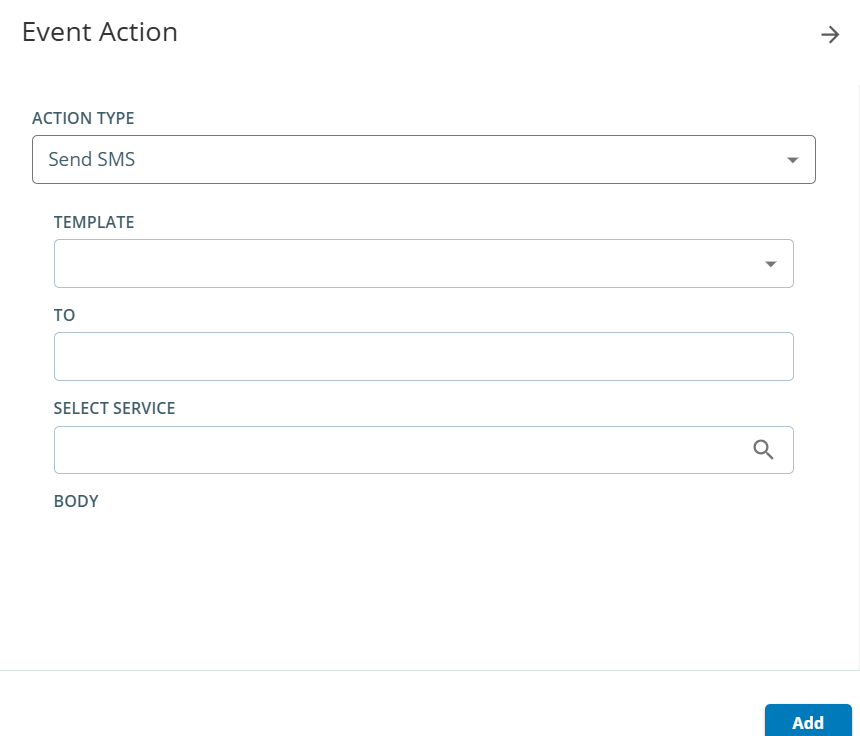
When creating the Send SMS action, you can specify the following fields:TEMPLATE: Enables you to select an SMS template. The message in the selected template appears in the section.
- TO: Enables you to specify a phone number or select one of the following options and then it will use the value contained to send the SMS :
- contact.phone1: Phone number of the contact associated with the ticket.
- ticket.phone1: Primary phone number associated with the ticket.
- ticket.phone2: Secondary phone number associated with the ticket.
- SELECT SERVICE:
- BODY:
- Stop Workflow Execution: Stops the workflow.
- Update Ticket: Modifies the value in a field on the ticket.
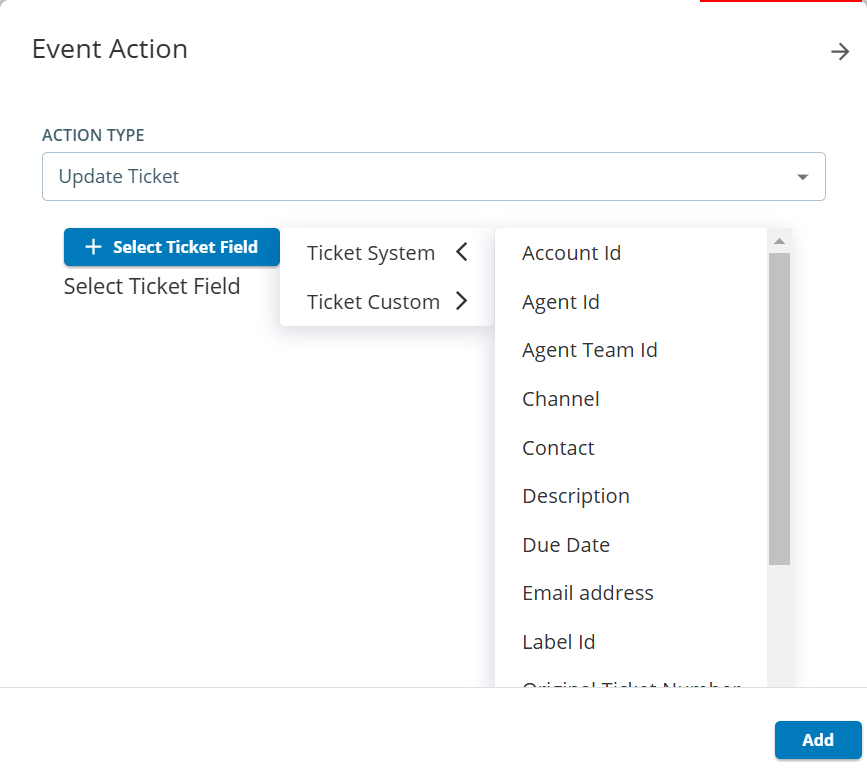
After you specify a value in the Action Type field, select values in the fields that appear.
Email and SMS messages generated through a ticket workflow are defined in a contact flow—in the Expressions section of the Expression Builder window, which contains the account and ticket fields (both standard and custom). For information about contact flows, see the Contact Flow Guide.
Click Add.
The workflow is created with that design, and the event appears on the Design subtab.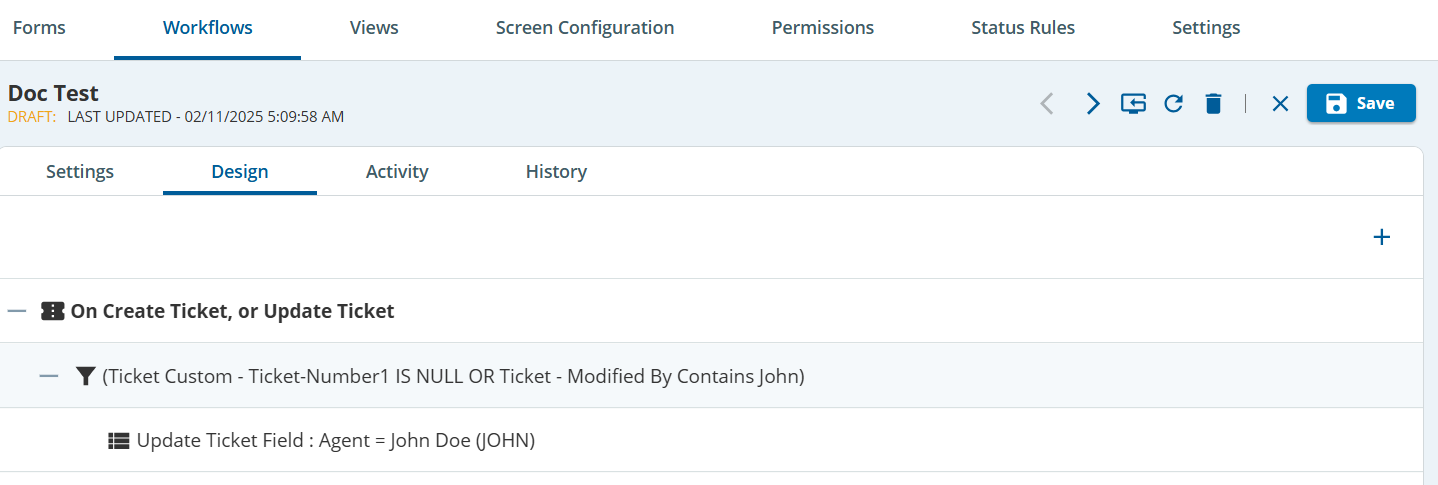
- For the same event (Create Ticket, Update Ticket, or Nightly Run), you can add another design (that is, specify additional ticket properties and actions for the workflow) using the
 icon next to the event.
- You can modify a design by double-clicking the entry.
- You can add another event using the Add Event button.
- You can delete an event using the Delete icon next to the event.
- For the same event (Create Ticket, Update Ticket, or Nightly Run), you can add another design (that is, specify additional ticket properties and actions for the workflow) using the
- To filter the workflows, on the Workflows tab, in the search box, specify the name on which you want to filter the workflows.
- To modify a workflow, on the Workflows tab, click the row displaying the workflow.
- To apply a workflow to a ticket, you must publish the workflow. To publish a workflow, on the Workflows tab, click the row displaying the workflow, and then click Publish (
 ).
- If a workflow is published, you cannot modify it unless you create a child draft of it. To create child draft, on the Workflows tab, double-click the row displaying the published workflow, and then click the Create Child Draft. The new version of the published workflow will be in the draft state. You can publish the new version; however, doing so deletes the published version.
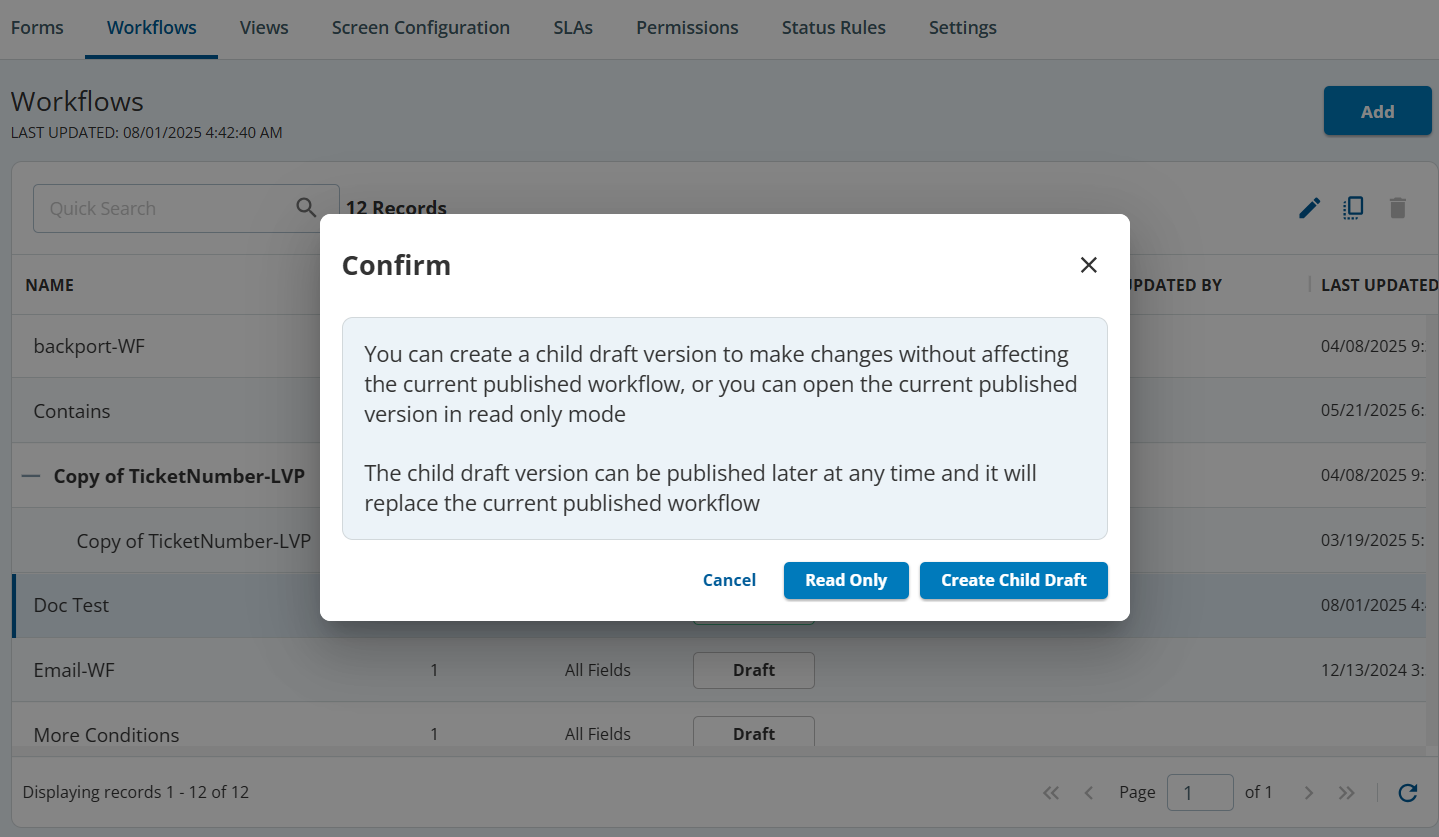
- To read, double-click the published workflow and click Read Only.
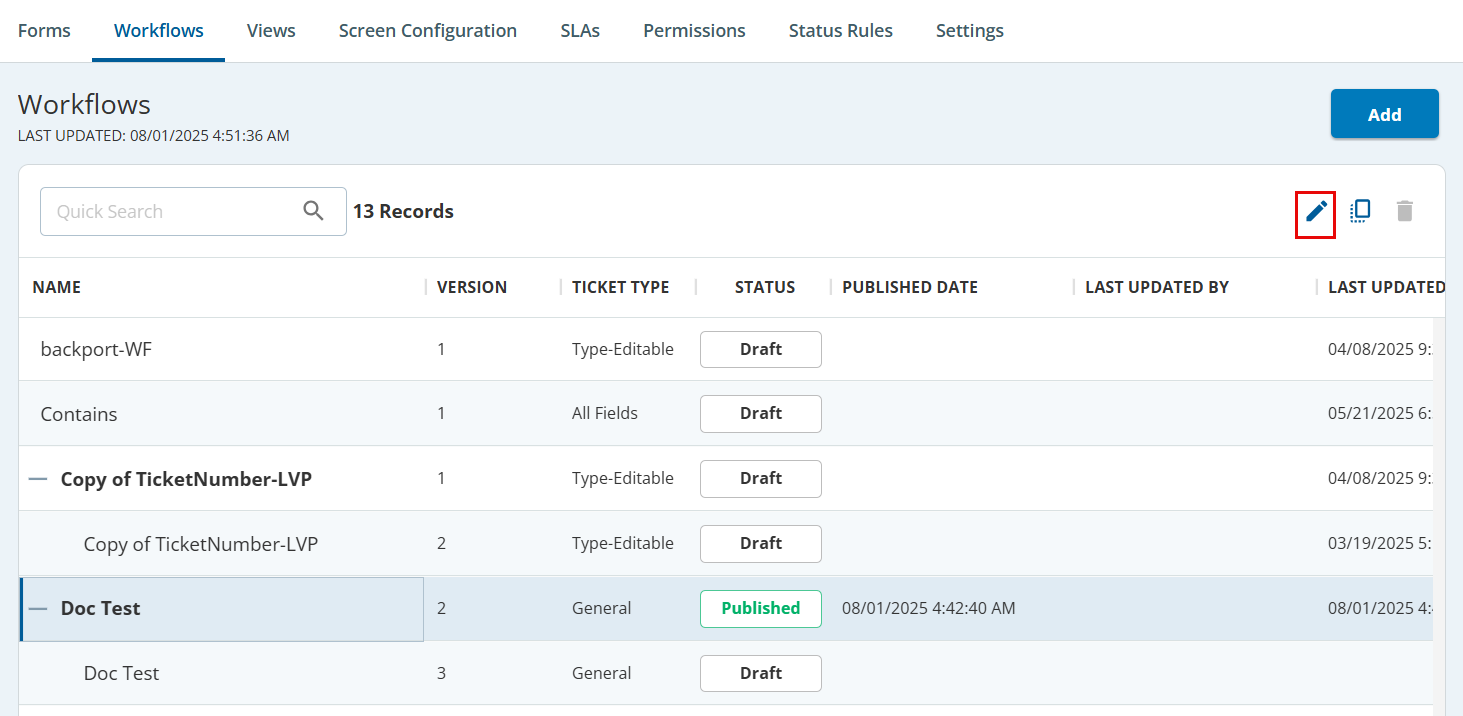
- To move a published workflow to draft, select the workflow row & click the edit icon.
- To copy a workflow, on the Workflows tab, click the row displaying the workflow, and then click Copy (
 ) icon. If the workflow that you copied is already published, you cannot publish the copy unless you unpublish the copied workflow.
To delete a workflow, on the Workflows tab, click the row displaying the workflow, and then use the Delete button. You can delete only draft of the workflow and not a published workflow.
Viewing the Workflow Activity
To view all the tickets attached to a workflow:
- On the Config tab, go to TICKETING > Tickets Config.
- On the Workflows tab, double-click the workflow for which you want to view the tickets, and then click the Activity subtab.
A table with the tickets attached to that workflow appears.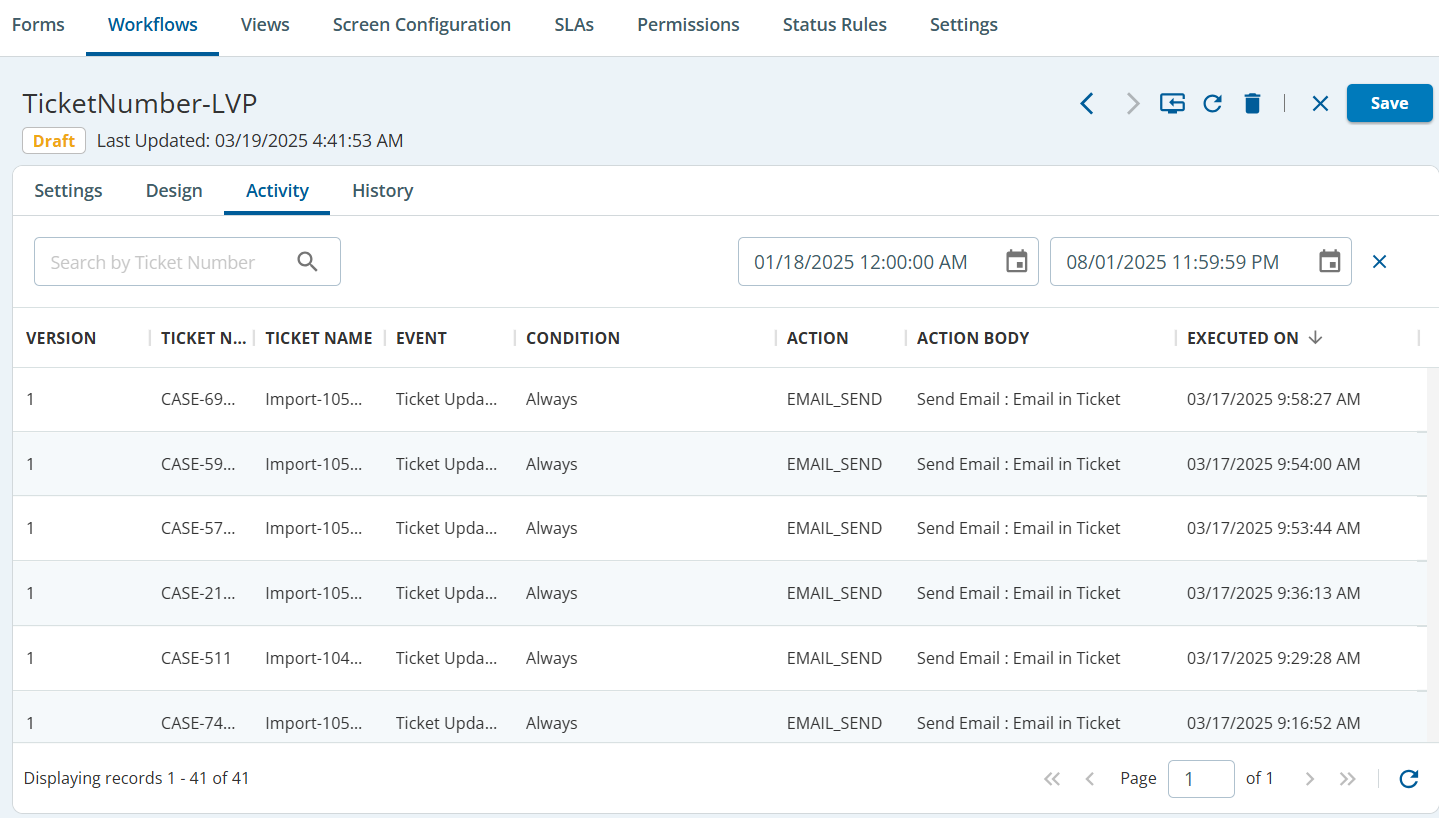
The table displays the following columns:- VERSION: Version of the workflow that was applied to the ticket.
- TICKET NUMBER: Number of the ticket.
- TICKET NAME: Subject of the ticket.
- EVENT: Event (trigger) when the workflow was applied to the ticket (that is, when the ticket was created or updated, or when a nightly run was initiated).
- CONDITION: Properties of the ticket that indicate whether the workflow is applied to the ticket. The value Always indicates that the workflow is applied to the ticket regardless of its properties.
- ACTION: Action resulting from the workflow.
- ACTION BODY: Details about the action.
- EXECUTED ON: Date and time when the workflow was applied to the ticket.
- VERSION: Version of the workflow that was applied to the ticket.
To filter the tickets, specify values in the following fields, as required, and then click Search:
- Ticket Number
- Start Date and Time
- End Date and Time
Viewing the Workflow History
To view all the changes made to a workflow, including its design:
- On the Config tab, go to Ticketing > Tickets Config.
- On the Workflows tab, double-click the workflow for which you want to view the changes, and then click the History subtab.
A table with the changes appears.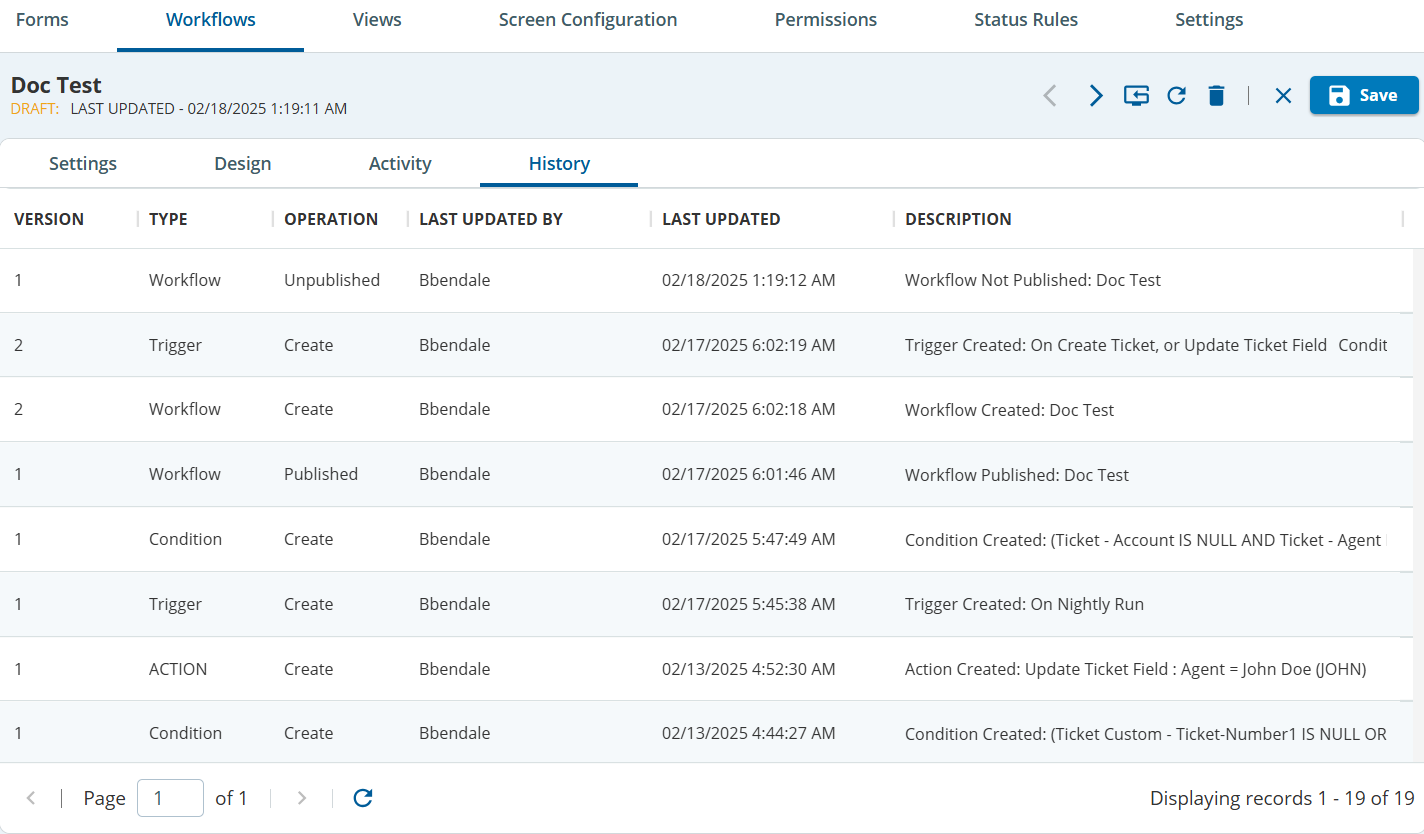
The table displays the following columns:VERSION: Version of the workflow on which the change was made.
If any change is made to a workflow after it is published, the version of the workflow is incremented.
TICKET TYPE: Section of the workflow design that was changed.
- The value EVENT indicates that the Involves any of these events section of the design was changed.
- The value CONDITION indicates that the On tickets with these properties section of the design was changed.
- The value ACTION indicates that the Perform these actions section of the design was changed.
- OPERATION: Type of change made to the workflow (for example, create, update, publish, unpublish, or delete).
- LAST UPDATED BY: ID of the user who made the change.
- LAST UPDATED : Date and time of the change
- DESCRIPTION: Description of the change.