Download PDF
Download page Action Rules.
Action Rules
The Action Rules option under Agent Assist lists all the rules you have created to assist agents. You create Agent Assist Rules to help agents with their real-time interactions.
As a manager, you can create an Agent Assist Rule and identify when the rule is valid for an interaction. For each interaction, SpeechIQ verifies that a rule can be applied and then takes any action as outlined in the rule. Managers can configure who needs to be alerted, and how an alert must be communicated. If an agent's interaction with the customer meets certain criteria, such as specific keywords, interaction intent, sentiment, and so on, you can also configure messages, links, and so on to help the agents. This information is displayed on the agent's desktop during that particular interaction.
All the Agent Assist Rules that are configured are displayed on the Agent Assist Rules List window.
Navigate to WFO > Agent Assist > Action Rules. The Agent Assist Rules List window is displayed. All the Agent Assist Rules that are configured are displayed on this screen.

Info
- Click the Active Only check box to list only the active rules.
- Click
 to search for a specific rule.
 - Select a rule from the list using the check box and click
 to publish the rule.
 - To copy configurations of an existing rule into a new rule, click
 . Click Ok when asked for a confirmation. You can rename the rule and make any changes to the existing settings as required.
 - Click
 to delete a selected rule.
Creating an Agent Assist Rule
To create an Agent Assist Rule:
- Navigate to WFO > Agent Assist > Action Rules.
The Agent Assist Rules List window is displayed. - Click
 to create a new rule.
- On the Settings tab:
- Enter a name in the Name field.
- Select a Type from the drop-down list. Choose between a Checklist and a Suggestion.
- Select a Priority from the drop-down list. Choose between Critical, High, Medium, or Low.
- Select a category in the Category field using the button. To create a new category, navigate to WFO > Agent Assist > Categories.
- Enter a Description for the rule.
- Enable the Active button to make the rule active.
- On the Parameters tab:
Set the filter criteria for the interactions where the rule is applied.- Select from the list of parameters, such as Agent Teams, Call Centers, Duration, Intent Models, Keywords, Metadata, Sentiment, and Services.
- For each of the parameters, click
 to expand and select the necessary criteria.
- On the Conditions tab:
Set up filters to trigger rules based on specific criteria.
- Click Add rule to add rules or click Add group to add a group consisting of multiple rules.
- Click And or Or to define the logic.
- Using the drop-down options, select a Field.
- Specify the relationship and the value for the field selected.

To add rules to a group, click Add rule in the group section and follow the steps listed above.
- On the Agent Suggestions tab:
The Agent Suggestions tab is available when Suggestions is selected as the Type in the Settings tab.

The text, information, or any links added here are displayed to help the agents with the interaction when the parameter and filter criteria specified in the Parameters and Conditions tabs are valid.- Enable the HTML option to add text, instructions, or links to help the agent with an interaction.
- Enable the API option to use the Application Programming Interfaces (APIs) to perform an automated action for an agent (for example, creating a JIRA ticket). Select the required API using the button.
- Enable the Knowledge Base option to provide access to knowledge base articles to the agent.
- On the Checklist tab:
The Checklist tab is available when Checklist is selected as the Type in the Settings tab.
Create a checklist of items that automatically flag an action the agents must take and mark it as complete.
- Click to add a checklist.

- In the Add Checklist window, under the Settings tab, specify a name for the checklist in the Name field.
- Specify the parameters such as Duration, Intent Models, and Keywords.
- In the Notification tab, specify who must be notified and how a notification must be sent. Select the Delivery Method and Recipients using the drop-down options.
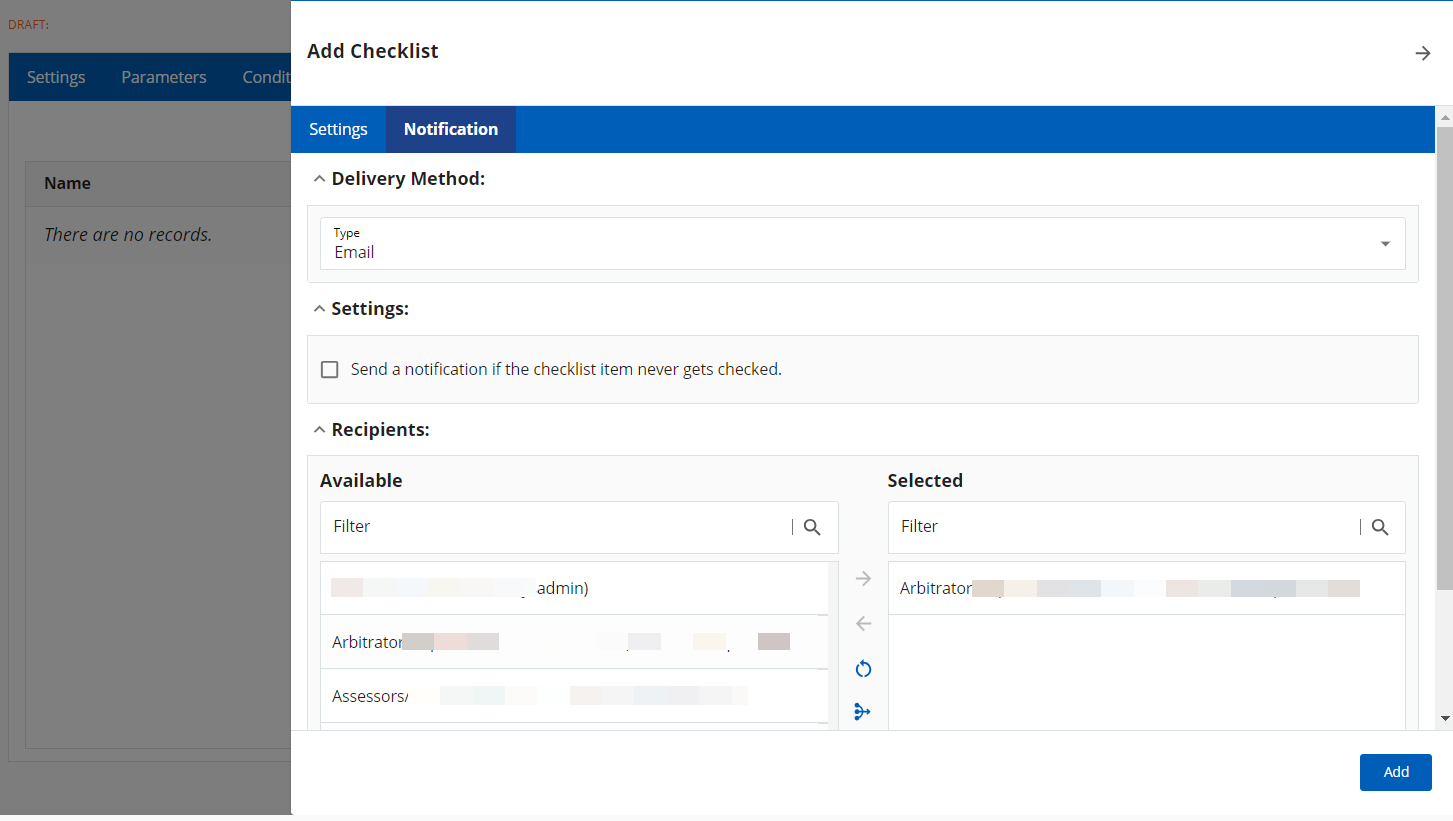
- Check the Send a notification if the checklist item never gets checked option to send an alert when a checklist item is not complete.
- Click Add.
- Click
- On the Notifications tab:
Use this tab to define how a manager must be notified in case of high-priority tasks, recurring tasks, and so on. Choose between Email, SMS, Work Queue, or Compliance Dashboard. Enable each option as required and navigate to the relevant tab highlighted in blue to make further configurations.
- Email – Use this option to alert using an email.
- Enter the subject in the Subject field and enter the email body in the box below.
- Enable Include Agent to the Subject Line to include the agent’s name in the subject.
- Select the recipients from the list below. Move from the Available list to the Selected list using the arrow key.
- SMS – Use this option to alert using an SMS.
- Enter the body of the SMS in the block below.
- You can add any keywords to the message, such as Rule Name, Agent Name, Agent Team, and so on using variables to represent the current interaction. To use variables, click
 and select a variable from the drop-down list and click Save.
- Work Queue – Use this option to trigger an entry to the Work Queue.
- Select Priority from the drop-down list.
- Select Days to Complete from the drop-down list.
- Enter the subject in the Subject field and body.
- Select the recipients from the list below. Move from the Available list to the Selected list using the arrow key.
- Performance Dashboard - Use this option to display an alert on the Performance Dashboard.
- Enter a message to be displayed as an alert pop-up on the Performance Dashboard. Include any variables if required using . Your message can have a maximum of 50 characters.
- Select the recipients from the list below. Move from the Available list to the Selected list using the arrow key.
- Enter a message to be displayed as an alert pop-up on the Performance Dashboard. Include any variables if required using
- Email – Use this option to alert using an email.
- On the Settings tab:
- Click Save.
- Click Publish to publish the rule before you start using it.
- The Activity and History tabs are enabled once the Agent Assist Rule is saved.
- The Activity tab provides detailed information about when the rule is triggered and for which agent. Details such as agent name, transcript, and actions taken are displayed.
- The History tab provides details of all the updates made to the rule.
Editing Categories
To edit a category:
- Navigate to SpeechIQ > Agent Assist > Action Rules.
- Click
 to edit the categories.
Navigate to SpeechIQ > Agent Assist > Categories.
The Categories List page (SpeechIQ > Agent Assist > Categories) is displayed. All the available categories are displayed on this page. - Click to search for a specific category.
- To create a new category, click .
The Category window is displayed. - Enter a name in the Category field.
- Select the Active check box to make the category active. You can use only active categories when creating Agent Assist Rules.
- Click Save.