Download PDF
Download page Quick Start Guide.
Quick Start Guide
This document provides a quick introduction to the SmartReach Public API and how to get started writing a client application.
It is assumed that readers of this document are familiar with REST, HTTP, and one or more programming languages for developing custom applications. Basic programming principles is not be explained in this document.
It is also assumed that readers of this document are familiar with the SmartReach platform and the features supported by the platform. In addition, some features can only be performed via the SmartReach portal.
Overview
For complete documentation of the API, visit the following URL: https://docs.livevox.com/dp
Customers have access to this site as part of the onboarding process. This process also provide the Environment, API Token, and other relevant information described below.
Environment
Each customer is configured within a specific SmartReach cloud environment. The API service URL depend upon the environment as follows:
NA3: api.livevox.com
NA4: api.na4.livevox.com
NA5: api.na5.livevox.com
NA6: api.na6.livevox.com
The appropriate URL is provided as part of the onboarding process. Using an incorrect URL results in an Authorization error.
Security
All API interactions are carried out over HTTPS. This ensures that confidential information in both the request and URI are encrypted and are not prone to man-in-the-middle attacks.
In addition, all API users are required to login before making a request to the platform. No request is be authorized without a valid login session. This is explained in more detail in the next section.
Finally, clients are responsible for maintaining endpoint and client application security. This includes performing OS, browser, and other patching requirements to avoid security issues within their systems.
Authorization and Authentication
To use the Public APIs, customers need to configure one or more valid Users with appropriate permissions for API access. A user may be a SysAdmin, SuperUser, Manager, or even an Agent. This must be done before API access can occur and must be done via the SmartReach portal. This process is not explained in this document.
In addition to creating users, customers need to have one or more API Application Tokens created for their API usage. An API Token is an alpha-numeric string that uniquely identifies a client application. An API token is be provided as part of the onboarding process. In general, a customer only needs one, however, if a customer wishes to partition and track their API use on a per-application basis, up to 5 API Tokens may be created. Each API user can create unique sessions by logging in with each distinct token available to the client. This allows traffic and API reporting to be segmented by application.
Contact the SmartReach Customer Care Team to have an API Token created. Tokens are uniquely associated with the requesting client and cannot be shared.
The credentials for a configured API user must be provided when establishing a login session. See the Session API section for a complete description of the login request. To successfully login, an API user must provide the API Token in the login request. This token is implicitly associated with all requests made within the session but is only required for a login request.
For example, the following invalid token shows how the LV-Access header is specified in an HTTP request: LV-Access: a0009999bcbc0000xxxx000000000000
If the LV-Access header is not provided, or the access token is not valid, the login request fail with an Authorization error. A successful login establishes a session for that user and return a session ID to use for subsequent requests. The following requests must provide the session ID in the LV-Session header.
For example, the following invalid session ID shows how the LV-Session header is specified in an HTTP request - LV-Session: c93caea3-6e61-428a-9a46-1af3cd0fb1fb
If the session ID is not specified or invalid, API requests fail with an Authorization error. Sessions may be invalidated if a user’s credentials have expired or been changed. In addition, sessions expire after 2 hours of inactivity. Users need to login again to establish a valid session before making addition requests.
Getting Started
REST Principles
This document does not provide a full introduction to RESTful (Representational State Transfer) APIs. For more information, clients are encouraged to read introductions in the programming language of their choice. A brief introduction to REST can be found in Wikipedia: https://en.wikipedia.org/wiki/Representational_state_transfer
A RESTful API allows users to navigate a collection of “objects” by using HTTP URLs. These objects then can be manipulated using HTTP methods. Some general “rules of thumb” which are useful for understanding the SmartReach Public APIs. The HTTP method categorizes all REST requests they use. The following table helps understand that mapping and the type of requests that can be made with the Public APIs.
REST action | HTTP method | Description |
Create | POST | Creates a new object and returns an ID to identify the object |
Read | GET | Provides the requested object. Requires an ID. |
Update | PUT/POST | Updates one or more values within the requested object. Requires an ID. |
Delete | DELETE | Deletes the requested object. Requires and ID. Not all objects can be deleted |
Find | POST | Provides a list of matching objects based on the provided information |
List | GET | Lists all the existing objects |
List Info | GET | Provides information on how many objects may be returned in a List request. |
The SmartReach Customer Care Team should be contacted for 500 level errors or any response code that is not listed in this table.
Postman Basics
There are a wide variety of tools for testing REST APIs. These include SOAPUI, ReadyAPI, and JMeter. However, these tools are designed for engineers and not the average user.
This document uses Postman, which is a freely-available HTTP/REST API testing tool. It can be obtained from https://www.getpostman.com/. This document only provides a brief introduction to Postman. Features are introduced along with the creation of the requests for the Sample Collection.
Customers are encouraged to follow the Postman tutorial and read the Postman documentation. A sample project can be provided by SmartReach that can be imported and customized by the customer.
Step 1: Create an Environment
Postman HTTP requests do not need to use an environment, however, this simplifies changing request values. Create an environment named “Sample.”

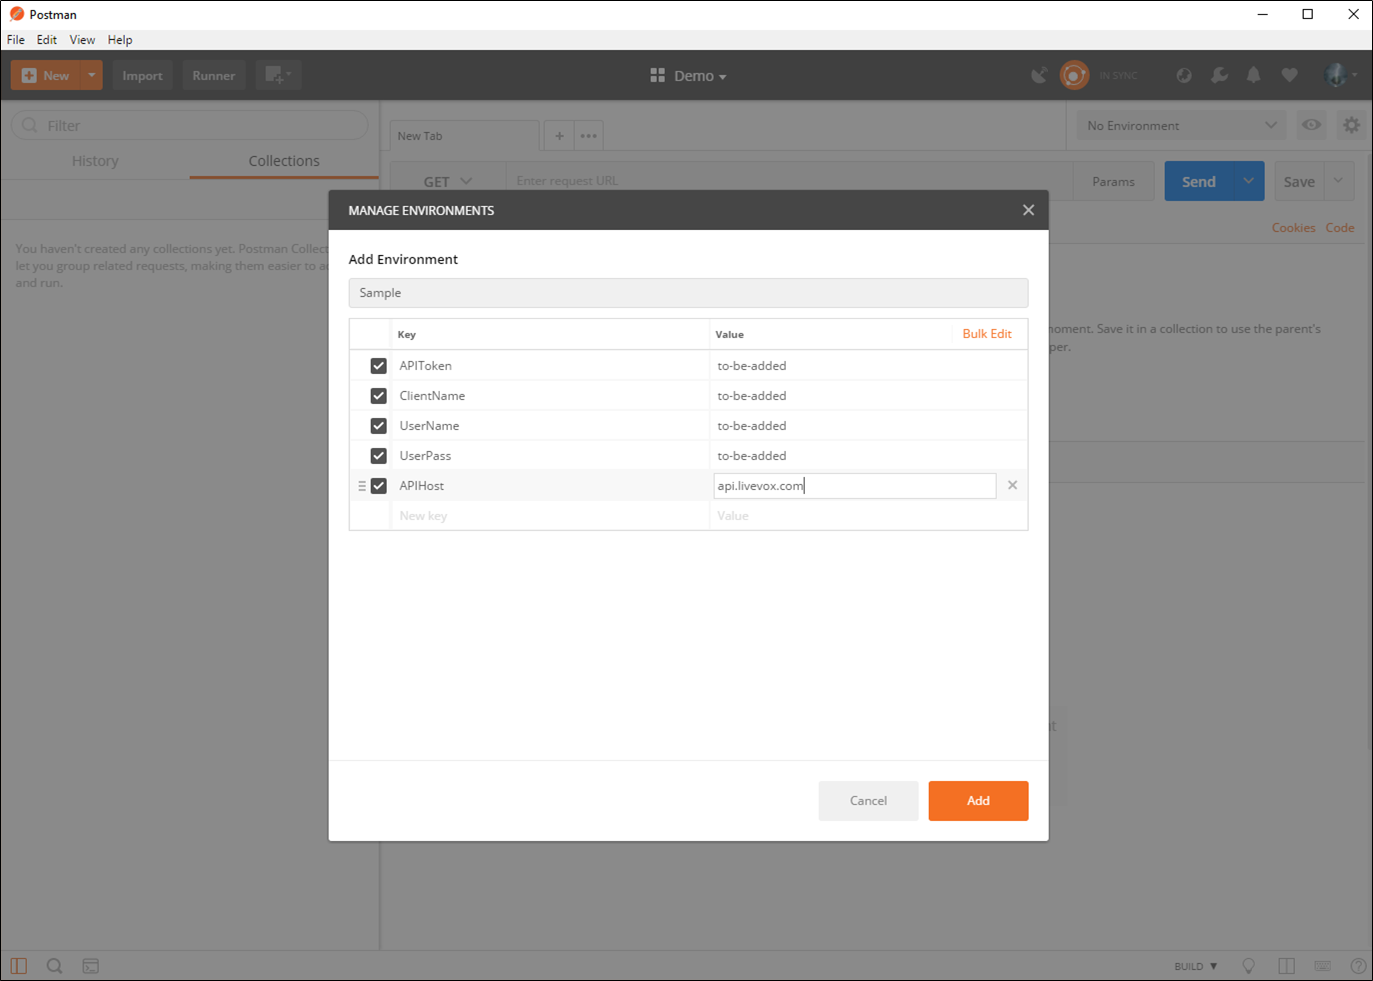
Add the indicated Keys and set the Values to valid values based on your configured SmartReach cloud. Created Keys can be used as variables in Postman Requests. See Appendix B for the complete list, or add APIToken, ClientName, UserName, UserPass, and APIHost with the appropriate values.
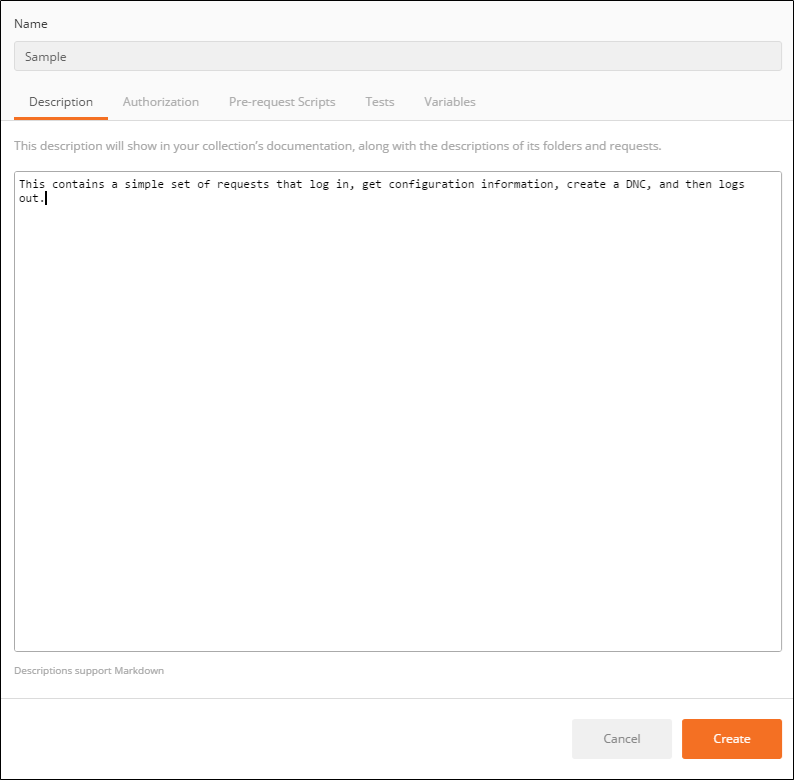
Step 2: Create a Collection
All requests are organized by collections. Create a collection named Sample.

Step 3: Creating Requests
The Sample application login, get some configuration, create a DNC and then logout. Postman features are introduced along the way.
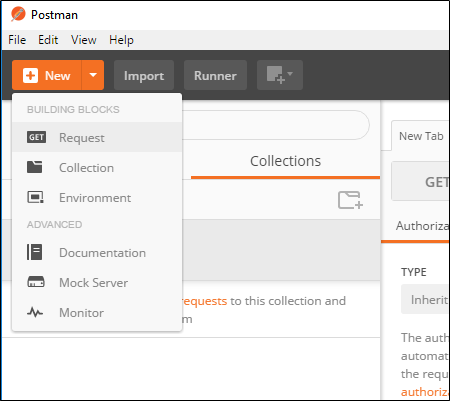
Created requests are put into the Sample collection.
Requests, in general, need specific HTTP information. When creating a new Request, a user specifies the Request URL along with the HTTP method type: GET, POST, PUT, or DELETE. As noted previously, the LV-Session header is mandatory for any request after a successful login. For POST and PUT methods, a body needs to be provided. The Public API uses the “application/json” content type.
Once requests are specified, they must be saved to avoid losing changes. After that, these requests can be safely run. An HTTP response code in the response indicates if the response was successful or not.
The following describes the meanings of the HTTP response codes returned by the Public APIs.
HTTP Response Code | Meaning | Description |
200 OK | Success | The request was successful and the response body contains more data |
201 Created | Success | A Create request was successful. The response body usually contains an ID for the successfully created item. Bulk requests may have different response bodies |
202 Accepted | Partial Success | The request wasn’t completely successful. More information is in the response body. Subsequent requests may be needed to resolve any issues. |
204 No Content | Success | The request was successful. The response body contains no content. This is usually returned for an Update or Delete request. |
400 Bad Request | Failure | The request was invalid or contained incorrect information. The body of the response should provide more information on the failure |
401 Unauthorized | Failure | The session is not valid. It may have expired or the request contained invalid credentials. The user must successfully login before making any further request |
403 Permission Denied | Failure | The user does not have permission to access the requested object and/or perform the method on the requested object. |
404 Not Found | Failure | The requested object does not exist |
405 Method Not Supported | Failure | The request contains an HTTP method that is invalid for the requested object |
409 Conflict | Failure | The request cannot be processed as it currently stands. This is commonly the case for attempting to create duplicate object (i.e. objects with the same name or ID). The user needs to modify the request to avoid the conflict. |
500 Internal Server Error | Failure | The request causes an unexpected error during processing. More information should be provided in the response. This requires help from SmartReach to resolve. |
502 Bad Gateway | Failure | This request cannot be handled due to a configuration error. This requires help from SmartReach to resolve. |
The SmartReach Customer Care Team should be contacted for 500 level errors or any response code that is not listed in this table.
Sample Administrative User Collection
After the Sample Environment and Collection have been created, it is time to start adding requests.
Prerequisite: A SmartReach user with user role IT User must be created for the following requests.
As described in the introduction, all API requests must be made within a valid session. A session is established by logging into the Public API with valid credentials as well as an API Token. If a valid session is not established, requests fail with an Authorization error.
Login
The first request to create is Login. This request also introduces many of the Postman request features for the first time. These features are not described in subsequent sections.

Login uses the Session API. This API also contains logout, validate session, and allows a user to update their password. The latter two methods are not described in this document. See the Public API Developer Portal for reference documentation.
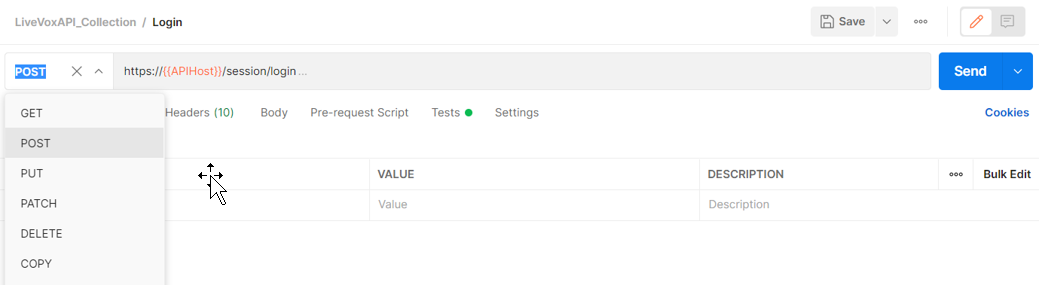
A login request uses the POST HTTP method.
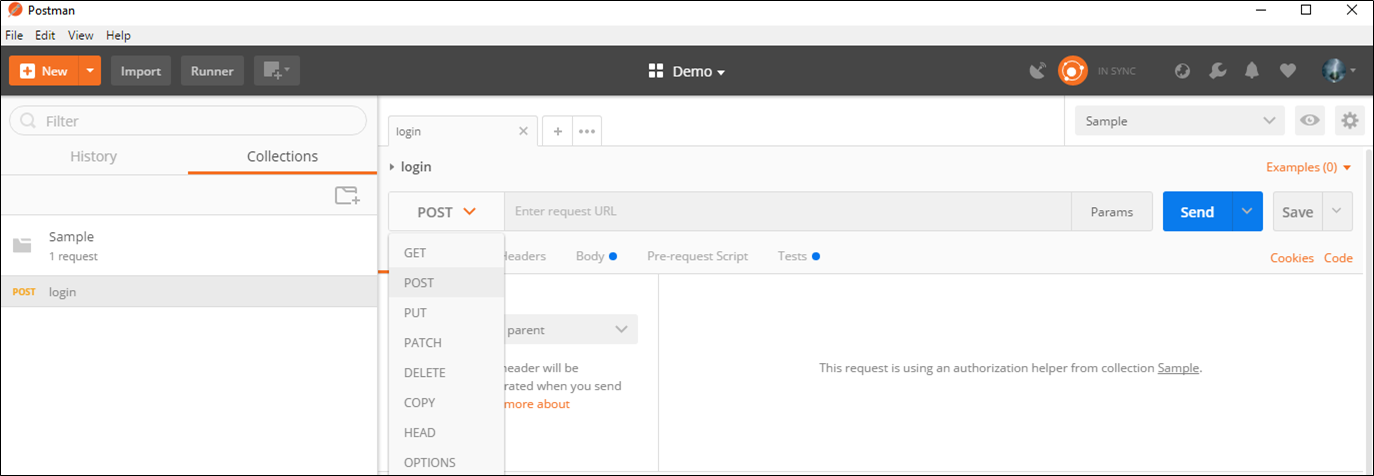
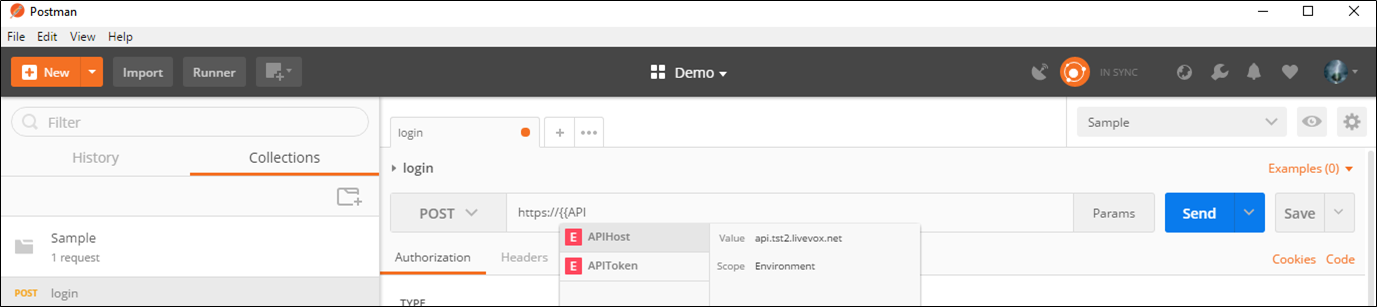
The POST is made on the API host using the /session/login URL. The Sample Environment contains an APIHost variable that can be used instead of typing in the actual hostname. Variables are contained within double braces, such as “{{}}”. Postman provides auto completion as the variable is typed out.
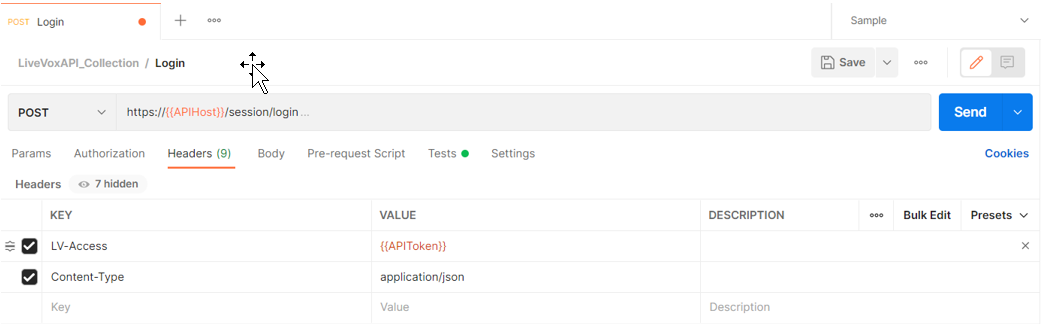
Once the URL is specified, the Headers and Body of the request need to be defined. For the Login, the LV-Access header and a Content-Type must be defined.
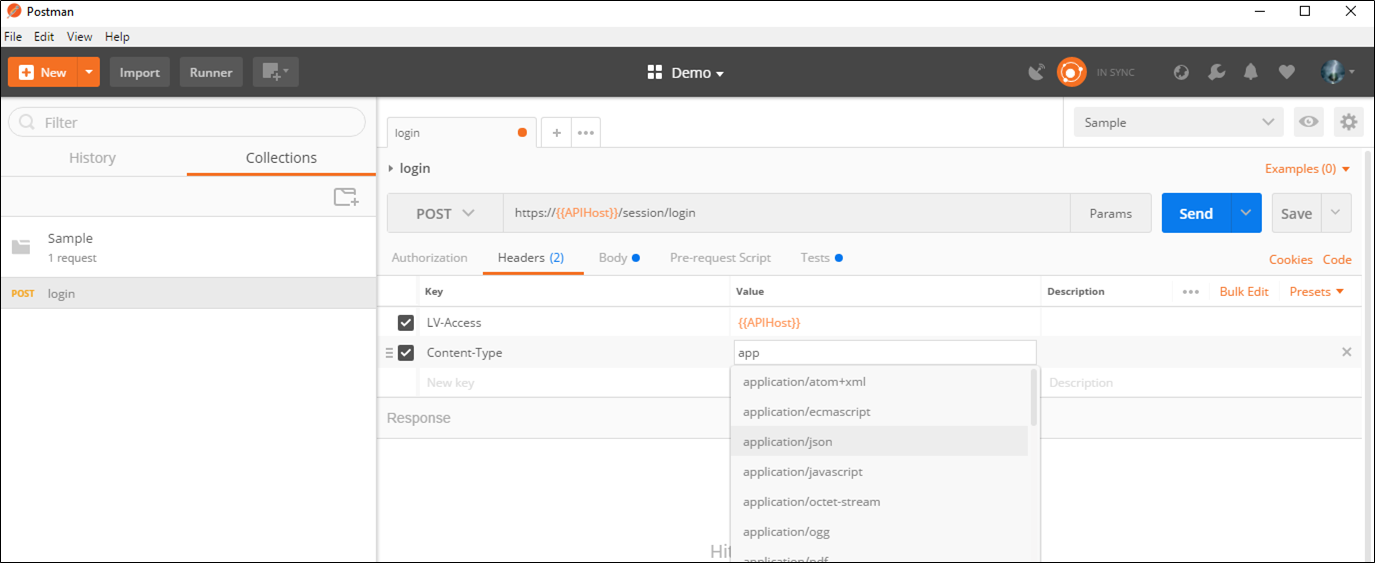
In this case, you are incorrectly specifying the token to show a 401 Unauthorized error later.
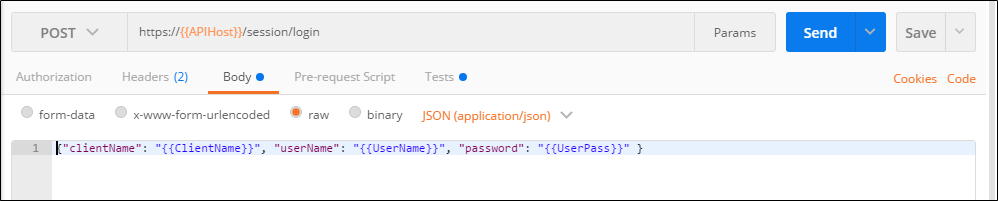
Since the Body of the request is defined in JSON, it can also use variables.
This request can be saved. If sent as is, it generates a 401 Unauthorized error since the API Token is incorrect.
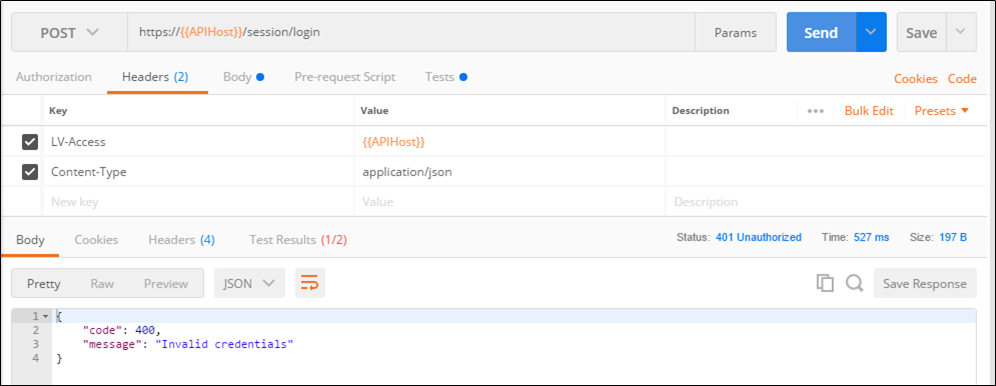
The LV-Access header should now be corrected to be {{APIToken}}.
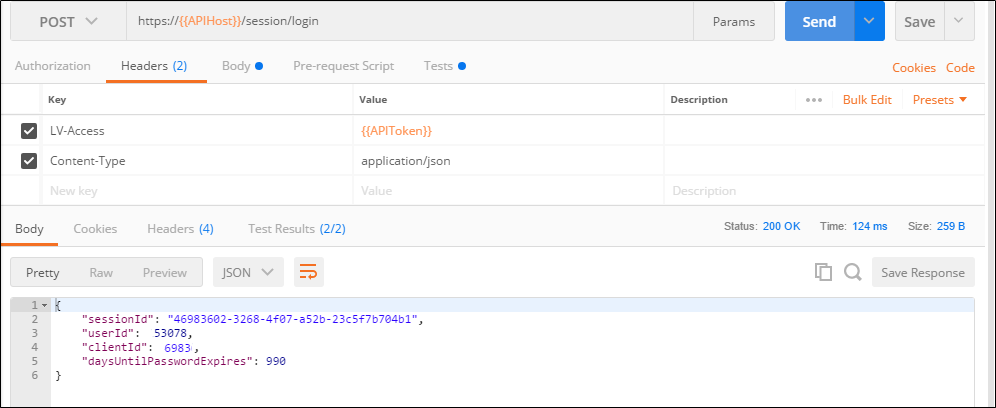
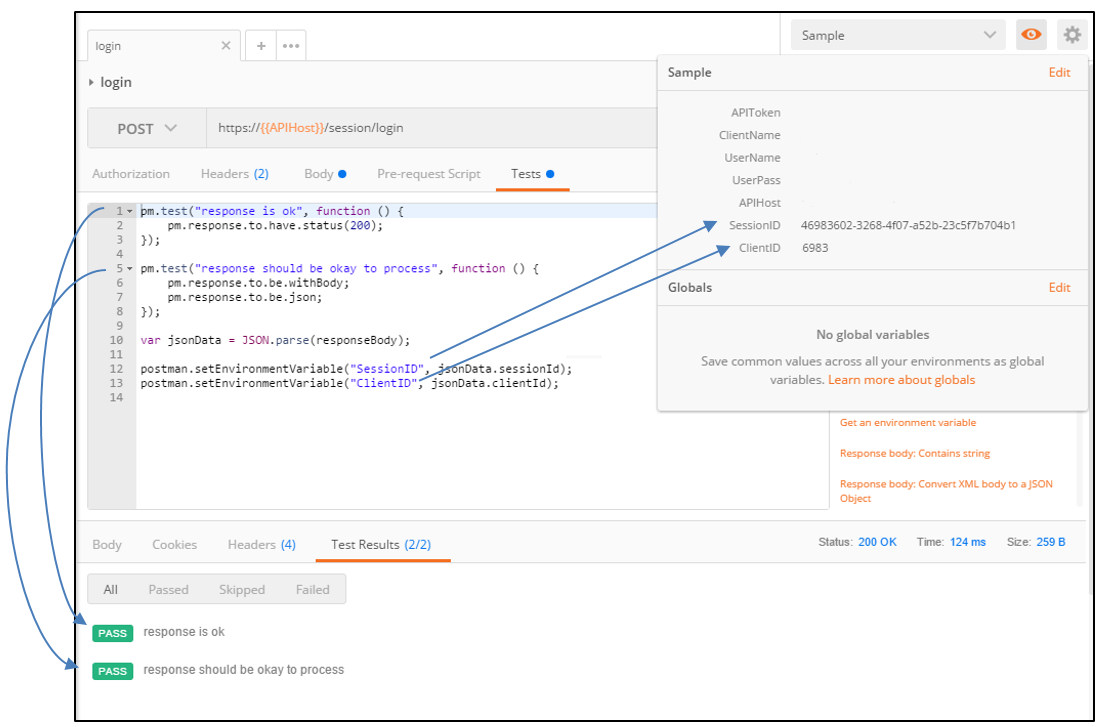
A successful login provides a Session ID that must be used in the LV-Session header for subsequent requests. In addition, it contains IDs for the user that logged in, the current client, and the number of days before the client must change their password.
Postman also provides some useful scripting that can create Environment Variable for later requests, as well as tests to ensure the returned response is what is expected. The script is written in JavaScript and is explained in the Postman documentation.
Now that you have successfully logged in, you can get some configuration information.
List Call Centers
Most RESTful APIs divide collections of objects into URLs with paths that divide collections into smaller collections of items. For example, /cars/Honda/2012/Civic/red could be an URL that points to a Red 2012 Honda Civic.
The Configuration API allows a client to query configuration information and update particular settings. Many of these methods are restricted to certain user permissions. One of the most generic methods is the ability to list all the configured call centers. This is only available to SysAdmins and IT Users. Please refer to the SmartReach Public API documentation to determine if a particular user can access an API.
The List Call Centers method provides the name, client ID, and call center ID for every item in the list.
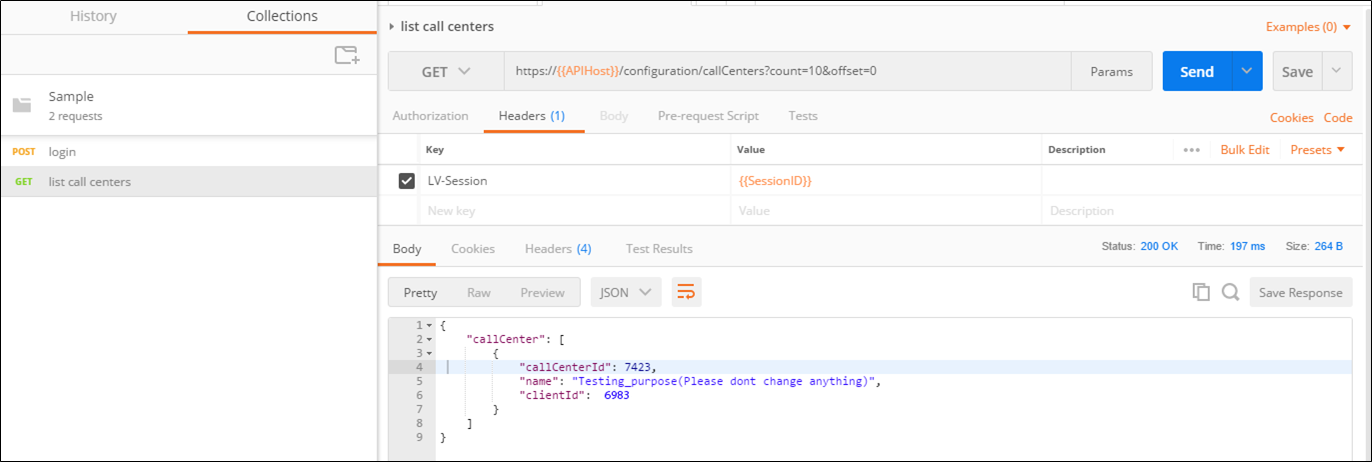
Lists are provided in a paginated fashion. The count and offset can be used to divide the response into pages of information. Count and offset are mandatory, where items start counting from 0.
List Services for a Call Center
Most requests are based on using an ID to get relevant information. For instance, to request all the services that a user can access based on a Call Center, the Call Center ID must be used in the request.

This is also a paginated request. In this case the first page would contain 3 items, counted from 0 through 2. The next page would start at item 3.
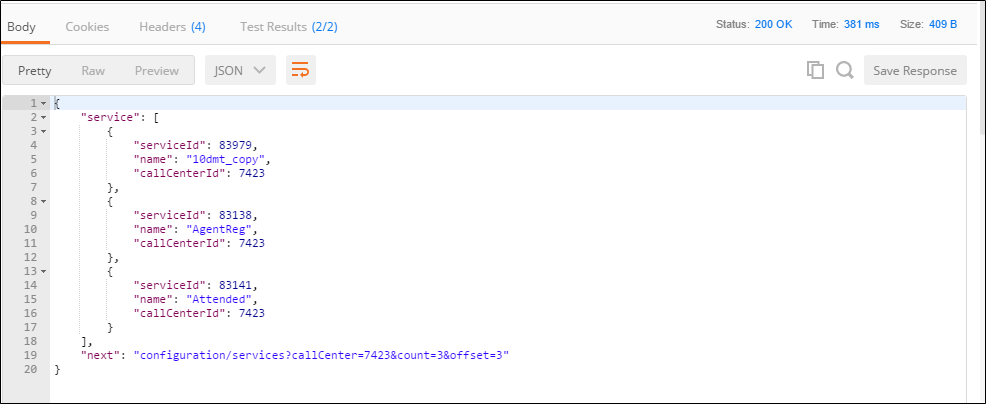
When there are additional pages of data, a next item in the response contains the URL for obtaining the next page. When there are no additional pages, this item is not provided. Note that count should contain a value between 1 and 1000.
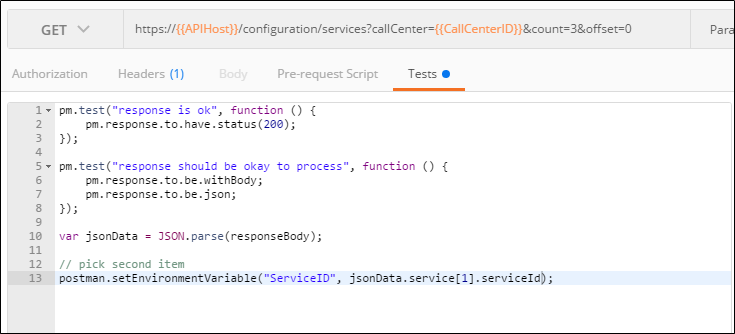
The tests in this case show how to obtain an item in an array from the response.
Updating a Service Name
Using the ID for an object allows a user to read, update and delete the identified object. Not all objects support delete.
To update a Service name, use POST and specify the new name in the body of the request.
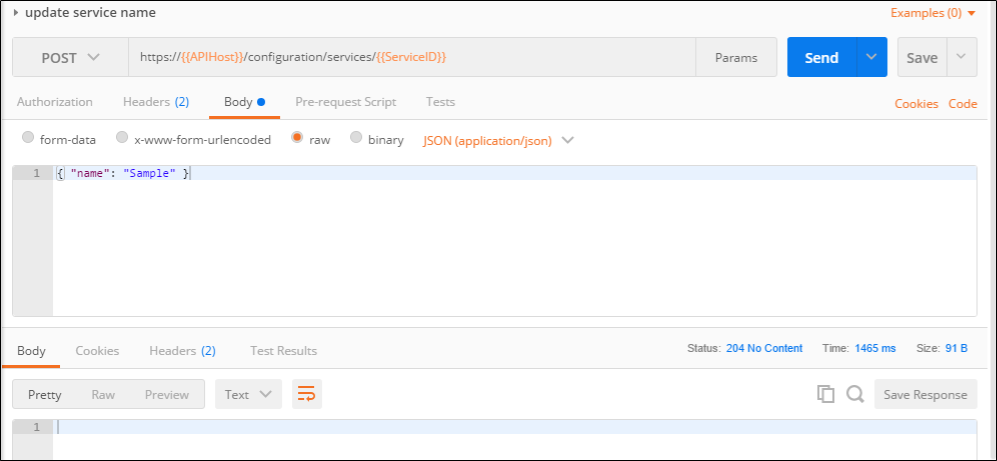
A successful update returns a 204 No Content response. A subsequent read of the service shows the updated name.
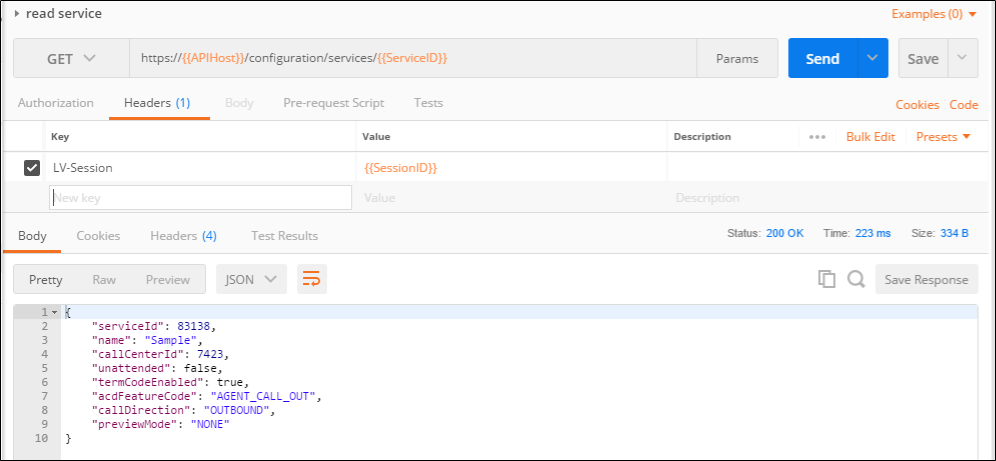
This returns more detailed service information. The Service can be updated multiple times to change various parts of the service definition.
If the service doesn’t exist for that ID, a 404 Not Found error is returned.
Creating DNCs
DNC (Do Not Call) are ways of controlling dialing on the platform. This is described in other SmartReach documentation.
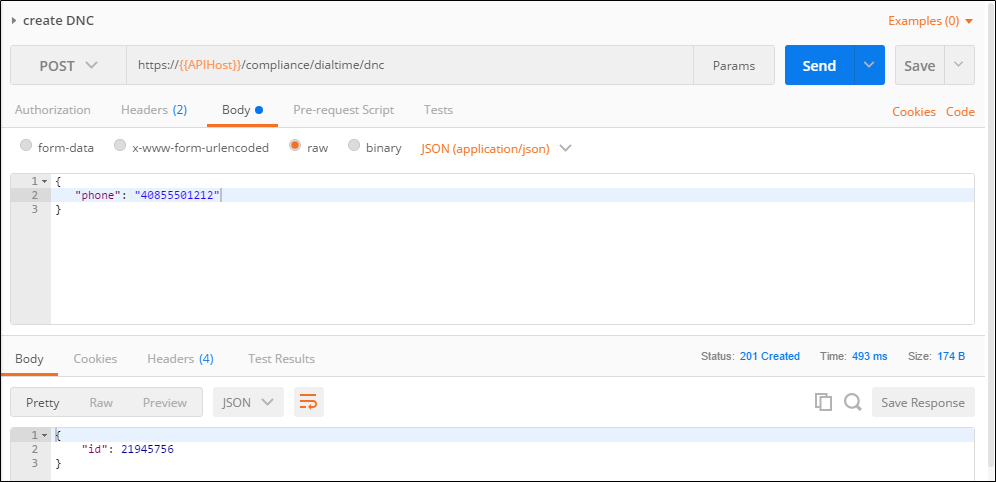
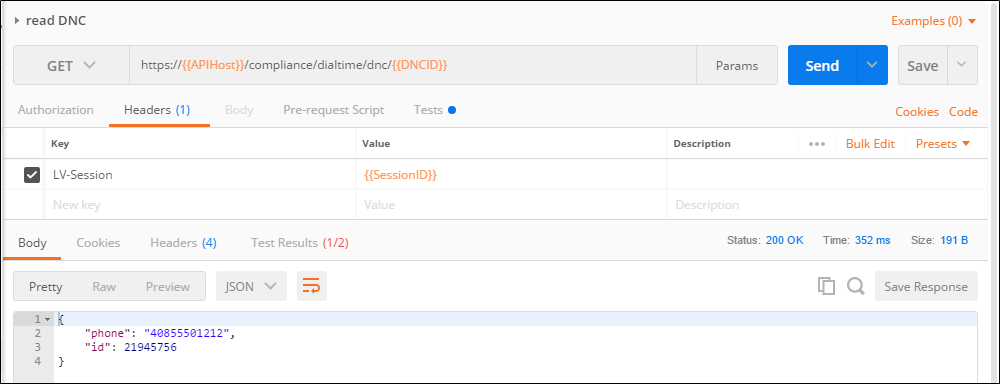
A successful create return a 201 Created response containing the ID of the new DNC. This ID can be used to read the complete DNC information.
Delete a DNC
Once the DNC is not needed, it can be explicitly deleted via the DELETE HTTP method.
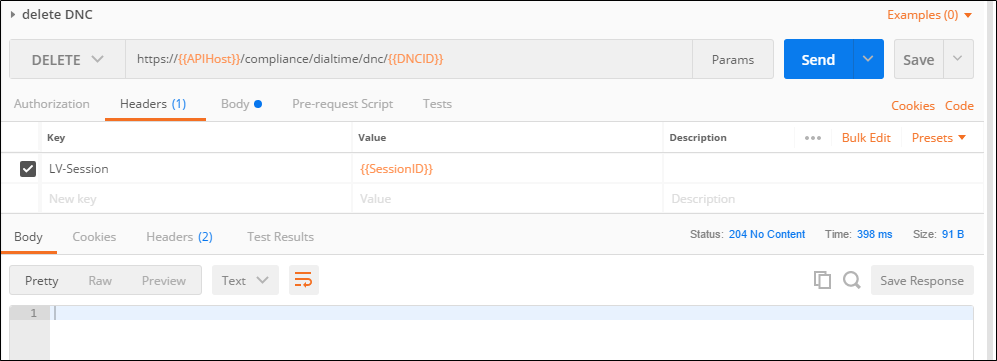
A 204 No Content response indicates the DNC was successfully deleted. Attempting to read this DNC again returns a 404 Not Found error.
Logout
When the client wishes to end or terminate a session, the logout method may be used. This is conceptually the same as deleting the session object so the HTTP DELETE method is used.

A successful logout returns a 204 No Content response. Any subsequent use of this session results in a 401 Unauthorized error.
Sample Agent Collection
After the sample environment and collection have been created, it is time to start adding requests.
Prerequisite: A SmartReach Agent must be created on the platform to use the following requests.
As described in the introduction, all API requests must be made with a valid session. A session is established by logging in to the Public API with valid credentials as well as an API Token. If a valid session is not established, requests fail with an authorization error.
Login
Login uses the Session API. The Session API also contains logout, validate session, and allows an agent to update their password.
A login request uses the POST HTTP method. The POST is made on the API host using the /session/login URL. The sample environment contains an APIHost variable that can be used instead of typing in the actual hostname. Variables are contained within double braces such as {{}}. Postman provides auto-completion as the variable is typed out.
Once the URL is specified, the Headers and Body of the request need to be defined. For the Login, the LV-Access header and a Content-Type must be defined.
Since the Body of the request is defined in JSON, it can also use variables.
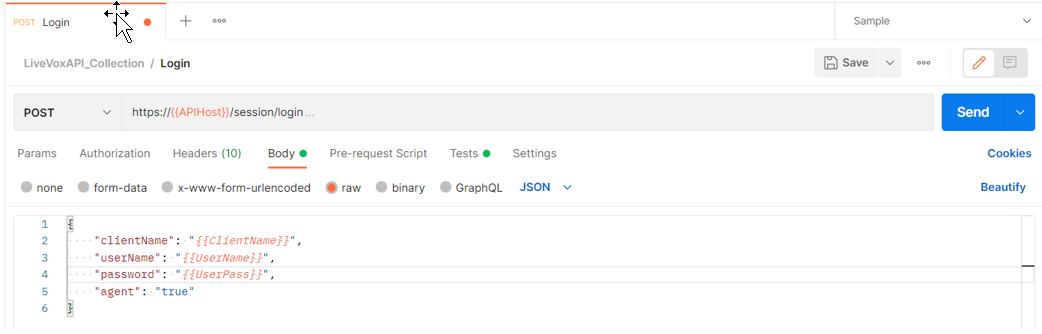
For logging in as an agent, the last value must be marked as true.
A successful login provides a Session ID that must be used in the LV-Session header for subsequent requests. In addition, it contains ID for the agent that logged in, the current client, and the number of days before the agent must change their password.
Now that you have successfully logged in, you can perform some tasks as an agent. These falls under the Call Control API.
Join a Service
Most RESTful APIs divide collections of objects into URLs with paths that divide collections into a smaller collection of items. The Call Control API allows you to perform agent functions. In addition, most requests are based on using an ID to get relevant information.
For example, the first method most likely to be used after logging in would be to put the agent into a specific service. This is done with the join service API. As stated, you need IDs. For this request, you must have the specific Service ID for which you want to place an agent. This ID number is included in the request. Also included in the request is a phone number. This is the phone number used to call out to the agent if the service requires it. If the service requires the agents to call in, they must establish their audio separately.

A successful operation returns a 204 No Content response.
Change to the Ready State
The next step is to place the agent into a ready status so that they are available to receive a call. This is not be possible until an audio connection is established. You must again use the session along with a simple post request.
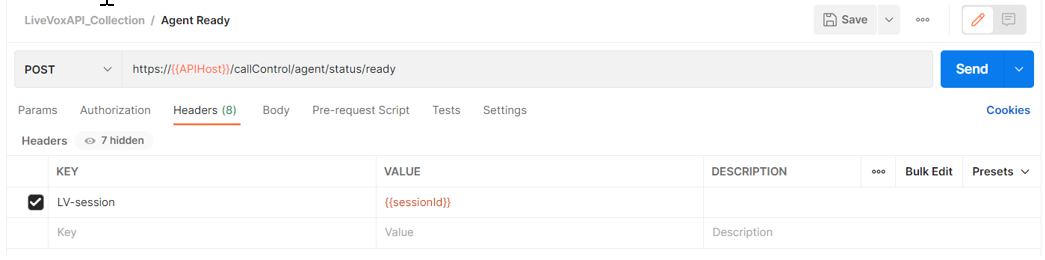
A successful operation returns a 204 No Content response. At this point, the agent is available to make or receive a call.
Get Agent Screenpops
Once the agent either makes or receives a call, agent can pull the information available to display on the agent desktop. This can be done through a GET request.
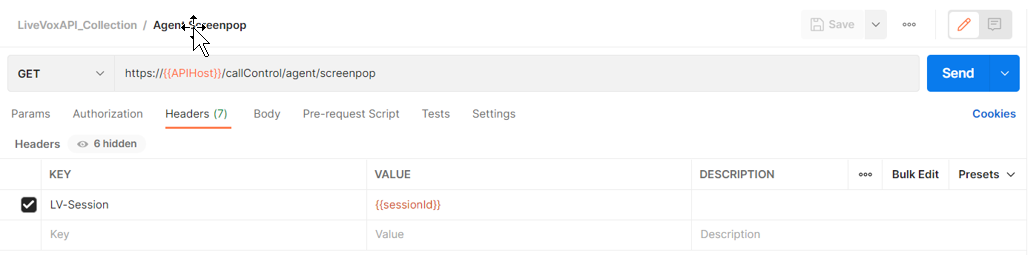
The response provides the same data that would display on the ACD panel including caller name, phone number, account number. This data can be customized through the standard SmartReach UI.
Get an Agent Status
This API method is used to get the current agent status as well as important data about the calls they take. The headers must include the LV-Session as always, along with Content-Type and Accept formats.
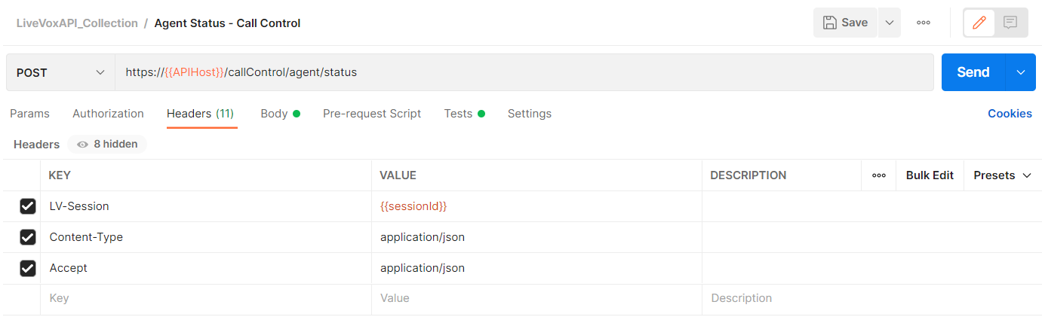
Besides these items, a timestamp must be specified in the body to filter out the Agent Status Objects such as state changes and calls details.
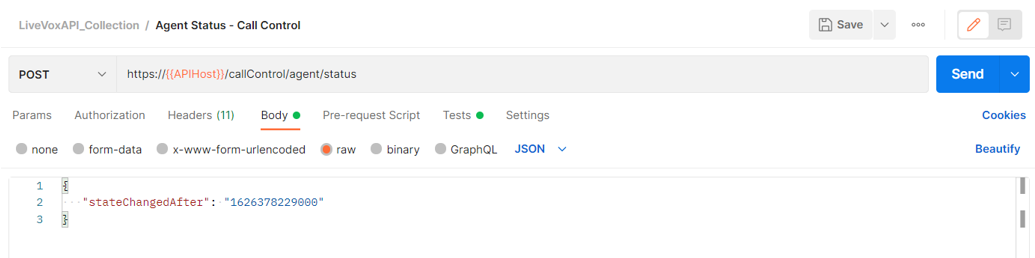
Besides returning the current status of the agent, the response also provides call information including the name, phone number, and account of the caller. However, it also provides two very important pieces of data, the Transaction ID, which provides the ID for the record entry in the database, and the Session ID, which provides the unique ID for the audio session on the SmartReach media servers. This is important to retain for other methods later.
Get a Termination Code
Once a call is completed, agent needs to terminate the call and then get back in ready to prepare them for the next call. The first step is to get a list of termination codes for the service using a GET request with the Service ID directly in the request.
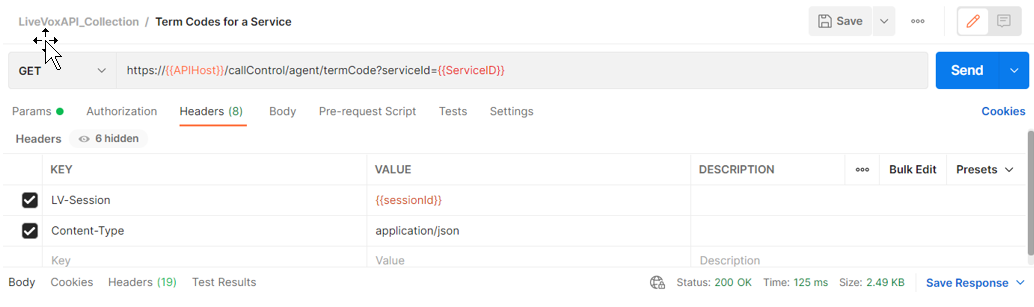
The response provides a complete list of termination codes available for agents to use in the specific service. The important piece of information to gather is the termination code ID. This is used to set the code for the agent.
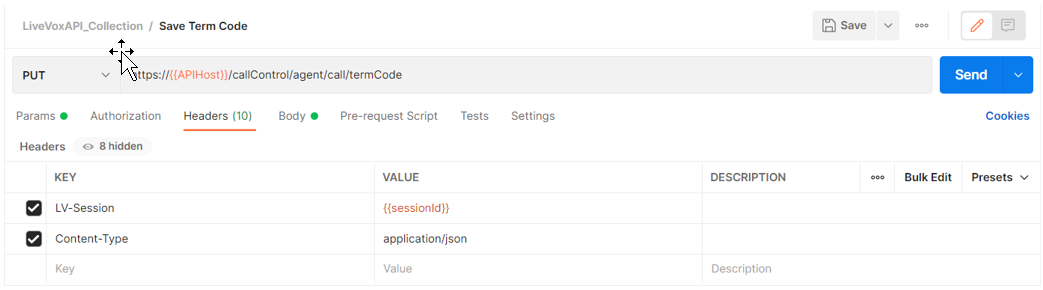
Save a Termination Code
The next step is to save the correct termination code and then move the agent back to ready. This can be done through the PUT term code method. The headers again require LV-Session and Content Type.
The body of the request requires the previously mentioned Transaction ID, Session ID, and Term Code ID. You must also specify the phone number of the call and whether you want to move the agent to “Not Ready” state or not. A value false as shown below moves the agent back to ready.
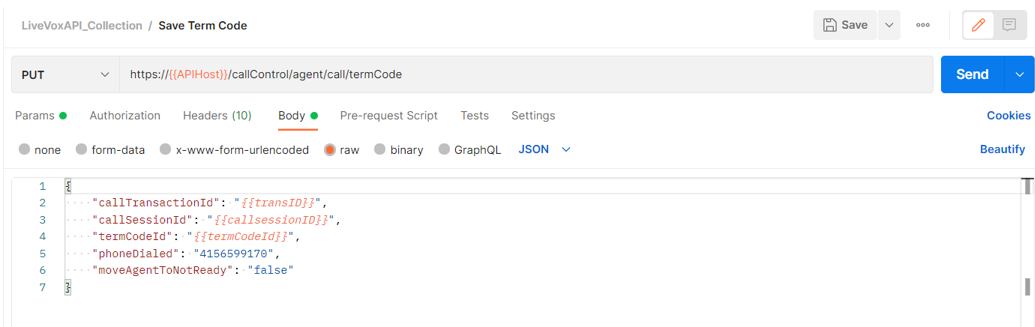
A successful operation returns a 204 No Content response. At this point the agent is ready to move on and take additional calls.
Leave a Service
Once an agent has completed the work, the method commonly used to log out is the Leave Service method. This is a simple post request that only uses the LV-Session header.
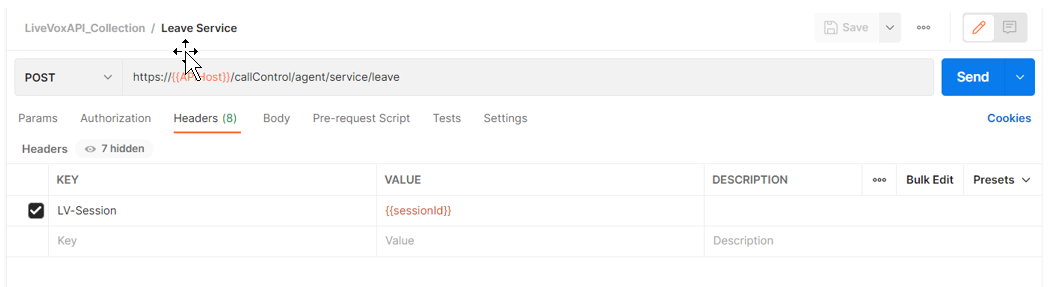
A successful operation returns a 204 No Content response and the agent should be logged out of the service.
Logout
It is also best practice to end your API session once you have completed your work. This can be done with a simple delete request requiring no headers. The Session ID only need be included in the request.
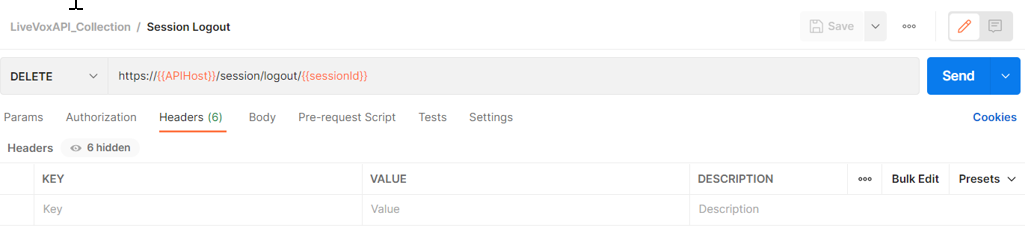
A successful operation returns a 204 No Content response and your session is over.
Summary
The previous sections only scratched the surface of the SmartReach APIs. There are hundreds of API methods that are categorized by functionality. The categories as of API 15.0 are:
- Session
- Account
- Configuration
- Compliance
- Campaign
- Contact Management
- Call Control:
- Agent
- Supervisor
- Routing
- Context Data
- Real-Time Reporting
- Reporting
- SMS
See https://docs.livevox.com/dp for more details on all the features provided via the SmartReach Public APIs.
Appendix A: Sample Collection
Click below to download
Appendix B: Sample Environment
Click below to download