
Introduction
This document provides an overview of the LiveVox Adding/Appending Records to Active Campaigns features.
Important Information
Requirements and Limitations
- You must be on platform release v.5+ and utilize the platform’s campaign APIs to use campaign appending.
- The records can only be appended to "today's” campaigns. Enhanced campaign append functionality which allows the service level dialing sort to be superseded for priority record handling is available. This allows appended campaign records to be handled with priority over existing campaign records.
- Requeue campaigns do not support append functionality.
- The 'Append Campaign Record' API method only works on campaigns that have the Allow Append option enabled. This document covers specific configuration details.
- New records can be appended to active campaigns only in Built, Pause or Play status. New transactions appended to campaigns in the Stop status are not supported.
- Campaign ID is required to use this functionality. The Campaign ID can be retrieved from the campaign upload process, but the campaign must be built for the API to append records.
- It is suggested to use the 'FindMatchingCampaigns' API method to gather the Campaign ID and then use that information to insert the Campaign ID into the 'Append Campaign Record' API call. Please refer to the User Hub’s Developer Portal for more information under the Campaign API documentation section regarding the ‘FindMatchingCampaigns’ and ‘Append Campaign Record’ API.
- The Developer portal is available from the Resources dropdown menu in the voice portal:
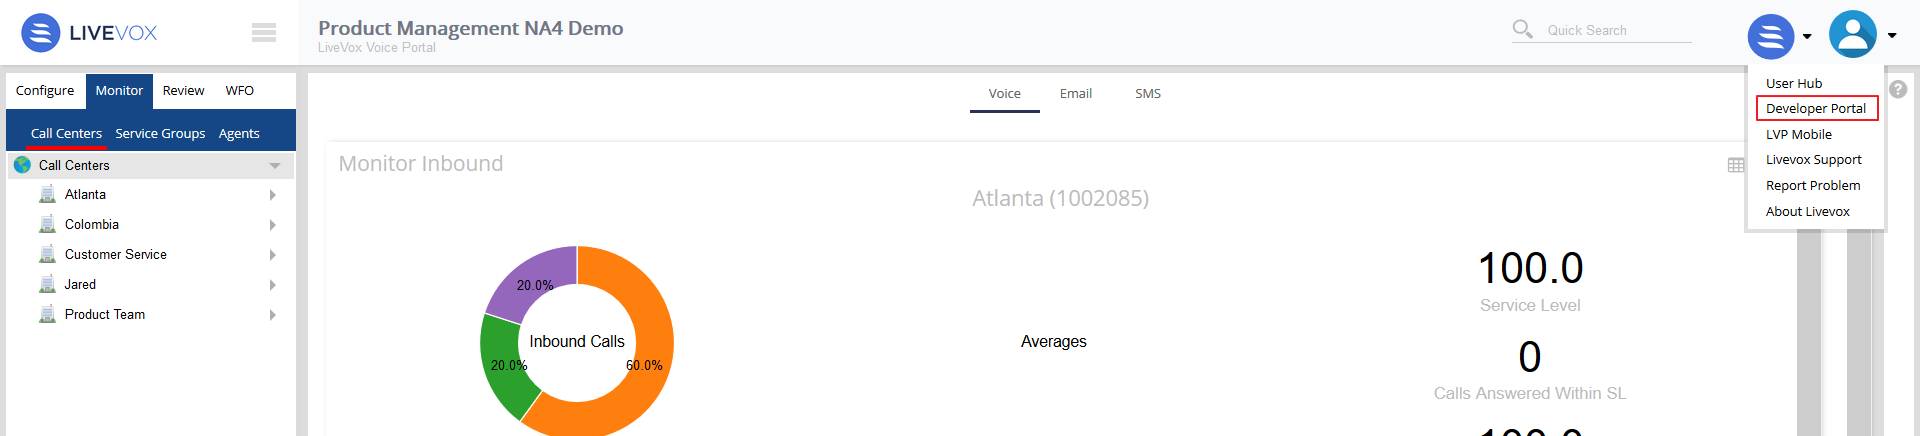
Figure 1: Developer portal link - Another way to get the Campaign ID is to record the Campaign ID number from the portal. See Find the Campaign ID for further information.
- The Developer portal is available from the Resources dropdown menu in the voice portal:
- It is suggested to use the 'FindMatchingCampaigns' API method to gather the Campaign ID and then use that information to insert the Campaign ID into the 'Append Campaign Record' API call. Please refer to the User Hub’s Developer Portal for more information under the Campaign API documentation section regarding the ‘FindMatchingCampaigns’ and ‘Append Campaign Record’ API.
Special considerations
- It is suggested to append records as frequently as every 20 seconds (in other words, the API should not be called more than 5 times per rolling minute).
- No more than 10 phone numbers per record are appended.
- Campaign build functionality does not apply to the appended records, only to the initial build. With this, no cell phone scrub or duplicate number checking, for example are performed on the appended records.
- API method requires only Phone_1 (or 1 phone number) at a minimum to append the records.
- There is a maximum of 10,000 records allowed per API call.
- Campaigns which can be appended will follow the configured dialing sort rules set at the service level and will be resorted after each successful append request.
- Set the service’s dialing sort to, “Inverted Consecutive” to dial the newly appended records at the next opportunity. This dialing sort uses the order in which records are loaded, from last record to first record for dialing purposes.
- Campaign Types this functionality does NOT pertain to:
- CALLBACK
- INBOUND
- SCHEDULED_CALLBACK
- MANUAL
How to use the Append Campaign Functionality
Enabling Campaign Appends
Campaign Appends are enabled in the Client section of the voice portal. To enable campaign appending:
- Navigate to Configure > Client/Service > Client > Settings tab.
- Click Campaign Appends Allowed in the Advanced Features options.
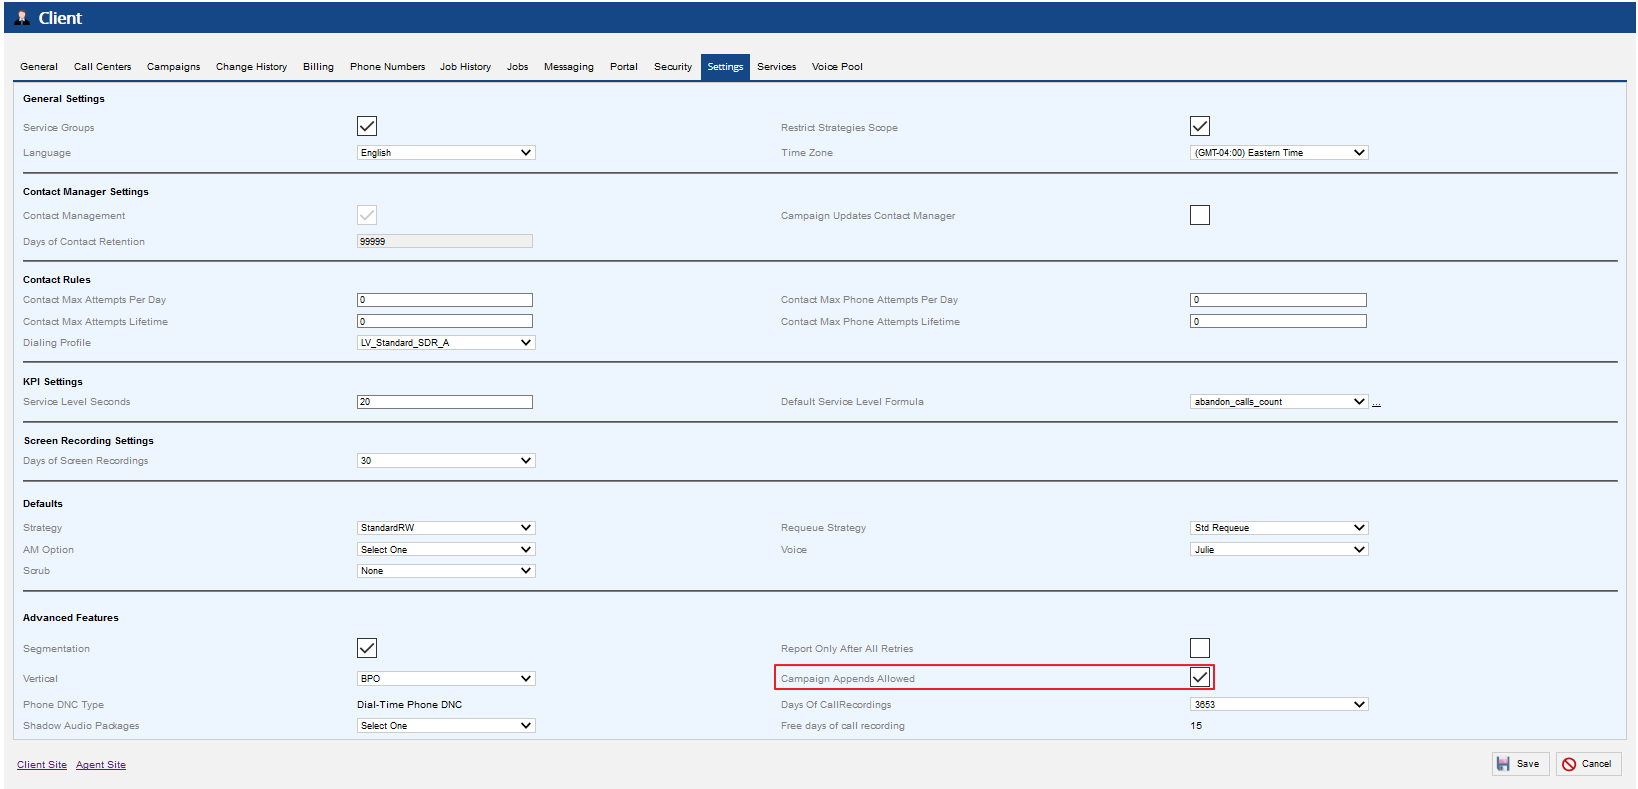
Figure 2: Campaign Appends Allowed in Client editor
Allowing Append Campaigns
To allow appending on a campaigns
- When uploading a campaign click Allow Append option. This allows the campaign file to be appended to an active campaign.
Figure 8: Allow Append checkbox
Campaign files with campaign append allowed display a green checkmark in the Allows Append column in the Campaigns editor. You must enable the “Allow Append” column view through the Customize Campaigns Grid configuration option as this is not visible in the default Campaigns view.
Figure 9: Allow Append column
This is also viewable in the Campaign details screen. This attribute is displayed as read only.
Figure 10: Allow Append option read only
Append Campaigns Report at End of Day - Service editor settings
The Services editor displays Append Campaigns Report at End of Day in the Settings tab. When checked, campaigns that have append enabled will report at the end of the day. When unchecked, campaigns will report when out of dialable records which would prevent records from being appended from that point when the Campaign is stopped.
Figure 11: Append Campaign Report at End of Day in Services editor
Appending a new campaign file
Upload a campaign file
Note : Detailed instructions on uploading a campaign and assigning dialing characteristics are available in the User Guide on User Hub. The upload a file option is available once navigated to the Campaigns section by electing Configure > Campaigns > Campaigns from the Navigation Panel.
Figure 12: Uploading a campaign file with Allow Append
Find the Campaign ID
Locating the Campaign ID to be used for the Append Campaign API is a key step. The Find Matching Campaigns API is available for this. Please note, that prior to using the Find Matching Campaigns API, the campaign must first have a Campaign ID in the platform. This is achieved by first loading the initial file into the platform. Once the file is loaded, the Campaign ID is generated as shown below on the General tab of the Campaign details.
Figure 13: Sample Campaign ID and Service ID displayed in Campaign Details
A typical way to locate the appropriate Campaign ID is to load the initial file at a certain time of day and then use the Find Matching Campaigns API to search by the time and Service ID associated with the campaign. You may also supply the expected state and type when searching as well. This will provide the Campaign ID to use in subsequent append requests to that campaign.
Figure 14: Find Matching Campaign ID request
Set the "LV-Access" token to the LiveVox supplied token and the "LV-Session" token to the session id retrieved from the Session Login API. Search for campaigns for client id limited to only 10 records at a time. Specified the date Range with a 15-minute interval in the "from" and "to" element. The "from" and "to" values are in number of milliseconds since Epoch and use a third-party site, https://currentmillis.com to aide in generating the values. The "state" element is set to match the possible states we expect the campaign to be in when performing the search. The "service" element contains the Service ID that the campaign is configured for in the platform (See Figure 13). The "type" is set to a "1" for Outbound.
From the Response, we should receive the Campaign ID in the "campaign" array under the "id" element. This id is to be used for the append operation.
Figure 15: Campaign ID
Append Record to Campaign
Once the Campaign ID has been obtained, the next step is to append a record to the campaign. Along with the typical inputs of the "LV-Access" and "LV-Session" tokens, the Campaign ID must be included as a URL parameter in the HTTP PUT request along with a simple record containing a phone number. Only the "phone1" element is required by the Append Record to Campaign API, but additional information such as account number, names, email, etc. can be submitted in a real-world scenario.
Figure 16: Append campaigns example request
You may enter additional phone numbers using the phone2 field. This should be entered as an array of phone numbers. This field can be filled with up to 30 additional phone numbers separated by a comma. In this example two additional phone numbers are added to the appended record. The following is the code in JSON for the phone2 field.
Figure 17: phone2 field
After submitting the append request, a Status code of 204 should be returned indicating the record has been successfully added to the campaign.
Figure 18: Successfully appended campaign message
Viewing Appended Records
To view your appended records on the selected campaign, navigate to the Campaign details screen and select the Campaign Records tab. You will be able to view a new record, including newly added phone numbers on the Phone 2 column.
Figure 19: Appended record in Campaign Details screen
[1] For append automation support please contact your Account Manager or LiveVox Client Services. They can coordinate a daily upload enabling the Allow Append flag as a seed campaign for the target service or services.