UI EnhancementsObject Ids with Object Names in Drop-downsThis feature provides a new option to display the object Id in drop-down lists across the voice portal. On the GUI Settings menu, select Show Object ids with Object Names in drop-downs. When checkedenabled, all drop-down menus will show the Id of the each option listed. This option is disabled by default unchecked. This only applies to drop-down lists where the text names and IDs are different (i. e. this This is not applicable for drop-down lists such as rates, versions, etc.). Image Modified Image Modified When uncheckeddisabled, Image Modified Image Modified
When checkedenabled,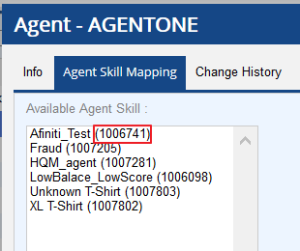 Image Modified Image Modified
Improved Visibility of the Help PanelPreviously, on any page of the Voice Portal, users could access context-sensitive help by clicking the arrow icon on in the upper right corner of the screen. 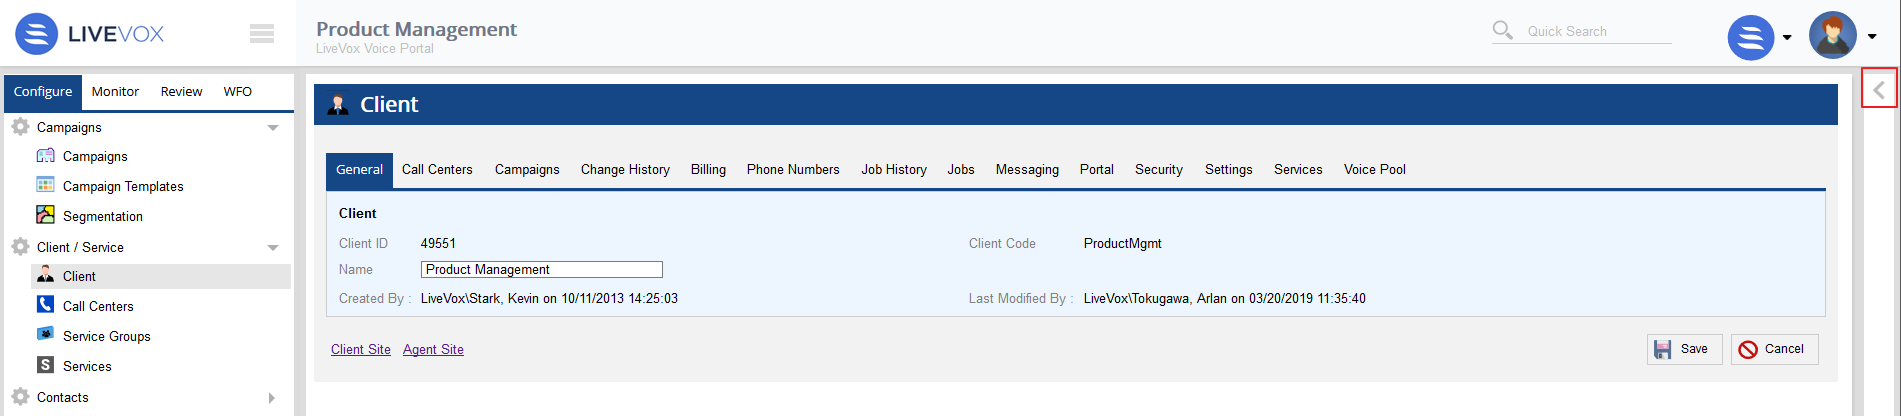 Image Modified Image Modified This version enhances the visibility of the help panel by changing the arrow icon to a question mark. Click on the question mark icon  Image Modified to access the help panel. Image Modified to access the help panel. 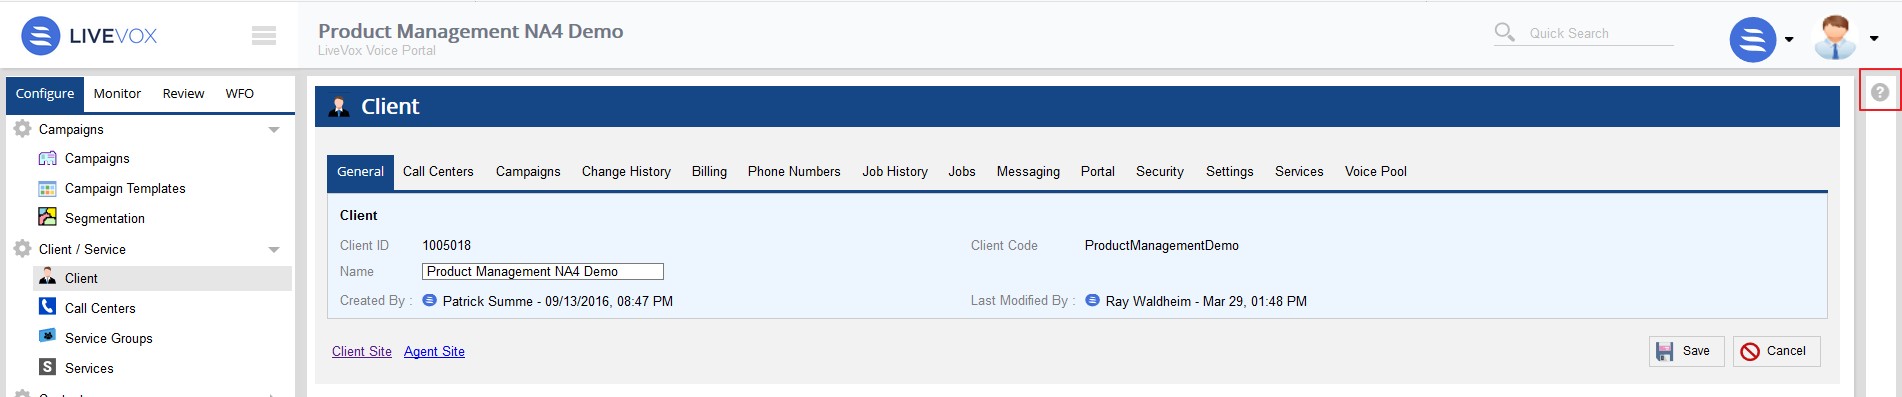 Image Modified Image Modified
Messages Editor UI EnhancementsNew Wizard to Add a New Message Previously, when users wanted to add a new Message, they were getting would see a dialog box to set the message name, description, and assign a callflowcall flow. 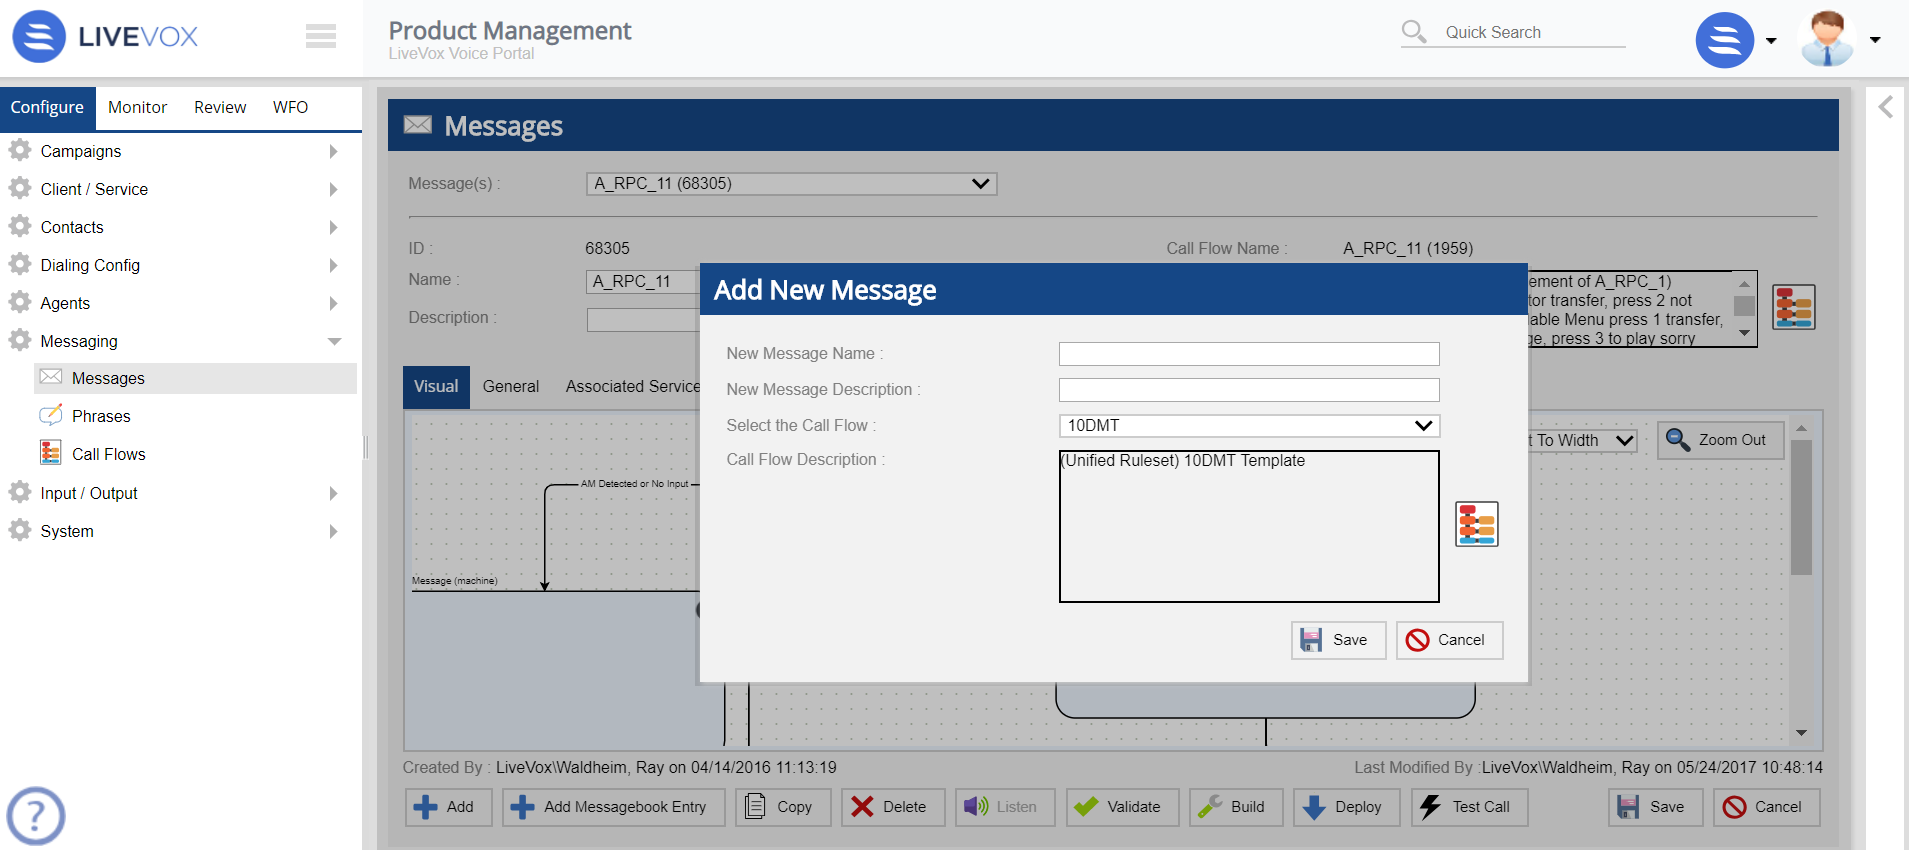 Image Modified Image Modified
This version provides the details of callflow call flow with the wizard like dialog when users add the new Message. To add the Message, navigate : | Panel |
|---|
- Navigate to Configure > Messaging > Messages
|
. Click Users will get the - The first screen of Add New Message wizard appears.
 Image Added Image Added
- Specify the New Message Name and New Message Description.
|
Image Removed After specifying details, click on the - Click the Next button to get second screen of the wizard.
 Image Added Image Added
- Select filter
|
option and callflow. The - option from the Filter By drop-down menu. This option allows to find
|
callflows - call flows based on Name, Description, as well as Module name.
|
The - Select the call flow from the Callflow drop-down
|
option - menu. Options display icons next to the
|
callflow - call flow to identify standard call flows (
 Image Modified) which are provided by Livevox and created by the user ( Image Modified) which are provided by Livevox and created by the user ( Image Modified). The list of Image Modified). The list of
|
callflows - call flows will show the name and its type (Standard or custom).
|
The preview screen allows full screen view of the callflow. The - The Modules Assigned displays the module being used by the
|
callflow.- call flow.
The Peview screen allows full screen view of the call flow.
|
Image Removed When Email callflow callflow call flow details show differently. Since Email |
|
callflow call flow is Livevox provided |
|
callflow call flow and has only email modules, the |
|
callflow call flow details display the template selection and the template preview. |
|
 Image Removed Image Removed
- Click on the Next button to
|
get third - get third (final) screen of the wizard. This screen displays
|
which shows - the summary of the user's selection.
 Image Modified Image Modified
|
New Wizard to Add a New Messagebook Entry Previously, when users wanted to add a new Messagebook entry, they were getting would see a dialog box to set the message name, and description. 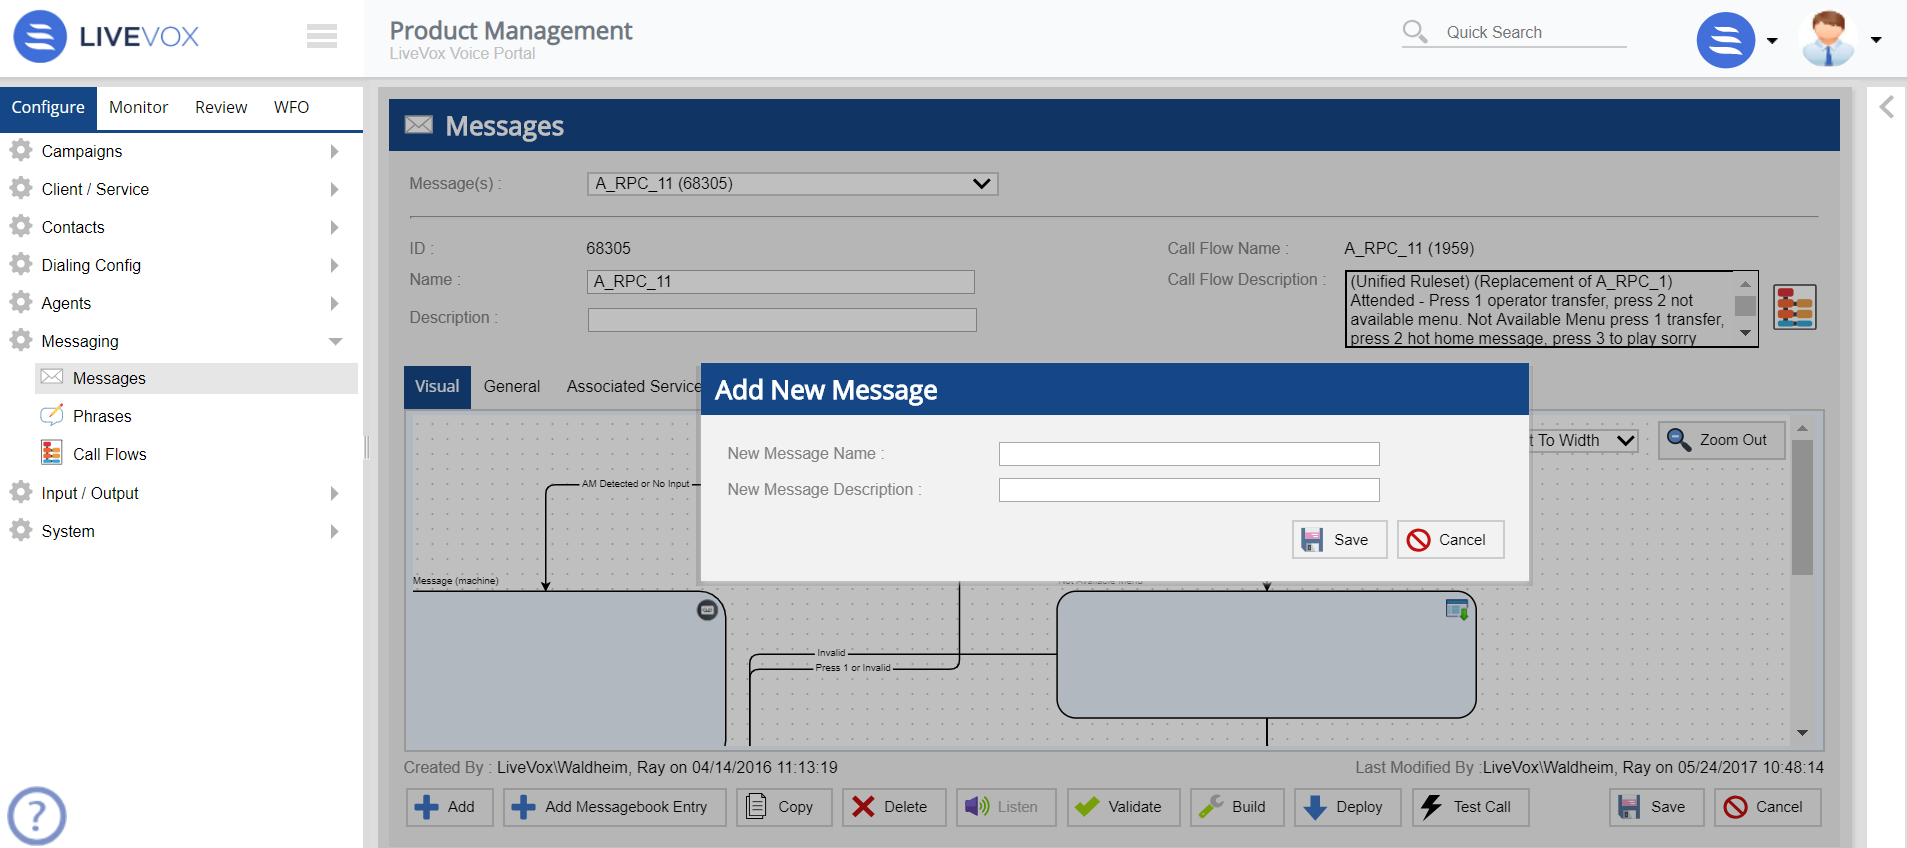 Image Modified Image Modified
This version provides the details of callflow call flow with the wizard like dialog when users add the new Messagebook entry. To add the Messagebook entry, navigate : | Panel |
|---|
- Navigate to Configure > Messaging > Messages.
|
Click - Click the Add Messagebook Entry button.
|
Users will get the - The first screen of the Add New Message wizard appears.
 Image Added Image Added
- Specify the New Message Name and New Message Description.
|
Image Removed Click on - Click the Next button to get second screen of the wizard.
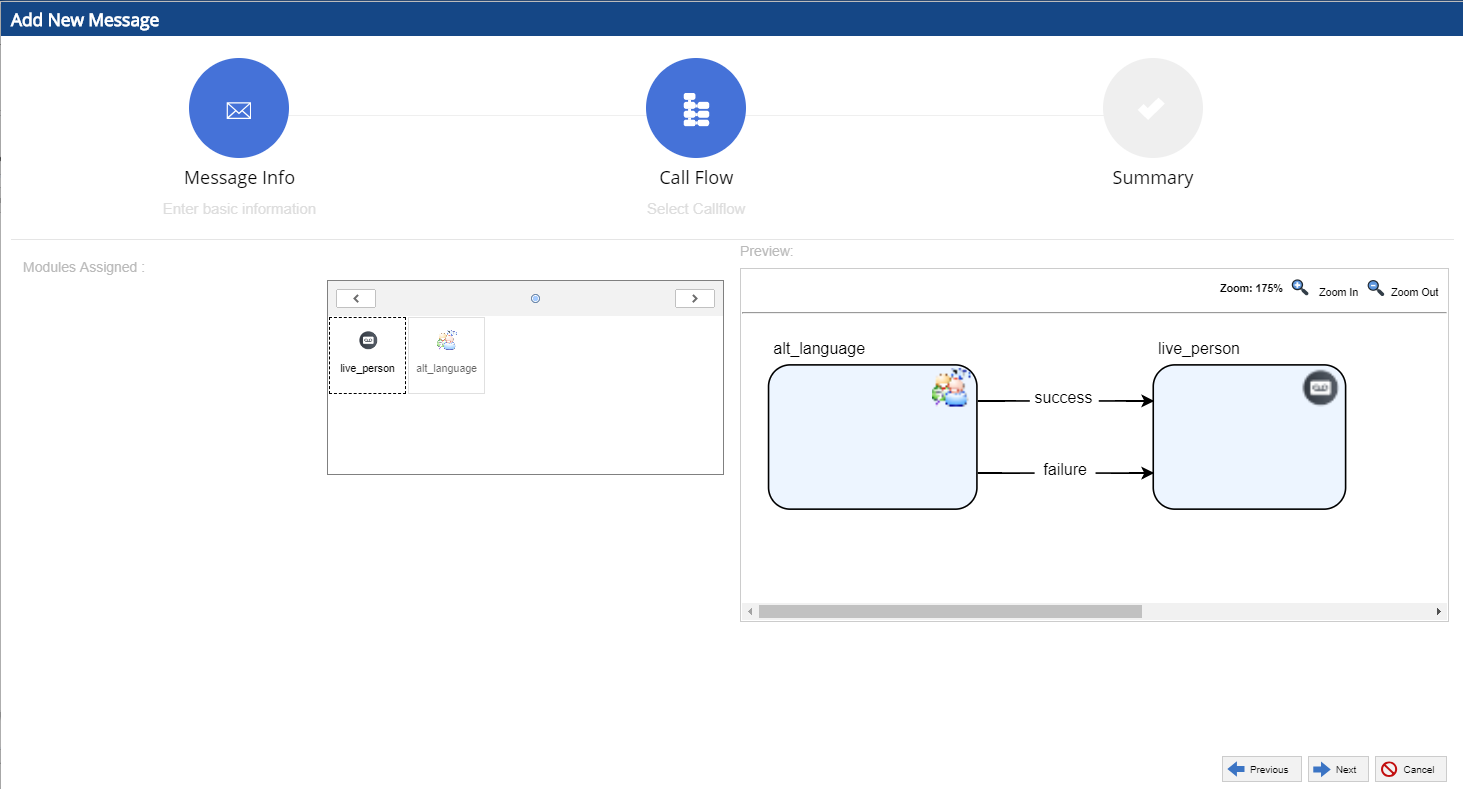 Image Added Image Added
The Modules Assigned displays the module being used by the
|
callflow call flow Messagebook_1. The
|
preview Preview screen allows full screen view of the
|
callflowImage Removed on the Next button to get third (final) screen of the wizard. This screen displays
|
which shows the summary of the user's selection. 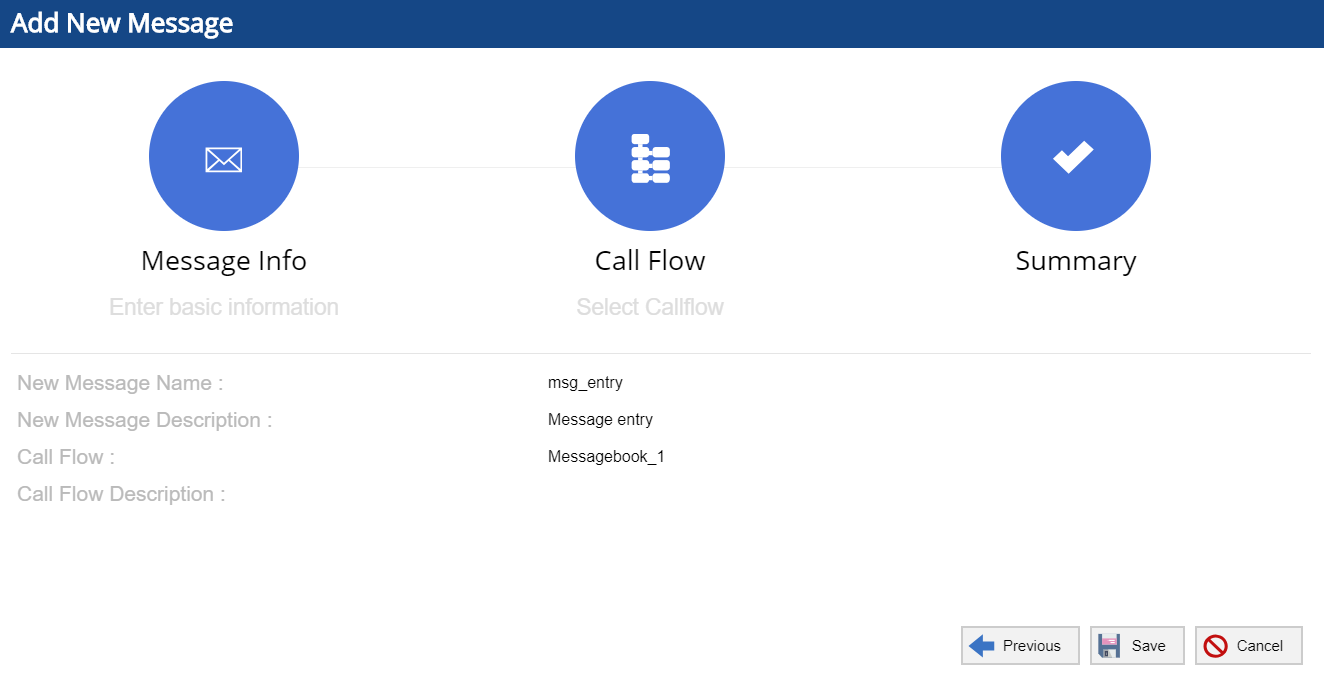 Image Modified Image Modified
|
New Properties Panel Previously, users were needed required to double-click on a module to view or update its properties and the connector associated with it.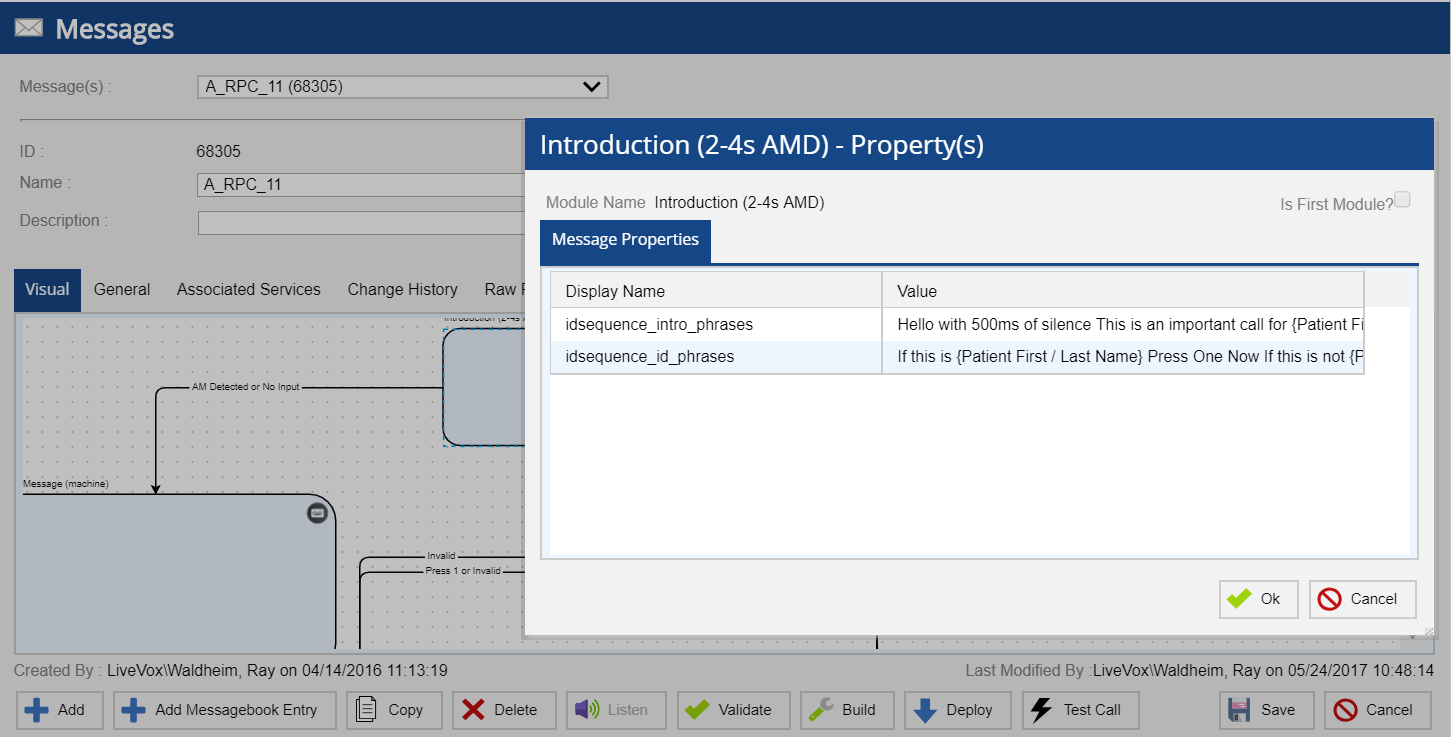 Image Removed Image Removed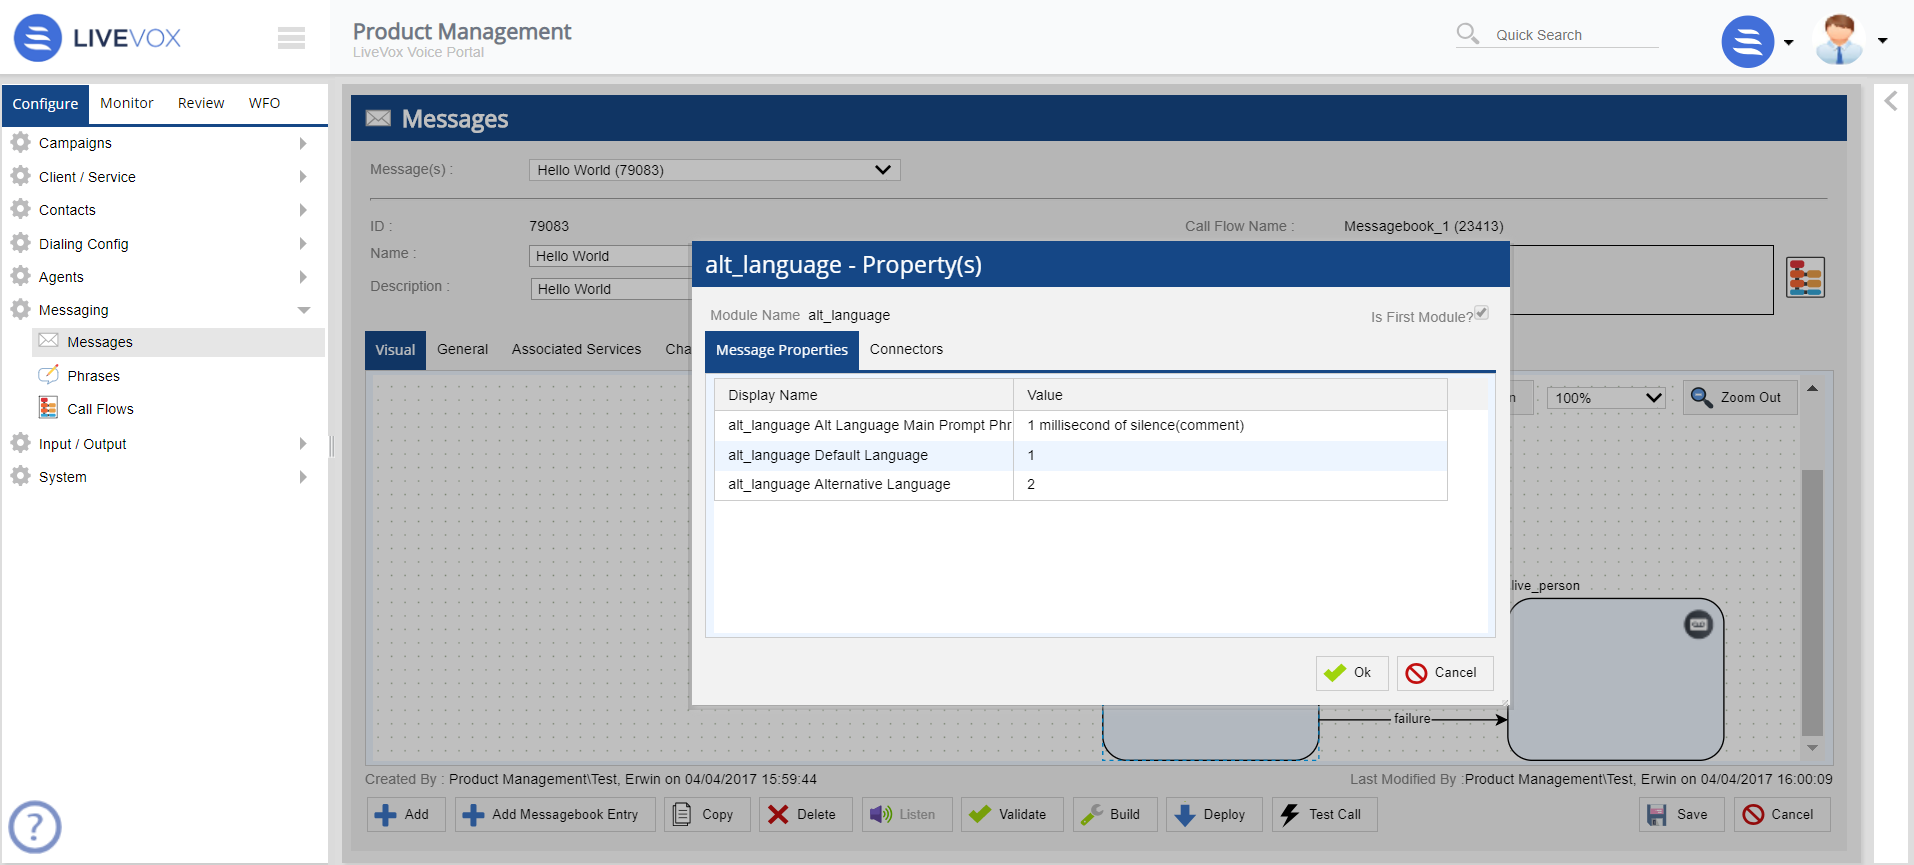 Image Added Image Added
This version removes Connectors tab from module properties. Image Added Users can also allows users to view the properties of a module in the Properties Ppanel on the right side pane when the module is selected.  Image Removed Image Removed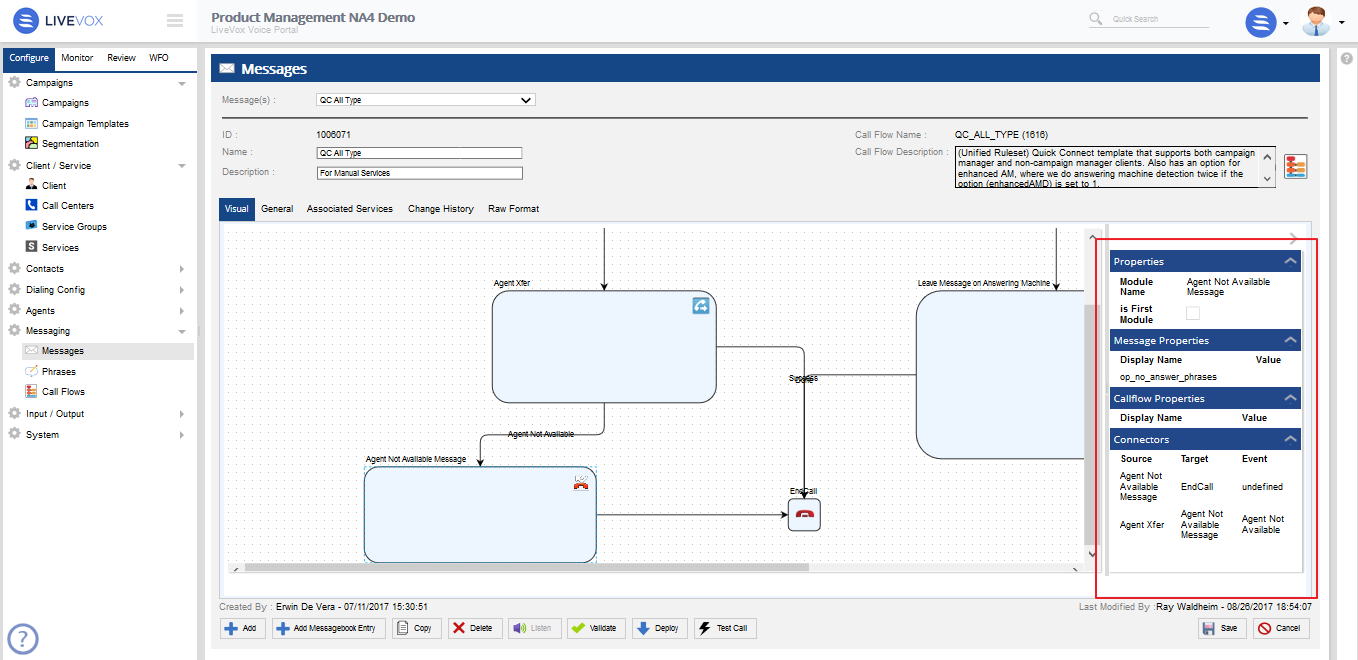 Image Added Image Added
Merging of Build and Deploy With this version, Build and Deploy buttons are merged into single Deploy button to reduce the number of steps when setting up a message. Previously,  Image Removed Image Removed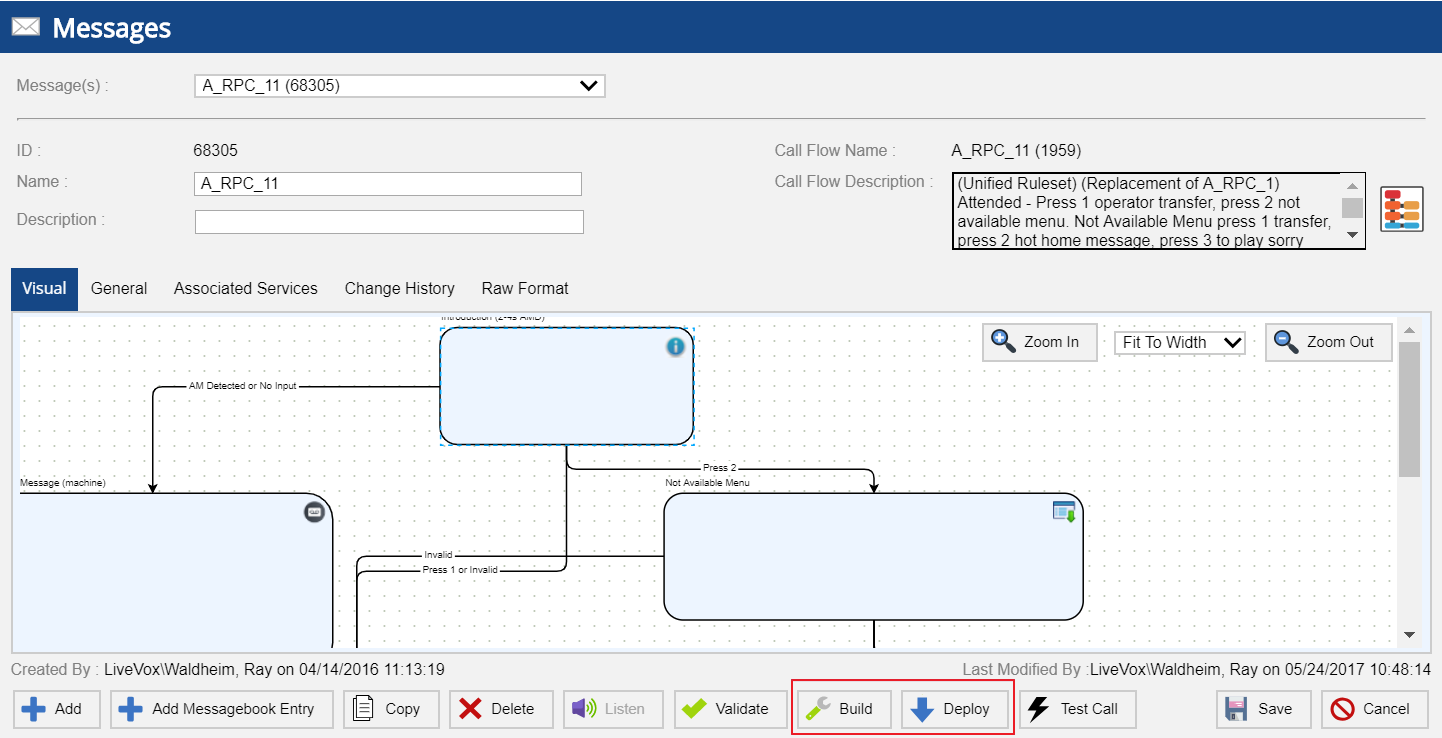 Image Added Image Added
With this version,  Image Removed Image Removed
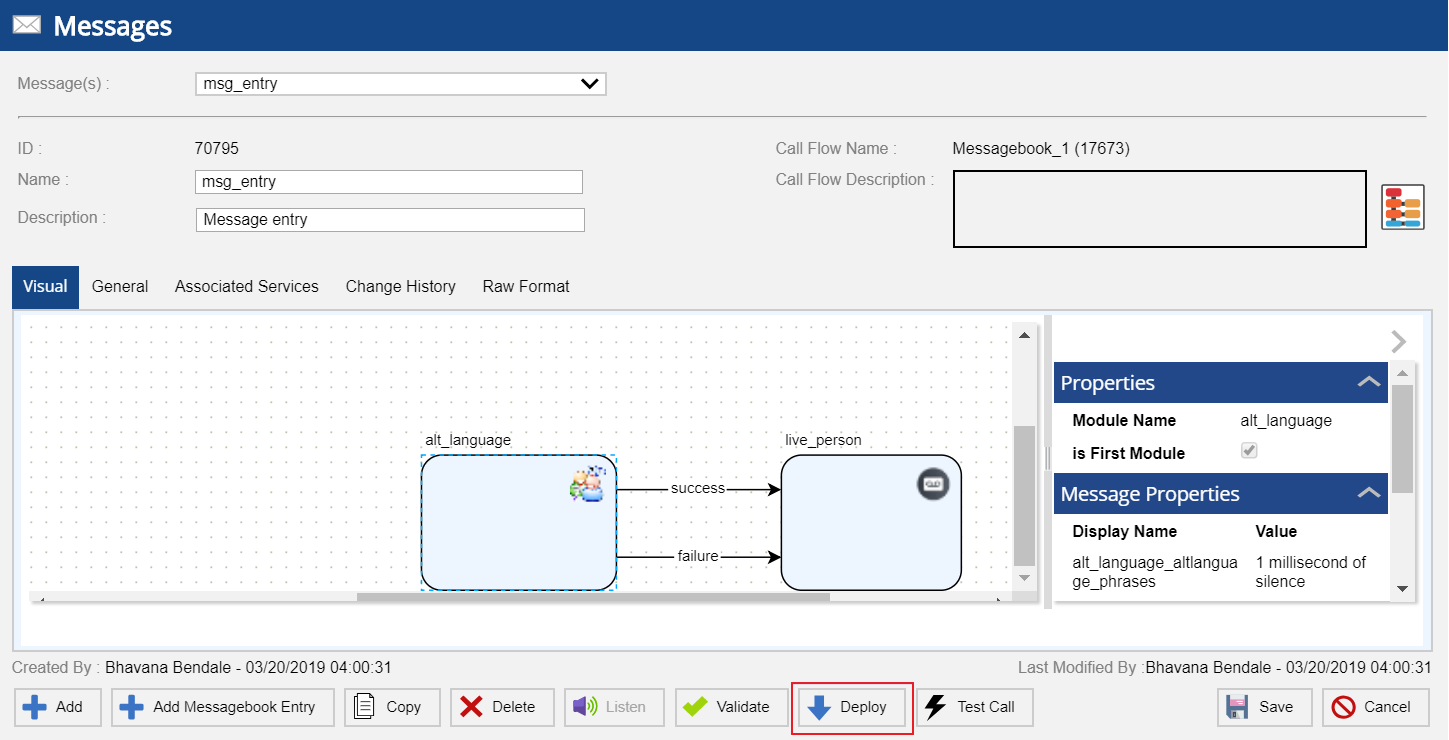 Image Added Image Added
Four new With this version, four new system fields are now available in Contact Manager:- Salutation
- Description
- Department
- Title
 Image Removed Image Removed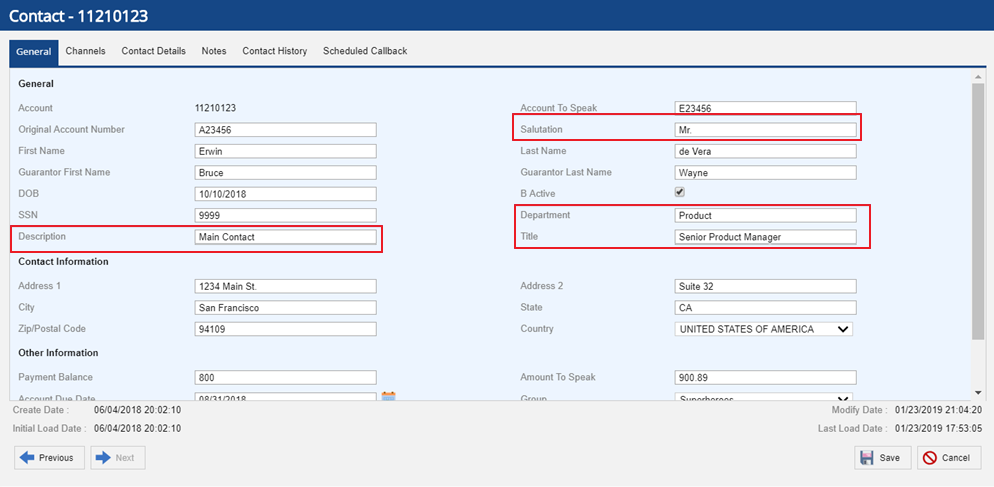 Image Added Image Added
The contact import process is enhanced to provide better user experience in U10. Fields Editor Enhancements - Fields Editor view is now paginated instead of a scroll
Previously  Image Added Image Added
Now 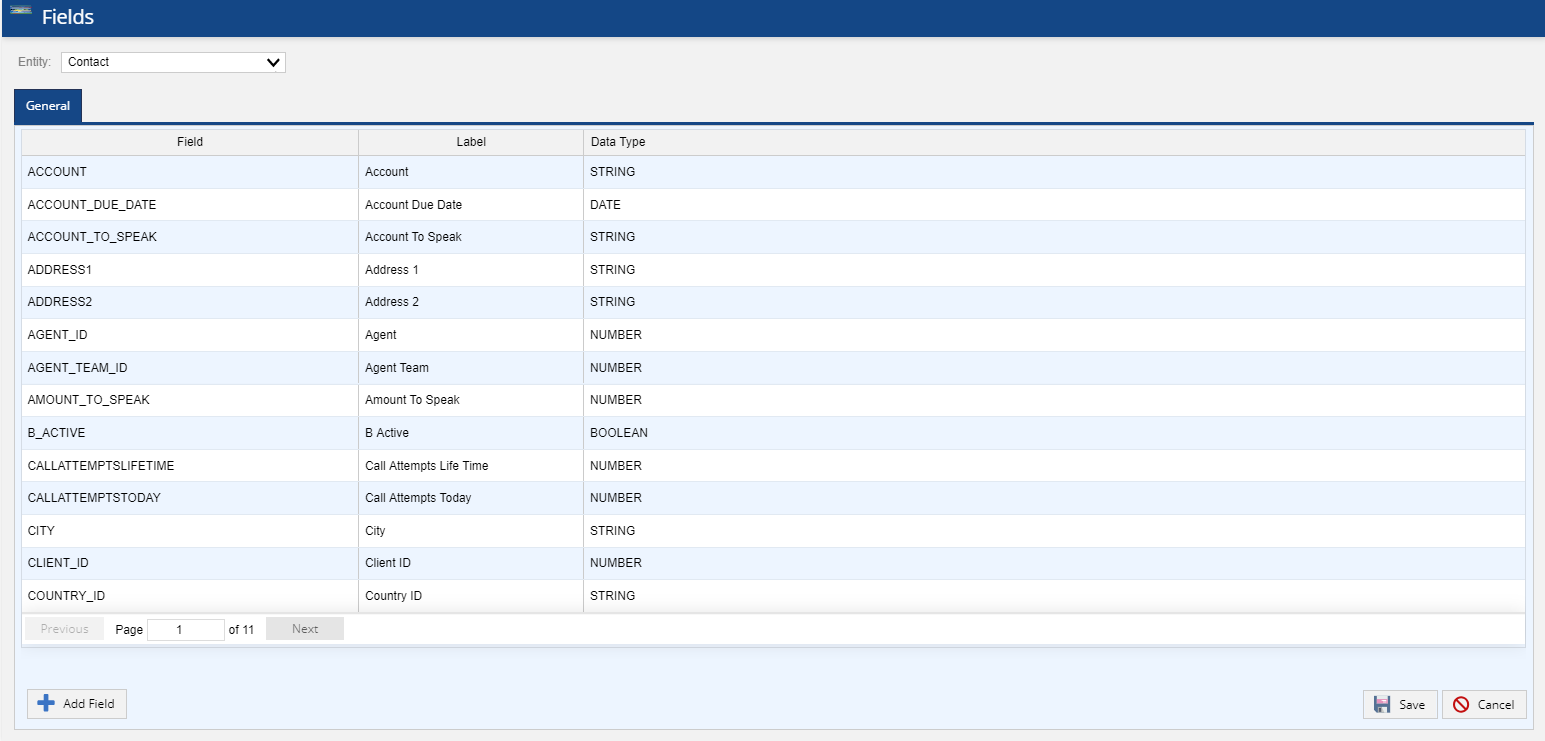 Image Added Image Added Image Removed Image Removed
- Users can label each phone field in Contact Manager through Fields editor. Once labeled, it is persisted the name persists throughout the platform where ever the phone position is referred.
 Image Removed Image Removed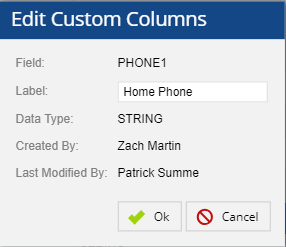 Image Added Image Added
Input Filter Enhancements - Transformation - In this version, Transformations dynamically change based on the Data Types defined by the users in Fields editor when configuring file mapping for contact manager imports. (For example: If , if col1 is defined as a Number data type in Fields editor, then only number related transformations are allowed in Input Filter).
Previously,  Image Removed Image Removed
With this version, 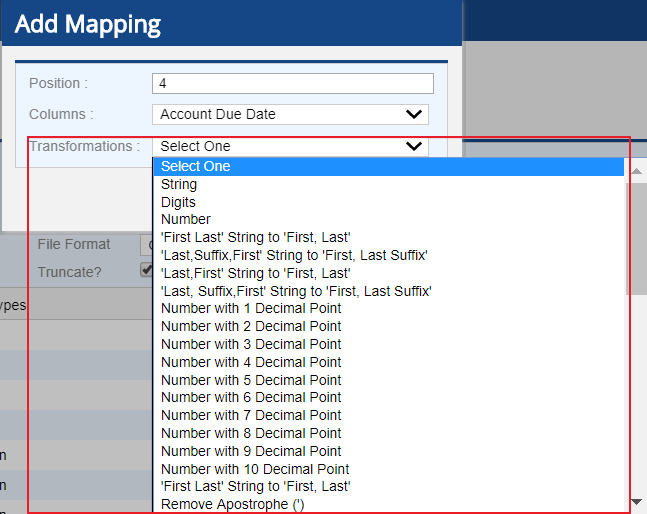 Image Added Image Added
Now 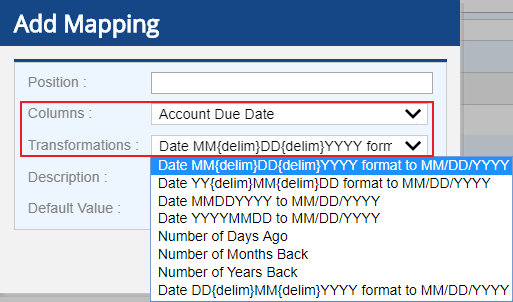 Image Added Image Added Image Removed Image Removed
- Description - Users can now utilize use the new Description field to define the purpose of each column.
- Default Value - Default Value field allows the users to write a static value for any field that is blank. This field can be utilized to define the mandatory fields used for business workflow and the value that should must be stamped over it for the contact imports.
 Image Removed Image Removed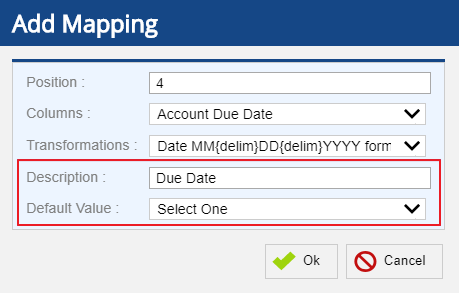 Image Added Image Added
- Substitute Value - Users have the ability to substitute certain values during the Contact Manager import process to Contact Manager by configuring the Substitute Values. For example: If value is 'X', replace with 'Y'. Substitute Value supports up to 5 transformations for each column.
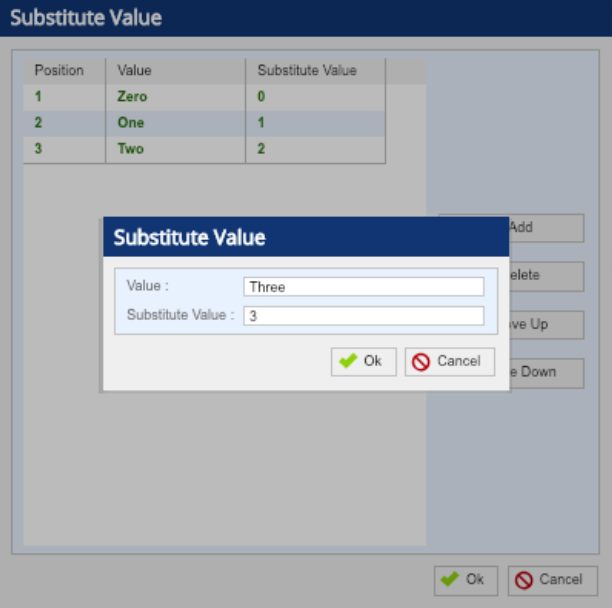 Image Modified Image Modified
- Column Split - Users have the ability to split a column into two and store them accordingly for contact manager imports. For example: Currently, Name field is utilized in 1 column as a Full name - 'Wayne, Bruce'. Now, users can split this to store as 'First Name = Bruce, and Last Name = Wayne'.
In this version, users can add Notes to a Contact record. In addition to notes, users can also view the Session and Transaction ID of Agent Notes. This is helpful for additional auditing purpose. Navigate to Config > Contacts > Contacts > Double Click a Contact > Notes tab to view and add account notes. 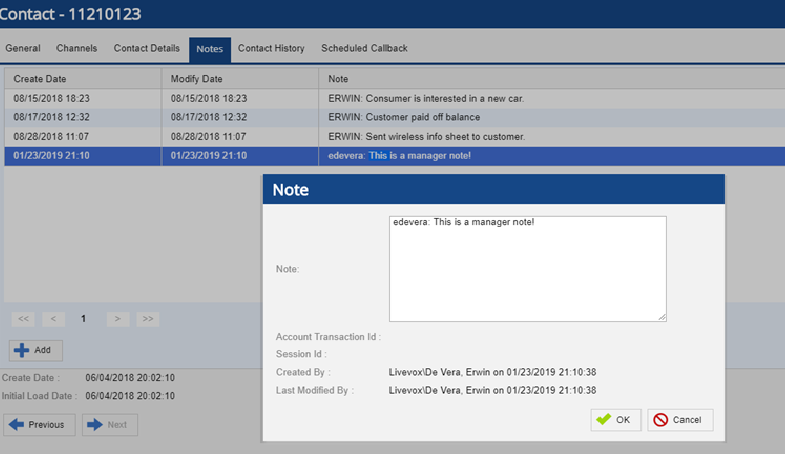 Image Modified Image Modified
The Add button on the Notes tab allows the users to add new notes. - A maximum of 4000 characters are allowed to be saved.
- Agents can view these notes on their Desktop , if the Notes viewer is enabled for them.
| Note |
|---|
Notes that are once saved , cannot be deleted or modified. |
Scheduled Callback Editor EnhancementsAgent Desktop EnhancementPreviously, widgets would appear on the Extended panel based on the agent state configuration. In this version, users have can configure the ability widgets to view the status of all the Callbacks (completed, missed, pending, etc) scheduled for the present day and past 90 days. Navigate to Configure>Agents>Scheduled Callback editor to view the status of the scheduled callback records.  Image Removed Image Removed
In addition to this, they can now adjust the schedule for the missed scheduled callback records which includes: - The records presented to an agent and timed out without the agent taking an action and
- The records missed due to non availability of agents at the scheduled time.
Call Flow Editor Enhancements List Return Support for the Phone Lookup ModuleWith this version, additional list return functionality within the phone lookup module provides an improved experience for customers in multi-phone match scenarios. This offers added support for list return where there may be more than one Phone ANI match within Contacts. This is especially helpful when the caller has more than one account. This feature includes: - Up to 5 matches for the Phone lookup can be returned as a Contact match.
- A configurable Multi-Match Prompt Phrase which can be configured to relay to the caller that there are multiple matches for their phone number.
- A new call flow event connector for MultiMatch which can then be configured to prompt the caller to enter their account number for further validation.
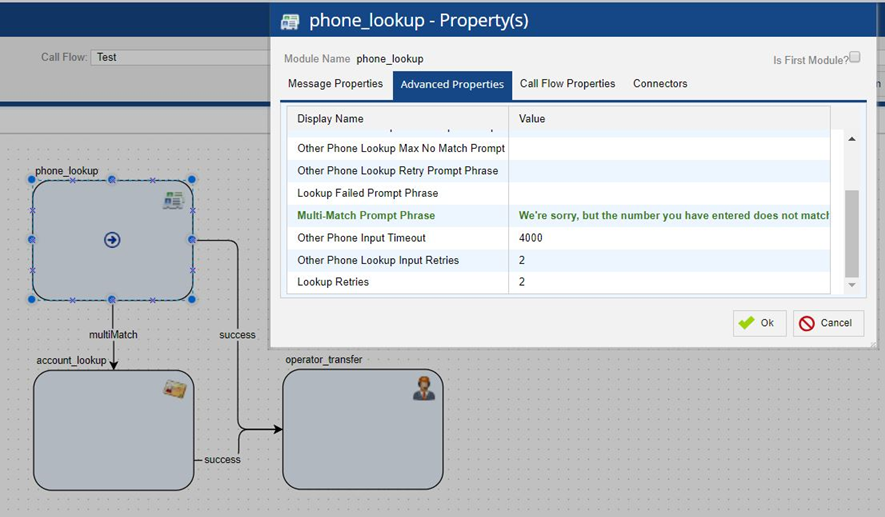 Image Removed Image Removed
The phone lookup module uses a support_multiple_records flag for backward compatibility. appear on the extended panel (Standard UAD and ADN) regardless of the agent state. To enable this feature, navigate to Configure > Agents > Agent Desktop > Extended Panel tab, and select the Stateless Panel checkbox. 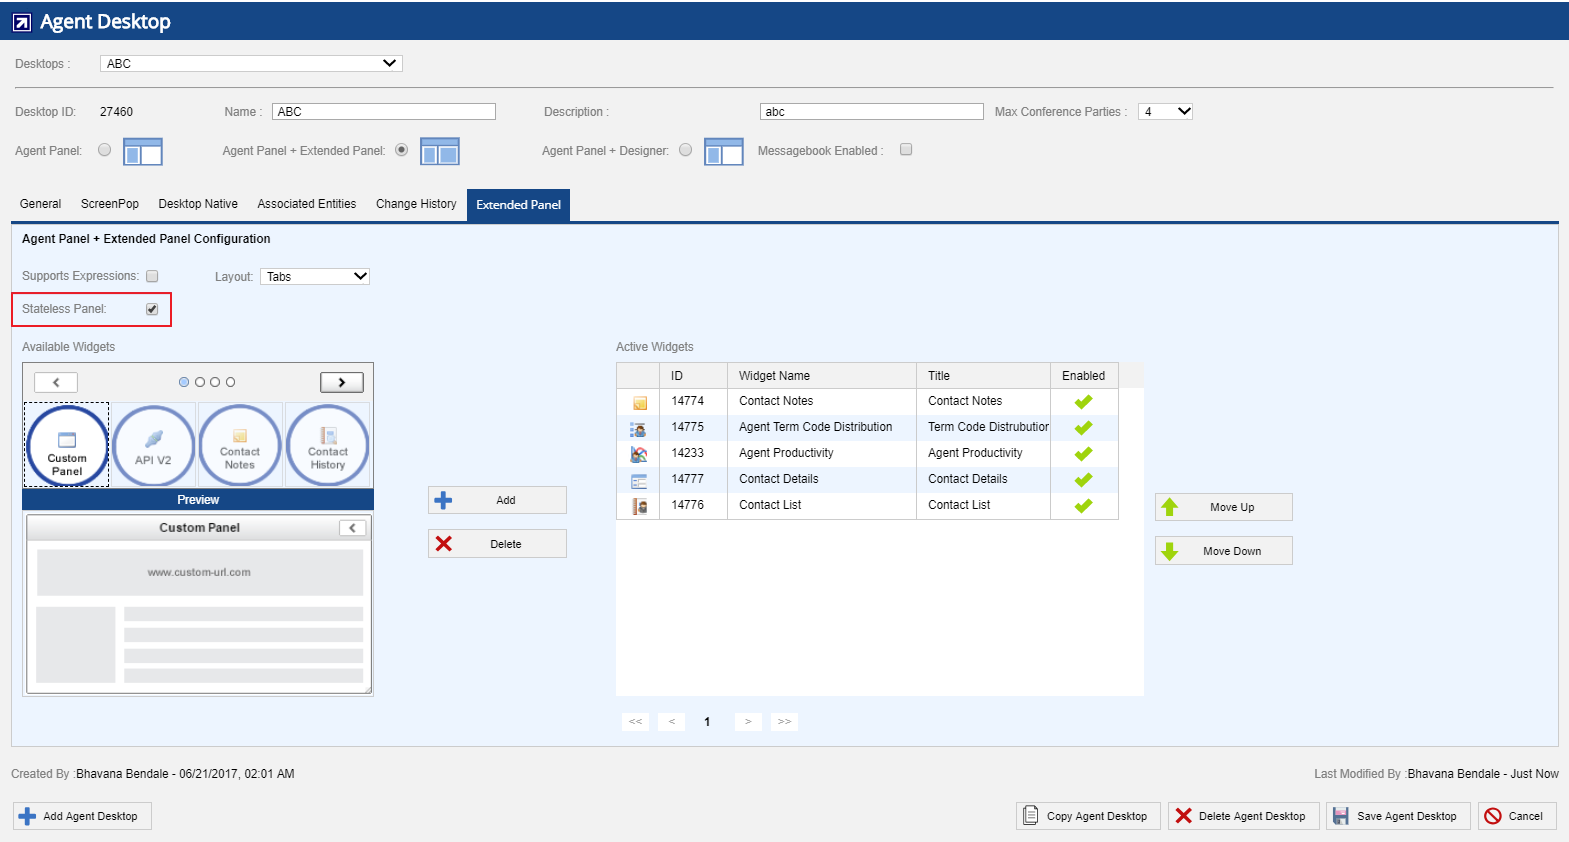 Image Added Image Added
| Info |
|---|
If the Stateless Panel is not enabled, widgets are displayed based on the agent state configuration. |
If the Stateless Panel is enabled, the Event selection option is not available. The below screenshot shows the available Event option in Contact List widget when Stateless Panel checkbox is not selected. 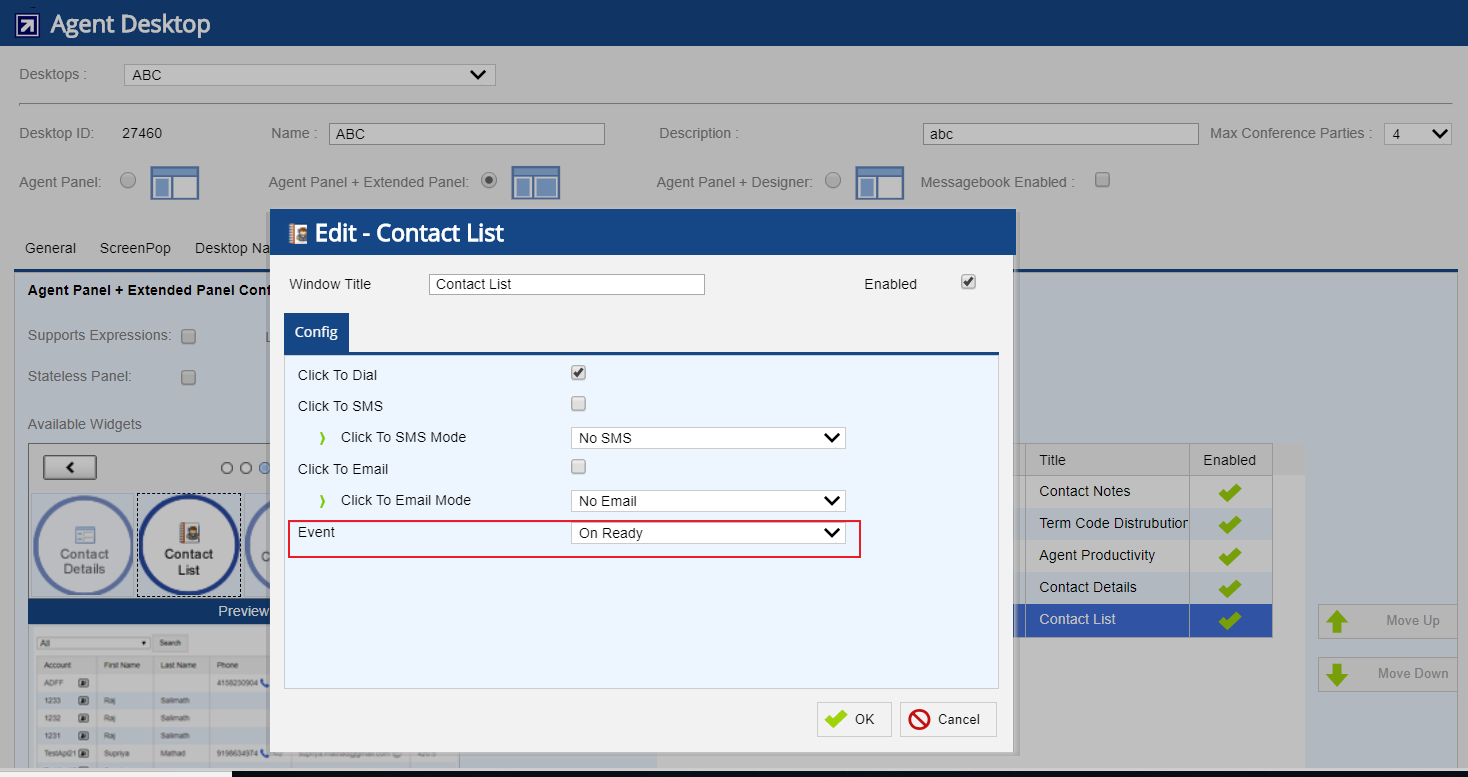 Image Added Image Added
Previously, the Extended panel widgets were displayed in the order that they were added on the agent desktop. In this version, users can configure the order of widgets in which they appear on the extended panel (Standard UAD & through ADN) for Tabs layout only. | Note |
|---|
Users can configure the order of widgets for Tabs Layout and Stateless Panels. |
To enable this feature, navigate to Configure > Agents > Agent Desktop > Extended Panel tab, and select the Stateless Panel checkbox and Tabs as Layout. To change the order of widgets, select the widget and click the Move Up or Move Down button. 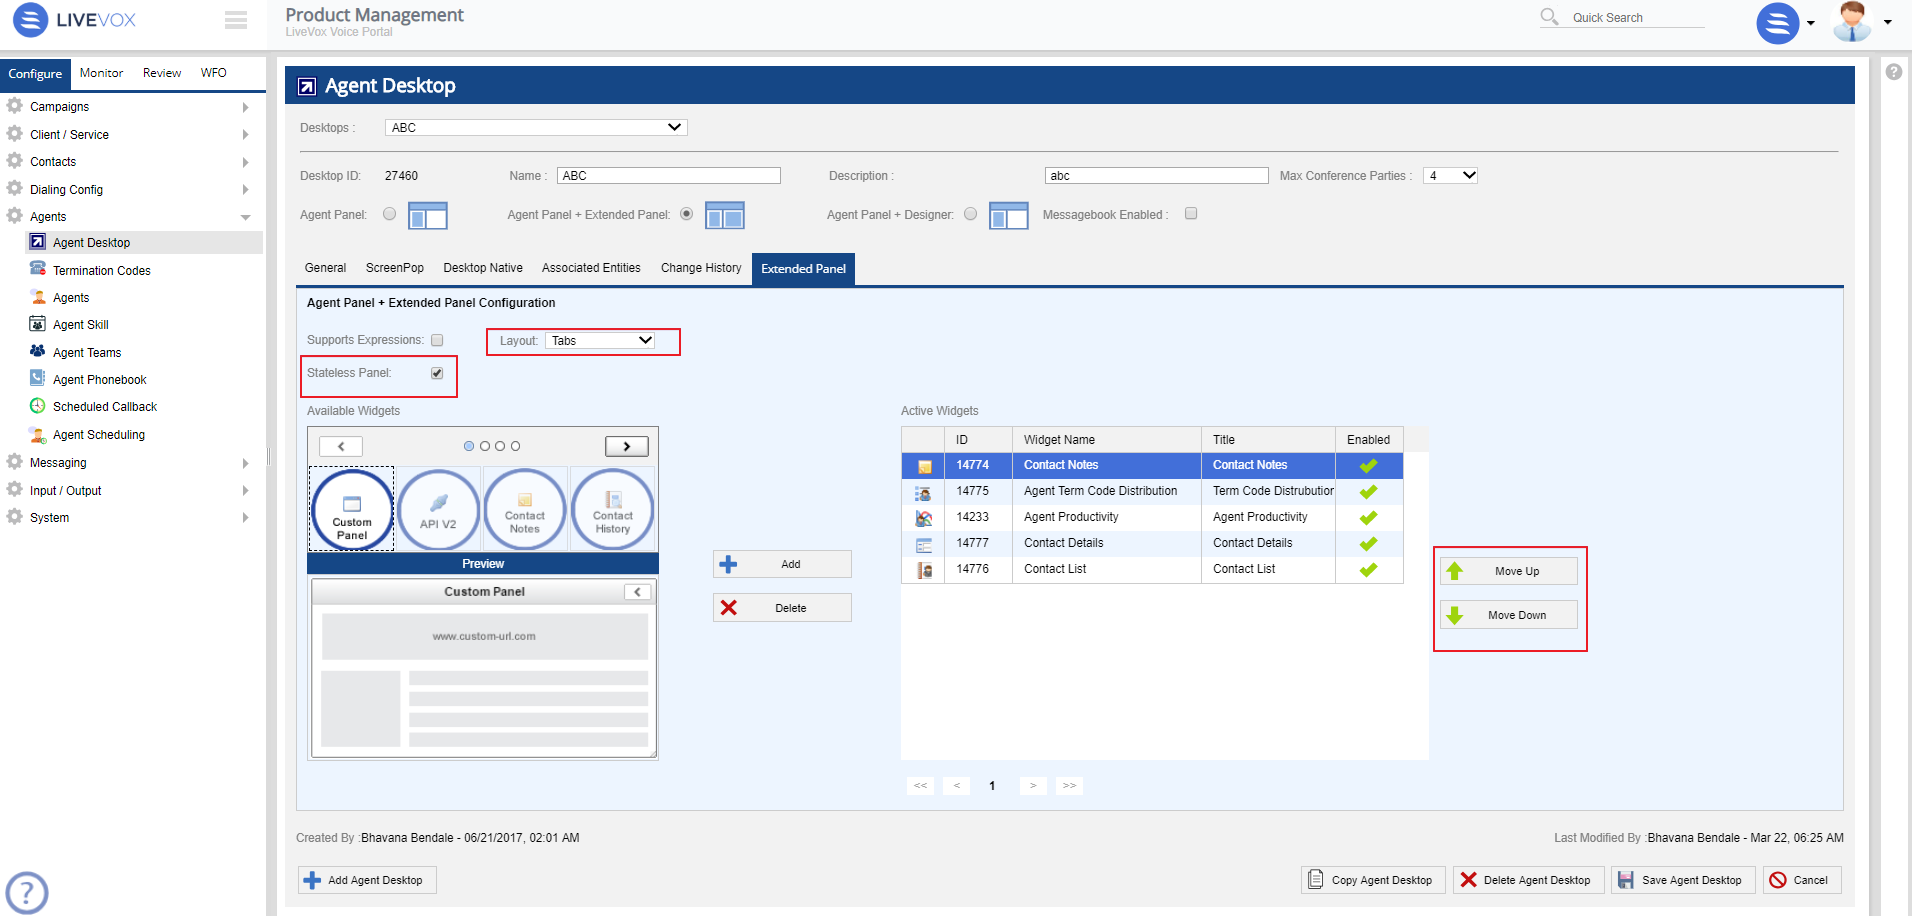 Image Added Image Added
Interoperability of Secure Payment Capture (SPC) with Designer DesktopPreviously, SPC functionality was available on the Agent desktop with Extended panel. In this version, users can enable the SPC functionality on Agent Desktop with Designer. To enable the functionality:
| Panel |
|---|
- Navigate to Configure > Agents > Agent Desktop.
- Select the desktop (associated with the designer desktop service) from the Desktops drop-down menu.
- Select the Agent Panel + Extended Panel option.
- Add Secure Payment Capture widgets.
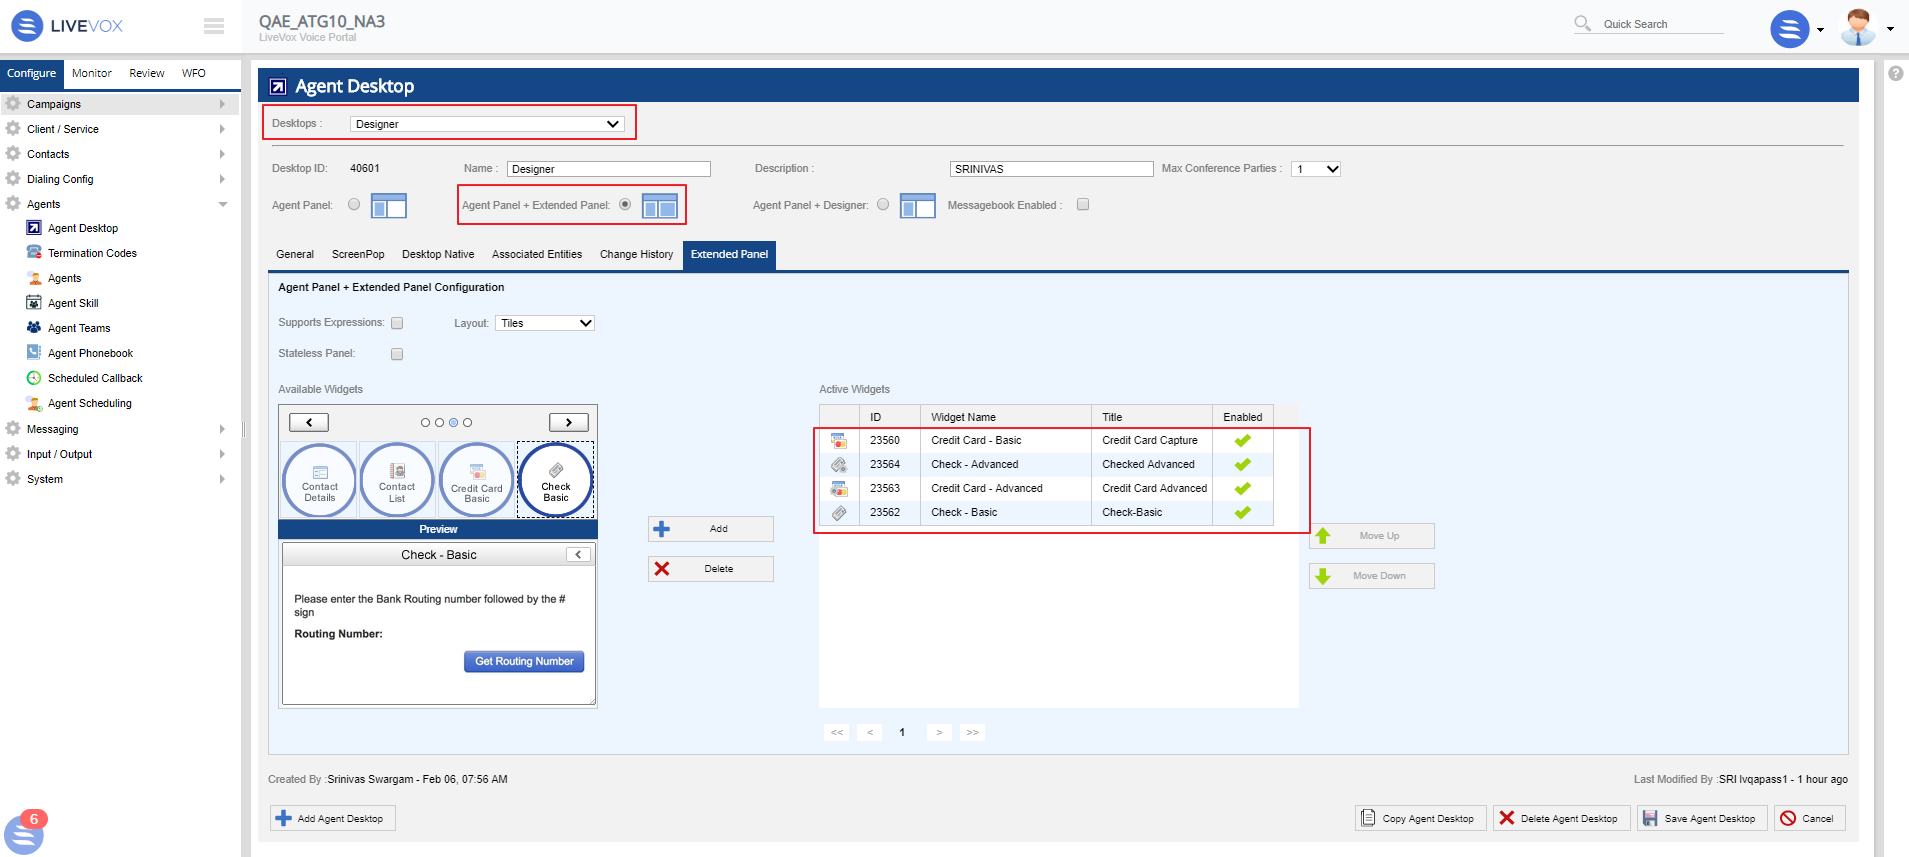 Image Added Image Added - Click the Save Agent Desktop button.
- Select the Agent Panel + Designer option for the same desktop.
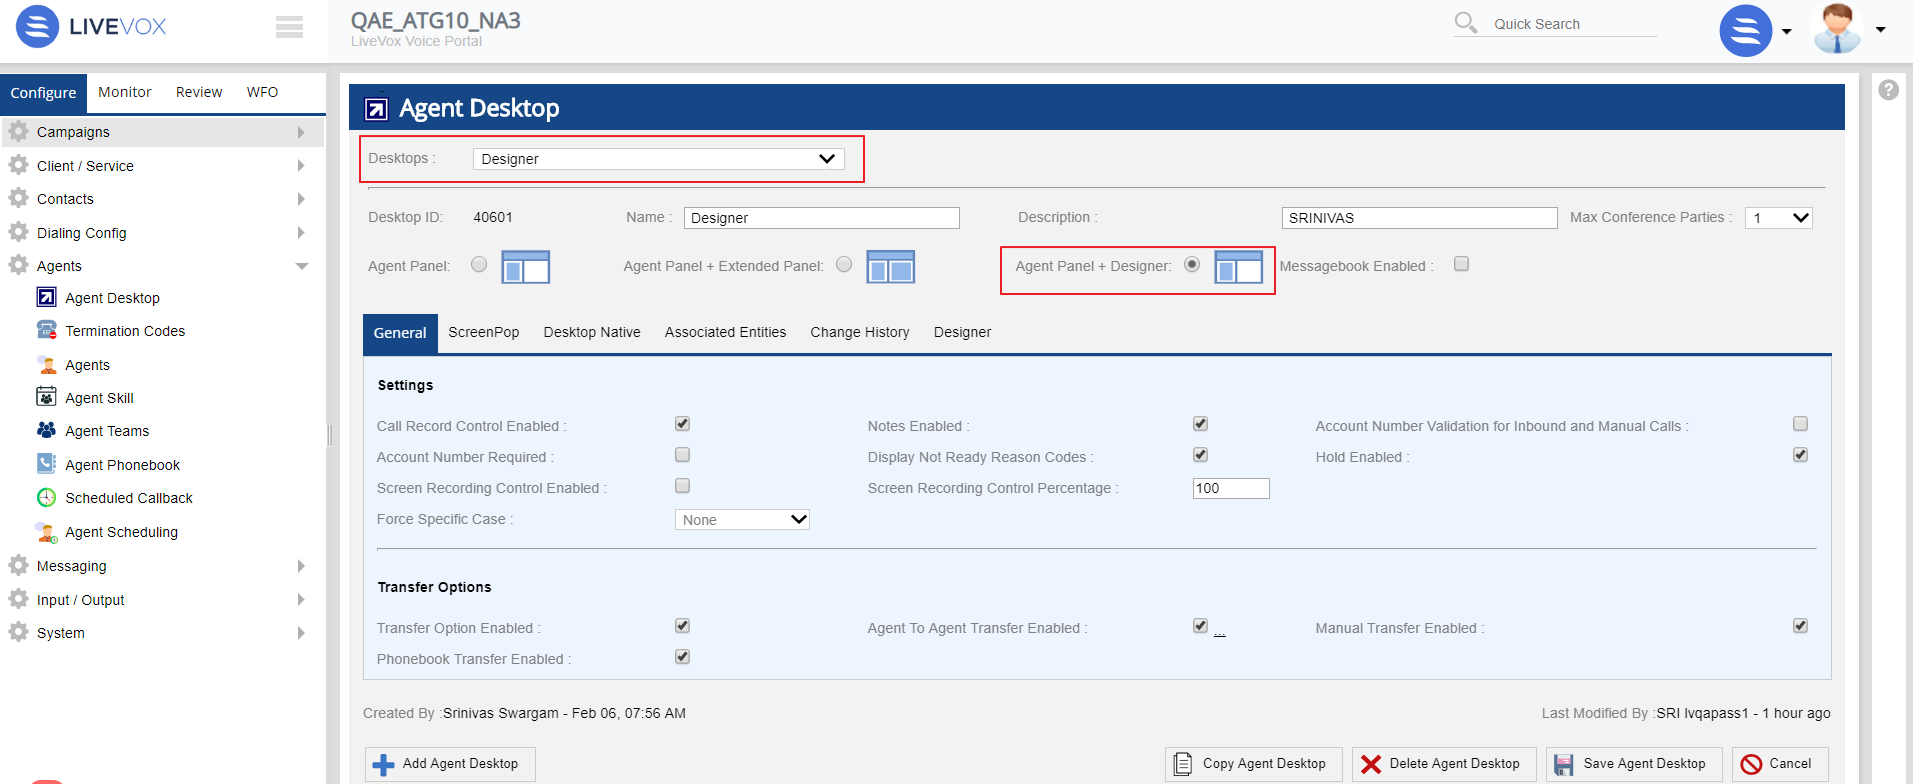 Image Added Image Added - Click the Save Agent Desktop button.
- Navigate to the Designer tab.
- Select the required designer desktop from the Designer Desktop drop-down menu.
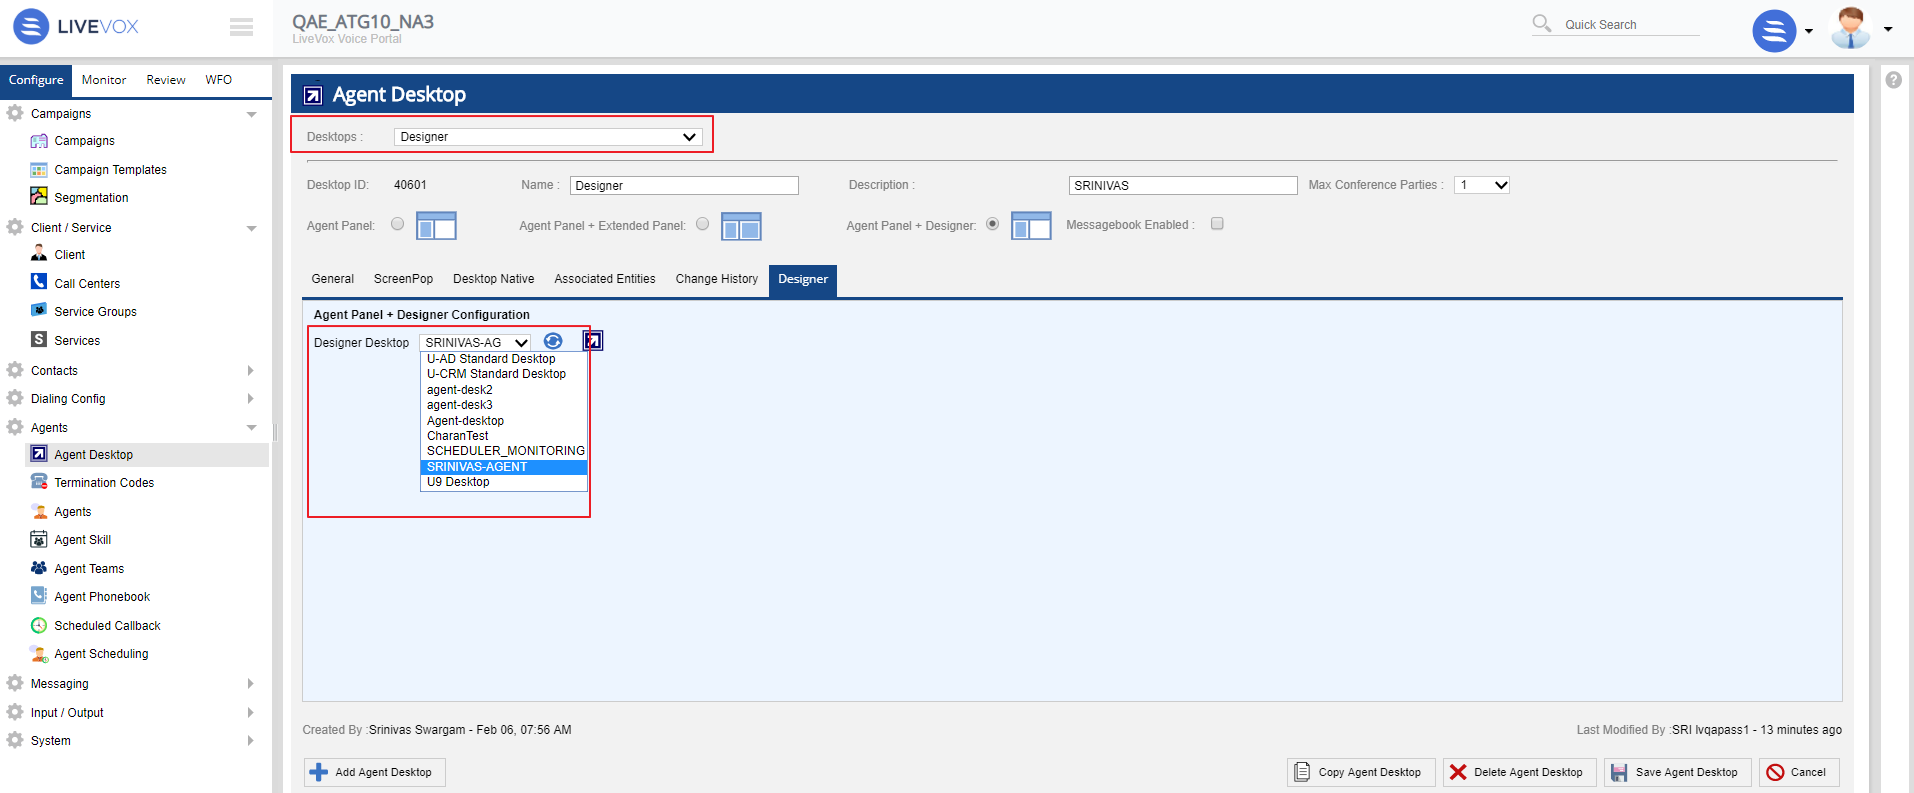 Image Added Image Added - Click the Save Agent Desktop button.
|
For agent specific information, see the Agent Enhancements U10 section. Modifying the Designer DesktopIn U10 and later versions of the LiveVox Portal (LVP), you cannot modify the Designer Desktops that were created in U9. | Note |
|---|
You must recreate such Designer Desktops by using the Designer tool. |
New Agent Desktop Native (ADN) VersionA new version of Agent Desktop Native (ADN) (7.2.0) is now available for the LiveVox platform. You can download the package from the Desktop Native tab. The Update Strategy option (OK, ASK, FORCE) dictates the version deployment. If you have not whitelisted “*.livevox.com,” you must white list the "cdn.livevox.com" link to download ADN installers. The new version is recommended for users currently on U9 version of the LiveVox platform or higher.  Image Added Image Added
Scheduled Callback Editor EnhancementsIn this version, the search filter of Scheduled Callback editor defaults to Today.  Image Added Image Added
The Scheduled Callback editor now allows users to view the Status of all the Callbacks (completed, missed, pending, etc) scheduled for the present day and past 90 days. Navigate to Configure>Agents>Scheduled Callback editor to view the status of the scheduled callback records. 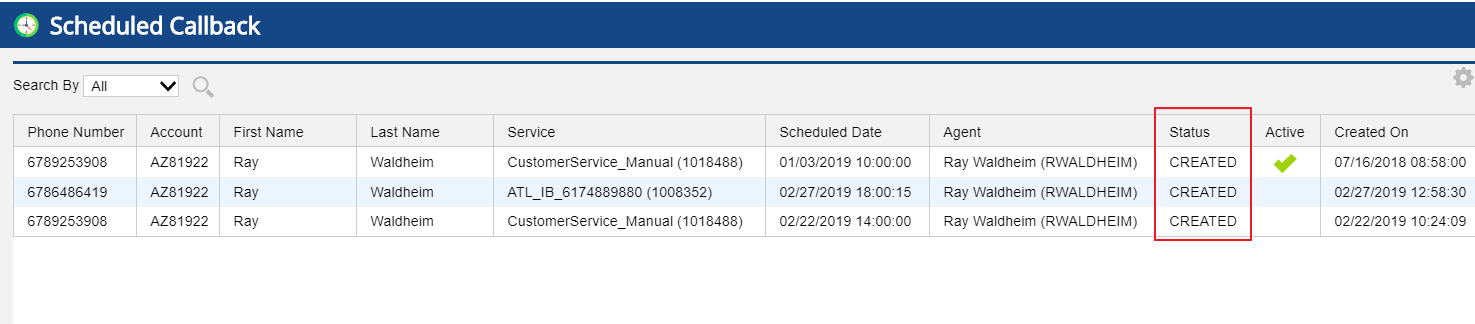 Image Added Image Added
The Status column of the Scheduled Callback editor displays the following types of status: - Created
- Picked
- Assigned
- Launched
- Restricted
- Skipped
- No Agent
- Failed
| Note |
|---|
Users can modify only the schedule of the callback records with CREATED or PICKED status. |
In addition to this, users can now modify the schedule of the present-day's missed scheduled callback records which includes: - Records presented to an agent and timed out without the agent taking an action
- Records missed due to non availability of agents at the scheduled time.
Call Flow Editor EnhancementsList Return Support for the Phone Lookup ModuleWith this version, additional list return functionality within the phone lookup module provides an improved experience for customers in multi-phone match scenarios. This offers added support for list return where there may be more than one Phone ANI match within Contacts. This is especially helpful when the caller has more than one account. This feature includes: - Up to 5 matches for the Phone lookup can be returned as a Contact match.
- A configurable Multi-Match Prompt Phrase which can be configured to relay to the caller that there are multiple matches for their phone number.
- A new call flow event connector for MultiMatch which can then be configured to prompt the caller to enter their account number for further validation.
Image Added The phone lookup module uses a support_multiple_records flag for backward compatibility.
New Properties Panel Previously, users were required to double-click on a module to view its properties. 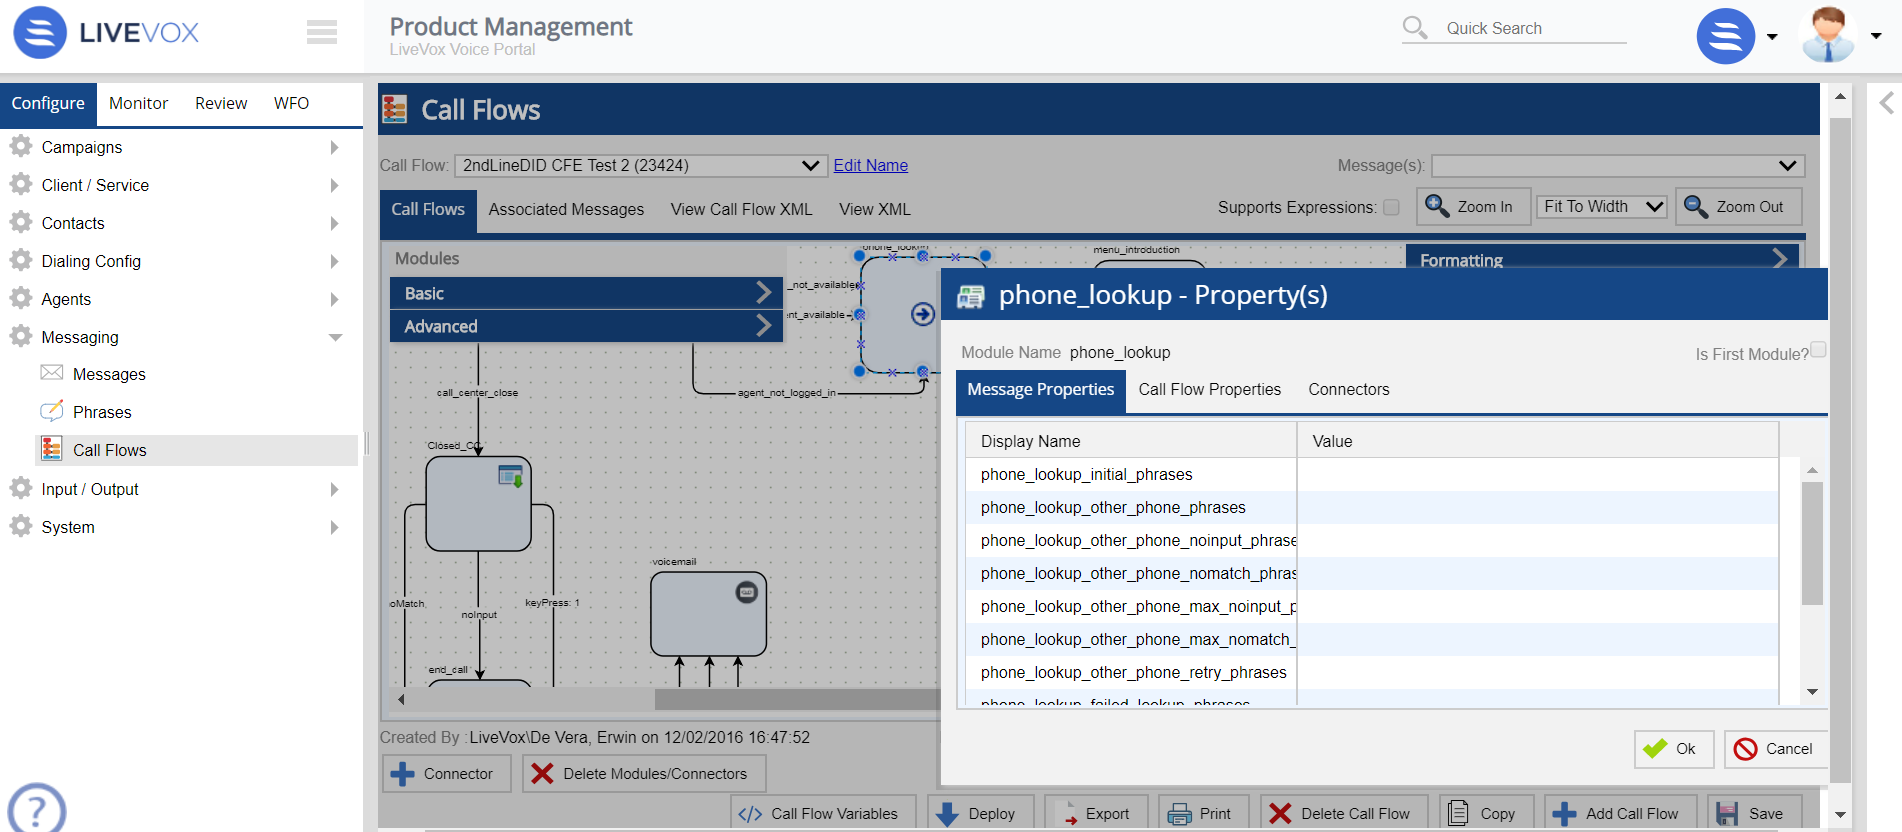 Image Added Image Added
This version allows users to view the properties of a module in the new Properties Panel on the right pane when the module is selected. 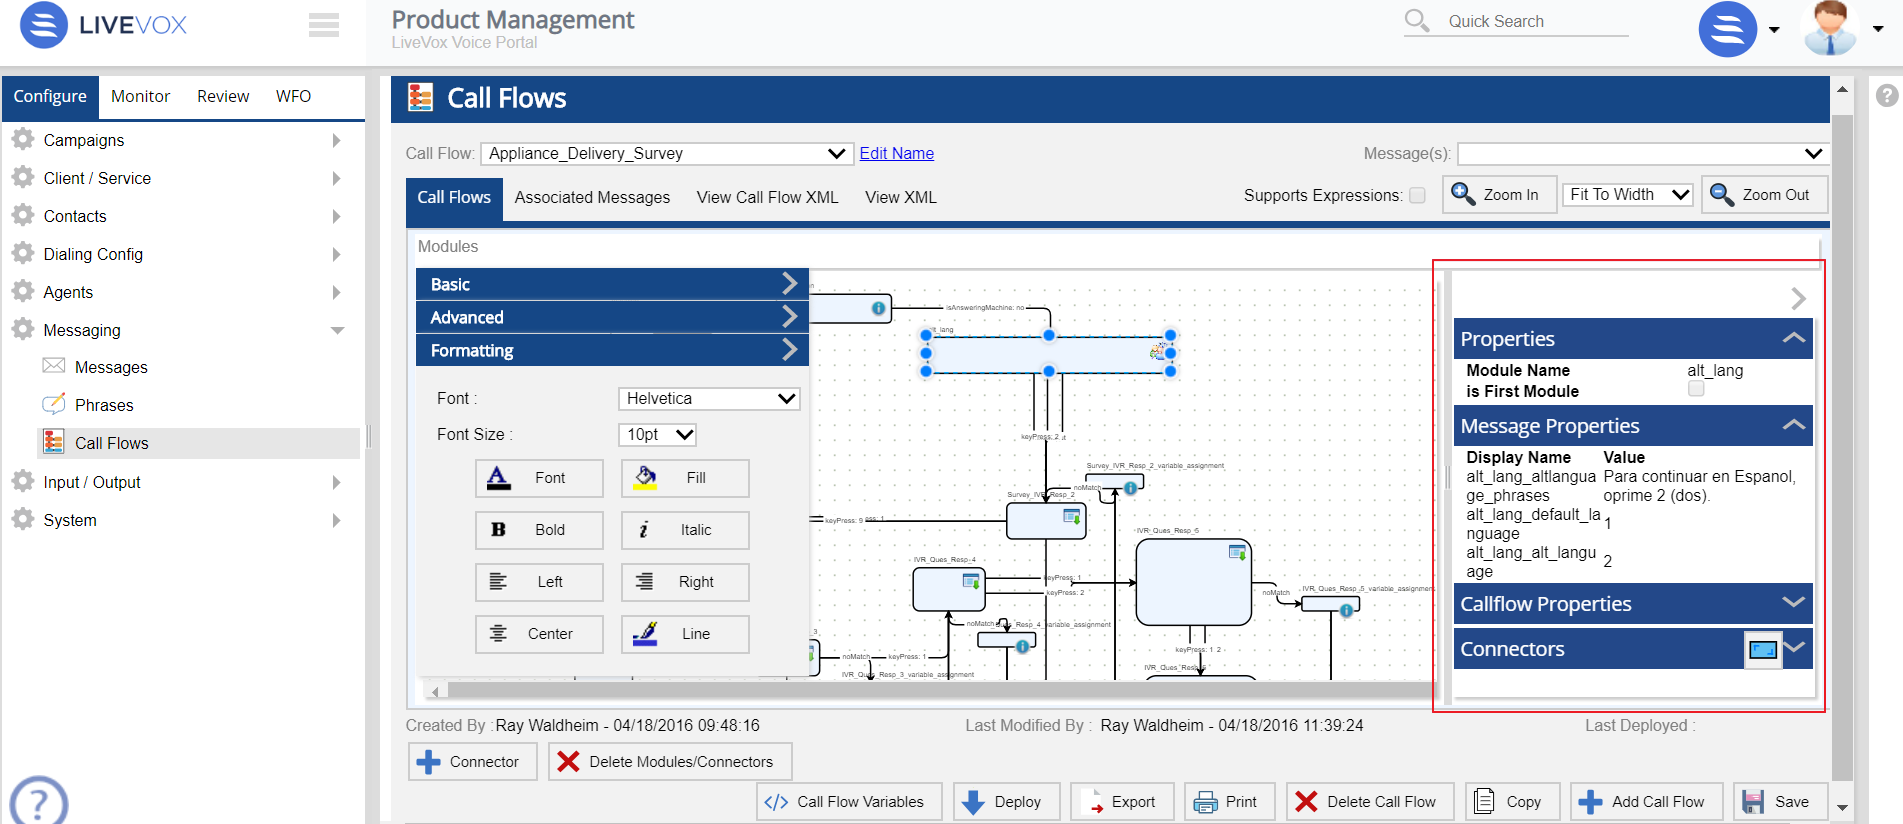 Image Added Image Added
Routing to Last AgentLast agent routing through Contacts lookup ensures that the New Properties Panel Previously, users needed to double-click on a module to view its properties. Image Removed This version allows users to view the properties of a module in the new Properties Panel on the right side when the module is selected.  Image Removed Image Removed
Inbound Routing to Last AgentLast agent routing via Contacts lookup ensures the customer has a consistent contact point. The benefits of this enhancement are decreased AHT Average Handle Time and a more unified customer experience. Additionally, routing order logic within operator_transfer module supports Account Ownership or the Service’s routing configuration. Routing order can be configured by specifying one of the following options as (ACD) Routing Orderoptions: - 5 - Last Agent, Owner Agent, Service
- 4 - Owner Agent, Last Agent, Service
- 3 - Last Agent, Service
- 2 - Owner Agent, Service
- 1 - Service (Default)
Previously, 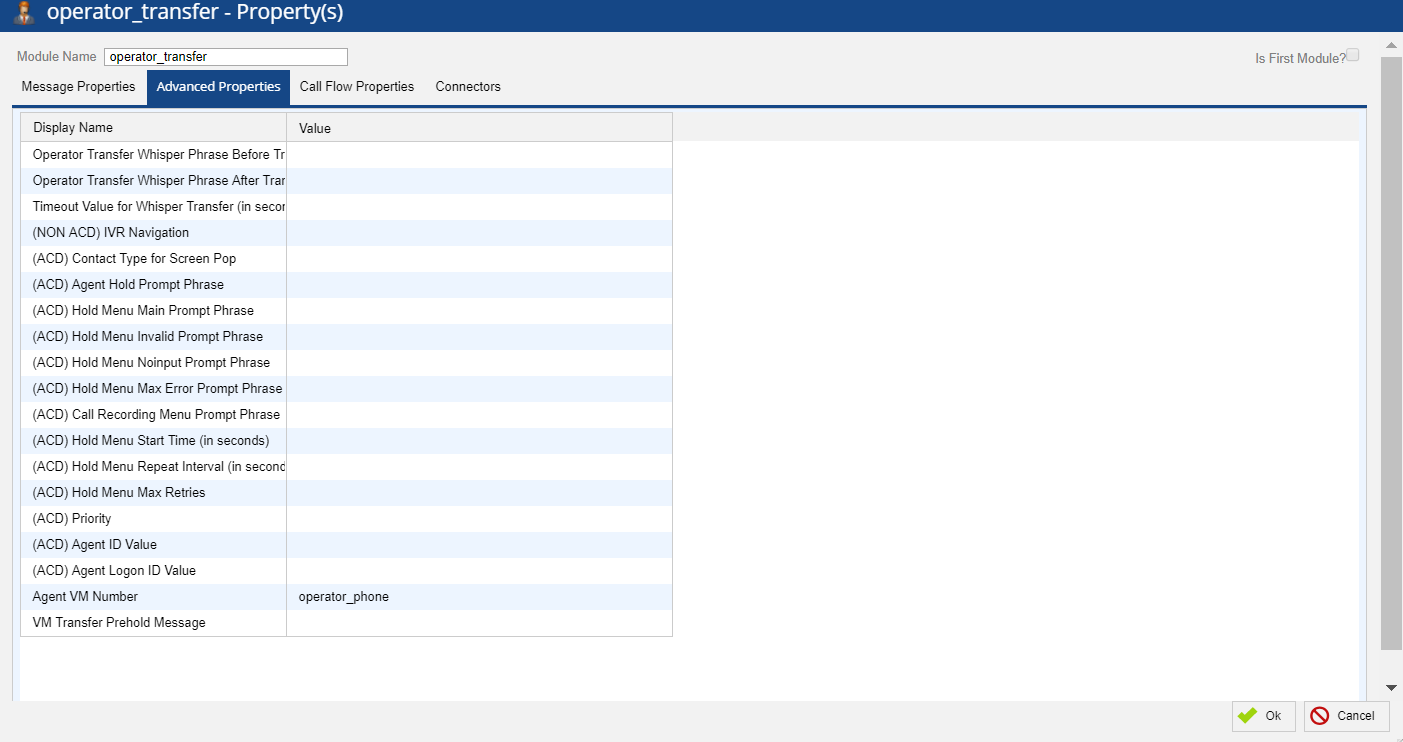 Image Removed Image Removed
In this version,  Image Removed Image Removed
In addition, last_agent_timeout and owner_agent_timeout allows users to configure the wait time before moving on to the next routing order.moving on to the next routing order. - (ACD) Last_agent_timeout (in seconds) – Mandatory to enter the value. The default value is set to 60 (seconds)
- (ACD) LastOwner_agent_timeout (in seconds) – Mandatory to enter the value. The default value is set to 60 (seconds)
- (ACD) Owner_agent_timeout (in seconds) – Mandatory to enter the value. The default value is set to 120 (seconds)
- ) – Mandatory to enter the value. The default value is set to 120 (seconds)
Previously Image Added Now 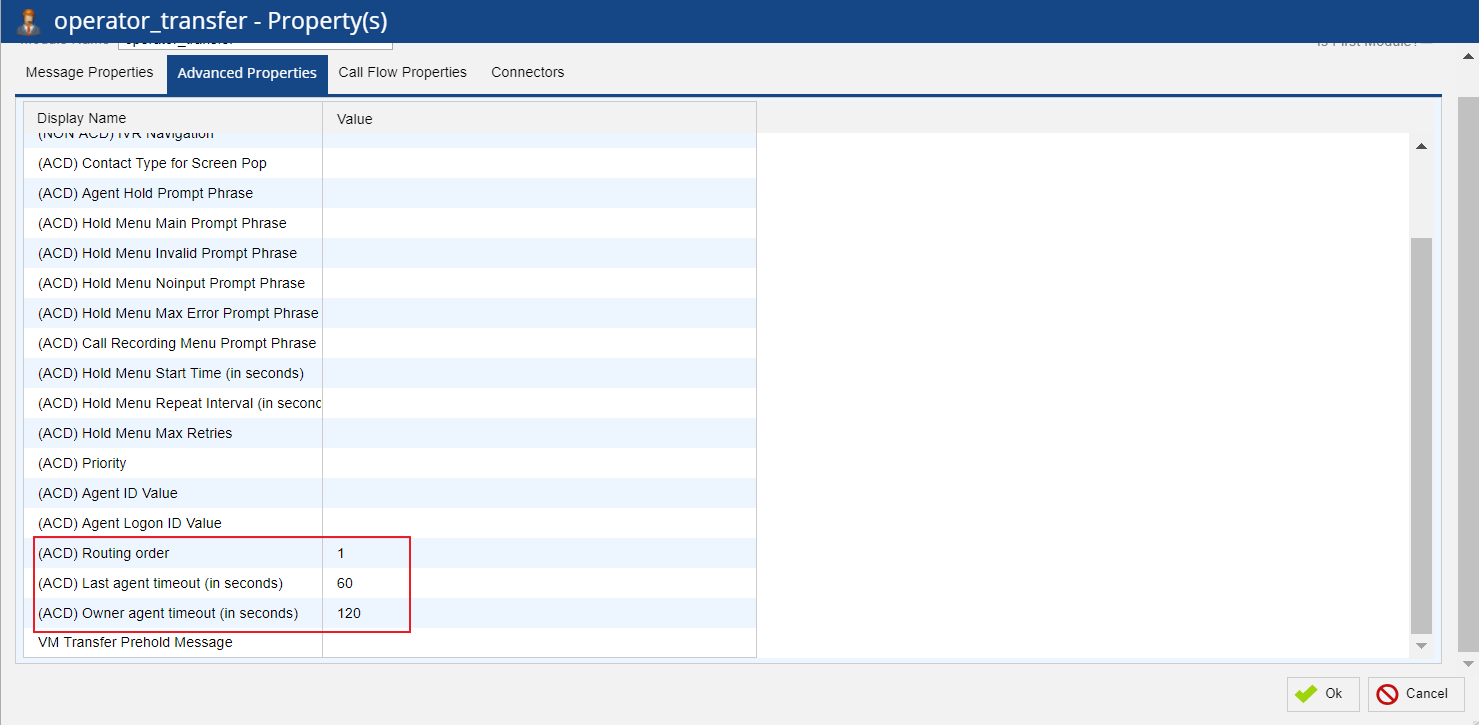 Image Added Image Added
WebChat IntegrationWhen enabled, WebChat can easily be configured by creating a new CallFlow with a Chat module and assigned to a service. - Chat Token is the unique identifier that routes incoming chat to a service.
- A WebChat CallFlow can also be configured to initially route to a ChatBot with escape key words.
- Since CallFlow is utilized, users are able to create a dynamic ChatBot that can query values out of Contact Manager and create intelligent routing or other multi-channel actions (ie. Send an SMS or an Email).
 Image Added Image Added
 Image Added Image Added
Advanced Text-To-Speech (TTS)PreviouslyIn the earlier versions of LiveVox, the system was supporting Advanced text-to-speech system supported only Acapella as TTS engine. With In this version, the system also supports supports two additional advanced TTS engines (- Google and Amazon ). These TTS engines provide high fidelity speech synthesis that sounds natural.
| Note |
|---|
This is a billable feature. Contact Client Services to set up Advanced TTS for your site. |
To verify the enabled Advanced TTS option for the portal, navigate to Configure > Client / Service > Client > Billing > A.I.
 Image Removed Image Removed
 Image Added Image Added
If enabled, allow users to can select the advanced TTS engines (Google/Amazon) within CallFlow Call Flow editor or Phrase editor. If disabled, the platform functions as is without the ability to select advanced TTS engines. Phrases Editor Enhancement This feature supports the following TTS engines option from Verbiage drop-down menu through Phrases editor. | |
|---|
| Acapela (default) | Engine 1 | | Google | Engine 2 | | Amazon | Engine 3 |
The Advanced TTS feature also supports the voices of English male, female, and Spanish female. To generate a TTS file with new options, navigate to Configure > Messaging > Phrases editor.  Image Removed Image Removed
With this, users 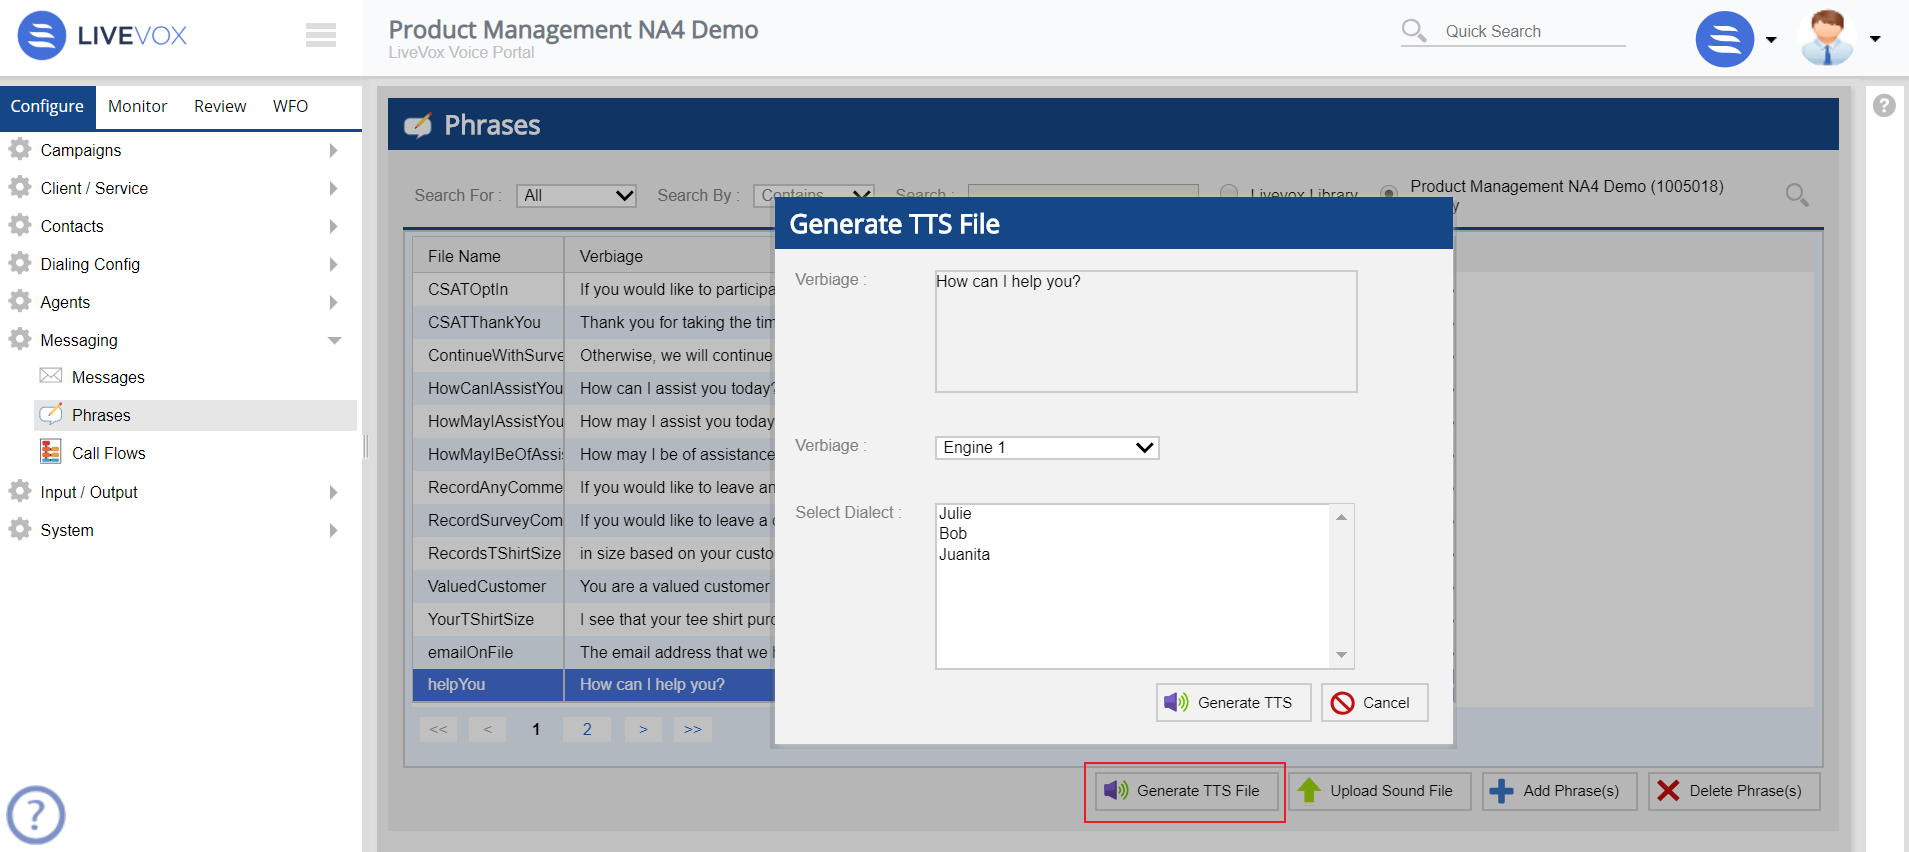 Image Added Image Added
Users can easily create new phrases and immediately use them on any message template. Speak Speech Module Enhancement
This feature supports the advanced TTS engines (Google and Amazon) TTS engines through Speak Module of CallFlow editor. Navigate to Configure > Messaging > Call Flow. Double-click on the added Speak module. You get the The Property(s) popup appears. Under Message Properties, select the required TTS options by double-clicking on the TTS Engine property. 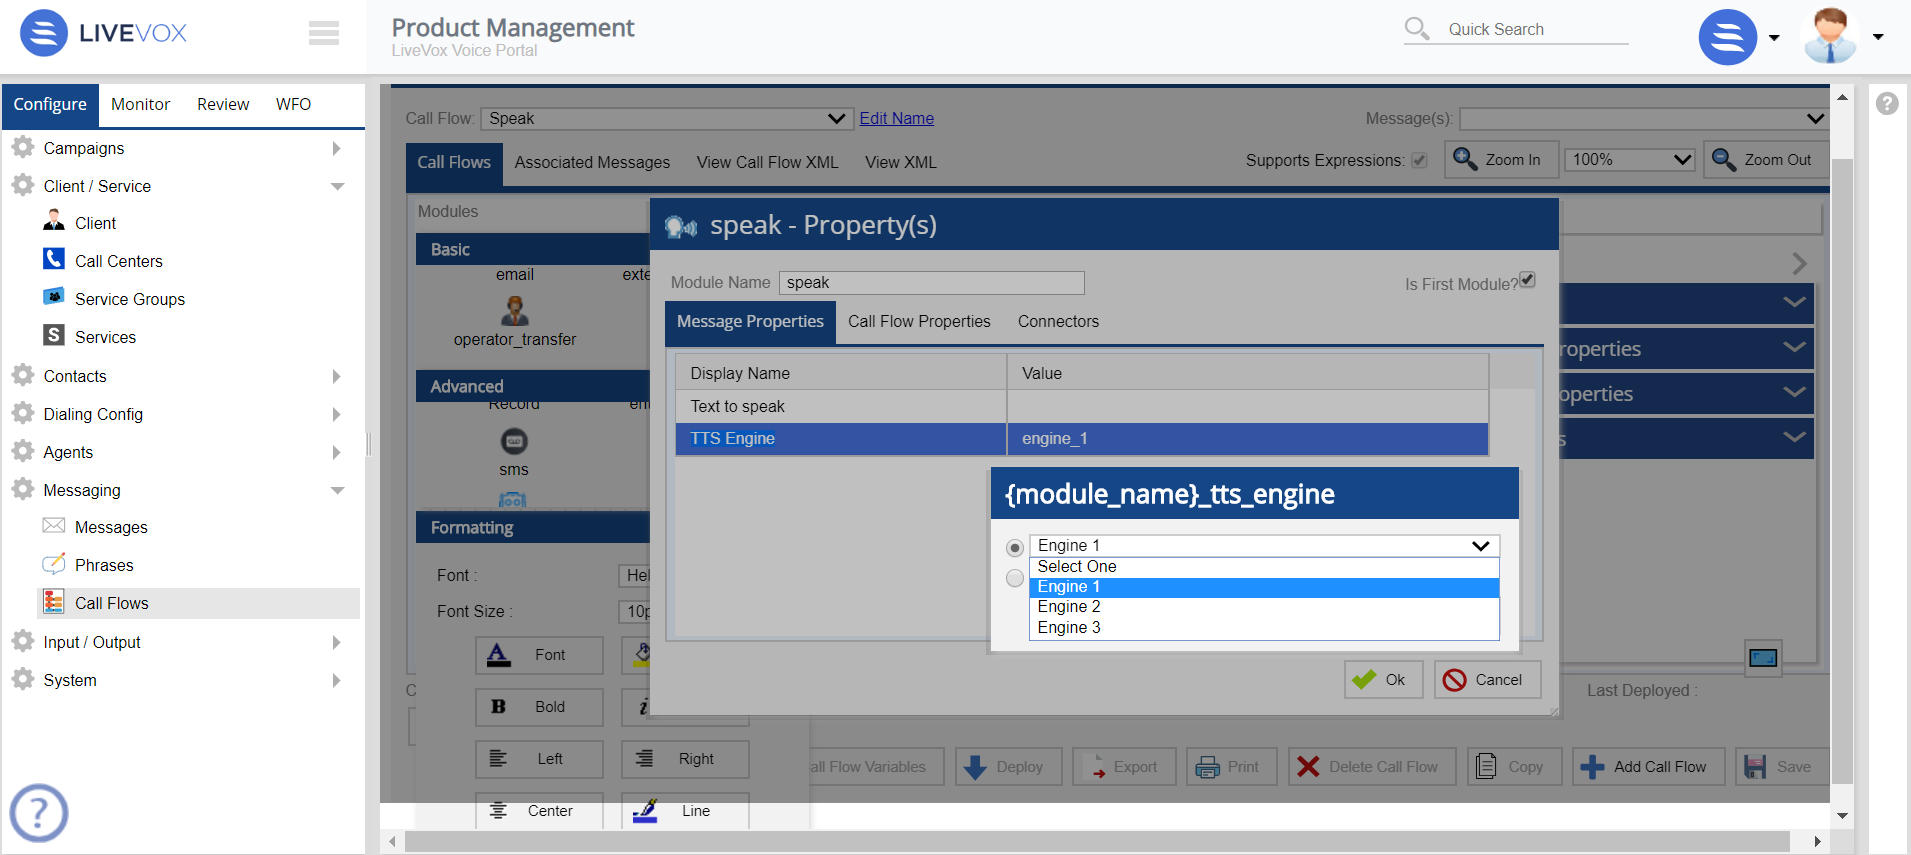 Image Modified Image Modified
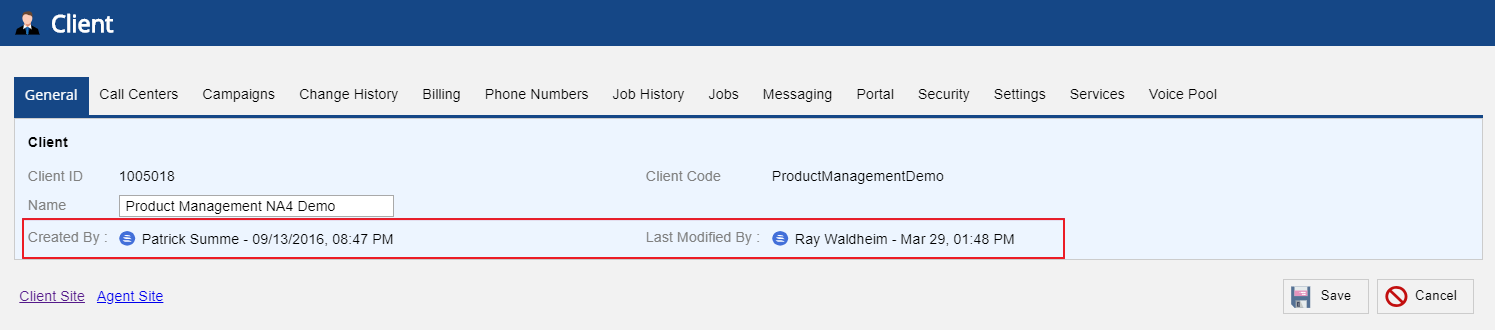
Integration of Customer/Consumer Chat This version provides integration of the Customer Chat feature to the voice portal. The The Customer Chat feature is now integrated into the Billing tab of the Client editor.of the Client editor. 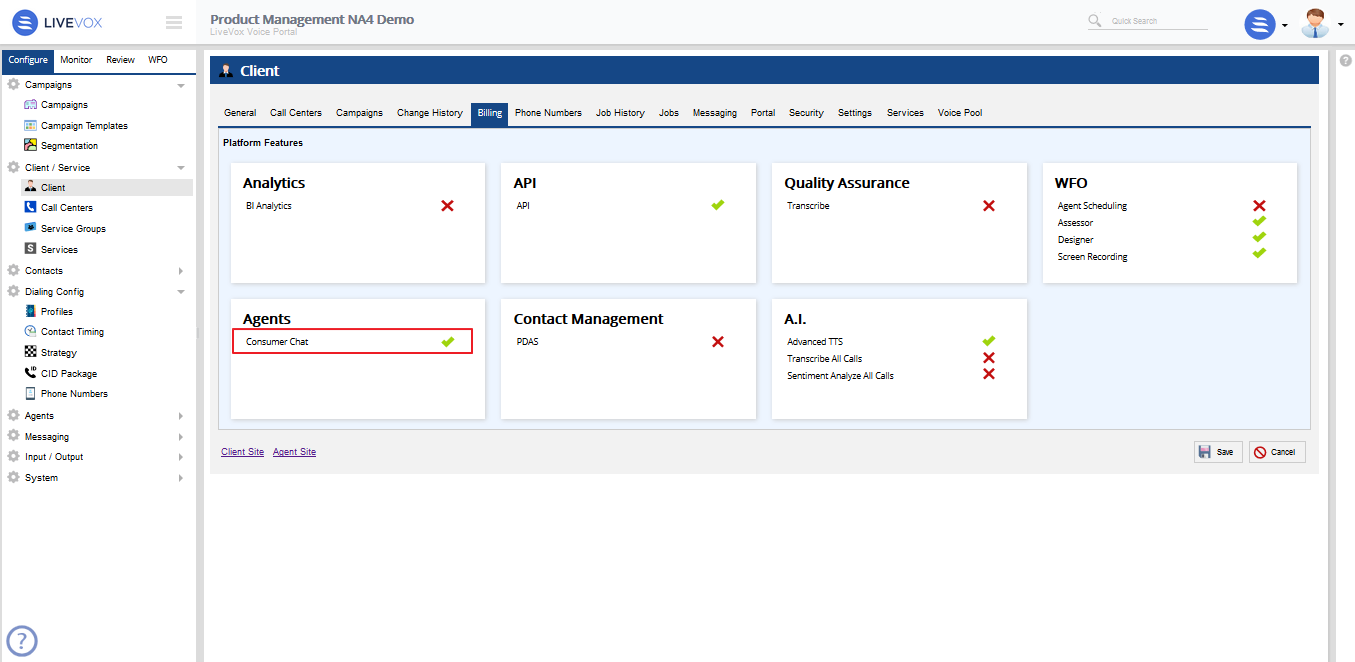 Image Added Image Added Report Writer EnhancementsNormalized Custom Columns in Report Writer This version of the voice portal normalizes custom columns in Report writer. The list below describes the enhancements made in this release: - Renamed all the entries in the Table drop-down menu for improved categorization and readability.
- Renamed Account and Account Details to Contacts.
- Renamed ACCT_TRANSACTION to Transaction.
- Renamed ACCT_CALL_ATTEMPT_RESULTS to Interaction.
Previously 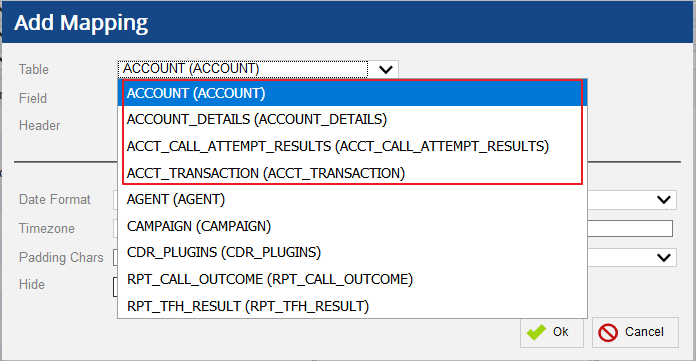 Image Added Image Added
Now 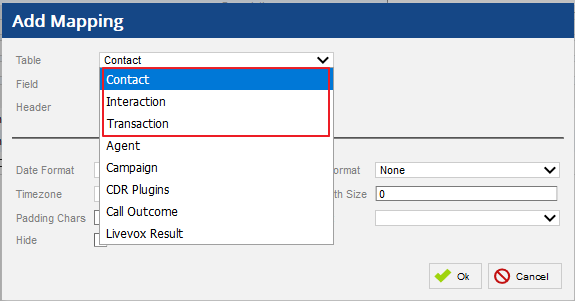 Image Added Image Added
New fields in CDR PluginsIn this version, CDR plugins table includes five new fields as given below: - areaCodeState
- callCenterId
- campaignType (not ID)
- phonePosition
- zipCodeState
To add fields to Report Format of CDR plugins: | Panel |
|---|
- Navigate to Configure > Input / Output > Report Writer.
- Click the Add Mapping button. An Add Mapping popup appears.
 Image Added Image Added
- Select CDR plugins option from Table drop-down menu. Users can add the new fields from the Fields drop-down menu.
|
 Image Removed Image Removed ACD Mode for Service Type HCI as Read-Only Field This version of the voice portal makes the ACD Mode option, when Service Type HCI is selected, a read-only field in the Services editor.  Image Removed Image Removed
Service Inbound SMS & Inbound Email MessageThis Inbound Email message and Inbound SMS message options are now exposed in the Settings tab of the Services editor, under Contact rules. These options select the inbound message template that will be applied to inbound email or SMS. Image Removed Image Removed
Normalized Custom Columns in Report Writer This version of the voice portal normalizes custom columns in Report writer. Enhancements include: - Shows Contact instead of Account and Account Details in Table option.
- Renamed ACCT_TRANSACTION to Transaction.
- Renamed ACCT_CALL_ATTEMPT_RESULTS to Interaction.
Previously, Image Removed With this version, Image Removed New Values in Segmentation EditorWith this version, two new values are added under Manage Criteria setting of the Segmentation editor. Navigate to Config>Campaigns>Segmentation>Manage Criteria>Add Criteria to utilise utilize the following fields for creating Contact source criteria: - Dialed in last 'x' days - Allows users to include accounts that have been dialed within a specific window, day, or within a number of days/weeks/months.
 Image Modified Image Modified
- Dialed in last 'x' days for Livevox Result - Allows users to include accounts that have been dialed within a specific window, day, or within a number of days/weeks/months, and had a specific result. (Livevox Result drop-down is only visible for Dialed in last 'x' days for Livevox Result field).
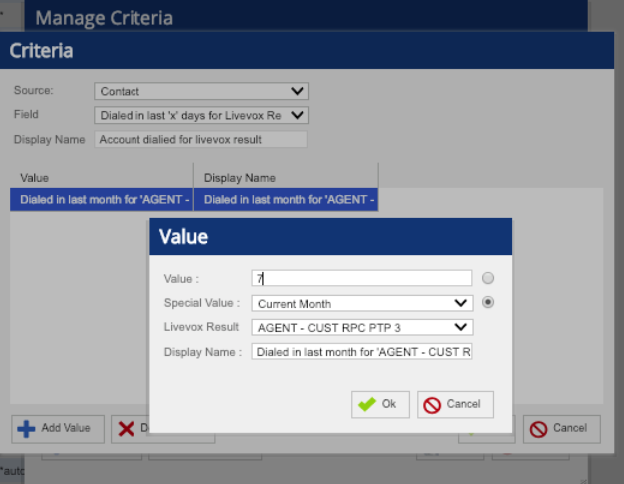 Image Modified Image Modified
Append Handling with PriorityPreviously, records sent via through the Append Campaign Record feature were prioritized based on the target service dialing sort. Appended records generally fell into two categories: - Append "normal records" to an ongoing campaign with normal priority.
- Append "hot records" to an ongoing campaign where Priority dialing is required immediately.
With this version, enhanced campaign append functionality is now available where the service level dialing sort can be superseded for priority record handling allowing appended campaign records to be handled with priority over existing campaign records. | Note |
|---|
Contact client services to configure Append Handling with Priority. |
Select Allow Append at the service level and campaign or campaign template levels to enable this feature. 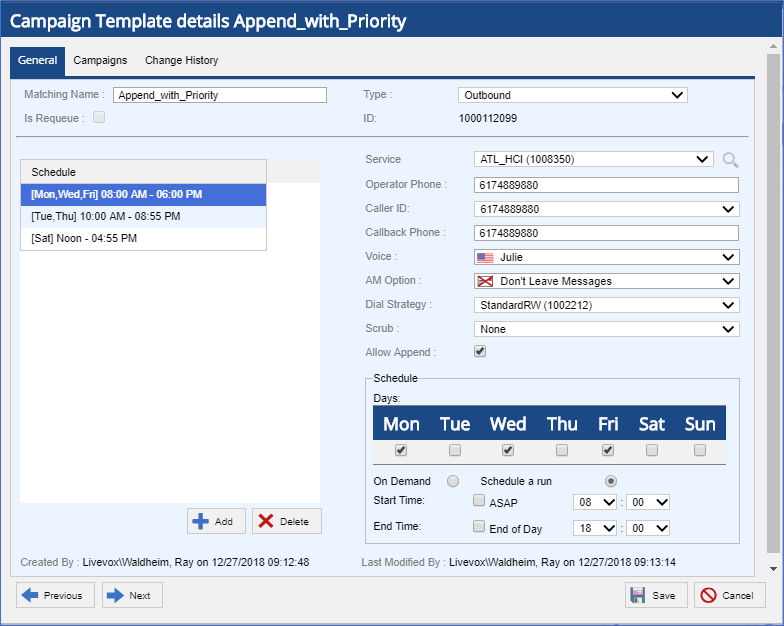 Image Removed Image Removed
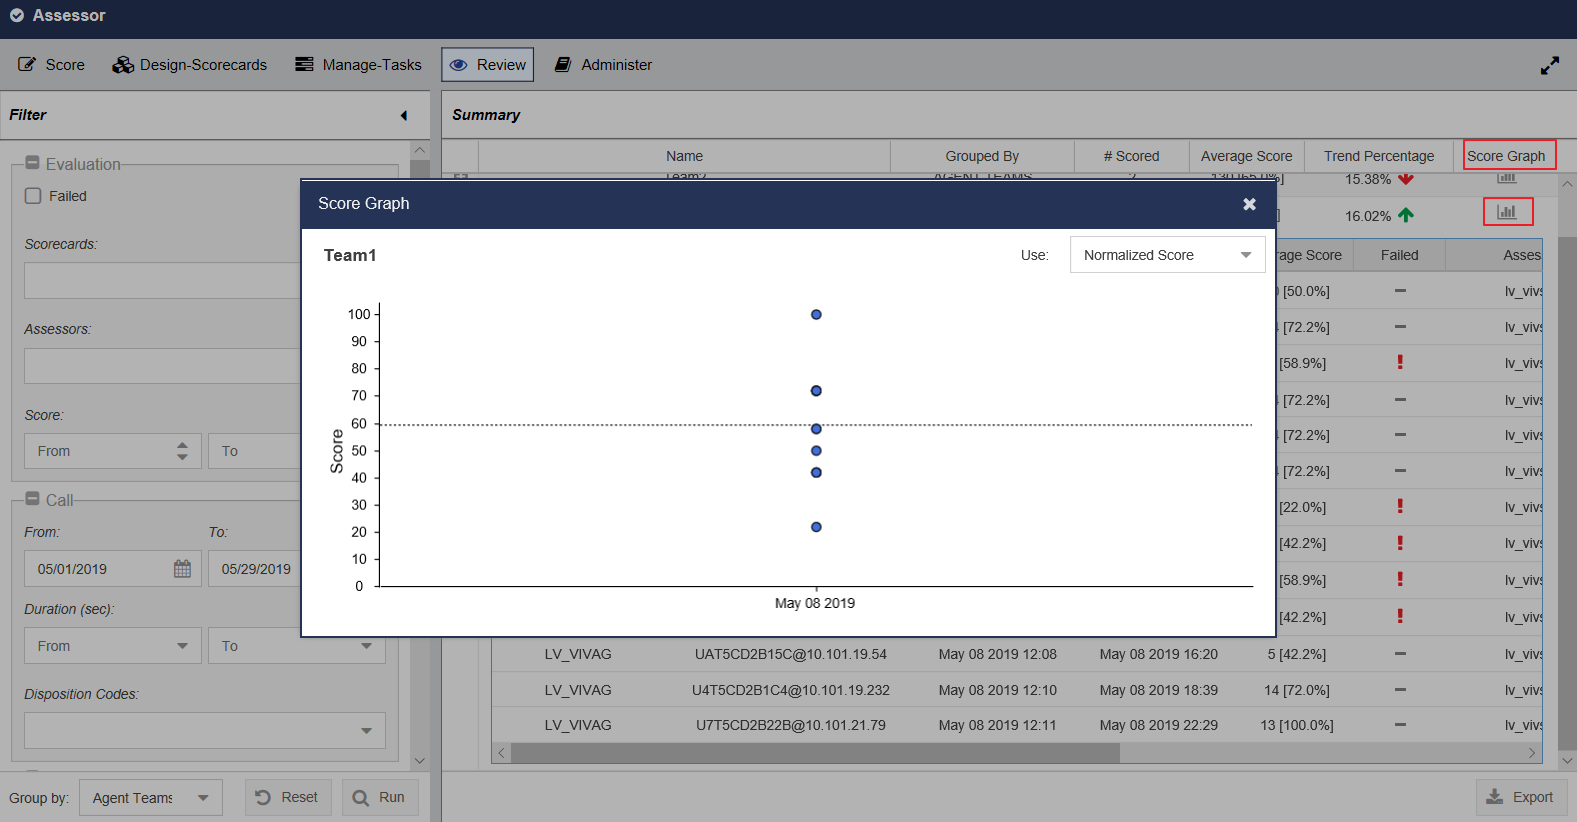
Call Recording Speech AnalyticsThis version introduces new Call Recording speech analytics which provide transcription and sentiment analysis after a recording is complete. This allows for post-call analysis. The Call Recording report provides a transcription which displays the customer and agent conversation. Sentiment Analysis is also provided with the new Neutral bar. The bar position displays the overall sentiment of the call, varying from an unsatisfying experience to a satisfying experience from left to right.  Image Removed Image Removed
When enabled, you can see the Call Transcription and Sentiment Analysis options checked in the Billing tab of the Client editor. Image Removed Image Removed
| Note |
|---|
| Contact client services to enable Call Transcription and Sentiment Analysis on call recordings. |
Split the Standard Call Recording Job by Call CenterThis version allows users to split the standard call recording job by call center. The zip files are stored in the specific Call Center zip file. Also, password options allows users to generate password protected the zip file. To configure, navigate Configure > Client/Service > Client editor > Jobs tab. Click on a link next to Call Recording. Users are presented with Configure Call Recording Job popup. Previously,  Image Removed Image RemovedNow,  Image Removed Image Removed | Info |
|---|
Call Recording Zip file is not created for Call Centers with no recordings. |
Integration of PDAS This version now provides integration of PDAS to the voice portal. This is displayed in the Billing tab of the Client editor:  Image Removed Image RemovedThe integration allows users to access all PDAS functions and features within the voice portal without having to open a different webpage. 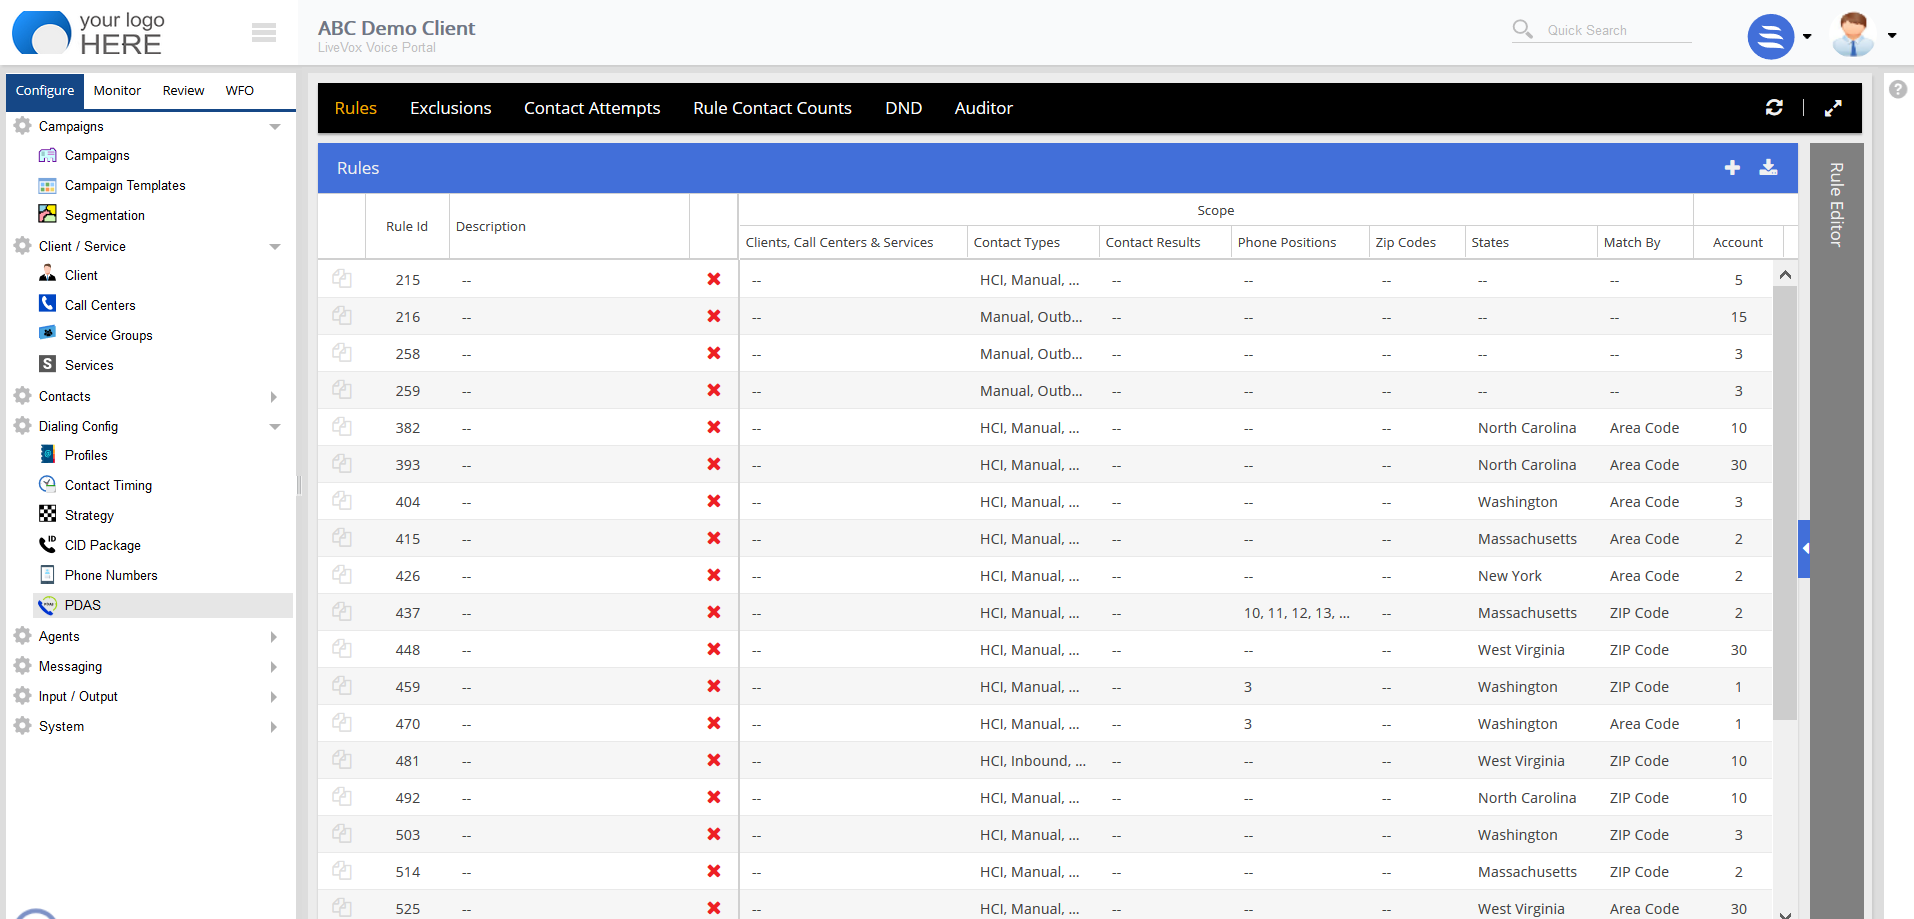 Image Removed Image Removed
Further enhancements: - Expired blocks under the DND tab are now retained for 60 days instead of 14 days. This allows users to better track and audit historical blocks on PDAS.
- Users are now able to configure PDAS rules with Phone+Contact Group restrictions.
- Rules created in PDASfor phone numbers can be associated to multiple Contact Groups.
| Note |
|---|
| Only Phone Numbers can be restricted with a Contact Group association. |
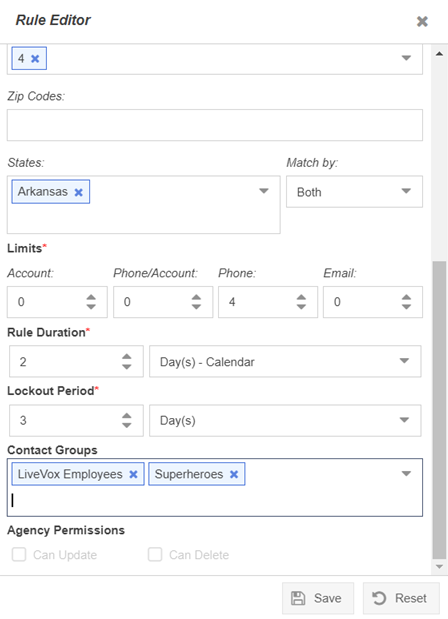 Image Removed Image Removed
Email/SMS Channels Configuration Fields This version provides enhanced Email/SMS functionality for agents. For complete setup support of Email/SMS configurations the following fields are now exposed to users. Channels Tab - For any SMS Engine configurations exposed the following:
- Authorization Key
- Authorization Id
- Authorization password
| Note |
|---|
| Each engine requires different configurations which can be configured w/ different combinations of the above. |
Email Channel options:  Image Removed Image Removed
SMS Channel options:  Image Removed Image RemovedAgent Inbox Multi-Channel ConfigurationPreviously, inbound SMS and Inbound Email were not routed to agents. This version provides: - Ability to assign the unassigned/unread SMS and Email to the agent.
- Ability to check the SMS and Email Queue for the agent.
- Ability to reply back to the SMS or Email.
- Ability to provide result/status to the conversation.
SMS, Email and Chat response is provided with an optional channel for agents. Agents can be assigned these channels via Agent Desktop editor.  Image Removed Image Removed
Once assigned, agents can handle Email, SMS or Chat response so long as they log into the service wherethese messaging channels are configured to route to. - Inbound Email routing is based on associating the domain to a service.
- Inbound SMS routing is based on where the originating outbound SMS is launched from.
- Inbound Chat routing is based on what service the Chat Routing Token is assigned to.
- Services with SMS, Email or Chat configured, require an associated inbound Email, inbound SMS or inbound Chat Message template selected in the Settings tab of the Services editor.
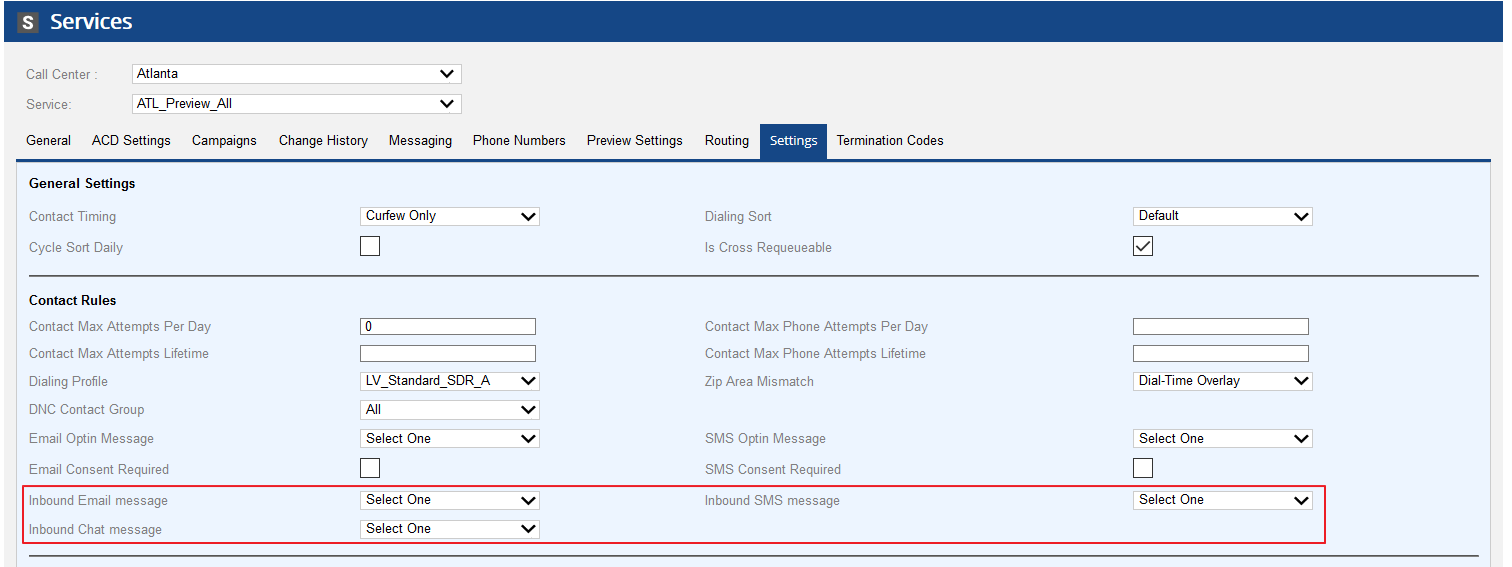 Image Removed Image Removed
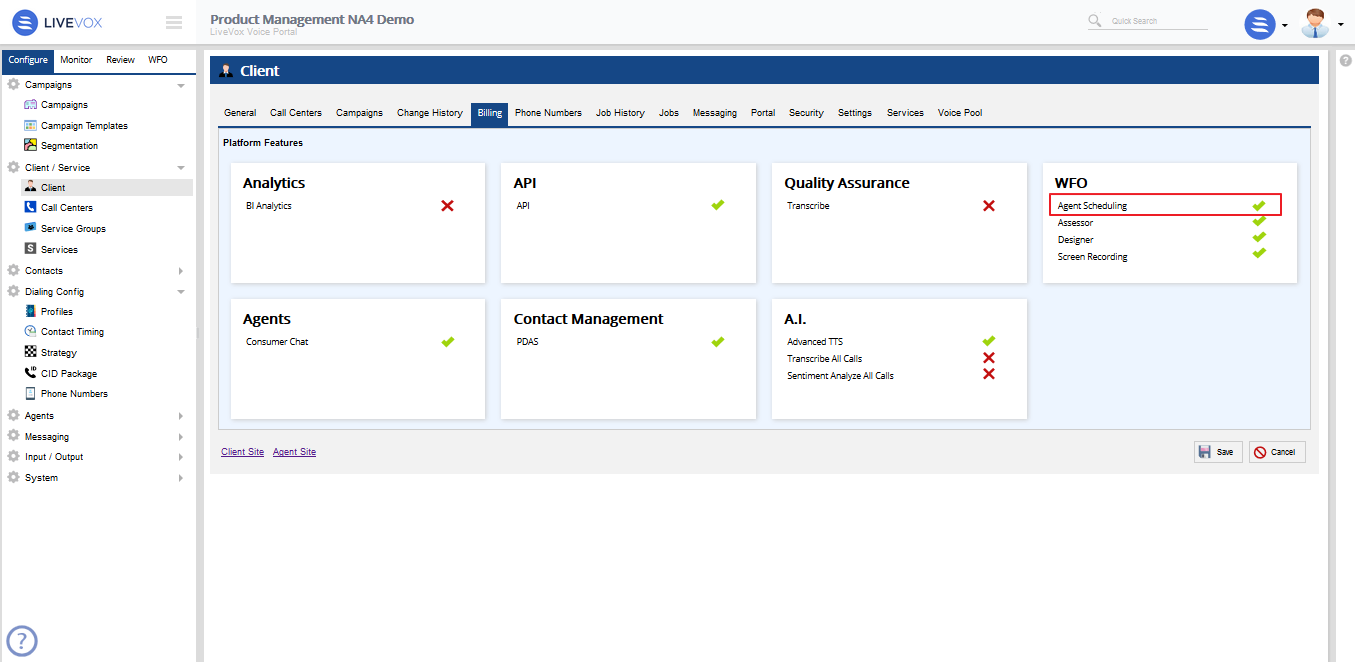
WFONew Agent Scheduling EditorIn this version, Agent Scheduling is integrated into LiveVox Voice Portal. Clients who subscribe to Agent Scheduling can access Agent Scheduling within their LiveVox Voice Portal. Agent Scheduling editor which allows the permitted users to create shift calendars and assign agents to specific shifts. The introduction of Agent Scheduling makes the user experience smoother. The new Agent Scheduling editor is available under the Config node when enabled by the Internal LiveVox users on the billing tab of Client editor:  Image Removed Image Removed
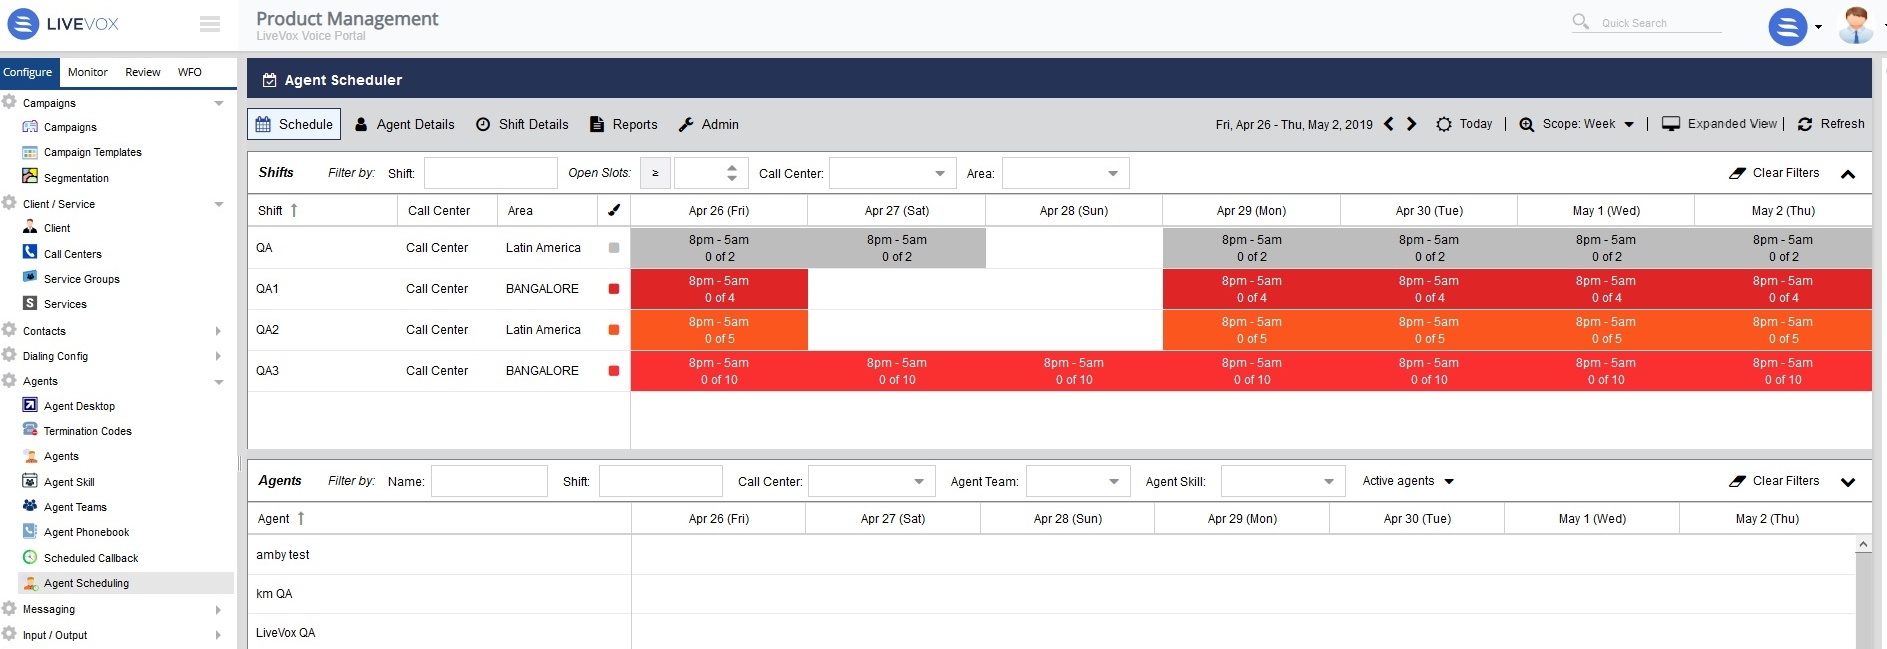
Navigate to Config > Agents > Agent Scheduling to access the Agent Scheduling editor:  Image Removed Image Removed
This application includes functionality for multiple levels of users: - System Admin and Super Users - Sysadmin and super users have the ability to manage the agent schedule, bulk assign shifts and generate reports. They can create work calendars and shifts, assign agents to the shifts, mass assign shifts, generate shift assignment and shift reports.
- Manager Users - Manager users have the ability to create and manage agent work schedules. They can create work calendars and shifts and assign agents to the shifts.
- The work calendar displays both shifts and agents. Users can drag the shifts to the date cell that is specific to an agent.
- Users can also expand the calendar to view the shift details of a specific agent for a month.
- Users can create the following shifts:
- Locale
- Area
- # of slots
- Start and end times
- Timezone
- Breaks
- Skill
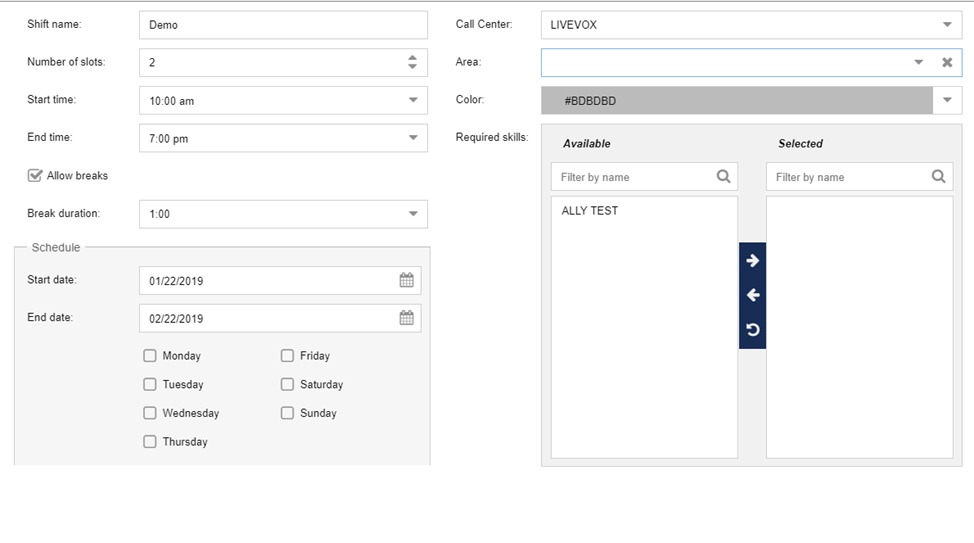 Image Removed Image Removed
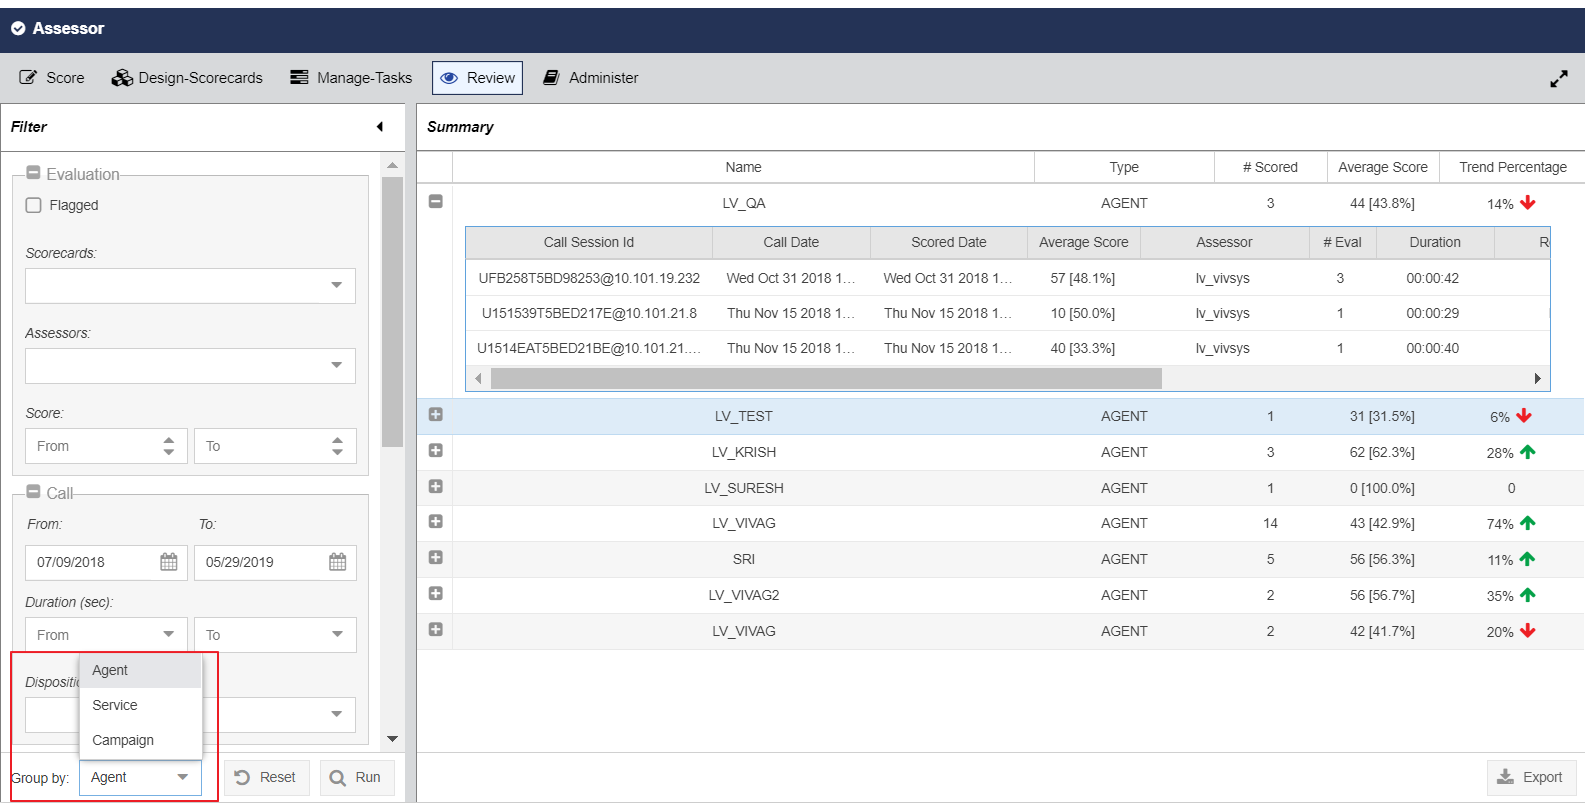
Acknowledgement With ArbitrationIn this version, Assessor provides the ability for Acknowledgement and Arbitration (form of alternative dispute resolution) of an evaluation. Acknowledgement and Arbitration can be enabled while designing a Scorecard. Assessor users can also assign the Arbitrator to review any disputed evaluations.  Image Removed Image Removed
The feature provides the following functionality: Assessors (evaluator) can evaluate a call and save the evaluation.Assessors can add an evaluation with the Acknowledgement request to the Agent Work Queue in order to notify the agent of a new evaluation.Agents can view the notification of a new task in the Agent's Queue and review the evaluation in a form.Agents can select the appropriate Acknowledgement option and submit the response.If an agent chooses to Dispute the evaluation, the task is moved to the Arbitrators work queue to be reviewed.
| Note |
|---|
- Answers to questions can now Auto fail an evaluation form.
- An evaluation or arbitration is completed when an agent acknowledges it. The evaluation is moved from the In Process status and marked as complete.
|
|