The Ticketing Config window enables you to define the forms, workflows, views, settings, and display for tickets.
...
Forms
The Forms tab enables you to configure the fields that appear while creating a ticket, accounts, and contacts. Agents using the U-CRM Agent Desktop can use web forms when creating accounts, contacts, and tickets.
| Expand |
|---|
| on tickets for agents and consumers. Forms can be accessed by agents through the Agent Desktop (U-CRM) and by their customers through the Web Widget. |
The Forms tab contains the following subtabs: - Design: To Used to design the form
- Settings: To Used to create and design the appearance of the form
- Preview: To preview Used to preview your design
- Activity: To view Used to view the tickets that were created using the form
- Change History: To Used to view the history of the formchanges made to the form and who had made the changes.
|
| Expand |
|---|
|
You can On the Agent Desktop, you use a form to configure the template used for a ticket on the Agent Desktop using a form. To create and design a form: - On the Ticketing Config screen window, click the Forms tab and then click New.
The Create Form window appears.
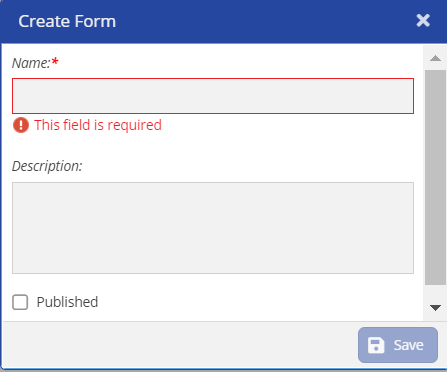 Image Removed Image Removed
- Description
Specify the values in the following fields. Field | - Name
Enter a - : Specify the name for the form.
- Description
- : Provide information about the form. This field is optional
.Enter the description of the form- .
Published
: Select
the this checkbox if you want the form to be automatically published when it is created.
Click Save.
The form is created, and the Design subtab opens.
| Expand |
|---|
| After the form appears in the Design tab. You can add fields, set styles, validate the length, and set conditions for the fields to appear in the form. The following subtabs appear when you want to add the fields to the form: - Display: You can specify the Field Type, Label, Placeholder, and Column.
Style: You can specify | Info |
|---|
- If you haven't selected the Publish checkbox while creating the form, you can opt to publish the form later. To publish the form at a later stage, from the Ticket Config > Forms window, select the checkbox next to the form, the Publish button is enabled, click Publish. The form is published and an
 Image Added icon appears in the Published column. Image Added icon appears in the Published column. - To unpublish an already published form, select the checkbox and then click Publish button. The form gets unpublished and an
 Image Added icon appears in the Published column. Image Added icon appears in the Published column.
|
Click Save.
The form is created, and the Design subtab opens.
|
| Expand |
|---|
|
After the form appears in the Design tab. You can add fields, set styles, validate the length, and set conditions for the fields to appear in the form. The following subtabs appear to add fields to the form: - Display: Specify the Field Type, Label, Placeholder, and Column.
- Style: Specify the Label Color and Font Size. You can also specify
if - whether the text should be Bold or Italic.
- Validation:
You can specify - Specify the Minimum Length and Maximum Length of the field. You
can - set the condition by choosing No, Always, and On-Conditions.
- Conditional: You can
specify if the field should be Display or Hide, select - define a condition for a field to be displayed and also set a rule as to when it must be displayed. Select the When the Form Field type, and also set the value in the Has the Value.
| Expand |
|---|
| title | DesignYou
can design the form by adding add fields, labels,
setting set the label position, create a placeholder
of the for fields, and add columns
for to the form.
To design the form:
On the New Form window, click  Image Modified.
The
Display Design subtab opens.
You can create either a stand-
alone form alone field or
associate have the
form field to be either from Accounts, Contacts, or Tickets.
To associate an entity to a form, enable Associate to Entity- You can use a field from Accounts, Contacts, or Tickets. Enable Associate to Entity option.
In the Entity field, select an Entity and then select the Field for the entity from the drop-down list.
the Entity, you must also add a field |
to select the Namefor the entity you have selected. For example, if you select the Entity as Accounts, then you must add |
another Field
specify
Account Name
if
- If you select the
FIeld - Field as Billing then in the Label text-box the Billing field appears.
- In the Label field, specify a name for the form.
- In the Label Position, select the required position from the drop-down list.
- Specify the Placeholder and then select
the - Column from the drop-down list.
Click Style and specify the Label Color and Font Size.
| Info |
|---|
If you want the font to be Bold bold or Italics italics, enable the appropriate check-boxescheckboxes. If you do not select any of the options then the font will stay remain normal. |
Click the Validation tab if you have any label constraints, you can specify that the
label field is a mandatory field or is any based on
any various conditions.
To specify the conditions for the
labelsfields, click the Conditions tab and specify the required conditions.
Click Save.
| Info |
|---|
You can edit the fields, move the fields up or down, and delete the fields using the following icons: Image Modified Image Modified buttons. |
|---|
| Expand |
|---|
|
The Settings subtab enables you to specify the Messages, Theme, Layout, and Attachments for a form You can update the window title, submit button and add the attachments using the Settings subtab. To update the settings: Specify values in the following fields.
| Field | Description |
|---|
Form Titles | Messages
Theme
- Form: Select the form color.
- Fields: Select the field color.
- Submit button: Select the Submit button color.
Layout
- Columns: Select the columns from the list.
Attachments - Enable Attachments: If you enable this option, the Attachments box appears.
Submit Button | Success Text | Error Text | | Theme |
|---|
Form | Fields | Submit Button | | Layout |
|---|
Columns | | Attachments |
|---|
Enable Attachments- Max # number of Attachments: Specify the number of attachments that you can attach.
Required
| Expand |
|---|
title | PreviewAfter updating the form, click Save. | Info |
|---|
| - If you wish to delete the updates to the form, click the Delete button.
- Click the Refresh button to view the updated changes to the form.
|
|
| Expand |
|---|
|
You can view the design updates to the form in the Preview tab. You can specify the values in the fields and test the form. to that you save the changes in the Design tab to get the latest updates in the form. |
|
| Expand |
|---|
| title | Tracking the Activities of a Form |
|---|
|
You can view the form history in the Activity tab. To view all the tickets that were created using a form: - On the Forms subtab, double-click the form for which you want to view the tickets.
The Design subtab opens. - Click the Activity subtab.
A table appears, displaying the tickets that were created using the form. The table contains the following columns:- Entity
- Number (that is, the number of the ticket)
- Created By
- Created Date
|
| Expand |
|---|
| title | Change History of the Form |
|---|
|
titleThe Change History tab contains a table with the history of all changes made to the service. The table contains the following columns. Column | Description |
|---|
| Changed By | Name of the user who modified the form | | Changed On | Date and time when the user modified the form, represented in Eastern Time | | Short Description | A short description of the modification done to the form. |
|
| Expand |
|---|
|
Workflows
You can configure a workflow for tickets so that they undergo a standard process that reduces manual work, saves time, and minimizes errors. A ticket workflow ensures that all tickets are handled in a consistent and timely manner. The Workflows tab of the Ticketing Config window enables you to configure workflows for tickets based on certain conditions when the ticket is created or updated, or when a nightly run is initiated.
| Expand |
|---|
| title | Configuring the Workflows |
|---|
|
You can configure a ticket You can configure a ticket workflow to generate any of the following events: - Send an email or SMS
- Create a work queue task
- Update a field in a ticket
- Call an API function
- Stop the workflow
The Workflows tab displays the following subtabs: Workflows: Enables enables you to create a workflow .for different ticket types, the tab consists of the following subtabs: |
| Expand |
|---|
| title | Creating and Designing a Workflow |
|---|
|
To create and design a workflow: - On
the Workflows subtab of - the Workflows tab, click New
.
The New Ticket Workflow window appears- .
- Specify values in the fields, and then click Save.
The ticket workflow is created, and the Design subtab appears. Click New Event. Specify values in the following sections, as required:
any of ickets - these events: Actions when you want the workflow to be triggered (for example, when the ticket is created or updated, or when a nightly run is initiated). If you select the Update Ticket trigger, the workflow is triggered only when a specific field in the ticket is updated.
On t- Tickets with these properties: Properties for the tickets on which you want the workflow to be applied. The default value is Always, which indicates that the workflow is applied to tickets regardless of their properties. You can modify the value by using the Edit button.
- Perform these actions: Resulting actions for the workflow, such as:
using  Image Removed Image Removed - using the delete icon
 Image Addednext to the action. Image Addednext to the action.
|
Click Save.
The workflow is designed, and the event appears on the Design subtab. | Info |
|---|
- For the same event (Create Ticket, Update Ticket, or Nightly Run), you can add another design (that is, specify additional ticket properties and actions for the workflow) by using
|
Image Removed next - the plus icon
 Image Added next to the event. Image Added next to the event. - You can modify a design by using
|
Image Removed next - the pencil icon
 Image Added next to the design. Image Added next to the design. - You can add another event by using the New Event button.
- You can delete an event by using
|
Image Removed- the delete iconImage Addednext to the event.
|
| Info |
|---|
- To filter the workflows, on the
WORKFLOWS subtab- Workflows tab, in the Filter box, specify the text based on which you want to filter the workflows.
- To modify a workflow, on the
WORKFLOWS subtab- Workflows tab, click the row displaying the workflow, and then use the Edit button.
If you want to - To apply a workflow to a ticket, you must publish the workflow. To publish a workflow, on the
WORKFLOWS subtab- Workflows tab, click the row displaying the workflow, and then click Publish.
- The Edit button is disabled for a published workflow.
- To copy a workflow, on the
WORKFLOWS subtab- Workflows tab, click the row displaying the workflow, and then click Copy. If the workflow that you copied is already published, you cannot publish the copy unless you unpublish the copied workflow.
- To unpublish a workflow, on the
WORKFLOWS subtab- Workflows tab, click the row displaying the workflow, and then click Unpublish.
- If a workflow is published, you cannot modify it unless you create another version of it. To create another version, on the
WORKFLOWS subtab- Workflows tab, double-click the row displaying the published workflow, and then click New Version. The new version of the published workflow will be in the draft state. You can publish the new version; however, doing so
will delete WORKFLOWS subtab |
|
| Expand |
|---|
| title | Viewing the Workflow Activity |
|---|
|
To view all the tickets to which a workflow was applied, on the WORKFLOWS subtab of the Workflows Workflows tab, double-click the workflow for which you want to view the tickets, and then click the Activity subtab.
A table with the tickets to which the workflow was applied appears. The table displays the following columns: - Version: Version of the workflow that was applied to the ticket.
- Executed
on- at: Date and time when the workflow was applied to the ticket.
- Ticket: Number of the ticket.
- Ticket Name: Subject of the ticket.
- Event: Event (trigger) when the workflow was applied to the ticket (that is, when the ticket was created or updated, or when a nightly run was initiated).
- Condition: Properties of the ticket
based on which - that determines if the workflow
was - is applied to the ticket. The value Always indicates that the workflow was applied to the ticket regardless of its properties.
- Action: Action resulting from the workflow.
- Action Body:
Details - Information about the action.
| Expand |
|---|
| title | Viewing the | Info |
|---|
You view the tickets using the search option, specify the Ticket Number, Start Date and Time, and End Date and Time. |
|---|
| Expand |
|---|
| title | Viewing the Workflow History |
|---|
|
titleTo view all the changes made to a workflow (including its design), on the WORKFLOWS subtab of the Workflows tab, double-click the workflow for which you want to view the changes, and then click the Change History subtab.
A table with the changes appears, displaying the following columns: Version: Version of the workflow on which the change was made.
| Info |
|---|
If any change is made to a workflow after it is published, the version of the workflow is incremented. |
- Changed on: Date and time of the change.
- Updated by: ID of the user who made the change.
Entity: Entity that was changed.
| Info |
|---|
- The value WORKFLOW indicates that the workflow was changed.
- The value TRIGGER indicates that the design of the workflow was changed.
|
Ticket Type: Section of the workflow design that was changed.
| Info |
|---|
- The value EVENT indicates that the Involves any of these events section of the design was changed.
- The value CONDITION indicates that the On tickets with these properties section of the design was changed.
- The value ACTION indicates that the Perform these actions section of the design was changed.
|
- Operation: Type of change made to the workflow (for example, create, update, publish, unpublish, or delete).
- Details: Description of the change.
|
| Expand |
|---|
|
Views
A ticket view is a customized view of a table containing tickets, intended to help you and your agents to easily segment, find, track, prioritize, or manage tickets, without the need for a manual search. You can define a ticket view based on the properties of a ticket and also define who can view or modify the ticket view.
| Expand |
|---|
| title | Types of Ticket Views |
|---|
|
The following describes the types of ticket views: Ticket views are of the following types: - Dashboard: Tickets view Ticket views of this type appear as options in the Select a predefined view field in a ticket dashboard window.
- List: Tickets Ticket views of this type appear as options in the Select a predefined view field on the Tickets tab that appears when you go to click Ticketing > Tickets on the Configure tab.
For agents and agent teams, ticket views appear as options in the Select a predefined view field in the ticket list section on their Agent Desktops.
|
| Expand |
|---|
| title | Creating and Designing a Ticket View |
|---|
|
To create and design a ticket view: - On the Views tab, on the VIEWS subtab, click New.
The New Ticket Search View window appears. Specify values in the following fields, and then click Save: - Name: Name to identify Identifies the view.
Type: Type Indicates the type of ticket display (that is, ticket dashboard or ticket list) to which the view is applicable. Description: Description Provides a description of the view. This field is optional.
The ticket view is created and is available on the VIEWS subtab. The Design tab appears to enable you to design the view.
On the Design tab, specify values in the fields of the following sections, and then click Save.
| Expand |
|---|
| title | Section Descriptions |
|---|
| Section | Description |
|---|
Specify Filter Criteria | Specify the values in the fields based on which you want the tickets to be filtered. | Restrict Editors | If you want everyone to be able to modify the ticket view, select the Everyone option. If you want only certain users to be able to modify the ticket view, select the Users option, and then, in the Available Users section, select their names, and then click Image Removed. If you do not want the selected users to be able to modify the ticket view, in the Selected Users section, select their names, and then click Image Removed. | Tip |
|---|
You can revert all your changes by clicking  Image Removed. Image Removed. |
Select Fields to Display
| Note |
|---|
This section appears if you created the ticket view for the List type. |
The items that appear in the Selected Columns section represent the columns in the table of tickets that appears when you select the ticket view. If you want to display additional columns in the ticket table, in the Available Columns section, select the names of such columns, and then click Image Removed. If you want to hide certain columns from the ticket table, in the Selected Columns section, select the names of such columns fields, and then click Image Removed. The order in which the items appear in the Selected Columns section represents the order in which they appear as columns in the ticket table. To modify the position of a column, in the Selected Columns section, drag the name of that column to the position you want. | Restrict Visibility | If you want the ticket view to be visible to everyone, select the Everyone option. If you want the ticket view to be visible to only certain users, teams, or agents, select one of the following options, and then, in the Available Users section, select their names, and then click Image Removed: - Users: Indicates that the ticket view is visible to only the selected users.
- Teams: Indicates that the ticket view is visible to only the selected agent teams.
- Agents: Indicates that the ticket view is visible to only the selected agents.
If you do not want the ticket view to be visible to the selected users, teams, or agents, in the Selected Users section, select their names, and then click Image Removed. | Tip |
|---|
You can revert all your changes by clicking Image Removed. |
The design of the ticket view is saved.
| Tip |
|---|
In the Ticketing Config window, on the Views tab, on the VIEWS subtab, you can: - Preview a ticket view by double-clicking the row displaying the view and then clicking the Preview tab.
- Modify, copy, or delete a ticket view by selecting the row displaying the view and then using Edit, Copy, or Delete, respectively.
- Modify the design of a ticket view by double-clicking the row displaying the view.
- View a summary of all changes made to a ticket view by double-clicking the row displaying the view and then clicking the Change History tab.
- Filter the ticket views by entering in the Filter box the text based on which you want to filter the views.
|
|
| Expand |
|---|
|
The Screen tab of the Ticketing Config window enables you to configure the display of the main area of a ticket and the Detail tab of a ticket for a specific ticket type.
To configure the ticket display:
To configure the display of the main area of a ticket:
On the Screen tab, on the Ticket Highlight subtab, in the Ticket Types section, select the type of ticket for which you want to configure the display.
| Tip |
|---|
You can delete a ticket type by hovering over the ticket type in the Ticket Types section and then using Image Removed. |
In the Available section, select the fields that you want to be displayed in the main area of the ticket, and then click Image Removed.
The selected fields appear in the Selected section.
In the Selected section, select the fields that you do not want to be displayed in the main area of the ticket, and then click Image Removed.
The selected fields appear in the Available section.
| Tip |
|---|
You can revert your changes by clicking the reset icon Image Removed or Refresh. |
If you want to modify the position of a field in the ticket, in the Selected section, drag the field to the position you want.
| Info |
|---|
The order in which the fields appear in the Selected section represents the order in which they appear in the ticket. |
If you want to modify the values in these columns, in the Selected section, click the cell displaying the values, and then enter the value you want.
| Tip |
|---|
- The Name, Type, and Column columns in the Selected section represent the label of the field, characteristic (data type) of the field, and the columnar position of the field in the area, respectively.
- The Required column in the Selected section indicates if a field must contain a value (mandatory field) to create or update a ticket.
- You can revert your changes by clicking Refresh.
- You can preview your changes by expanding the Preview section.
|
To configure the display of the Detail tab of a ticket:
On the Screen tab, perform step 1 on the Ticket Detail subtab.
If you want to modify the value in this column, in the Selected section, click the cell displaying the value, and then select the section you want.
| Info |
|---|
The Group column in the Selected section represents the section (for example, General or Other) on the Detail tab in which the field is displayed. |
Click Save.
The design of the ticket view is saved.
| Tip |
|---|
In the Ticketing Config window, on the Views tab, on the VIEWS subtab, you can: - Preview a ticket view by double-clicking the row displaying the view and then clicking the Preview tab.
- Modify, copy, or delete a ticket view by selecting the row displaying the view and then using Edit, Copy, or Delete, respectively.
- Modify the design of a ticket view by double-clicking the row displaying the view.
- View a summary of all changes made to a ticket view by double-clicking the row displaying the view and then clicking the Change History tab.
- Filter the ticket views by entering in the Filter box the text based on which you want to filter the views.
|
|
Managing a View
You can view your tickets by specifying the criteria in the filter Criteria tab. By default, the filter Criteriatab consists of a few fields. You can specify your choices in the fields and save the changes.
For more information on managing ticket filters, see Managing a Ticket.
| Info |
|---|
The Summary section displays the following: - Filter Criteria: All the selected criteria appear.
- Fields to Display: All the fields that are present in the Filter Criteria tab will appear.
- Restrict Editors: If the ticket contains any restricted editors, then the name will appear.
- Restrict Visibility: If the ticket contains any restricted visibility, then the name will appear.
|
Screen
The Screen tab of the Ticketing Config window enables you to configure the display of the main area of a ticket and the Detail tab of a ticket for a specific ticket type.
| Expand |
|---|
| title | Configuring the Screen Display |
|---|
|
To configure the ticket display: To configure the display of the main area of a ticket: On the Screen tab, double-click the ticket type for which you want to configure the display.
The Ticket Highlight and Ticket Detail subtabs appear for the ticket type. On the Ticket Highlight subtab, in the Available section, select the fields that you want to be displayed in the main area of a ticket, and then click the right arrow icon  Image AddedThe selected fields appear in the Selected section. Image AddedThe selected fields appear in the Selected section. | Tip |
|---|
You can filter the fields in the Available section using the Filter box. |
In the Selected section, select the field that you do not want to be displayed in the main area of the ticket, and then click the left arrow icon  Image Added.The selected field is removed from the Selected section, and it appears in the Available section. Image Added.The selected field is removed from the Selected section, and it appears in the Available section. To define the position of a field in a ticket, in the Selected section, drag the field to the desired position. | Info |
|---|
The order in which the fields appear in the Selected section represents the order in which they appear in a ticket. |
To modify the properties of the selected fields, in the Selected section, click the cell containing the property you want to modify, and then specify the desired property. | Info |
|---|
- You can revert your changes by clicking Reset.
- You can preview your changes by expanding the Preview section.
|
To configure the display of the area on the Detail tab of a ticket, perform the previous step on the Ticket Detail subtab. | Info |
|---|
The Group column in the Selected section represents that section on the Detail tab in which the field appears (for example, Description, General, or Scope). You can modify the value in this column by clicking the cell displaying the value and then selecting the desired section. |
- Click Save.
The display of the main area and the area on the Detail tab of a ticket for the selected ticket type is configured.
|
Permissions
Permissions allow managers to determine which agents have access to which Ticket Forms, either by agent team or at the desktop level.
| Expand |
|---|
|
To add a permission: - Click the Edit button.
The Editor window appears.
- Select a Label from the drop-down list.
- Select a Permission from the drop-down list.
- Select the Users or Team, or Agents option.
- From the Available box, select and move the User/Team/Agent to the Selected box.
- Click Save.
A new permission is added to the Permissions tab. | Info |
|---|
- If you have selected Label and have not selected any user, by default, the tickets of this type are visible to all users.
- To modify user permission, select and double-click on the permission from the Permissions tab, modify the user rights and then click Save.
|
|
Status Rules
You can change the status of a ticket using the Label, Ticket Type, and Status parameters on the Status Rules tab. You can change the current of the tickets to the available status.
| Expand |
|---|
| title | Managing the Status Rules |
|---|
|
To manage a status of a ticket: - Click the Edit button.
The Editor window appears.
- Select a Label, Ticket Type, and Status from the drop-down list.
- Select the status from the Available box and move it to the Selected box.
Click Save.
A new status rule is added to the tab. | Info |
|---|
To modify an existing status rule, double-click the rule and select the status and then modify the status in the Editor window, click Save. |
|
Settings
The Settings tab enables you to define how a ticket and associated fields are uploaded to LiveVox. You can define the acceptable values for different fields within ticketing.
| Expand |
|---|
|
You can update the following options in the General section: | Expand |
|---|
| If you want a ticket that already exists in LiveVox to be overwritten when the same ticket is uploaded to LiveVox, in the General section, select the Bulk Ticket Upload checkbox. Otherwise, clear the checkbox. |
| Expand |
|---|
| title | Mentions to Followers |
|---|
| If you want to communicate to the ticket followers about updates made to the ticket, in the General section, select the Mentions to Followers checkbox. You enable that when an agent is assigned to a ticket they automatically are added as a follower of a ticket and will get all updates on the ticket. |
|
| Expand |
|---|
|
You can categorize the tickets using labels. When you create a label and attach the label for the tickets, it is easier to update the tickets based on the selected labels. Each of the labels that you create is displayed as an option in the Label field of a ticket. To create a label: On the Settings tab, in the Labels section, click New.
The New Label window appears.
| Info |
|---|
A label is case sensitive, you have to specify the ticket using the uppercase case, number, and underscore when creating a label. |
- In the Please enter label name field, enter a prefix for the label, and then click Save.
The label is created, and it appears in the Labels section. This label appears as an option in the Label field of a ticket.
| Tip |
|---|
- If you do not want a label to appear as an option in the Label field of a ticket form that is used by the customers then in the Labels section, in the row displaying the label, clear the Public checkbox.
- If you want to set a label as the default value in the Label field of a ticket, in the Labels section, in the row displaying the label, select the Default option.
- The order in which the types appear in the Labels section represents the order in which they appear in the dropdown as options in the Label field of a ticket. You can modify the position of a label by dragging the name of the label in the Labels section to the desired position.
- In the Labels section, you can:
- Modify the prefix, name, or description of a label by clicking the Prefix, Name, or Description cell in the row displaying the label and then entering the value you want.
- Search for a label by entering the partial or complete prefix of the label in the Filter box.
- Delete a label by hovering over the row displaying the label and then clicking the delete iconImage Added.
|
|
| Expand |
|---|
| title | Specifying a Label Component for the Label |
|---|
|
You can categorize a label at the component level. To create a label component: |
Click Save.
The display configuration of a ticket for the selected ticket type is saved.| Expand |
|---|
|
| Expand |
|---|
|
| Expand |
|---|
|
The Settings tab enables you to define the behavior of the loading process of tickets and their fields. | Expand |
|---|
| title | Defining the Bulk Ticket Upload Process |
|---|
| If you want a ticket that already exists in LiveVox to be overwritten when the same ticket is uploaded to LiveVox, in the General section, select the Bulk Ticket Upload checkbox. Otherwise, clear the checkbox. |
| Expand |
|---|
|
| title | Defining Priorities and Their SLAs |
|---|
|
The priority of a ticket indicates the level of urgency and helps you specify the work order of the tickets.
You can define the options that appear in the Priority field of a ticket by creating ticket priorities. Each of the priorities that you create is displayed as an option in the Priority field of a ticket. By default, the following priorities are available for each ticket type: High, Medium, and Low. You can, however, modify these priorities.
You can also define the service-level agreement (SLA) limit for a ticket priority.
| Info |
|---|
SLA metrics can be monitored on the ticket dashboard. |
To create a priority and define its SLA:
On the Settings tab, in the Priorities section, click New.
The New window appears.In the Please enter priority name field, enter a name for the priority, and then click Save.
The priority is created, and it appears in the Priorities section.
| Info |
|---|
This priority appears as an option in the Priority field of a ticket. |
In the row displaying the priority, click the Icon cell, and then select the icon by which you want to represent the priority.If you want to define the service-level agreement (SLA) hours for the priority, in the row displaying the priority, click the SLA Hours cell, and then enter the value you want.
| Tip |
|---|
If you want the SLA hours to include Saturdays or Sundays, select the Include Saturday or Include Sunday checkbox, respectively. |
| Tip |
|---|
If you do not want a priority to appear as an option in the Priority field of a ticket, in the Priorities section, in the row displaying the priority, clear the Public checkbox.If you want to set a priority as the default priority in the Priority field of a ticket, in the Priorities section, in the row displaying the priority, select the Default option.The order in which the priorities appear in the Priorities - On the Settings tab, in the Label Components section, click New.
The New Component window appears. In the Please enter label name field, enter a prefix for the label, and then click Save.
The label component is created, and it appears in the Label Component section. This component appears as an option in the Components field of a ticket when the associated label is selected in the Label field.
| Tip |
|---|
- If you do not want a component to appear as an option in the Components field of a ticket form that is available for your customer's use, in the Components section, in the row displaying the component, clear the Public checkbox.
- The order in which the types appear in the Components
|
- section represents the order in which they appear as options in
|
the Priority - the Components field of a ticket. You can modify the position of a
|
priority by dragging - component by dragging the name of the
|
priority in the Priorities section - component in the Components section to the position you want.
- In the
|
Priorities
a priority
the
cell - cell in the row displaying
|
the priority - the component and then entering the name you want.
- Search for
|
a priority
in the Filter box - the partial or complete name of the component in the
|
priority
a priority - a component by hovering over the row displaying
|
the priority
using Image Removed- clicking the delete iconImage Added.
|
| Expand |
|---|
| Defining Statuses | The status of a ticket indicates the progress of a ticket towards completion or resolution. |
You can define the options that appear in the Status field of a ticket by creating ticket statuses. Each of the statuses that you create is displayed as an option in the Status field of a ticket. By default, the following priorities are available for each ticket type: Open, In Progress, and Closed. You can, however, modify these statuses.To create a status:add followers to the ticket. When you add the followers, they are notified by email of any updates or changes to the ticket. - On the Settings tab, in the
Status - Followers section, click New.
The New Followers window appears.
In the Please enter status name field, enter a name for the statusSelect the follower's name from the drop-down list, and then click Save
.
The status is created, and it appears in the Status section. This status appears as an option in the Status field of a ticket.| Tip |
|---|
- If you do not want a status to appear as an option in the Status field of a ticket, in the Status section, in the row displaying the status, clear the Public checkbox.
- If you want a comment to be added to a ticket when the ticket moves to a given status, in the Status section, in the row displaying that status, select the Requires Comment checkbox.
- If you want a ticket to be closed when it moves to a given status, in the Status section, in the row displaying that status, select the Closes Ticket checkbox.
- The order in which the statuses appear in the Status section represents the order in which they appear as options in the Status field of a ticket. You can modify the position of a status by dragging the name of the status in the Status section to the position you want.
- In the Status section, you can:
- Modify the name of a status by clicking the Name cell in the row displaying the status and then entering the name you want.
- Search for a status by entering in the Filter box the partial or complete name of the status.
- Delete a status by hovering over the row displaying the status and then using Image Removed.
|
| Expand |
|---|
| title | Defining Labels.
The Followers list is created, and it appears in the Label Follower's section.
|---|
| Expand |
|---|
|
In a ticket, you can link tickets, KB (Knowledge Base articles), or URL to a ticket so that it appears in the Links tab of a ticket. You can create the pre-defined status in the Link Types section by specifying the name (status) inward description (enhancing the status description), and the outward description (this description appears in the Links tab of a ticket). - On the Settings tab, in the Types section, click New.
The New Link Types window appears.
Specify the Link Type name, Inward Description, and Outward Description. - Click Save.
The types list is created, and it appears in the Link Types section.
|
| Expand |
|---|
| title | Defining Priorities and Their SLAs |
|---|
|
The priority of a ticket indicates the level of urgency and helps you specify the work order of the tickets. You can define the options that appear in the Label Priority field of a ticket by creating ticket labelspriorities. Each of the labels priorities that you create is displayed as an option in the Priority field of a ticket. By default, the following priorities are available for each ticket type: High, Medium, and Low. You can, however, modify these priorities. You can also define the service-level agreement (SLA) limit for a ticket priority.
| Info |
|---|
You can monitor the SLA metrics on the ticket dashboard Label field of a ticket. |
To create a labelpriority and define its SLA: - On the Settings tab, in the
Labels section, click New.
The New window appears.In the Please enter label name field, enter a prefix for the label, and then click Save.
- Priorities section, click New.
The New window appears. In the Please enter priority name field, enter a name for the priority, and then click Save.
The priority is created, and it appears in the Priorities section.
| Info |
|---|
This priority appears as an option in the Priority field of a ticket. |
- In the row displaying the priority, click the Icon cell, and then select the icon that you want to represent the priority.
To define the service-level agreement (SLA) hours for the priority, in the row displaying the priority, click the SLA Hours cell, and then enter the desired value.
| Tip |
|---|
If you want the SLA hours to include Saturdays or Sundays, select the Include Saturday or Include Sunday checkbox, respectively |
The label is created, and it appears in the Labels section. This label appears as an option in the Label field of a ticket
| Tip |
|---|
label - priority to appear as an option in the
Label - Priority field of a ticket, in
the Labels section- the Priorities section, in the row displaying the
label- priority, clear the Public checkbox.
- If you want to set a
label value Label - Priority field of a ticket, in the
Labels - Priorities section, in the row displaying the
label- priority, select the Default option.
- The order in which
the types - the priorities appear in the
Labels - Priorities section represents the order in which they appear as options in
the Label - the Priority field of a ticket. You can modify the position of a
label dragging label section Labels - Priorities section to the desired position
you want Labels - Priorities section, you can:
prefix, , or description a label the Prefix, Name, or Description cell - the Name cell in the row displaying
the label - the priority and then entering
the value you want a label in Filter box the prefix of the label- name of the priority in the Filter box .
- Delete
a label - a priority by hovering over the row displaying
the label using Image Removed- clicking the delete iconImage Added.
|
|
| Expand |
|---|
|
The status of a ticket indicates the progress of a ticket towards completion or resolution. ComponentsYou can define the options that appear in the Components the Status field of a ticket by creating ticket componentsstatuses. Each of the components statuses that you create for a label is displayed as an option in the Components Status field of a ticket for the associated label. By default, the following priorities are available for each ticket type: Open, In Progress, and Closed. You can modify these statuses. To create a component for a labelstatus: - On the Settings tab, in the
Components section, in the drop-down list box, select the label for which you want to create a component, and then click- Status section, click New.
The New window appears. - In
the - the Please enter
component - status name field, enter a name for the
component- status, and then click Save.
The
component - status is created
for the label- , and it appears in the
Components - Status section. This status appears as an option in the Status field of a ticket.
| Tip |
|---|
- If you do not want a status to appear
component appears Components field of a ticket when the associated label is selected in the Label field.- Status field of a ticket, in the Status section, in the row displaying the status, clear the Public checkbox.
- If you want a comment to be added to a ticket when the ticket moves to a given status, in the Status section, in the row displaying that status, select the Requires Comment checkbox.
- If you want a ticket to be closed when it moves to a given status, in the Status
| Tip |
|---|
If you do not want a component to appear as an option in the Components field of a ticket, in the Components - section, in the row displaying
the component clear the Public checkbox- select the Closes Ticket checkbox.
- The order in which
the types the Components - the Status section represents the order in which they appear as options in the
Components - Status field of a ticket. You can modify the position of a
component by dragging - status by dragging the name of the
component in the Components section - status in the Status section to the desired position
you want Types a component the cell - cell in the row displaying
the component - the status and then entering
the you want a component in Filter box the - partial or complete name of the status in the
component a component - a status by hovering over the row displaying
the component using Image Removed- clicking the delete iconImage Added.
|
|
| Expand |
|---|
|
You can define the options that appear in the Type field of a ticket by creating ticket types. Each of the ticket types that you create is displayed as an option in the Type field of a ticket. To create a ticket type: On the Configure tab, go to Ticketing > Tickets Config.
The Ticketing Config window appears.- On the Settings tab, in the Types section, click New.
The New window appears. - In the Please enter type name field, enter a name for the type, and then click Save.
The type is created, and it appears in the Types section. This type appears as an option in the Type field of a ticket.
| Tip |
|---|
- If you do not want a type to appear as an option in the Type field of a ticket, in the Types section, in the row displaying the type, clear the Public checkbox.
- The order in which the types appear in the
Types - Types section represents the order in which they appear as options in the Type field of a ticket. You can modify the position of a type by dragging the name of the type in the Types section to the desired position
you want- .
- In the Types section, you can:
- Modify the name of a type by clicking the Name cell in the row displaying the type and then entering the new name
you want.- Search for a type by entering
in Filter box the - partial or complete name of the type in the Filter box.
- Delete a type by hovering over the row displaying the type and then
using Image Removed- clicking the delete iconImage Added.
|
|