| Section | |||||||||||||||||||||||||||||||||||||||||||||||||||||||||||||||||||||||||||||||||||||||||||||||
|---|---|---|---|---|---|---|---|---|---|---|---|---|---|---|---|---|---|---|---|---|---|---|---|---|---|---|---|---|---|---|---|---|---|---|---|---|---|---|---|---|---|---|---|---|---|---|---|---|---|---|---|---|---|---|---|---|---|---|---|---|---|---|---|---|---|---|---|---|---|---|---|---|---|---|---|---|---|---|---|---|---|---|---|---|---|---|---|---|---|---|---|---|---|---|---|
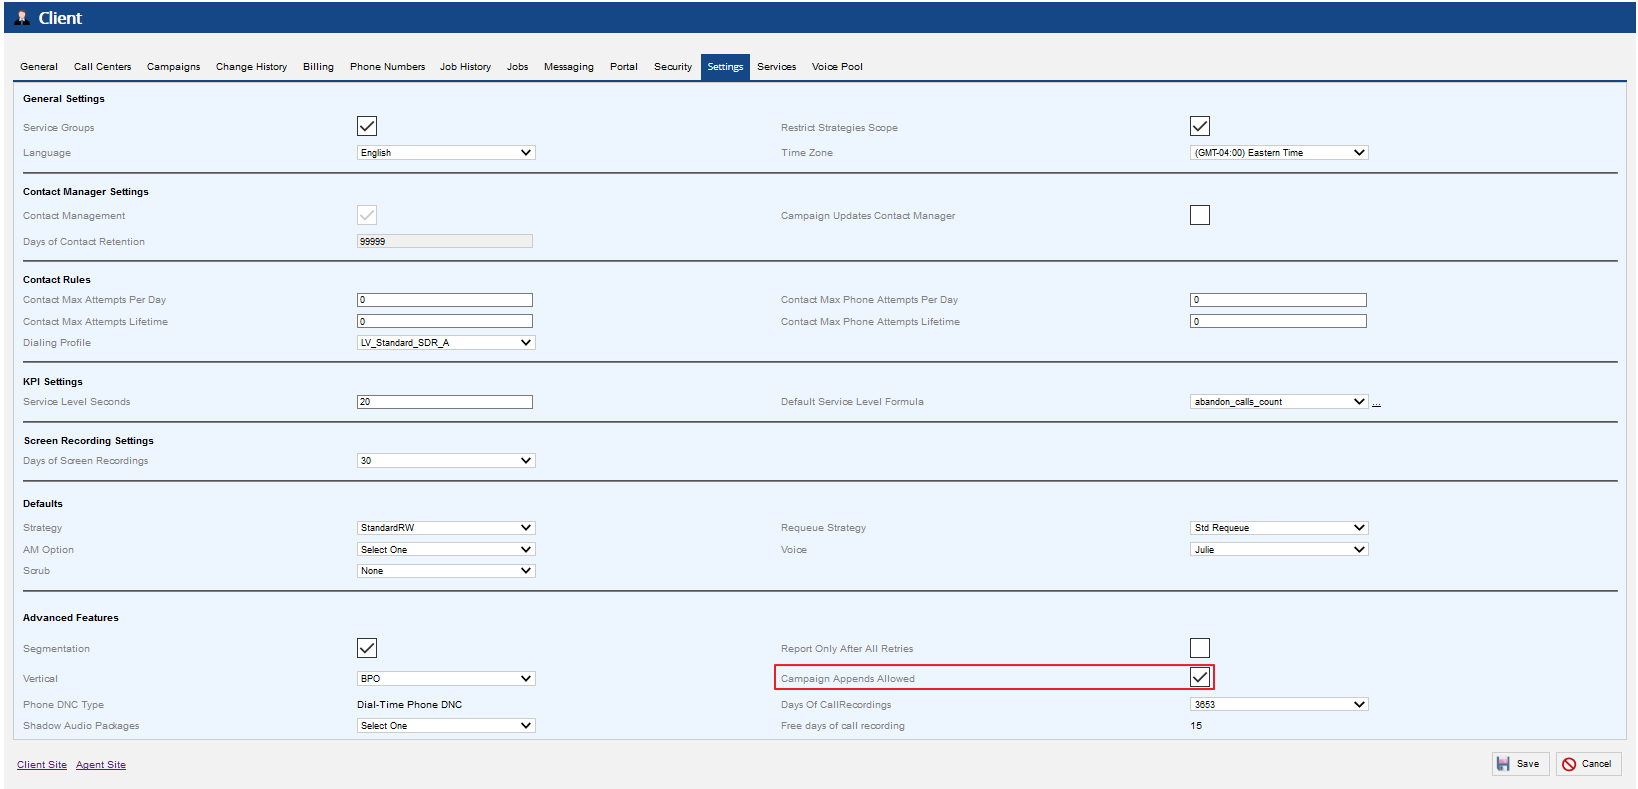
To allow appending on a campaign, follow the procedure below:
If you enable the Allow Append feature for a Campaign, the campaign displays Campaign files with campaign append allowed display a green checkmark in the Allows Append column in of the Campaigns editorsection. You You must enable the “Allow Append” Allow Append column view through the Customize Campaigns Grid configuration option as this is not visible in the default Campaigns view.Figure 9:
The Allow Append columnThis option is also viewable in the Campaign details screen . This attribute is displayed as read only.Figure 10: Allow Append option read onlybut cannot be modified.
- Service editor settingsAnchor |
|


| Info | ||
|---|---|---|
| ||
Appending records to active campaigns uses the Append Campaign Record API method. For more information on using LiveVox APIs, see the Developer Portal. Follow the procedure below to append new records to campaigns.
Anchor eus eus
1. Establish User Session
| eus | |
| eus |
To append records, you must establish an API user session with the LiveVox platform. This is required because it returns a 'session Id' which must be passed with every subsequent API call. The session API requires three elements to log in – client name, username, and password. The session API accepts both User and Agent credentials.
User accounts can access the LiveVox voice portal (LVP) https://login.livevox.com, which allows them to perform administrative tasks on the platform. Agent accounts are used to log into the ACD to make and receive calls. For this section, a user account is required. To determine if you are using a user or agent account, log in to the LiveVox Portal. If you can log in to the LiveVox portal, you can log in to the LiveVox APIs as a user. If you are unable to log in to the LiveVox Platform, contact customercare@livevox.com for help in troubleshooting the issue.
| Note |
|---|
| Only Sysadmin, Superuser and Manager user role types can append records. |
Once the API request is made, a response containing the 'session id' and the client id to be used in subsequent requests is returned.
Anchor fci fci
2. Find the Campaign ID
| fci | |
| fci |
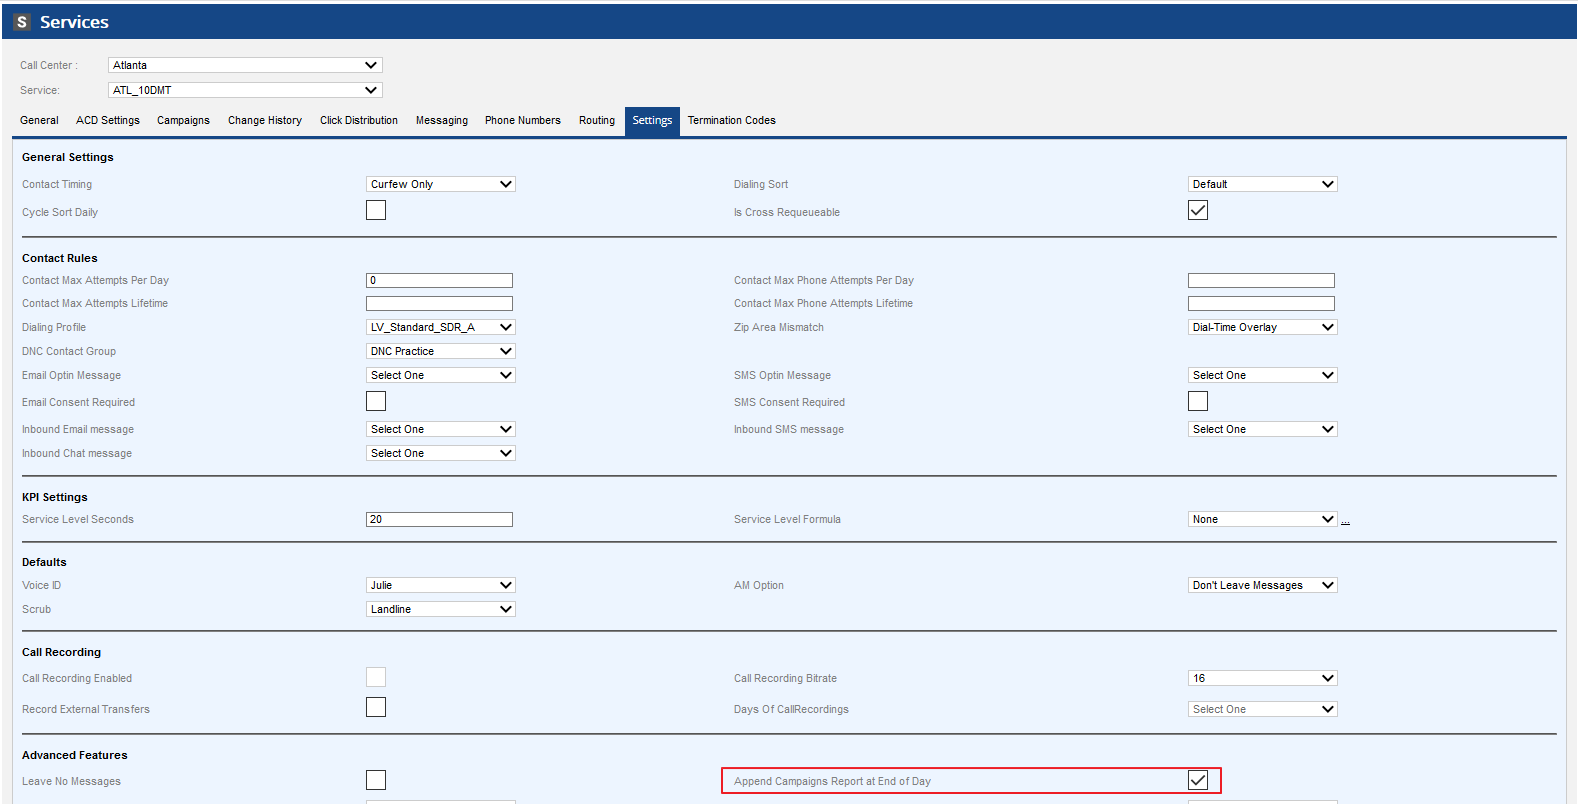
Before
Figure 11: Append Campaign Report at End of Day in Services editor
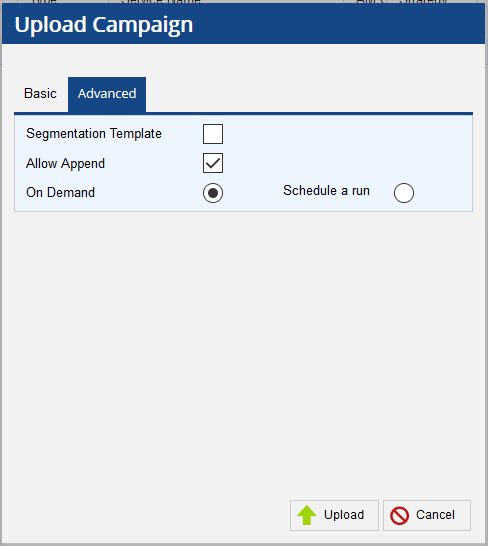
Appending a new campaign file
Upload a campaign file
Note : Detailed instructions on uploading a campaign and assigning dialing characteristics are available in the User Guide on User Hub. The upload a file option is available once navigated to the Campaigns section by electing Configure > Campaigns > Campaigns from the Navigation Panel.
Figure 12: Uploading a campaign file with Allow Append
Find the Campaign ID
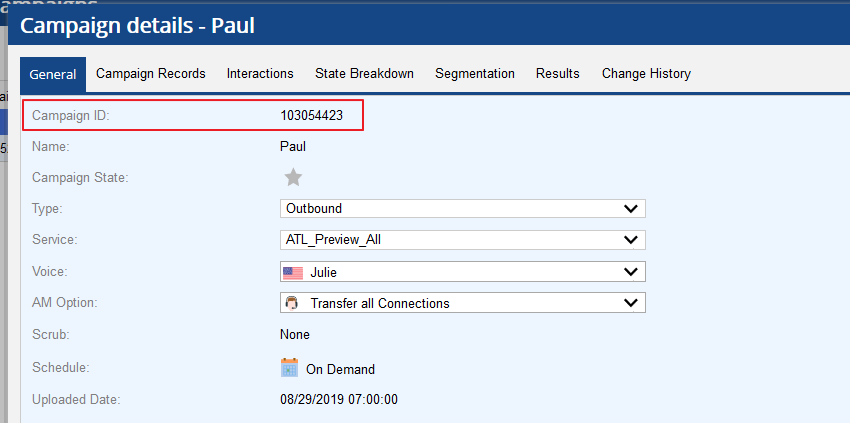
Locating the Campaign ID to be used for the Append Campaign API is a key step. The Find Matching Campaigns API is available for this. Please note, that prior to using the Find Matching Campaigns API, the campaign must first have a Campaign ID in on the platform. This is achieved by first You can generate a Campaign ID by loading the initial file into the platform. Once the file is loaded, the Campaign ID is generated as shown below on the General tab of the Campaign details.
Figure 13: Sample Campaign ID and Service ID displayed in Campaign Details
Alternately, the Campaign ID can be retrieved using the 'Find Matching Campaigns' API method.
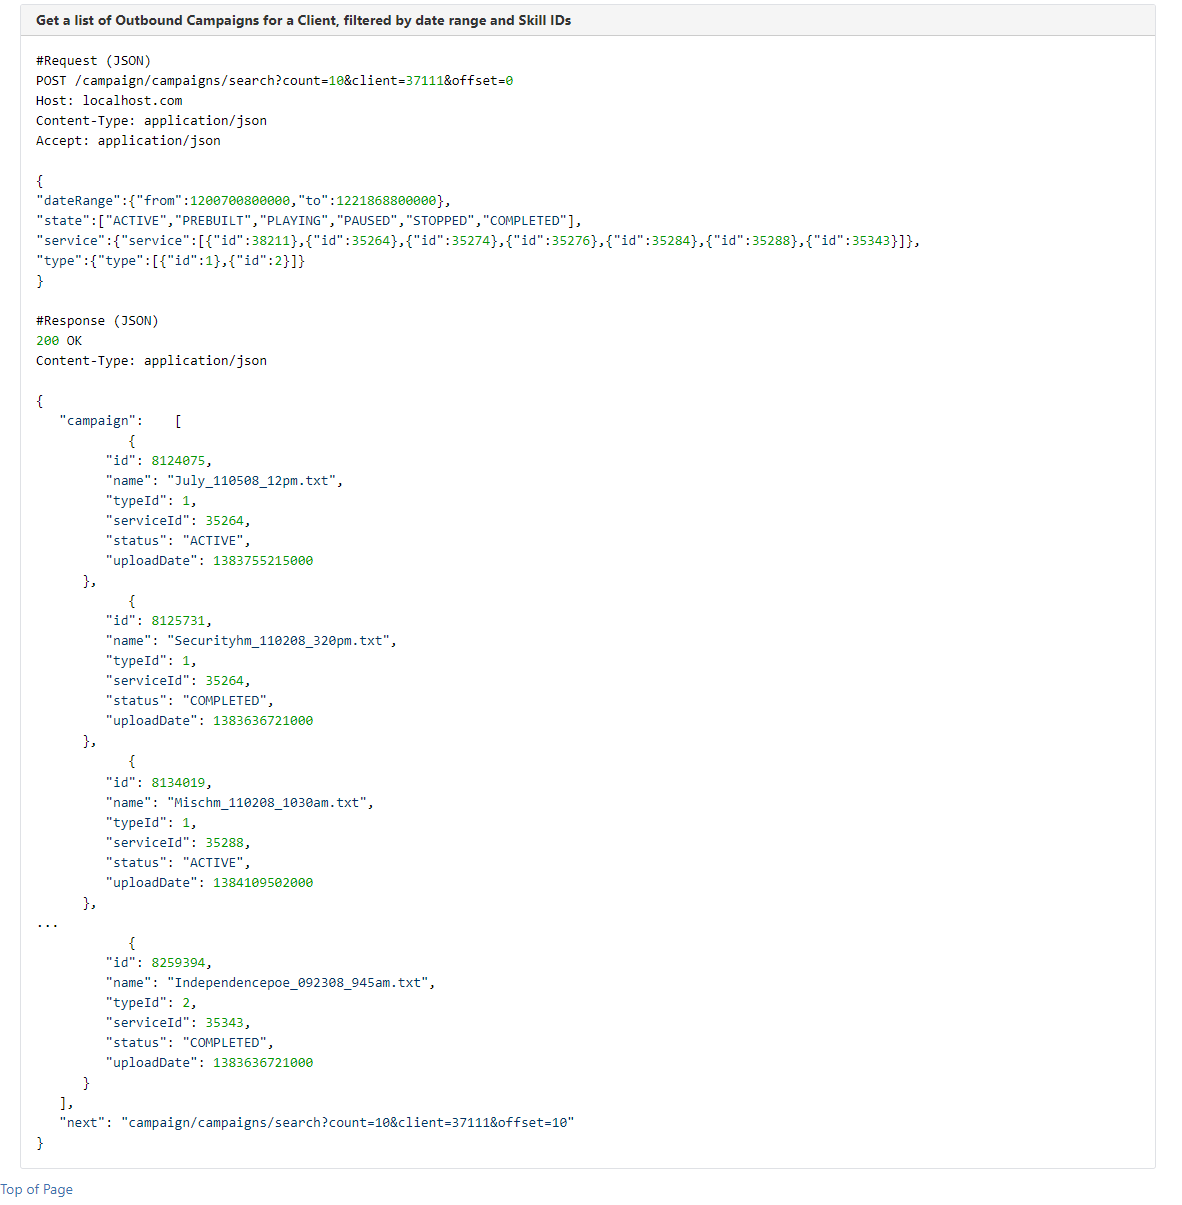
To A typical way to locate the appropriate Campaign ID is to load the initial file at a certain time of day and then use using the Find Matching Campaigns API to perform a search by against the time and Service ID associated with the target campaign. You may can also supply the expected campaign state and type when searching as well. This will provide provides the Campaign ID to use in subsequent append requests to that campaign.
Figure 14: Find Matching Campaign ID request
Set the "LV-Access" token to the LiveVox supplied token and the "LV-Session" token to the session id retrieved from the Session Login API. Search for campaigns for client id limited to only 10 records at a time. Specified Specify the date Range range with a 15-minute interval in the "from" and "to" element. The "from" and "to" values are in number of milliseconds since Epoch and use uses a third-party site, https://currentmillis.com, to aide aid in generating the values. The "state" element is set to match the possible states we expect the campaign to be in when performing the search. The "service" element contains the Service ID that the campaign is configured for in the platform (See Figure 13). The "type" is set to a "1" for Outbound.
From the Response, we should receive the Campaign ID in the "campaign" array under the "id" element. This id ID is to be used for the append operation. The following is an example of the Request and Response.
Figure 15: Campaign ID
Append Record to Campaign
Anchor arc arc
3. Append Records to a Campaign
| arc | |
| arc |
After you generate the Campaign ID, you can append records to the target campaign. In addition to the LV-Session API tokenOnce the Campaign ID has been obtained, the next step is to append a record to the campaign. Along with the typical inputs of the "LV-Access" and "LV-Session" tokens, the Campaign ID must be included as a URL parameter in the HTTP PUT request along with a simple record containing (at minimum) a phone number. Only the "phone1" element is required by the Append Record to Campaign API, but additional information such as account number, names, email, etc. can be submitted in a real-world scenario.
Figure 16: Append campaigns example request
.
| Note |
|---|
As a best practice, it is beneficial to append records with "phone1" and the "account" for screen pop and reporting purposes. Additional fields can be added as needed to further identify the appended records. |
You can You may enter additional phone numbers using the phone2 field. This should be entered as an array of phone numbers. This field can be filled with up to 30 additional phone numbers separated by a comma. In this example, two additional phone numbers are added to the appended record. The following is the code in JSON for the phone2 field.an example of the Request and Response.
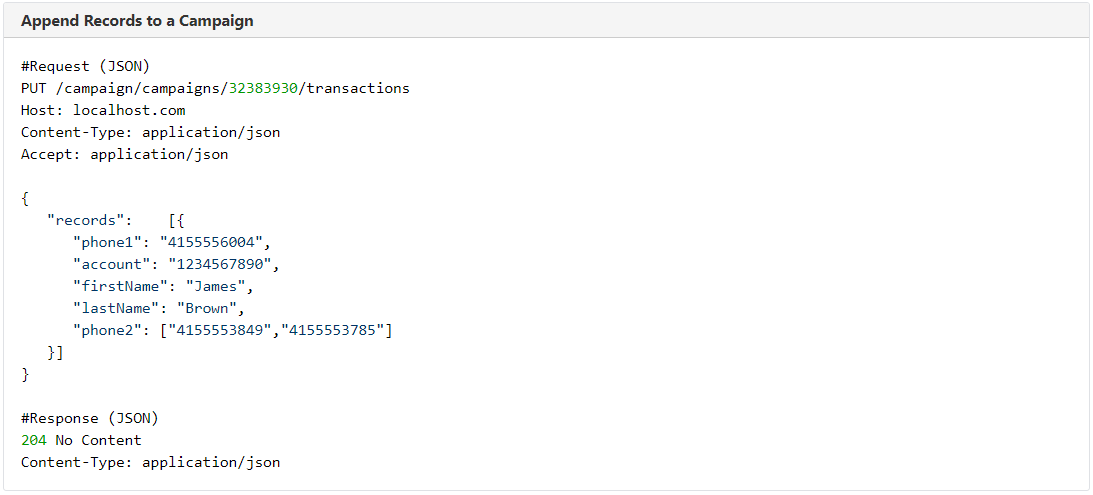 Figure 17: phone2 field
After submitting the append request, a Status status code of 204 should be returned indicating the record has been successfully added to the campaign.
Figure 18: Successfully appended campaign message
Anchor var var
4. View
Viewing | var | |
| var |
Appended Records
To view your appended records on the selected campaign, navigate to the Campaign details screen and select the Campaign Records tab. You will be able to view a new record, including newly added phone numbers on the Phone 2 column.
Figure 19: Appended record in Campaign Details screen
[1] For append automation support please contact your Account Manager or LiveVox Client Services. They can coordinate a daily upload enabling the Allow Append flag as a seed campaign for the target service or services.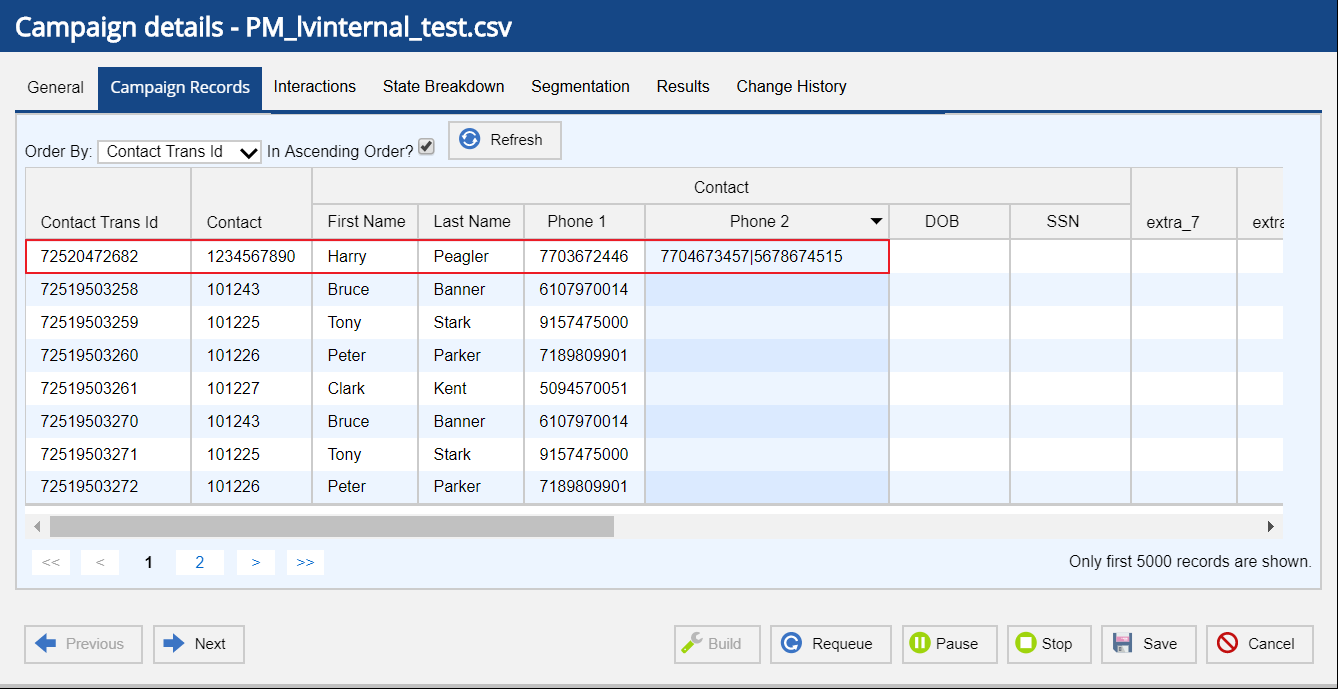
Real-Time Statistics for Appended Campaign
Real-time campaign statistics are updated to reflect the appended campaign records within the LiveVox Portal. The below list provides the cumulative list of all the fileds on the various campaign monitor panels. Each configured campaign monitor panel will display only the relevant fields applicable to it.
- Uploaded: Number of records uploaded in original campaign and all records appended in the campaign
- Loaded: Number of valid records in original campaign and all records appended in the campaign
- Completed: Number of dialed records
- Remaining: Number of records yet to be dialed
- % Completed: The percentage of records that have completed dialing.
- Total: Total number of valid records in the original campaign and all records that are appended in the campaign.
- % Done: The percentage of records that have completed dialing.
| Info | ||
|---|---|---|
| ||
Loaded and Uploaded values are updated regardless of whether the campaign is playing or not. |
| Noprint |
|---|