Page tree

Versions Compared

Key

  • This line was added.
  • This line was removed.
  • Formatting was changed.

...

Expand
titleForms

The Forms tab enables you to configure the fields that appear on tickets for agents and consumers. Forms can be accessed by agents through the Agent Desktop (U-CRM) and by their customers through the Web Widget.

The Forms tab contains the following subtabs:

  • Design: To design the form
  • Settings: To create and design the appearance of the form
  • Preview: To preview your design
  • Activity: To view the tickets that were created using the form
  • Change History: To view the history of the form


Enter a
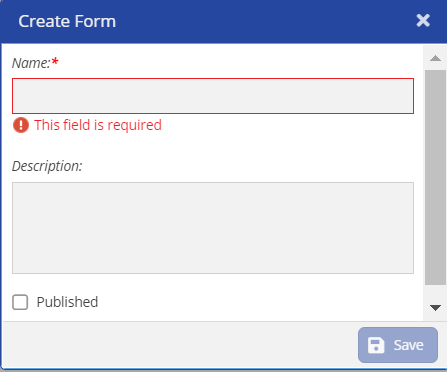
  1. Name: You can specify the name for the form.
  1. Description: You can specify the Description for the form. This field is optional
.Enter the description of the form
  1. .
  2. Published
  1. : Select the checkbox if you want the form to be automatically published when it is created.
  • Click Save.
    The form is created, and the Design subtab opens.

  • Expand
    titleCreating a Form

    You can configure the template for a ticket on the Agent Desktop using a form. 

    To create and design a form:

    1. On the Ticketing Config screen, click the Forms tab and then click New.
      The Create Form window appears.
      Image Removed
    2. Specify the values in the following fields.

      Field


    Description Name Description


    Expand
    titleDesign

    After the form appears in the Design tab. You can add fields, set styles, validate the length, and set conditions for the fields to appear in the form.

    The following subtabs appear when you want to add the fields to the form:

    • Display: You can specify the Field Type, Label, Placeholder, and Column.
    • Style: You can specify the Label Color and Font Size. You can also specify if the text should be Bold or Italic.
    • Validation: You can specify the Minimum Length and Maximum Length of the field. You can set the condition by choosing No, Always, and On-Conditions.
    • Conditional: You can specify if the field should be Display or Hide, select the When the Form Field type, and also set the value in the Has the Value.

    You can design the form by adding fields, labels, setting the label position, a placeholder of the fields, and columns for the form. 

    To design the form:

    1. On the New Form window, click .
      The Display subtab opens.

    2. You can create either a stand-alone form or associate the form to Accounts, Contacts, or Tickets.

      1. To associate an entity to a form, enable Associate to Entity.
      2. In the Entity field, select an Entity and then the Field from the drop-down list.

        Info

        If you select the Entity, you must also add a field to select the Name. For example, you select the Entity as Accounts, then you must add another Field to specify the Account Name.


      3.  if you select the FIeld as Billing then in the Label text-box the Billing appears.
      4. In the Label Position, select the required position from the drop-down list.
      5. Specify the Placeholder and then select the Column from the drop-down list.
    3. Click Style and specify the Label Color and Font Size.

      Info

      If you want the font to be Bold or Italics, enable the appropriate checkboxes. If you do not select any of the options then the font will stay normal.


    4. Click the Validation tab if you have any label constraints, you can specify the label is a mandatory field or is any based on any conditions.

    5. To specify the conditions for the labels, click the Conditions tab and specify the required conditions. 

    6. Click Save.

      Info

      You can edit the fields, move up or down, and delete the fields by using the following icons:.


    1. Form Titles

    1. : Specify

    the
    1. a form title.

    2. Submit Button

    1. Specify the text for the button.

    2. Success Text
    This
    1. : This message will be displayed when creating a ticket.
    2. Error Text
    Specify
    1. : Specify the error message.
      Theme
    2. Form
    1. Select the form color.
    2. Fields
    1. Select the field color.
    2. Submit Button
    1. Select the submit button color.
      Layout
    2. Columns
    Select
    1. : Select the columns from the list.
      Attachments
    2. Enable Attachments
    If
    1. : If you enable this option, the attachments box appears.
    2. Max # number of Attachments
    Specify
    1. : Specify the number of attachments that you can attach.
    2. Required

    Enable
    1. : Enable this option if the attachments are mandatory.


    Expand
    titleSettings

    You can update the window title, submit button and add the attachments using the Settings subtab.

    To update the settings:

    1. Specify values in the following fields.

    FieldDescription


    Expand
    titlePreview

    You can view the design updates to the form in the Preview tab. You can specify the values in the fields and test the form.

    Note

    Ensure to save the changes in the Design tab to get the latest updates in the form.


    Expand
    titleActivity

    To view all the tickets that were created using a form:

    1. On the Forms subtab, double-click the form for which you want to view the tickets.
      The Design subtab opens.
    2. Click the Activity subtab.
      A table appears, displaying the tickets that were created using the form. The table contains the following columns:
      • Entity
      • Number (that is, the number of the ticket)
      • Created By
      • Created Date


    Expand
    titleChange History

    The Change History tab contains a table with the history of all changes made to the service. The table contains the following columns.

    Column

    Description

    Changed ByName of the user who modified the form
    Changed OnDate and time when the user modified the form, represented in Eastern Time
    Short Description

    A short description of the modification done to the form.


    ...