This document provides an overview of the new features and enhancements to existing features of the LiveVox User Portal in the LiveVox U13 release. New Features in LiveVox U13 User PortalThis section describes the new features in the LiveVox U13 release. Blocking Inbound Caller IDsThe Block Caller ID editor allows you to create and manage entries to block inbound unwanted caller. You can block inbound caller IDs for a specified duration. In addition, you can add, remove, import, export, and search for inbound caller IDs. Navigate to Configure > Voice < Block Caller ID option, you are presented with the following Block Caller ID editor. 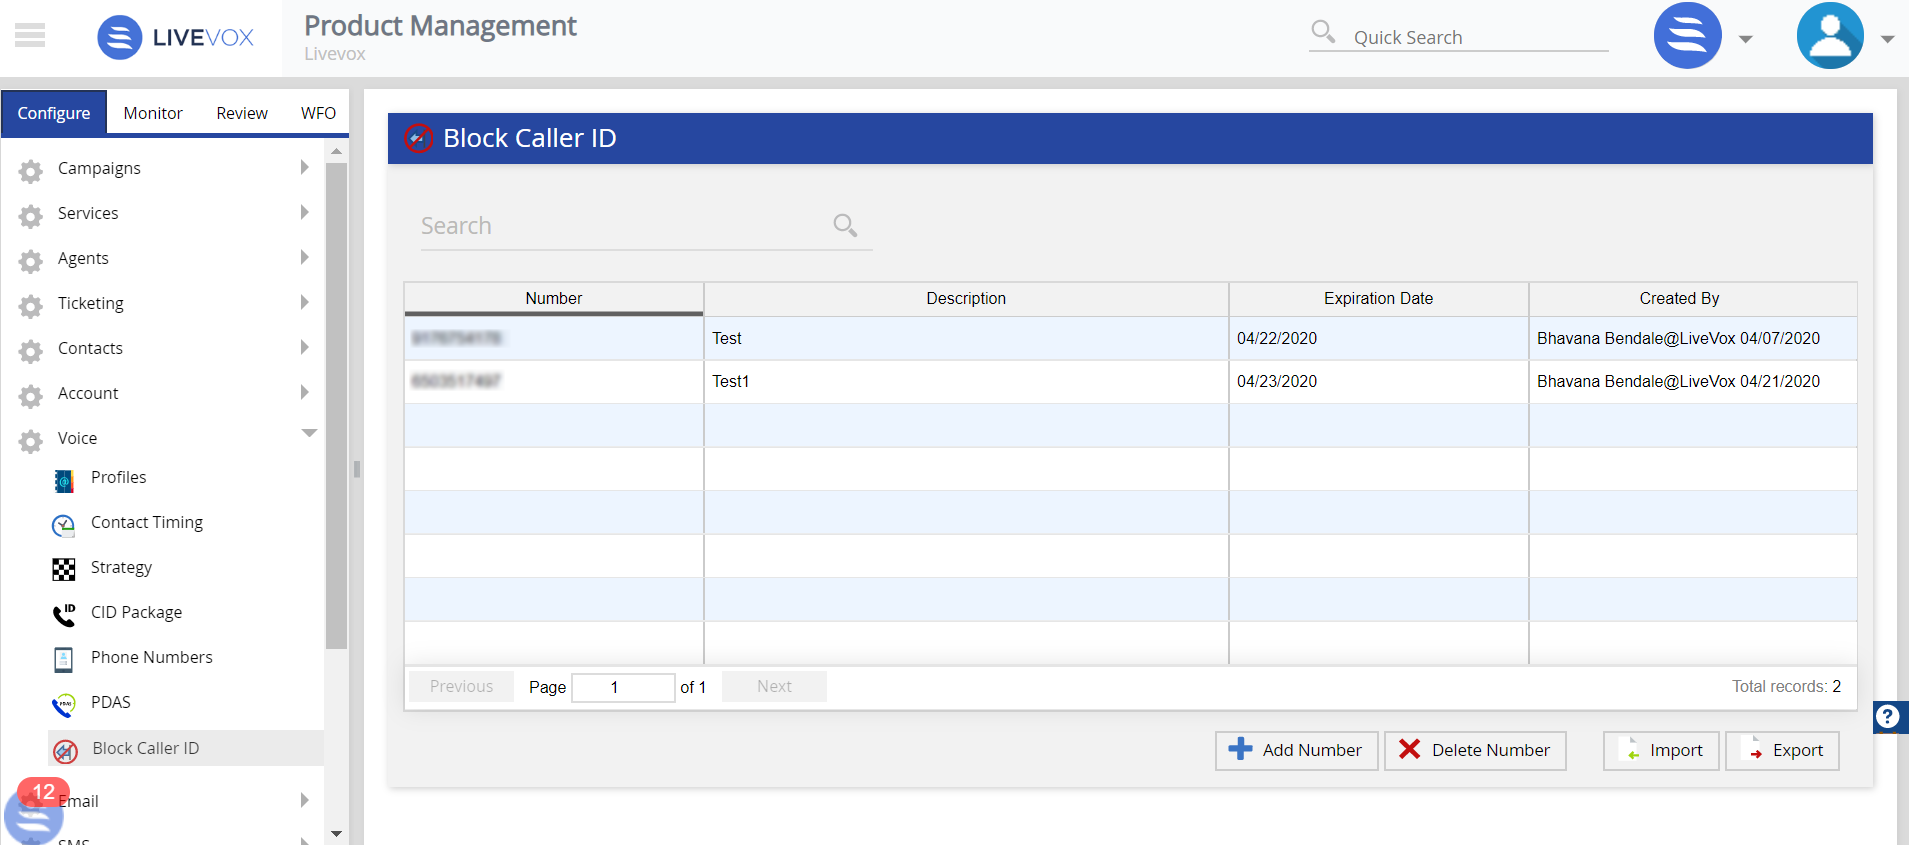
The following functionalities are available with this new editor: - Blocking a Caller ID
- Click the Add Number button from the bottom-right corner. You are presented with the Add Number popup window.
 - Enter the number you want to block.
- Specify an expiration date by clicking on the calendar icon and selecting the date from the Date Picker. Click Ok.
- Add the description for the number.
- Click the Save Number button to add the number in the list.
- Adjusting an Entry
- Navigate to the phone number you wish to adjust. Scroll through the pages, or use the Search box to narrow down the list.
- Double-click anywhere on the phone number's row. The Edit Number popup window appears.
- Adjust required fields.
- Click the Save Number button.
- Adding Entries in Bulk
- Click the Import button. The Import File popup window appears.
- Click in the Select a File to upload box and navigate to your revised/new phone number list.
- Your file must be in a specific format to be successfully imported. The easiest way to proceed is to export your current list of phone numbers to see the columns, format, and needed information. The required data format for each row is as follows: Number, Description, Expiration Date
For Example: 10020202020, public number 1, 11/23/2030 - Please note to include valid or blank data in appropriate fields when importing bulk phone number lists.
- Select Include Header checkbox if the import file has column headers in the first row.
- Open the required file and click the Import button. If successful, a notification appears and the phone numbers list is added. If not, correct your file and try again.
- Deleting an Entry
- Navigate to the phone number you wish to delete. Scroll through the pages or use the Search box to narrow down the list.
- Click anywhere on the phone number's row you wish to delete.
- Click the Delete Number button from the bottom-right corner. The Confirm popup notification appears.
- Click Yes to confirm the deleting of the phone number.
- Exporting Entries
- Clicking on the Export button from bottom-right corner exports the list of all blocked phone numbers with details in CSV format.
Teckst PlatformYou can now configure the Teckst widget to enable agents to send SMS messages to customers. You can configure this widget using the Designer window for the following pages of the Agent Desktop: - Contact Actions
- Contact Detail
- Contact Directory
- Contact Highlight
- Contact List
- Tickets List
- Work Queue
| Note |
|---|
- To facilitate this new feature, you must enable the Allow Teckst option and specify the Teckst client ID on the Properties tab of the Desktops window.
- To obtain the Teckst client ID, contact Client Services.
- If the Teckst widget is not configured, agents can send SMS messages using the default SMS widget.
|
Enhancements in LiveVox U13 User PortalThis section describes the enhancements to existing features in the LiveVox U13 release. ACD Settings TabThe ACD Settings tab of the Services window is now renamed Agent Desktop and displayed as a section on the Settings tab. Basic (Auto) Service To improve the U-CRM experience, the AgentReg (Auto) service has been renamed as Basic (Auto) and enhanced with blended multi-channel capabilities. The Basic (Auto) service is routed through an automated cloud and supports inbound and outbound interactions containing the following features: - Outbound voice
- Inbound voice
- Attended automated voice campaigns
- Automated email and SMS campaigns
- Inbound email and SMS campaigns
- Bi-directional email, SMS, and chat communication
- Click-enabled voice, email, or SMS
| Note |
|---|
- The Basic (Auto) service does not support the following features:
- Preview All campaigns
- HCI or 10DMT campaigns
- Unattended voice campaigns
- Whisper voice campaigns
- If you are using the AgentReg (Auto) service, it will be changed to the Quick Connect (Auto) service during the U13 upgrade.
|
| Info |
|---|
When the service type is Basic (Auto), in the Services window: - The value in the Call Direction field is Blended and the field is disabled.
- The Inbound tab appears.
- The Inbound Phone Number table appears on the Phone Numbers tab.
- When you attempt to upload a campaign, only the following values appear in the Upload Campaign window:
|
Customizing Columns in the Call and Screen Recording ReportsYou can now customize the columns that appear on the Call Recording Report and Screen Recording Report windows. To facilitate this enhancement, is added to the Results section of the two windows and the following enhancements are made to the columns in the Results section: is added to the Results section of the two windows and the following enhancements are made to the columns in the Results section: - The Original Account Number column is removed.
- The Transfer Connect and Transfer End columns are renamed Start and End, respectively.
- The Transfer Connect Duration column is renamed Recording Duration.
- The Outcome column is renamed Result.
- The Audio Play, Download, Multimedia, and Video Download columns are replaced by the Multimedia column, which contains the following icons, as applicable:
 : To play the audio : To play the audio : To download the call recording : To download the call recording : To download the screen recording : To download the screen recording : To view the multimedia : To view the multimedia
| Info |
|---|
If the Speech Analytics feature is enabled, you can now generate the Call Recording Report for the following attributes for voice calls: - Agent talk time
- Customer talk time
- Talk duration
- Silence duration
- Maximum silence duration
- Maximum silence start time
|
Displaying Accounts, Contacts, or Tickets in the Accounts or Contacts TablesYou can now enable the Contacts List and Tickets List tabs in the Accounts List table and enable the Accounts List and Tickets List tabs in the Contacts List table of the Agent Desktop. To facilitate this enhancement, the following checkboxes are added to the Properties tab of the Designer window: - Allow Accounts
- Allow Contacts
- Allow Tickets
| Anchor |
|---|
| emailqueuemonitoring |
|---|
| emailqueuemonitoring |
|---|
|
Monitoring Email QueuesYou can now monitor the email queues of agents in real time, including the status of the email threads. In addition, you can move an email thread to the group inbox, and you can assign/reassign an email thread that is in the agent or group inbox. To facilitate these enhancements, on the Email tab of call centers, the Inbound subtab is added. This subtab contains the following data for the current day: - Available Agents: Count of agents who are ready to respond to emails
- Email Threads In Group Inbox: Count of email threads in the group inbox
- Email Threads in Agent Inbox: Count of email threads in the inbox of the agents who are logged off
- Unresolved Email Threads: Count of unresolved email threads, which includes threads in both the agent inbox and the group inbox
- Resolved Email Threads: Count of resolved email threads
- Total Email Threads: Count of all email threads, which includes both unresolved and resolved email threads
In addition, the Inbound subtab contains the Email Inbox Monitor table with all email threads. The table contains the following columns: - Profile: Contains an icon to view the information about the customer who is a participant in the thread
- Thread: Contains an icon to view the entire email conversation that constitutes the thread
- From: Contains the email address of the customer
- Inbox: Contains the email address to which the customer sends an email
- Subject: Contains the subject of the email
- Thread Status: Contains the current status of the thread, which is one of the following values:
- In Queue: Indicates that the thread is in the group inbox
- With Agent: Indicates that the thread is in the agent inbox, regardless of the status of the agent (that is, logged on or logged off)
- Agent: Contains the name of the agent if the value in the corresponding Thread Status column is With Agent
- Thread State: Contains the current state of the last message on the thread, which is one of the following values:
- Unread: Indicates that an agent has not read the message or has marked the message as unread
- Read: Indicates that an agent has read the message
- Replied: Indicates that the last message was sent by an agent
- Last Interaction Date: Contains the time stamp of the last interaction on the thread
- Initial Interaction Date: Contains the time stamp of the first interaction on the thread
| Info |
|---|
- The information related to the outbound email campaigns appears on the Outbound subtab.
- The Email tab appears at different monitor levels (that is, call center, enterprise, service) of the Monitor tab, depending on the configuration.
|
| Anchor |
|---|
| smsqueuemonitoring |
|---|
| smsqueuemonitoring |
|---|
|
Monitoring SMS QueuesYou can now monitor the SMS queues of agents in real time, including the status of the SMS threads. In addition, you can move an SMS thread to the group inbox, and you can assign/reassign an SMS thread that is in the agent or group inbox. To facilitate these enhancements, on the SMS tab of call centers, the Inbound subtab is added. This subtab contains the following data for the current day: - Available Agents: Count of agents who are ready to respond to SMS messages
- SMS Threads In Queue: Count of SMS threads in the group inbox
- SMS Threads With Agent: Count of SMS threads in the inbox of the agents who are logged off
- Unresolved SMS Threads: Count of unresolved SMS threads, which includes threads in both the agent inbox and the group inbox
- Resolved SMS Threads: Count of resolved SMS threads
- Total SMS Threads: Count of all SMS threads, which includes both unresolved and resolved SMS threads
In addition, the Inbound subtab contains the SMS Inbox Monitor table with all SMS threads. The table contains the following columns: - Profile: Contains a link to view the information about the customer who is a participant in the thread
- Thread: Contains a link to view the entire SMS conversation that constitutes the thread
- From: Contains the phone number of the customer
- Inbox: Contains the short-code or long-code SMS number associated with the thread
- Thread Status: Contains the current status of the thread, which is one of the following values:
- In Queue: Indicates that the thread is in the group inbox
- With Agent: Indicates that the thread is in the agent inbox, regardless of the status of the agent (that is, logged on or logged off)
- Agent: Contains the name of the agent if the value in the corresponding Thread Status column is With Agent
- Thread State: Contains the current state of the last message on the thread, which is one of the following values:
- Unread: Indicates that an agent has not read the message or has marked the message as unread
- Read: Indicates that an agent has read the message
- Replied: Indicates that the last message was sent by an agent
- Last Interaction Date: Contains the time stamp of the last interaction on the thread
- Initial Interaction Date: Contains the time stamp of the first interaction on the thread
| Info |
|---|
- The information related to the outbound SMS campaigns appears on the Outbound subtab.
- The SMS tab appears at different monitor levels (that is, call center, enterprise, service) of the Monitor tab, depending on the configuration.
|
| Anchor |
|---|
| reportprinting |
|---|
| reportprinting |
|---|
|
Printing the Call and Screen Recording Reports
You can now print the Call Recording Report and the Screen Recording Report. To facilitate this enhancement, the Print button is added to the Call Recording Report and Screen Recording Report windows. callrecordingcallrecordingRecording CallsAgent Side ConversationYou can now record calls between agents during a enable recording of agent side conversation during the warm transfer. To facilitate this enhancement, the enable fuctionality, navigate to Configure > Services > Client > Settings tab and select the checkbox Record Owning Agent on Primary Channelcheckbox is added to the Settings tab of the Client window. | Info |
|---|
To view the Client window, on the Configure tab, go to Services > Client..  Image Added Image Added
Retaining Messages in Personal InboxFor a given service, you can now configure the duration for which you want to retain the unresolved email and SMS messages in the personal inbox of agents before the messages are moved to the group inbox. To facilitate this enhancement, the Retention Settings section is added to the Settings tab of the Services window. This section contains the following fields: - Days to Move Inactive Messages Back to Group Inbox: This field contains the value 1 by default. You can, however, change the value. The maximum value that you can select in this field is 14.
- Include Weekends: This checkbox is cleared by default. If you want to include weekends in the duration of retention, select the checkbox.
Searching for a Voice Interaction Based on the Silence DurationIf the Transcribe All Calls feature is enabled, you can now search for a voice interaction based on the duration of silence. To facilitate this enhancement, the Silence duration greater than option is added to the search window of the Assessor window. | Info |
|---|
To view the Assessor window, on the WFO tab, go to Quality Monitoring > Assessor. |
| Anchor |
|---|
| timeperiodibereport |
|---|
| timeperiodibereport |
|---|
|
Specifying Time Period in Inbound Efficiency ReportYou can now specify the start time and end time when generating the Inbound Efficiency Report. To facilitate this enhancement, the Hour Of Day Range field, which contains the From and To subfields, is added to the Inbound Efficient Report window. | Info |
|---|
The Inbound Efficient Report window appears when you click the Inbound Efficiency Report option in the Inbound Reports section of the Review tab. |
|
